15 Creative DIY Room Decor for Teens Ideas That Wow
Remember when you thought your room was perfect with those glow-in-the-dark stars stuck to the ceiling? Yeah, we’ve all been there.
But now you’re ready for something that actually looks like it belongs on Pinterest, not in a kindergarten classroom.
Lucky for you, I’ve gathered 15 DIY room decor ideas that’ll transform your space without emptying your wallet or requiring a degree in interior design.
Let’s be real—teenage rooms need to be multi-functional spaces that reflect personality while somehow managing to hide that pile of clothes you swear you’ll fold tomorrow.
These projects hit that sweet spot between looking amazing and being totally doable, even if your crafting experience peaks at making friendship bracelets in middle school.
Floating Shelves with LED Lights

Why These Shelves Hit Different
Who said storage can’t be aesthetic? Floating shelves with LED lights create this magical floating effect that makes everything you display look like it belongs in a museum. I installed these in my younger sister’s room last month, and now she thinks she’s running an art gallery.
The best part? You only need basic brackets, wooden boards, and LED strips from any hardware store. The whole project costs around $30-40, which beats those overpriced options at fancy furniture stores.
Making the Magic Happen
Start by choosing your wood—I recommend pine or plywood for beginners since they’re easy to work with. Cut them to your desired length (or sweet-talk the hardware store employee into doing it for you).
Here’s what you’ll need:
- Wooden boards (1-2 inches thick)
- L-brackets or invisible shelf brackets
- LED strip lights (battery-operated or plug-in)
- Wood stain or paint
- Drill and screws
Mount the brackets first, making sure they’re level—nothing screams “amateur hour” like crooked shelves. Attach your LED strips underneath each shelf before mounting them. The glow creates this ethereal effect that makes your room look like it belongs to a tech-savvy fairy.
Customized Wall Collage Frames

Creating Your Personal Gallery
Ever scrolled through someone’s perfectly curated wall collage and wondered how they made it look so effortless? Spoiler alert: it’s not that hard. Customized wall collage frames let you showcase your personality without committing to one massive poster that you’ll hate in six months.
I started my first collage with thrifted frames—different sizes, colors, and styles actually make it more interesting. Mix photos with concert tickets, pressed flowers, or even that fortune cookie message that weirdly predicted your future.
The Layout Game
Before hammering anything into your wall (and potentially losing your security deposit), arrange everything on the floor first. Take a photo of your layout because trust me, you’ll forget the arrangement the second you pick everything up.
Pro tips for nailing it:
- Start with your largest frame as the anchor
- Keep 2-3 inches between frames
- Mix horizontal and vertical orientations
- Include non-photo elements like mirrors or artwork
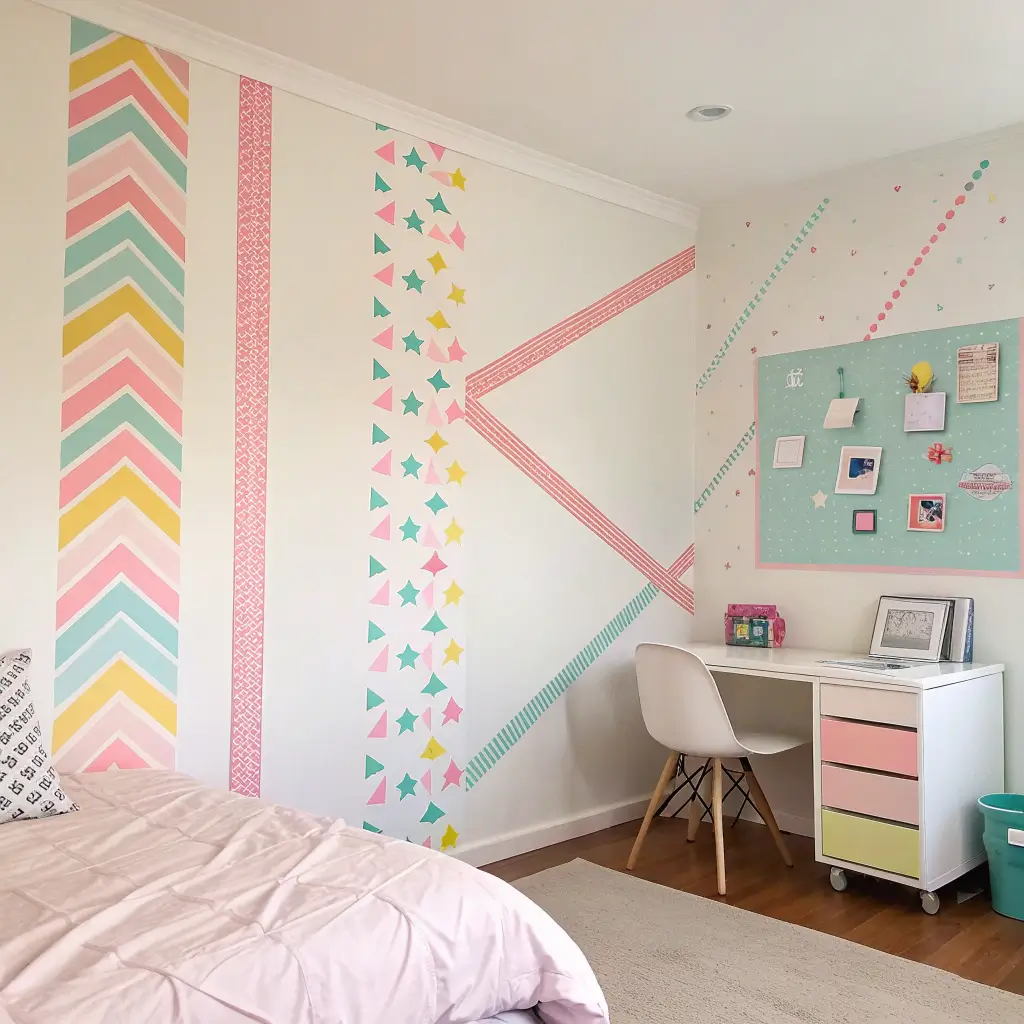
Painted Geometric Accent Wall

Why Geometry Suddenly Seems Cool
Remember hating geometry class? Well, turns out those shapes make killer wall designs. A geometric accent wall transforms boring beige into something that looks professionally designed. My friend painted triangles on her wall, and now everyone thinks she hired an interior designer.
You don’t need artistic talent—just painter’s tape and patience. The sharp lines and bold colors create visual interest that makes your room feel bigger and more dynamic.
Getting Those Crisp Lines
The secret to professional-looking geometric walls? Quality painter’s tape and taking your sweet time. Rush this, and you’ll end up with bleeding paint that looks like a kindergarten art project.
Here’s your game plan:
- Choose 2-4 colors that complement each other
- Map out your design with pencil (lightly!)
- Apply tape carefully, pressing edges firmly
- Paint in thin coats—patience prevents bleeding
- Remove tape while paint’s slightly wet for cleaner lines
Also Read: 15 Whimsical Cute DIY Room Decor Ideas for a Stylish Touch
Hanging Macrame Plant Holders

Bringing Nature Inside (Without the Commitment)
Plants make everything better, but let’s be honest—floor space is premium real estate in teen rooms. Macrame plant holders solve this problem while adding that boho vibe everyone’s obsessed with. Plus, if you kill the plant (we’ve all been there), at least the holder still looks cute.
I learned macrame from YouTube tutorials, and within an hour, I’d made my first holder. Now my room looks like an urban jungle, minus the mosquitoes.
Knot Your Average DIY
You’ll need:
- Macrame cord or thick cotton rope
- A metal or wooden ring
- Scissors
- A plant pot (obviously)
Start with basic knots—the square knot and spiral knot will get you through most designs. The repetitive motion becomes weirdly therapeutic, like meditation but with tangible results. Choose low-maintenance plants like pothos or snake plants unless you actually remember to water things regularly.
DIY Fairy Light Canopy

Creating Your Own Starry Night
Nothing says “cozy vibes” quite like a fairy light canopy. It’s like sleeping under the stars, except with WiFi and climate control. I made one for my dorm room, and suddenly everyone wanted to hang out in my space—consider yourself warned.
The setup takes maybe an hour, but the ambiance lasts forever. Whether you’re studying, scrolling TikTok, or having deep 2 AM conversations with friends, this lighting sets the perfect mood.
Stringing Up the Magic
Materials needed:
- Sheer curtains or tulle fabric
- Fairy lights (go for warm white)
- Ceiling hooks or Command strips
- Curtain rod or embroidery hoop
Mount your curtain rod or hoop above your bed’s headboard. Drape the fabric loosely—too tight looks forced. Weave the lights through the fabric randomly for that effortless, magical look. Battery-operated lights give you more flexibility, but plug-in versions last longer.
Upcycled Pallet Desk Organizer

From Trash to Treasure
Who knew those wooden pallets behind grocery stores could become stylish desk organizers? This project combines sustainability with functionality, and honestly, it looks way better than those plastic organizers from office supply stores.
I found my pallet on Facebook Marketplace for free (people literally give these away). After some sanding and staining, it became the centerpiece of my study area. FYI, the industrial vibe makes everything look intentionally curated 🙂
Building Your Command Center
Here’s what makes this project awesome:
- Sand the pallet smooth (splinters aren’t cute)
- Apply wood stain or paint for your desired look
- Add small containers or mason jars for supplies
- Mount it vertically for a space-saving solution
- Include hooks for headphones or keys
The vertical design keeps your desk clear while displaying everything within reach. Customize with paint colors that match your room’s vibe, or keep it natural for that minimalist aesthetic.
Also Read: 15 Beautiful Aesthetic Room Decor DIY Ideas for Small Spaces
Personalized Photo Clip String

Your Life in Snapshots
Remember when people actually printed photos? Well, it’s making a comeback with personalized photo clip strings. This isn’t your mom’s photo album—it’s a living, breathing display that you can update whenever you want.
I change mine seasonally, swapping summer adventures for cozy fall moments. It’s like having an Instagram feed on your wall, but more tangible and way more personal.
Stringing Along Your Memories
You’ll need:
- Twine, wire, or decorative string
- Mini clothespins or clips
- Photos (obviously)
- Command strips or small nails
String your line at eye level or in a creative pattern—zigzag, waves, or multiple parallel lines all work great. Mix photo sizes for visual interest, and don’t forget to include ticket stubs, postcards, or handwritten notes. The imperfection makes it perfect, IMO.
Washi Tape Wall Art Designs
The Renter-Friendly Revolution
Can’t paint? Parents said no to permanent changes? Washi tape wall art saves the day. This Japanese decorative tape comes in countless patterns and removes without damage—it’s basically the superhero of teen room decor.
I covered an entire wall with geometric patterns using washi tape, and when I moved out, it peeled off cleanly. My security deposit thanked me.
Tape It Till You Make It
Design ideas that actually work:
- Create faux picture frames
- Design a geometric headboard outline
- Make a city skyline silhouette
- Spell out inspirational quotes
- Create seasonal decorations you can change
Start simple with straight lines before attempting complex designs. Layer different patterns for depth, but don’t go overboard—three to four coordinating tapes maximum keeps it cohesive.
Handmade Dreamcatchers

Catching Vibes, Not Just Dreams
Sure, dreamcatchers might seem cliché, but handmade ones add personal meaning to the trend. Plus, they’re surprisingly meditative to make. I crafted one during finals week, and it became my favorite stress-relief activity.
Skip the cultural appropriation concerns by creating your own modern interpretation—think geometric shapes, unconventional materials, or minimalist designs that honor the craft without copying traditional patterns.
Weaving Your Web
Essential supplies:
- Embroidery hoop or bent wire
- String or embroidery thread
- Beads, feathers, or fabric strips
- Hot glue gun
Start with the outer ring, then create your web pattern. There’s no “wrong” way—asymmetrical designs often look more interesting than perfect symmetry. Add personal touches like charms from broken jewelry or fabric from meaningful clothing items.
Also Read: 15 Amazing DIY Crafts Room Decor Ideas to Brighten Your Space
Decorative Cork Board Letters

Functional Meets Fabulous
Cork board letters combine organization with decoration—finally, a place for all those concert tickets, photos, and random memorabilia that’s been living in your desk drawer. I made mine spell out “DREAM” because I’m basic like that, but at least it’s functional basic.
These work especially well above desks or in awkward wall spaces that need something but you’re not sure what.
Crafting Your Message
Materials list:
- Large cardboard letters (craft store find)
- Cork sheets or tiles
- Hot glue or strong adhesive
- Fabric or paint (optional)
- Push pins
Cover your letters with cork using hot glue, trimming excess with a craft knife. Customize with fabric or paint around the edges for extra pop. Arrange them to spell words or just use your initials for a personalized touch.
DIY Painted Mason Jar Lanterns
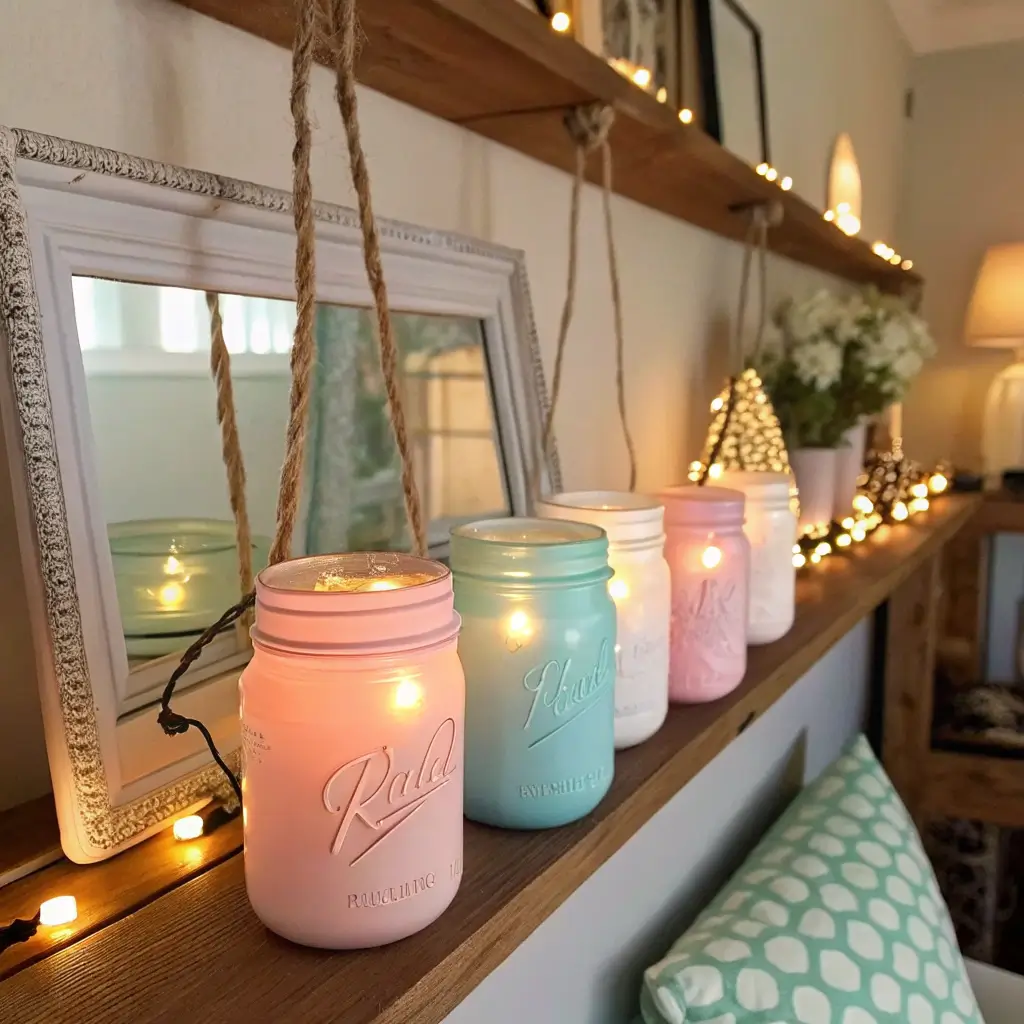
Mood Lighting on a Budget
Mason jar lanterns bring ambiance without the fire hazard of actual candles. After nearly burning down my dorm with a “relaxing” candle (don’t ask), these became my go-to mood lighting solution.
The best part? You probably already have mason jars somewhere in your house. If not, thrift stores practically give them away.
Illuminating Ideas
Transform basic jars into art:
- Paint them with translucent glass paint
- Create patterns with painter’s tape before painting
- Add tissue paper for stained glass effects
- Use glow-in-the-dark paint for nighttime magic
- String them together for party lights
Insert battery-operated tea lights or fairy lights for the glow. Hang them at different heights for visual interest, or line them along a shelf for consistent ambient lighting.
Floating Wall Cubes for Accessories
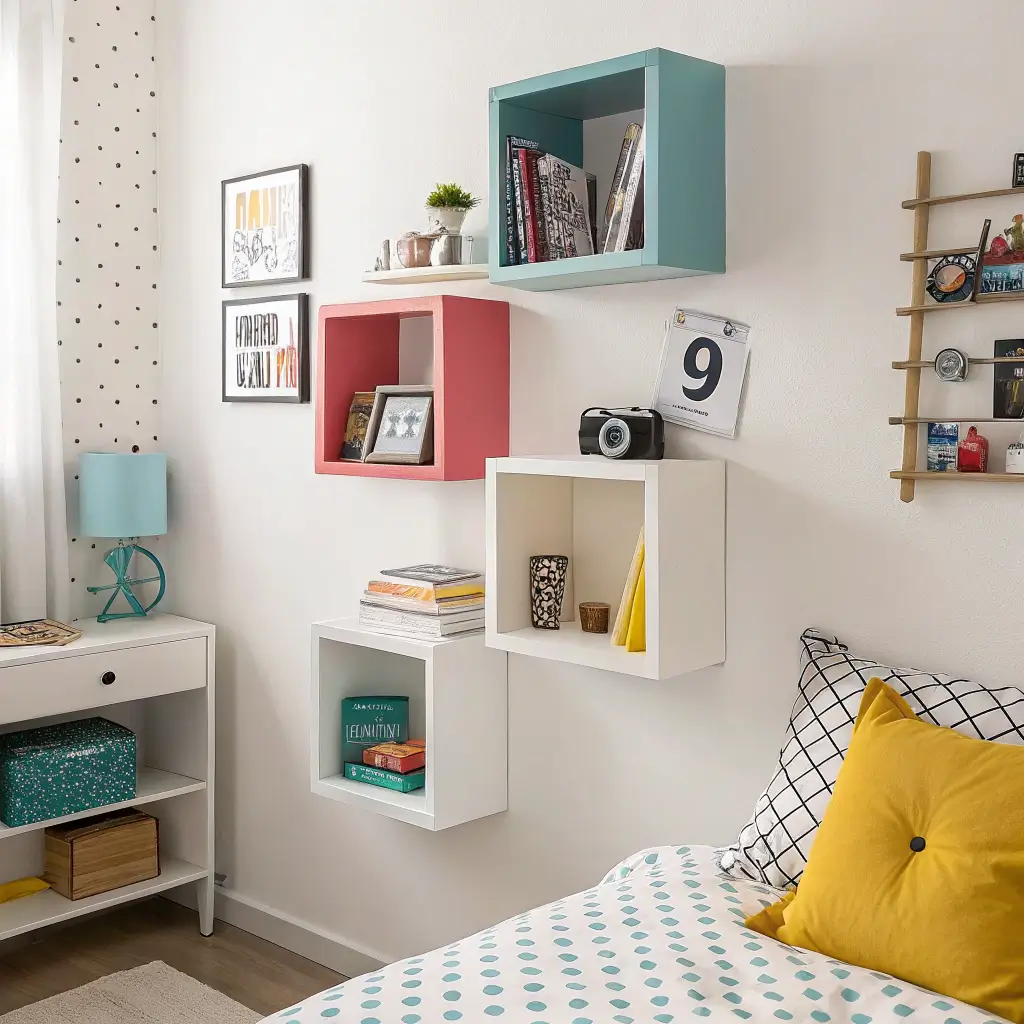
Display Storage That Doesn’t Suck
Floating wall cubes offer storage that doubles as decoration. Unlike traditional shelves, these boxes create depth and shadow play that makes your wall more dynamic. I use mine for everything from succulents to my growing vinyl collection.
The cube shape means you can arrange them in countless configurations—symmetrical for type-A personalities, random for creative chaos lovers.
Boxing Yourself In (The Good Way)
Building basics:
- Wooden boards cut to size
- Wood glue and screws
- Paint or stain
- Wall mounting brackets
- Sandpaper
Create boxes in varying sizes for visual interest. Mount them at different depths from the wall for a 3D effect. Paint the insides a contrasting color for an unexpected pop when viewing from angles.
Boho Tapestry Wall Hangings

Instant Room Transformation
Nothing changes a room faster than a large tapestry. It’s like a mood ring for your walls—swap them out based on your current vibe. My collection ranges from celestial designs to abstract patterns, depending on whether I’m feeling mystical or minimalist.
Tapestries also hide a multitude of sins, like that hole you accidentally made moving furniture or the questionable paint color chosen by previous tenants.
Hanging Without the Hassle
Mounting options that won’t destroy walls:
- Command strips (for lighter tapestries)
- Curtain rods for easy swapping
- Wooden dowels for a finished look
- Pushpins hidden in corners (desperate times)
Iron or steam your tapestry first—wrinkles kill the vibe. Create a gallery wall with multiple smaller tapestries, or go bold with one massive statement piece. Layer them with fairy lights behind for backlit magic.
Recycled Bottle Planters

Sustainable Style Points
Recycled bottle planters prove that eco-friendly can be aesthetic. Those cool glass bottles from fancy beverages? They deserve a second life as planters. I started with one and now have a whole windowsill collection—it’s basically free therapy.
Clear bottles work best, showing off root systems as they grow. It’s science meets art, and your plants will thank you for the unique homes.
Bottle It Up
Creating your garden:
- Clean bottles thoroughly (remove all labels)
- Cut plastic bottles carefully with scissors
- Use glass bottles as-is for water propagation
- Add drainage holes to plastic bottles
- Paint or wrap with twine for decoration
Propagate pothos or philodendrons in water-filled glass bottles for instant greenery. For plastic bottles, create self-watering systems by cutting them in half and inverting the top portion—engineering meets botany.
Magnetic Polaroid Photo Wall

Memories That Stick
The magnetic Polaroid wall combines nostalgia with modern convenience. No holes, no tape marks, just photos you can rearrange whenever your mood strikes. After getting a Polaroid camera for my birthday, this became my favorite way to display memories.
What makes this better than a traditional photo wall? The ability to constantly update and rearrange without commitment issues. Bad hair day in that photo? Switch it out. New memories from last weekend? Add them immediately.
Magnetic Attraction
Setup essentials:
- Magnetic paint or large metal sheet
- Small magnets
- Polaroid photos (or printed photos)
- Optional: decorative magnets
Apply 2-3 coats of magnetic paint for best results, or mount a thin metal sheet for stronger hold. Arrange photos in grids, scattered patterns, or shape formations. Mix in ticket stubs, notes, or small artwork between photos for variety.
Wrapping Up Your Creative Journey
So there you have it—15 DIY projects that’ll transform your room from basic to Pinterest-worthy without requiring a trust fund or professional skills. The best part about these ideas? You can mix, match, and modify them to fit your style and space perfectly.
Start with one project that speaks to you. Maybe it’s those floating shelves that’ll finally give your books a proper home, or perhaps the fairy light canopy that’ll make every night feel magical. Whatever you choose, remember that the imperfections make it yours. That slightly crooked mason jar? Character. The geometric wall where one triangle’s a bit off? Artistic interpretation.
Your room should tell your story, not look like a furniture store display. These projects let you create a space that grows and changes with you—because let’s face it, the person you are today might cringe at the choices you make next year, and that’s totally fine. At least with DIY, you can change things up without going broke or begging your parents for a room makeover :/
Now grab some supplies, queue up your favorite playlist, and start creating. Your future self will thank you when you’re chilling in your personally crafted sanctuary, scrolling through everyone else’s room envy on social media. Who knows? Maybe you’ll inspire the next generation of DIY enthusiasts.
Remember: The best room decor isn’t about perfection—it’s about creating a space that feels like home, even when everything else feels chaotic. So get crafting, and don’t forget to share your creations. We’re all just figuring this out together, one DIY project at a time.


