15 Colorful DIY Baby Room Decor Ideas and Playful Designs
So you’re expecting a baby or maybe you just love crafting adorable nursery spaces? Either way, you’re probably drowning in Pinterest boards and wondering which DIY projects actually work.
Trust me, I’ve been there – surrounded by half-finished mobiles and paint-splattered drop cloths at 2 AM.
Here’s the thing: creating a magical baby room doesn’t require an interior design degree or a trust fund. You need creativity, some basic supplies, and maybe a weekend or two.
I’ve tested, failed, and succeeded at countless nursery projects (my friends joke I should open a baby decor museum), and I’m sharing the ones that actually deliver without making you lose your mind.
Ready to transform that blank nursery into something special? Let’s talk about 15 DIY baby room decor ideas that won’t break the bank or your sanity.
Woodland Animal Wall Decals
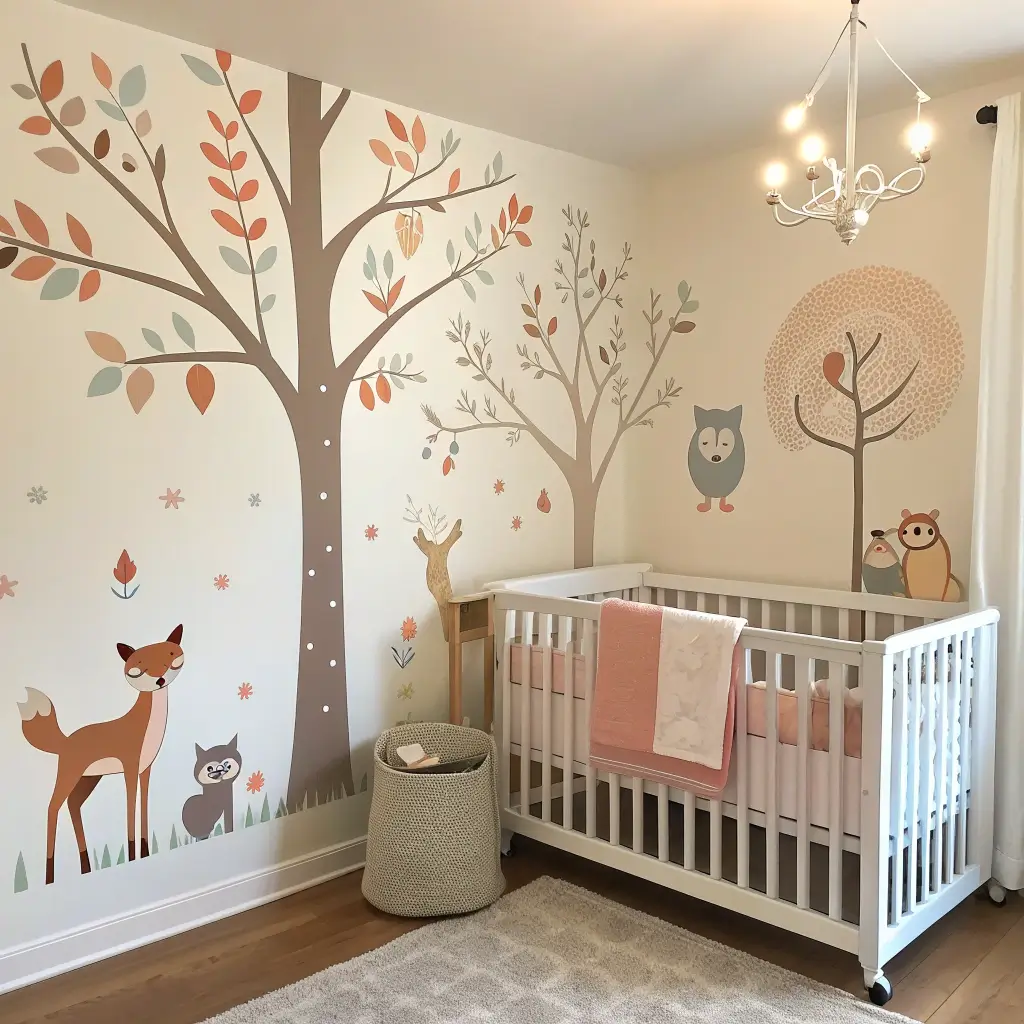
Who doesn’t love a forest full of friendly creatures watching over their little one? Woodland animal wall decals transform plain walls into enchanted forests without the commitment of paint or wallpaper. I discovered this trick when my nephew was born, and honestly, it saved my sister’s rental deposit.
You can create these decals using removable vinyl sheets and a cutting machine, or go old-school with contact paper and scissors. The best part? When your kid decides they’re “too old” for cute animals (around age 4, apparently), you just peel them off. No drama, no repainting.
Materials You’ll Need:
• Removable vinyl sheets in various colors
• Scissors or cutting machine
• Transfer tape
• Printed animal templates
• Pencil for tracing
Start by finding templates online – foxes, bears, owls, and deer work beautifully. Trace them onto your vinyl, cut carefully, and apply using transfer tape for smooth placement. Pro tip: arrange your animals at different heights to create depth and interest.
DIY Hanging Cloud Mobile
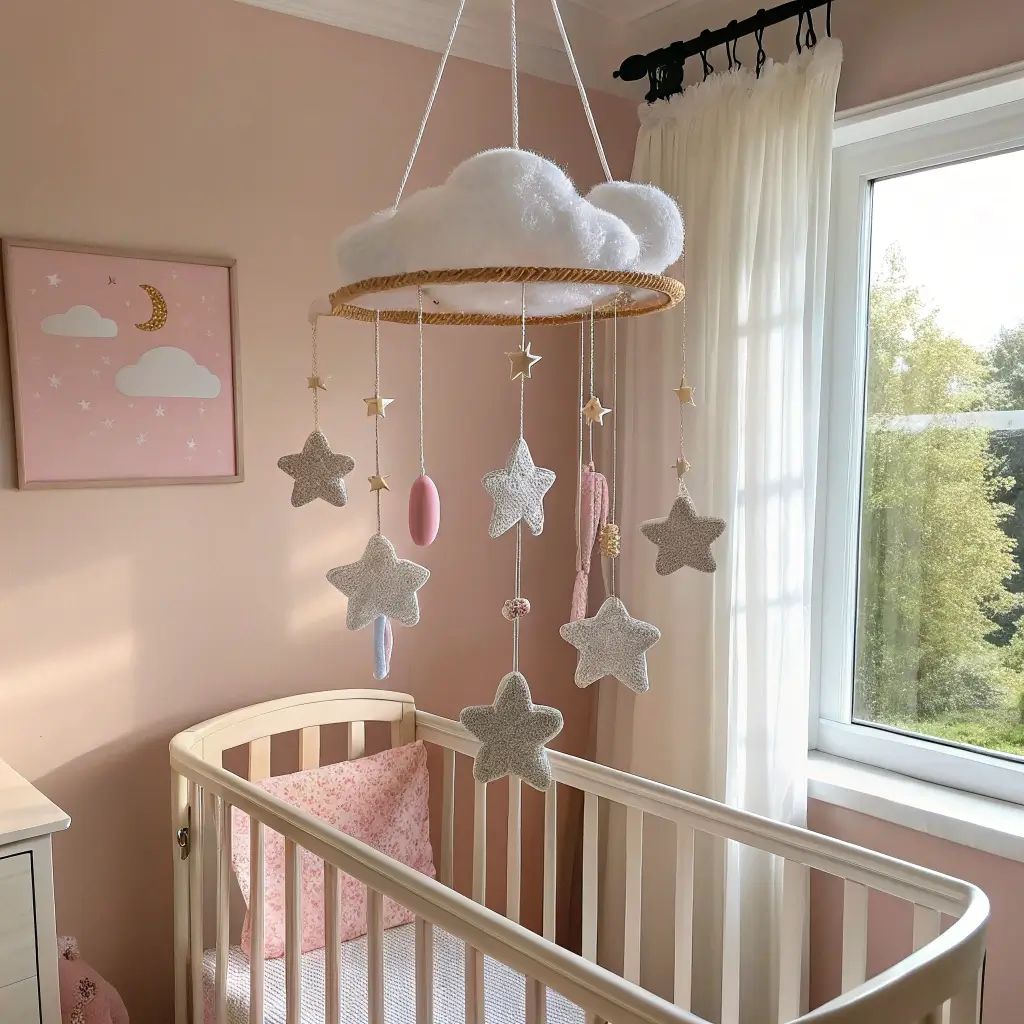
Remember those plastic mobiles that play the same tinny song 500 times? Yeah, we’re not making those. A DIY cloud mobile brings whimsy without the earworm soundtrack. Plus, it’s ridiculously easy to make.
I made my first cloud mobile after watching my friend struggle with a store-bought one that cost $80. Eighty dollars! For some fabric and string! That’s when I knew DIY was the way to go.
Creating Your Cloud Paradise:
• White felt or fleece (softer than regular cotton)
• Polyester stuffing
• Fishing line or clear thread
• Embroidery hoop or branch
• Hot glue gun
• Optional: LED string lights for magical effect
Cut cloud shapes in varying sizes – make them wonky and imperfect because real clouds aren’t cookie-cutter perfect. Sew or hot glue two pieces together, leaving a gap for stuffing. Once stuffed, hang them at different lengths from your hoop. The movement creates a dreamy effect that actually helps babies focus.
Want to level up? Add tiny raindrops using silver or blue beads. Your baby won’t care, but you’ll feel like a Pinterest champion.
Personalized Name Wall Art
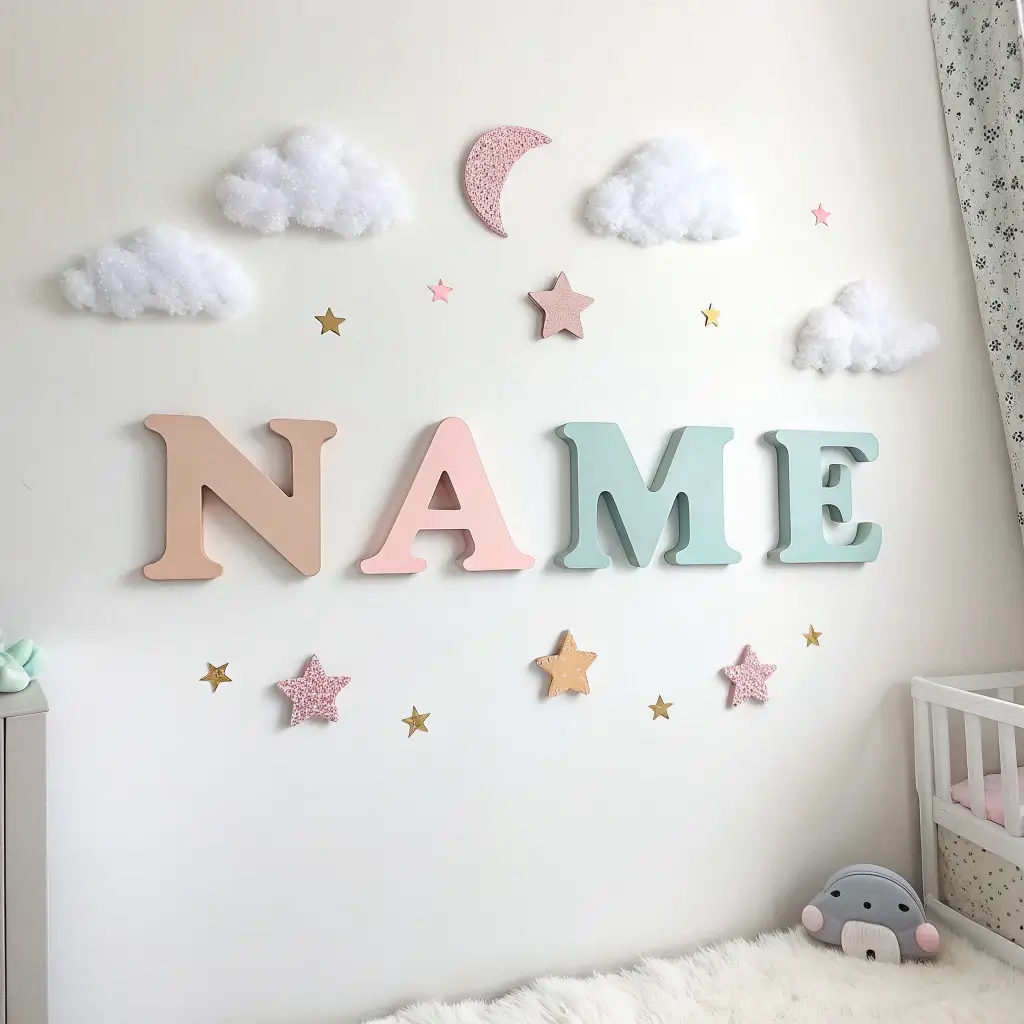
Nothing says “this is MY room” quite like giant letters spelling out your baby’s name. And before you roll your eyes thinking this is overdone – hear me out. The trick isn’t just doing it; it’s doing it with personality.
I’ve created name art using everything from reclaimed wood to paper flowers. Each one tells a different story. My favorite? Wrapping cardboard letters in fabric that matches the nursery theme. It’s budget-friendly and looks expensive (the best combination, IMO).
Methods to Try:
• Wooden letters painted in gradient colors
• Fabric-wrapped cardboard letters
• String art on painted boards
• Floral letters using artificial flowers
• Light-up marquee letters (if you’re feeling fancy)
The wooden letter route gives you the most flexibility. Sand them smooth, paint with non-toxic paint, and add details like polka dots or stripes. Mount them directly on the wall or attach to a painted board for easy hanging.
Also Read: 15 Fun DIY Kids Room Decor Ideas to Brighten Rooms
Rainbow-Themed Shelf Display

Can we talk about how rainbow shelves instantly make everything more cheerful? They’re not just storage; they’re art. And unlike that expensive rainbow bookshelf you saw online, you can make this with basic materials.
I stumbled upon this idea when organizing my niece’s books by color. The visual impact was immediate – suddenly, those beaten-up board books looked intentional and stylish. Who knew “Goodnight Moon” could be part of a design scheme?
Building Your Rainbow Display:
Start with simple floating shelves or repurpose an old bookcase. The magic happens in the arrangement:
• Sort items by color (books, toys, storage boxes)
• Create gradient transitions between colors
• Mix heights and textures within each color group
• Leave some breathing room – don’t overcrowd
Paint the shelves white to make colors pop, or go bold with a contrasting background. Add small plants or wooden toys to break up the rainbow without disrupting the flow.
Handmade Felt Animal Garland
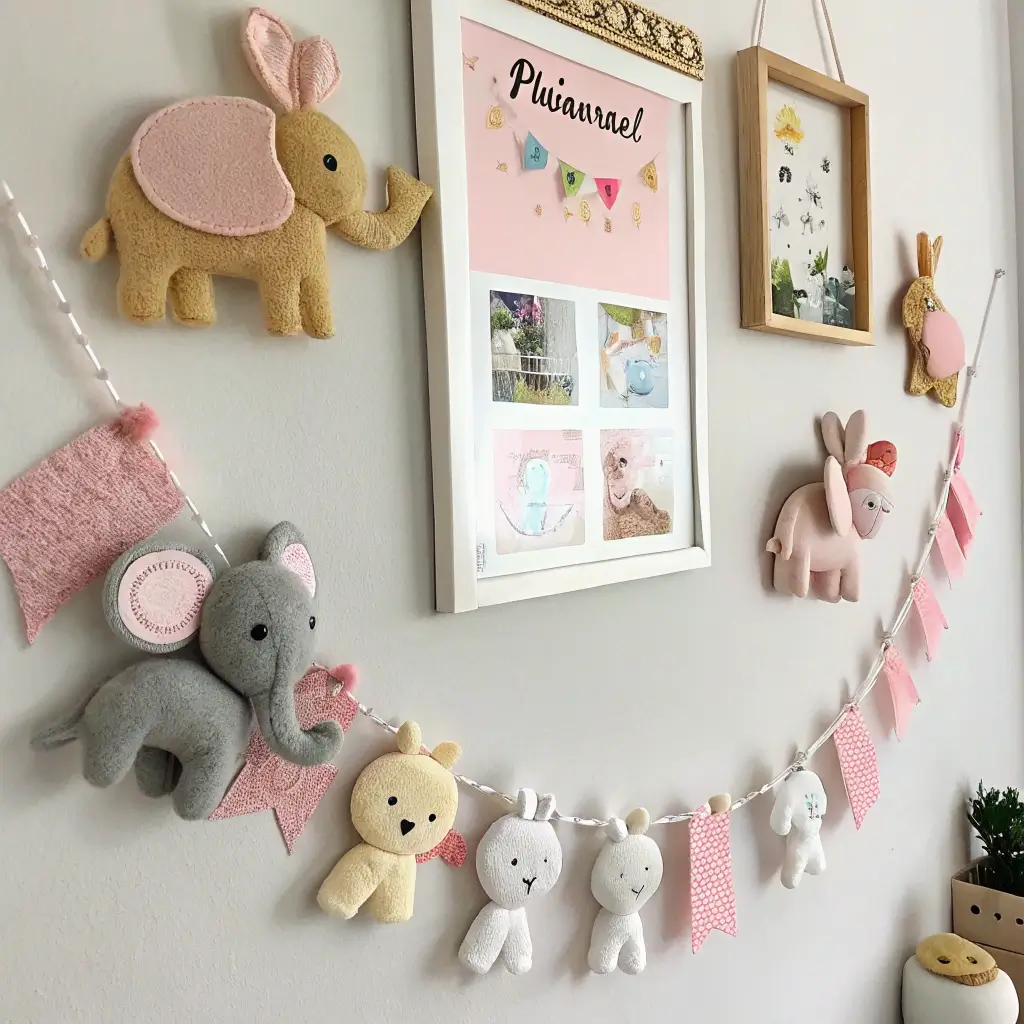
Garlands scream “celebration,” but why wait for a birthday? A felt animal garland brings daily joy and takes maybe two hours to create. Plus, felt is forgiving – even wonky animals look adorable.
My first attempt at this involved wine, Netflix, and questionable elephant shapes. But you know what? It still looked cute strung across the nursery window. That’s the beauty of handmade – imperfection adds character.
Garland Assembly Guide:
• Felt sheets in coordinating colors
• Animal templates (or freehand it!)
• Embroidery thread for details
• String or yarn for hanging
• Fabric glue or needle and thread
Cut two pieces per animal, add simple details like eyes and spots, then sandwich them together. String them on yarn with spacing that feels right – usually 4-6 inches apart works well. Hang across windows, above the crib (safely out of reach), or along a wall.
Upcycled Crate Toy Storage
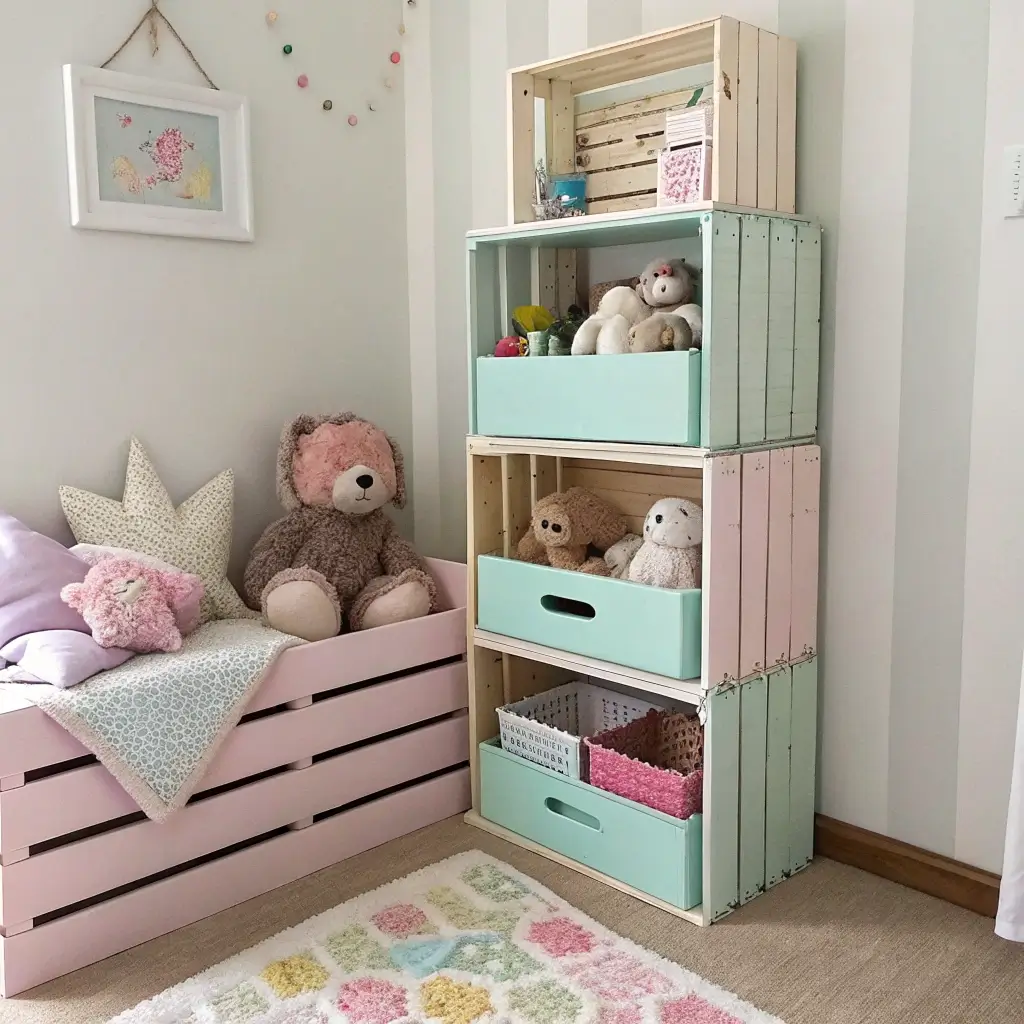
Those wooden crates at craft stores? They’re storage gold waiting to happen. Paint them, stack them, mount them – the possibilities are endless. And unlike plastic bins, they actually enhance your decor.
I learned this hack from a mom who turned wine crates into a whole storage system. Genius, right? Now I scout garage sales for old crates like some kind of storage archaeologist.
Crate Transformation Tips:
• Sand rough edges thoroughly (baby safety first!)
• Use non-toxic paint or wood stain
• Add wheels for mobile storage
• Install as wall shelves for vertical storage
• Label with cute tags or painted words
Stack crates in pyramid formations for freestanding storage, or mount individually as floating shelves. Line with fabric for storing delicate items, or leave raw for that rustic charm everyone’s obsessed with.
Also Read: 15 Trendy DIY Grunge Room Decor Ideas for Vintage Fans
Glow-in-the-Dark Star Ceiling
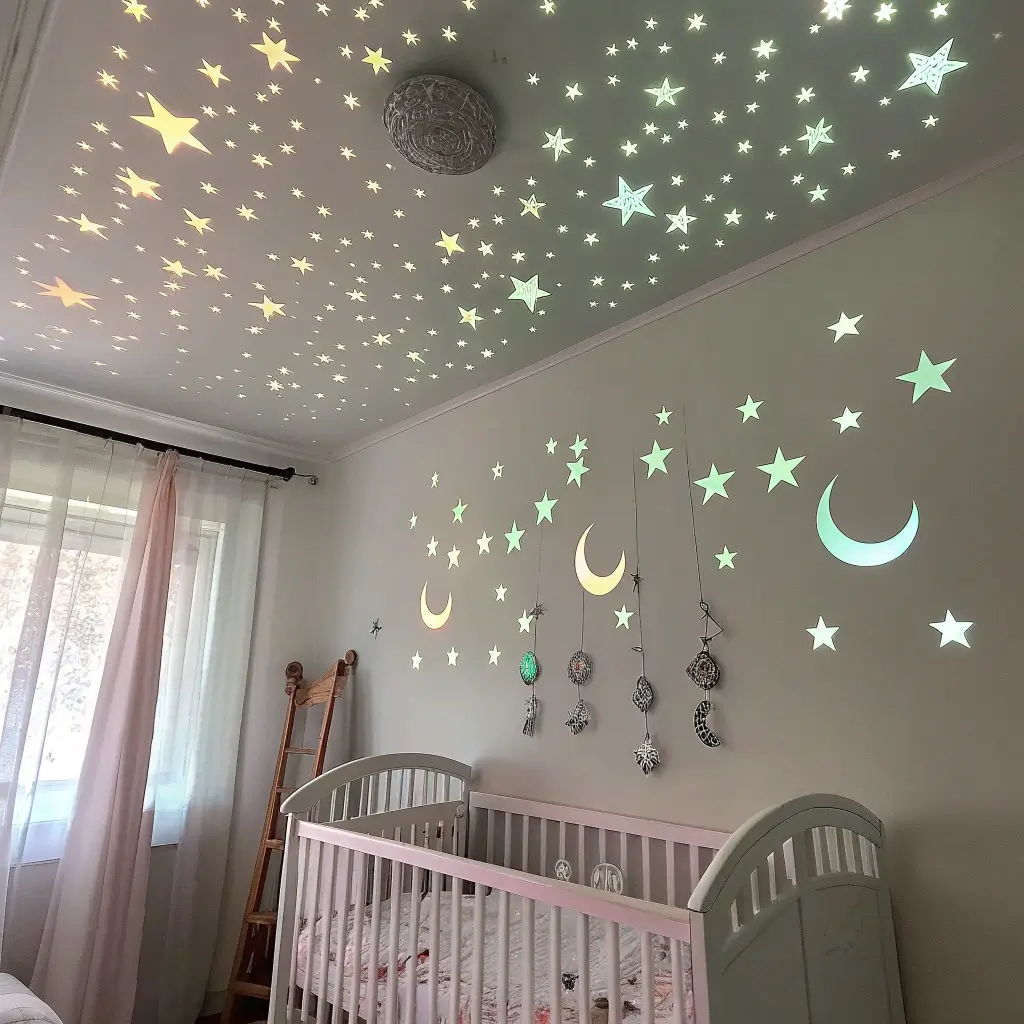
Want to blow a toddler’s mind? Create a glowing star ceiling that actually looks like constellations. Not those sad plastic stars from the ’90s – we’re talking next-level night sky magic.
My brother did this for his daughter, mapping out actual constellations. Now she knows Orion’s Belt at age 3. Show-off. But seriously, it’s both educational and mesmerizing.
Star Installation Process:
• Glow-in-the-dark paint (the good stuff, not dollar store quality)
• Star stencils or stamps
• Optional: Fiber optic lights for serious commitment
• Constellation maps for accuracy
• UV flashlight for “charging” the stars
Paint stars in varying sizes for depth. Cluster them realistically – the night sky isn’t evenly distributed. Use a UV flashlight to charge them up before bedtime for maximum glow. Fair warning: you might find yourself lying on the nursery floor stargazing. 🙂
DIY Fabric Wall Bunting
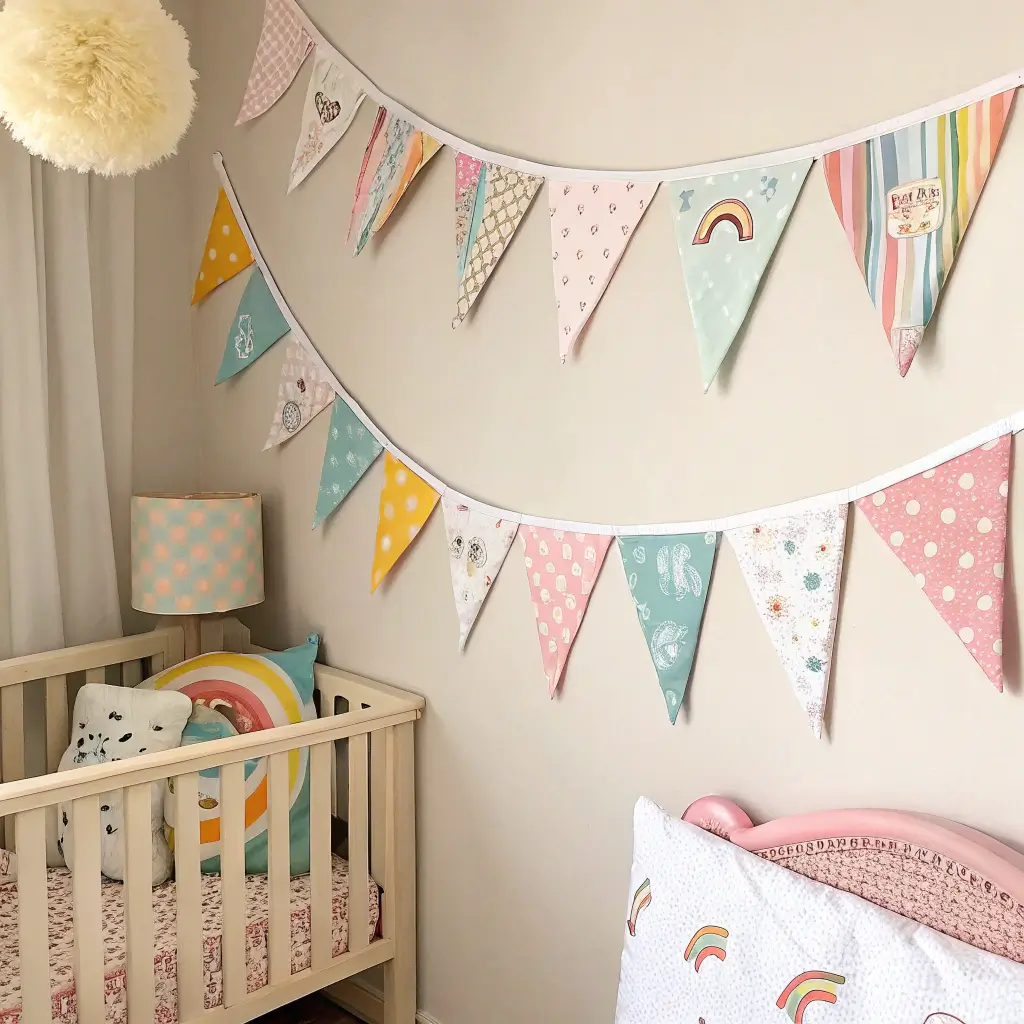
Fabric bunting never goes out of style. It’s cheerful, customizable, and way easier than you’d think. Plus, unlike paper versions, fabric bunting survives grabby toddler hands.
I make new bunting for every season because I have a problem. But honestly, switching out bunting instantly refreshes the room without major redecoration. It’s like a room makeover for $10.
Bunting Creation Steps:
• Fabric scraps in coordinating patterns
• Bias tape or ribbon
• Fabric scissors (or pinking shears for no-fray edges)
• Triangle template
• Sewing machine or fabric glue
Cut triangles using your template, ensuring consistent sizing. Sandwich them between folded bias tape, securing with glue or stitching. Space triangles evenly or create patterns with colors. The beauty of bunting? It works anywhere – windows, walls, or draped from the ceiling.
Custom Painted Growth Chart
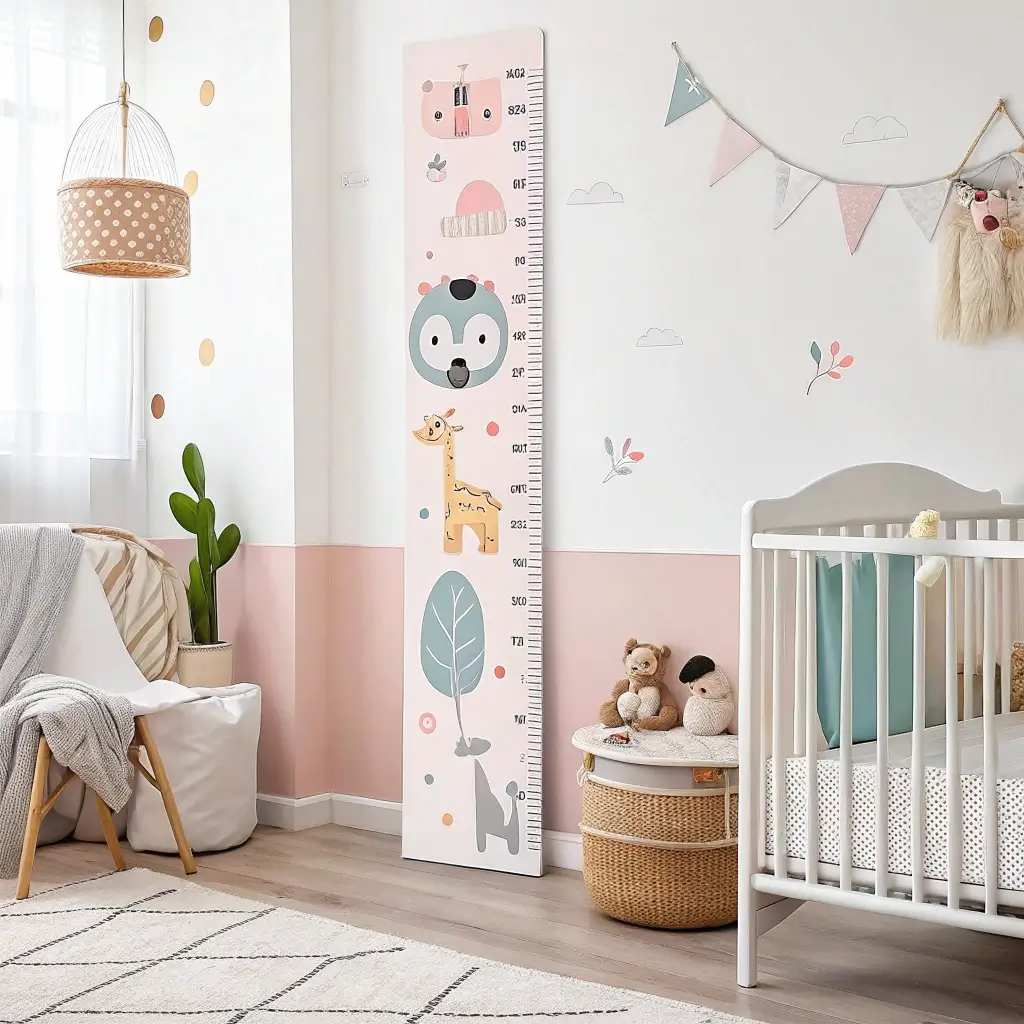
Forget those wall stickers that peel off. A painted growth chart becomes part of your home’s story. Every mark represents a moment, a memory. Getting sentimental? Good, because this project deserves it.
I made one for my best friend’s baby shower using reclaimed fence wood. Three years later, it’s covered in dates and heights, plus random doodles from the kid. It’s basically a family heirloom now.
Growth Chart Construction:
• Wood board (6 feet tall, 6-8 inches wide)
• Ruler and pencil
• Paint and brushes
• Polyurethane sealant
• Wall mounting hardware
Sand your wood smooth, then paint a base color. Mark measurements starting at 6 inches from the bottom (accounting for baseboard height). Add numbers and decorative elements – animals climbing up the side, a tree growing taller, whatever fits your theme. Seal everything with polyurethane to protect those precious height marks.
Also Read: 15 Simple Cardboard DIY Room Decor Ideas Anyone Can Do
Nursery Chalkboard Wall Corner
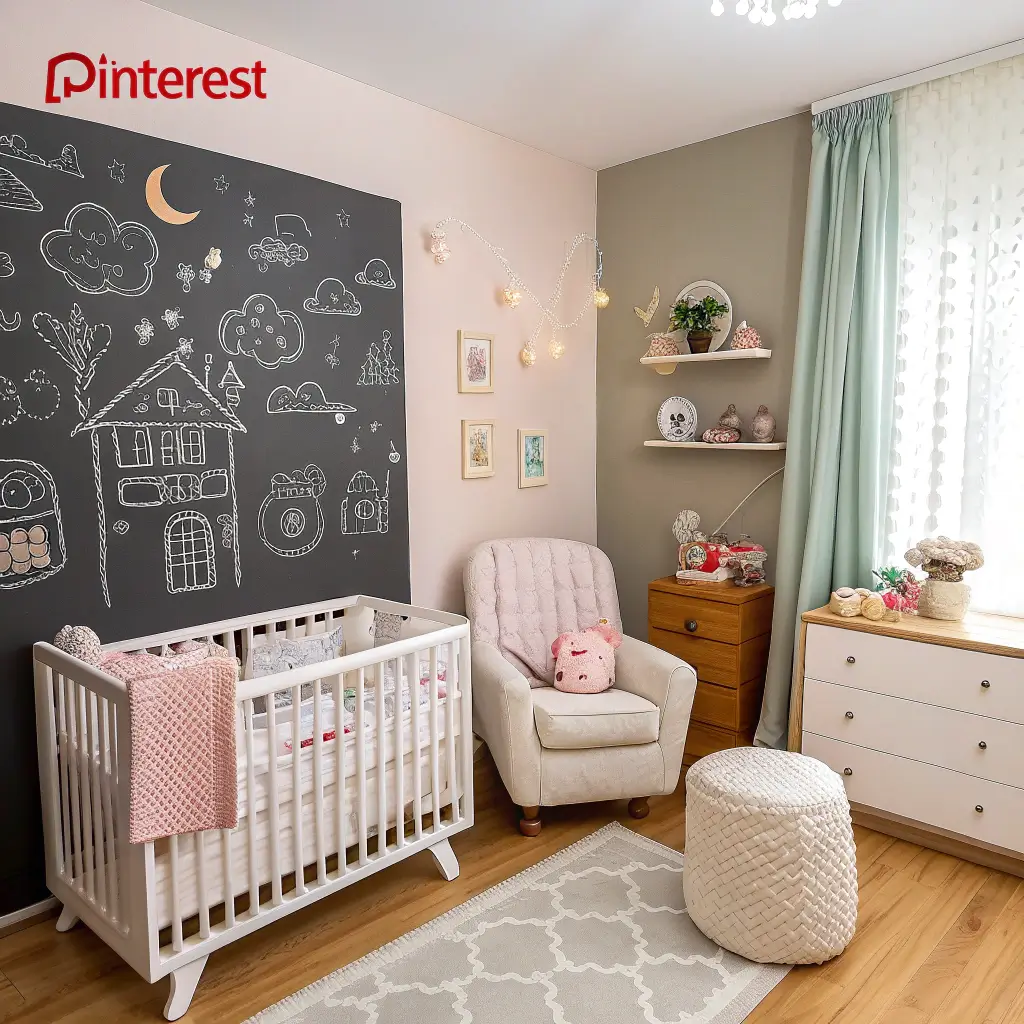
A chalkboard wall might seem crazy for a baby room. Won’t they draw everywhere? Maybe, but that’s future-you’s problem. Right now, it’s perfect for monthly photos, milestone tracking, or leaving sweet messages.
My cousin did a whole accent wall in chalkboard paint. Sure, her toddler went wild with chalk, but it contained the chaos to one wipeable surface. Strategic brilliance or lucky accident? We’ll never know.
Chalkboard Implementation:
• Chalkboard paint (comes in colors now!)
• Painter’s tape for clean edges
• Primer if painting over dark colors
• Quality brushes or rollers
• Chalk and eraser storage solution
Choose your area carefully – a corner, single wall, or even inside closet doors work great. Apply several thin coats rather than one thick one. Season the surface by rubbing chalk over it and erasing before first use. Install a small shelf nearby for chalk storage.
Handmade Pom-Pom Rug
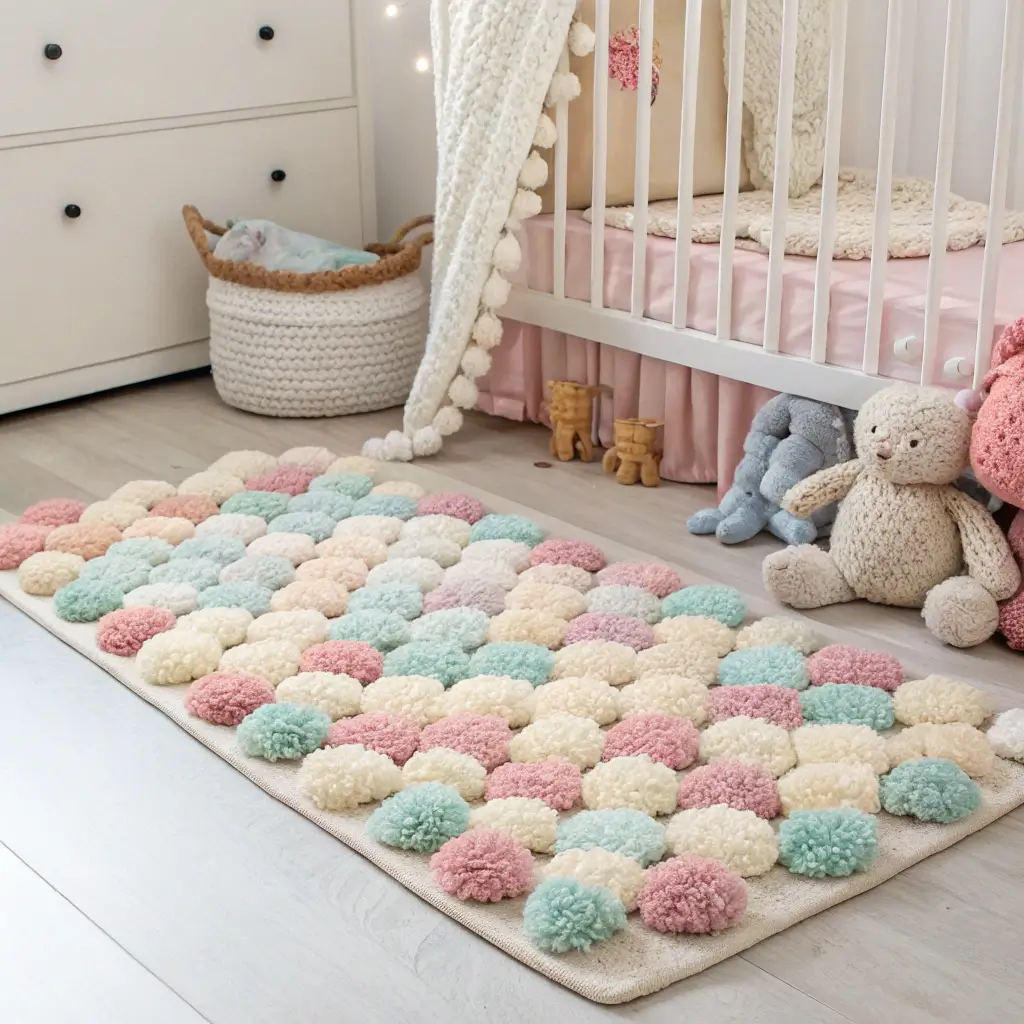
A pom-pom rug sounds tedious, but it’s actually meditative. Plus, the result? Pure fluffy joy that babies love to touch and toddlers refuse to leave.
FYI, making pom-poms while binge-watching shows is surprisingly therapeutic. I made a whole rug during one season of my favorite series. Now every time my friend’s baby plays on it, I remember that plot twist in episode 7.
Pom-Pom Rug Assembly:
• Yarn in multiple colors (lots of it)
• Non-slip rug pad as base
• Scissors
• Pom-pom maker or cardboard
• Strong thread for attaching
Make pom-poms until you question your life choices (usually around 80-100 for a decent-sized rug). Tie them tightly to the rug pad, placing them close together for fullness. Vary colors randomly or create patterns – stripes, circles, or ombré effects all work beautifully.
Baby-Themed Memory Board
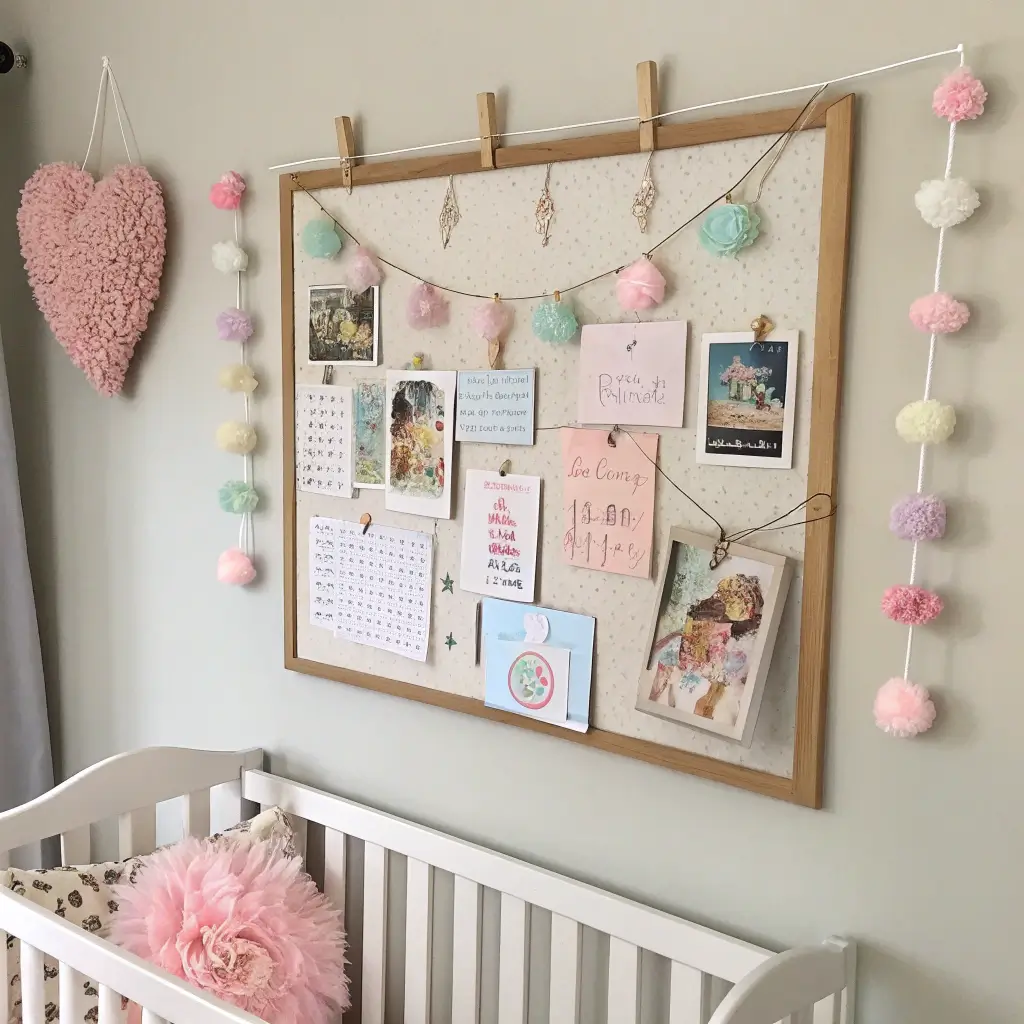
Memory boards capture those fleeting moments – hospital bracelets, first photos, tiny socks they outgrew in seconds. It’s scrapbooking for people who’ll never actually scrapbook.
I made one using an old picture frame and chicken wire. Sounds weird? Maybe, but it holds everything from ultrasound photos to birthday cards, and swapping items takes seconds.
Memory Board Options:
• Cork board with fabric covering
• Pegboard with painted details
• Chicken wire in a frame
• Ribbon board with crisscross pattern
• Magnetic board with cute magnets
Whatever style you choose, make it accessible. You’ll want to update it regularly as your baby grows. Use mini clothespins, decorative clips, or magnets to attach items without damage.
Soft Plush Wall Pockets

Wall pockets solve the eternal nursery problem: where to stash all those small essentials? Pacifiers, tiny socks, that one toy that stops the crying – they all need homes within arm’s reach.
My solution? Soft fabric pockets that double as decoration. They’re like functional art, if art held diaper cream and teething rings. Revolutionary? Nah. Helpful? Absolutely.
Pocket Construction Guide:
• Sturdy fabric for backing
• Coordinating fabrics for pockets
• Dowel or curtain rod for hanging
• Sewing supplies or fabric glue
• Optional embellishments
Create a backing piece, then attach pockets of varying sizes. Hang using a dowel threaded through a top sleeve, or mount directly to the wall. Position near the changing table or rocking chair for maximum convenience.
Origami Paper Crane Mobile
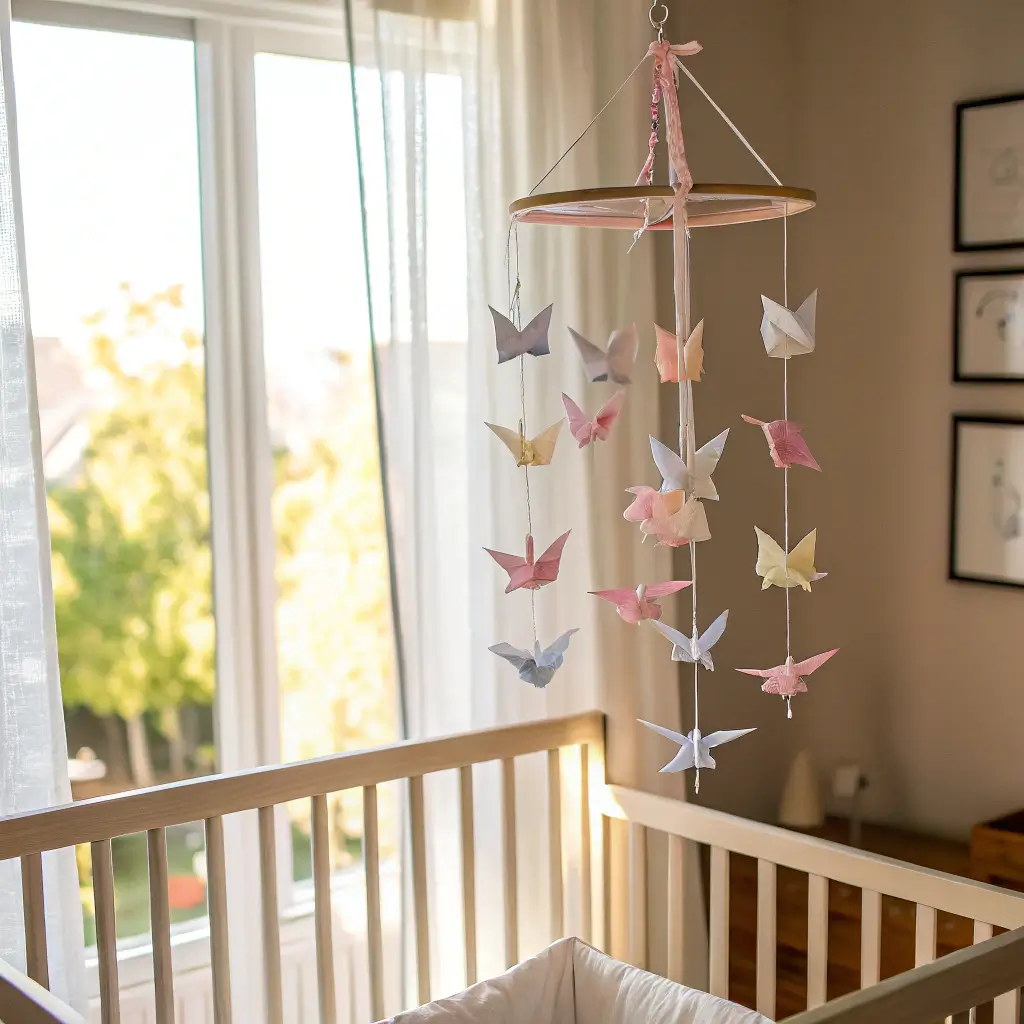
Ever heard the legend about 1,000 paper cranes? Well, you only need about 20 for a stunning origami mobile. It’s delicate, meaningful, and costs basically nothing if you already have paper.
I taught myself origami from YouTube videos while pregnant. Those paper cranes became a mobile that somehow survived my son’s grabby phase. They’re surprisingly durable for paper art. Who knew? :/
Crane Mobile Creation:
• Origami paper in various patterns
• Embroidery hoop or branches
• Thread or fishing line
• Needle for threading
• Optional: Beads for weight and decoration
Master the basic crane fold (practice makes perfect), then create cranes in different sizes. Thread them onto fishing line, adding beads between for spacing and gentle weight. Hang at varying lengths from your frame for movement and visual interest.
DIY Baby Room Canvas Art
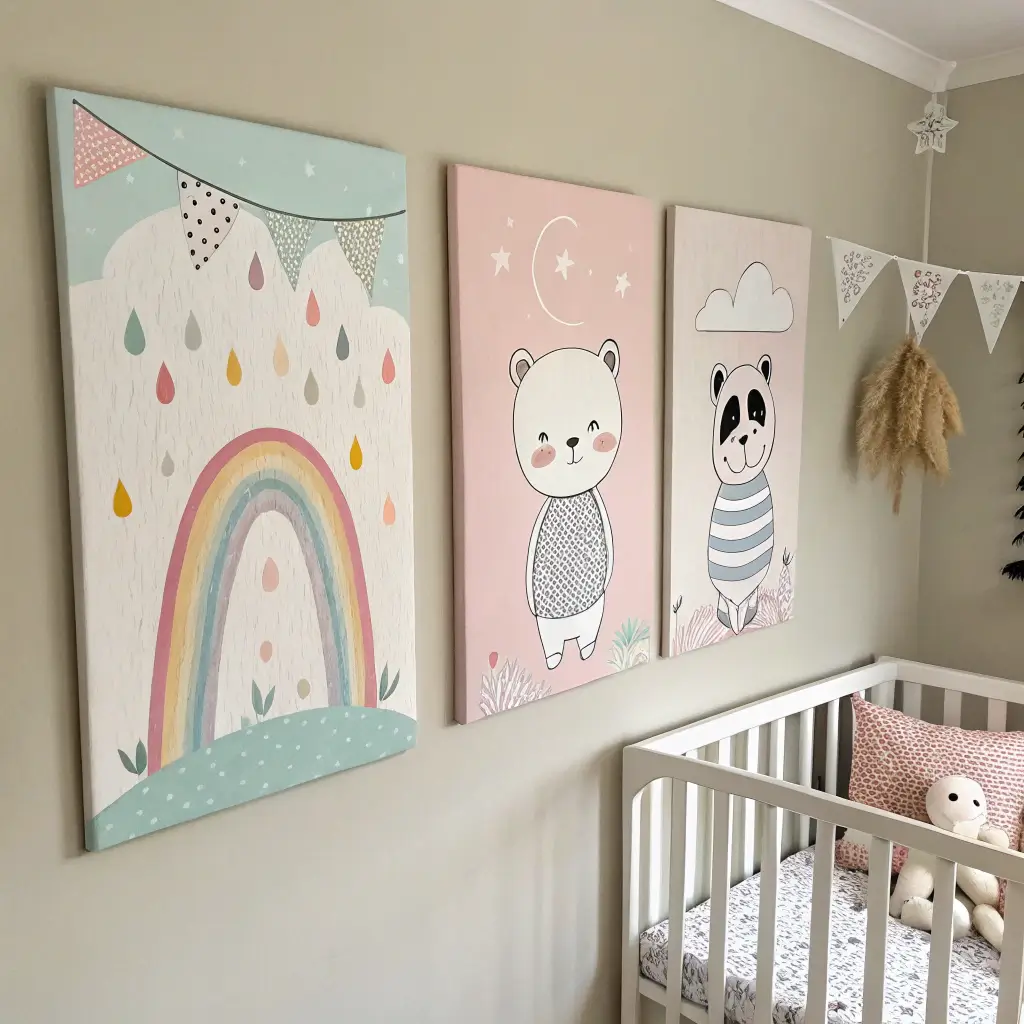
Finally, let’s talk canvas art. You don’t need artistic talent – seriously. Some of the best nursery art comes from happy accidents and experimental techniques.
I once made abstract art by letting paint-covered toy cars roll across canvas. My friend thought I bought it from an expensive boutique. That’s when I realized nursery art is whatever you make it.
Canvas Art Techniques:
• Paint pouring for abstract effects
• Handprint/footprint art (classic for a reason)
• Stenciled quotes or shapes
• Fabric-wrapped canvases
• Photo transfers onto canvas
Try the paint pour method: mix acrylic paint with pouring medium, layer colors in a cup, then flip onto canvas. The results are always unique and surprisingly sophisticated. Or go simple with geometric shapes using painter’s tape – anyone can paint straight lines with good tape.
Wrapping It All Up
So there you have it – 15 DIY baby room decor ideas that actually work. Some might take a weekend, others just an hour, but they all add personality without destroying your budget. The best part? Each project becomes part of your baby’s story, creating a room filled with love and intention.
Remember, perfection isn’t the goal here. That slightly crooked star on the ceiling or the elephant with uneven ears? Those imperfections make the room uniquely yours. Your baby won’t judge your crafting skills – they’re too busy being amazed by literally everything.
Start with one project that excites you. Once you see how achievable these ideas are, you’ll probably end up doing half the list. And when friends ask where you got that adorable cloud mobile or custom growth chart? You get to say those magic words: “Actually, I made it myself.”
Now grab some supplies, maybe a coffee (or wine, no judgment), and start creating that dream nursery. Your future self will thank you when you’re rocking your baby surrounded by handmade magic instead of generic store-bought decor. Happy crafting!