10 Elegant Kitchen Christmas Decor Ideas for Warm Vibes
You know that moment when you walk into someone’s kitchen during the holidays and everything just feels right? The warm glow, the festive touches, that subtle scent of cinnamon that makes you want to bake cookies immediately? Yeah, I’m totally obsessed with creating that magic in my own kitchen, and I bet you are too.
Here’s the thing about kitchen Christmas decor – it doesn’t have to cost a fortune or turn your cooking space into an unusable winter wonderland.
I’ve spent years perfecting the art of festive kitchen styling (and making plenty of mistakes along the way), and I’m about to share my favorite ideas that actually work.
These aren’t just pretty Pinterest fantasies; they’re practical decorations you can pull off while still making dinner every night.
Mini Christmas Tree Counter Display
Let me start with my absolute favorite kitchen decoration that never fails to spark joy. A mini Christmas tree on your counter creates an instant focal point without eating up all your workspace. I’m talking about those adorable 12-18 inch trees that fit perfectly in that awkward corner between your coffee maker and toaster.
Choosing the Perfect Spot
Finding the right location makes all the difference. I learned this the hard way after knocking over my first mini tree while reaching for the salt. Now I always place mine on the far end of the counter, away from the main prep zone. The corner near your breakfast nook works brilliantly, or that spot next to your cookbook stand that usually collects mail.
You want visibility without obstruction. Think about where you naturally glance when you enter the kitchen – that’s your sweet spot. Mine sits right where I can see it from the dining room, creating a lovely view during meals.
Decorating Your Tiny Tree
Here’s where you can really have fun. Forget traditional ornaments; they’re usually too heavy for these petite beauties anyway. Instead, I decorate mine with:
- Miniature kitchen-themed ornaments (tiny rolling pins, measuring spoons, chef hats)
- Small battery-operated LED lights that won’t heat up near food
- Lightweight ribbon bows in coordinating colors
- Dried orange slices I make myself (they smell amazing!)
- Tiny cookie cutters hung with fishing line
The key? Keep decorations proportional to your tree size. Nothing looks sillier than a massive star topper on a foot-tall tree. Trust me, I’ve been there.
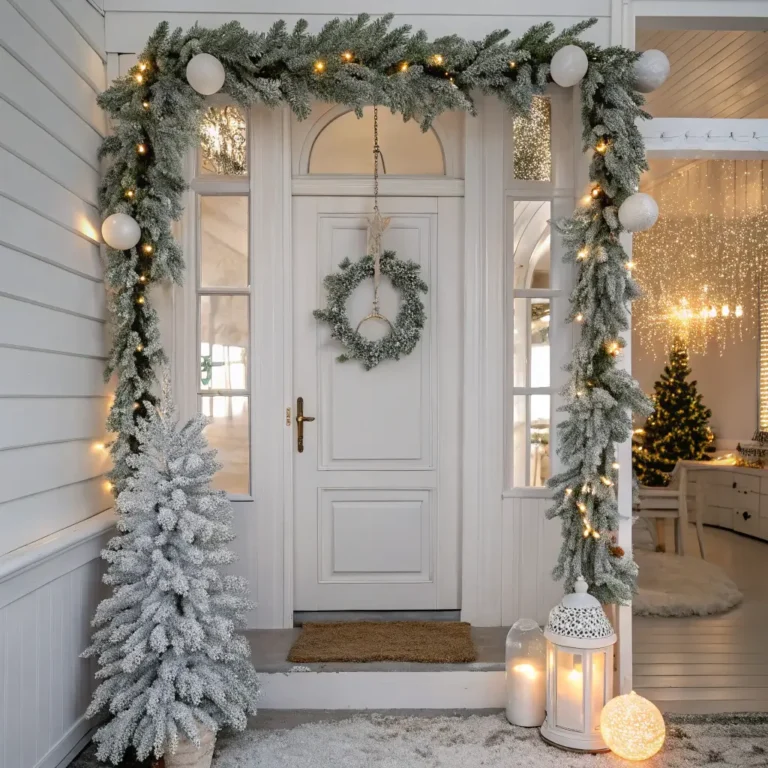
Festive Garland Over Kitchen Windows
Windows often get forgotten in kitchen decorating, which is crazy because they’re literally eye level! Garland draped across your kitchen windows transforms the whole room’s ambiance, especially when natural light filters through.
Installation Without Damage
Nobody wants to drill holes in their window frames, right? I use removable adhesive hooks that hold up to 5 pounds – they’re my holiday decorating lifesaver. Place them at the upper corners of your window frame and one in the center for longer spans. This creates that perfect swag effect without any permanent commitment.
For renters or damage-phobes like myself, clear suction cups with hooks work great on glass surfaces. Just clean the window thoroughly first, or you’ll wake up to garland on your floor (speaking from experience here).
Garland Selection Tips
Not all garlands are created equal for kitchen use. Skip the super cheap tinsel stuff – it sheds everywhere and looks terrible after a week. Instead, invest in:
- Quality artificial pine garland with mixed needle textures
- Pre-lit options with warm white LEDs
- Garland with built-in berries or pinecones for extra texture
I always add my own touches to store-bought garland. Weave in some battery-operated fairy lights if it’s not pre-lit, tuck in a few sprigs of fresh eucalyptus for scent, or tie on small ornaments that match your kitchen’s color scheme. The personalization makes all the difference between “meh” and magnificent.
Holiday-Themed Table Runner Setup
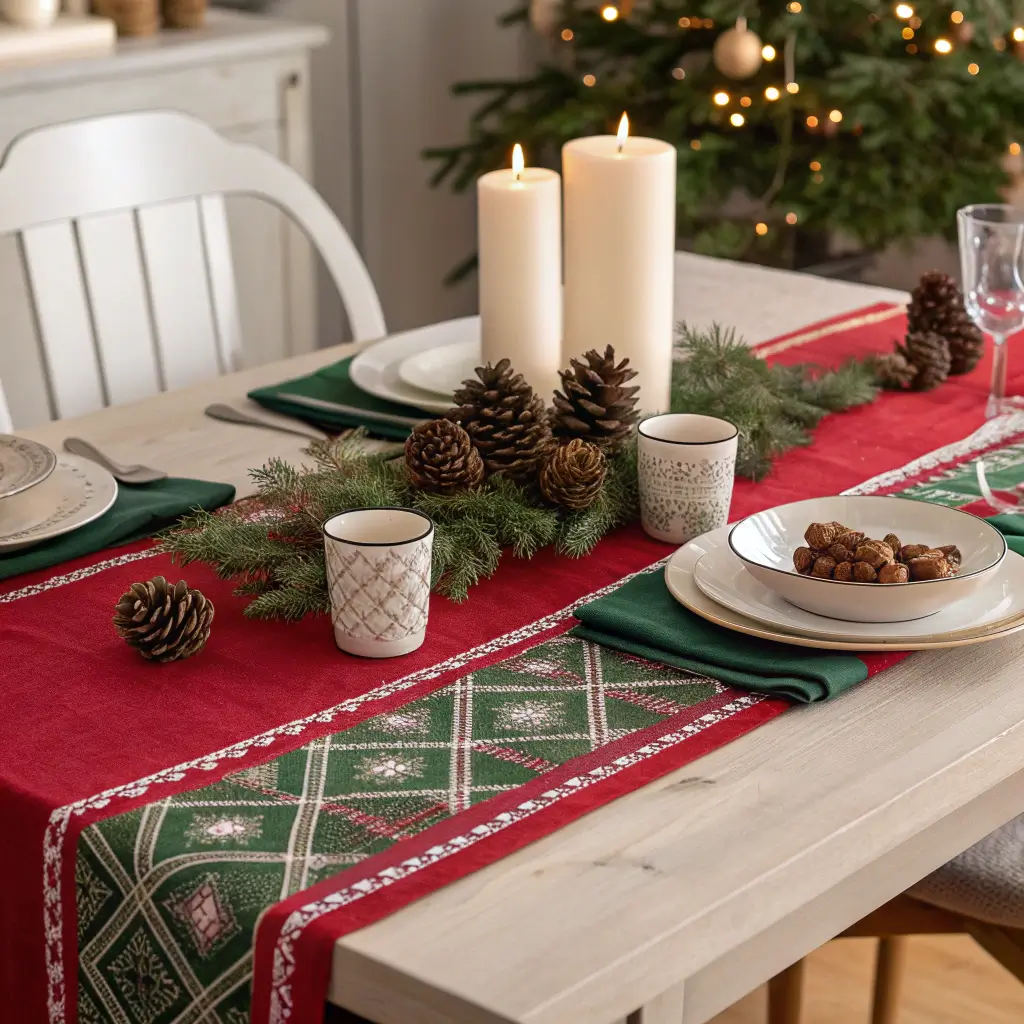
Your kitchen table or island deserves some holiday love too. A festive table runner instantly dresses up your eating space without requiring daily maintenance. IMO, this is one of the easiest ways to add Christmas cheer without going overboard.
Picking the Right Runner
Size matters more than you’d think. Your runner should hang over each end of the table by about 6-8 inches – any longer and people catch it with their knees (learned that during an awkward family dinner). Width-wise, leave at least 6 inches of table showing on each side for place settings.
Material choice depends on your lifestyle. With kids or messy eaters? Go for machine-washable cotton or polyester blends. Want something fancier for adult dinners? Linen or burlap with holiday prints looks sophisticated. I rotate between a casual plaid runner for everyday and a elegant embroidered one for company.
Styling Your Runner
A bare runner looks unfinished. Layer it with centerpiece elements that you can easily move for meals:
- A trio of pillar candles in varying heights
- Small potted poinsettias in decorative containers
- A wooden tray with pinecones and ornaments
- Battery-operated lanterns for safe ambiance
Pro tip: Create levels by placing some items on cake stands or stacked books wrapped in festive paper. The varying heights make everything look more intentional and designer-y.
Also Read: 15 Inspiring Christmas Outdoor Decor Ideas and Festive Cheer
DIY Mason Jar Snow Globes
Okay, this project makes me ridiculously happy every single time. Mason jar snow globes combine craftiness with kitchen charm, and they cost practically nothing to make. Plus, they’re a fun activity if you’ve got kids bouncing off the walls during winter break.
Gathering Your Supplies
You probably have most of this stuff already:
- Mason jars (any size works, but pint jars are perfect)
- Waterproof glue or hot glue gun
- Distilled water
- Glycerin (found at craft stores or pharmacies)
- Glitter or fake snow
- Small waterproof figurines or miniature trees
The glycerin is crucial – it thickens the water so your “snow” falls slowly instead of just sinking immediately. I learned this after my first attempt looked more like a glitter hurricane than a peaceful snowfall.
Assembly Process
Start by gluing your figurines to the inside of the lid. Let that dry completely, or you’ll have floating reindeer (amusing but not the goal). Fill your jar almost to the top with distilled water, add a teaspoon of glycerin, and a pinch of glitter.
Here’s the tricky part: carefully screw on the lid without disturbing your scene. Some water will overflow – that’s normal and actually necessary to prevent air bubbles. Wipe it clean, maybe add a ribbon around the lid, and boom – instant kitchen windowsill magic.
I make several with different scenes and line them up on my window ledge. The light catches the glitter beautifully during the day.
Christmas Cookie Station Decor

Who doesn’t love a dedicated cookie station during the holidays? Creating a festive cookie corner in your kitchen serves double duty – it’s decorative AND functional. This has become my favorite tradition, and visitors always gravitate toward it immediately.
Setting Up Your Station
Choose a section of counter or a small side table that won’t interfere with regular cooking. I use a vintage bar cart I found at a thrift store, but any surface works. The key is making it feel special and separate from everyday kitchen activities.
Display your cookies properly using:
- Tiered cake stands for vertical interest
- Clear glass jars with ribbon-tied tags
- Vintage tins (check grandma’s attic!)
- A wooden cutting board as a base for rustic charm
Don’t forget the practical elements. Include small tongs or cookie scoops, festive napkins, and maybe some to-go bags for guests. Everything should scream “please take one!” without you having to say it.
Decorative Touches
The magic happens in the details. String a small “Cookie Station” banner above your display, or use a chalkboard sign with playful messaging. Add battery-operated string lights around the area for a warm glow. Fresh greenery tucked around the base of your displays adds life and scent.
I always include a small bouquet of candy canes in a mason jar and a plate of homemade hot chocolate stirrers. These little extras make people feel special and turn simple cookies into an experience.
Twinkling Fairy Lights on Cabinets

Nothing transforms a kitchen faster than strategic lighting, and fairy lights on your cabinets create instant ambiance without any rewiring. This trick works whether you have upper cabinets, open shelving, or both.
Installation Methods
For upper cabinets, I run lights along the bottom edge, hidden behind the lip. This creates a gorgeous under-cabinet glow that’s both functional and festive. Command strips or tiny clear hooks work perfectly for securing the wire without damage.
Got crown molding on top of your cabinets? That’s prime real estate for lights! Lay them along the molding, letting them drape slightly for a relaxed look. The height draws eyes upward and makes your kitchen feel larger.
Open shelving offers even more options. Weave lights between dishes, wrap them around shelf brackets, or create swags between shelves. Just ensure the wire doesn’t interfere with grabbing your everyday items.
Choosing Your Lights
Not all fairy lights are created equal. After trying dozens (I might have a slight addiction), here’s what works best:
- Warm white LEDs over cool white – they’re cozier
- Battery-operated with timers for convenience
- Copper wire varieties that bend and hold shape
- Lights with multiple settings for mood control
Skip the colored lights unless your kitchen already has bold colors. In most kitchens, white lights look more sophisticated and won’t clash with your existing decor 🙂
Also Read: 11 Creative Christmas Coffee Bar Ideas to Wow Your Guests
Red and Green Dishware Display
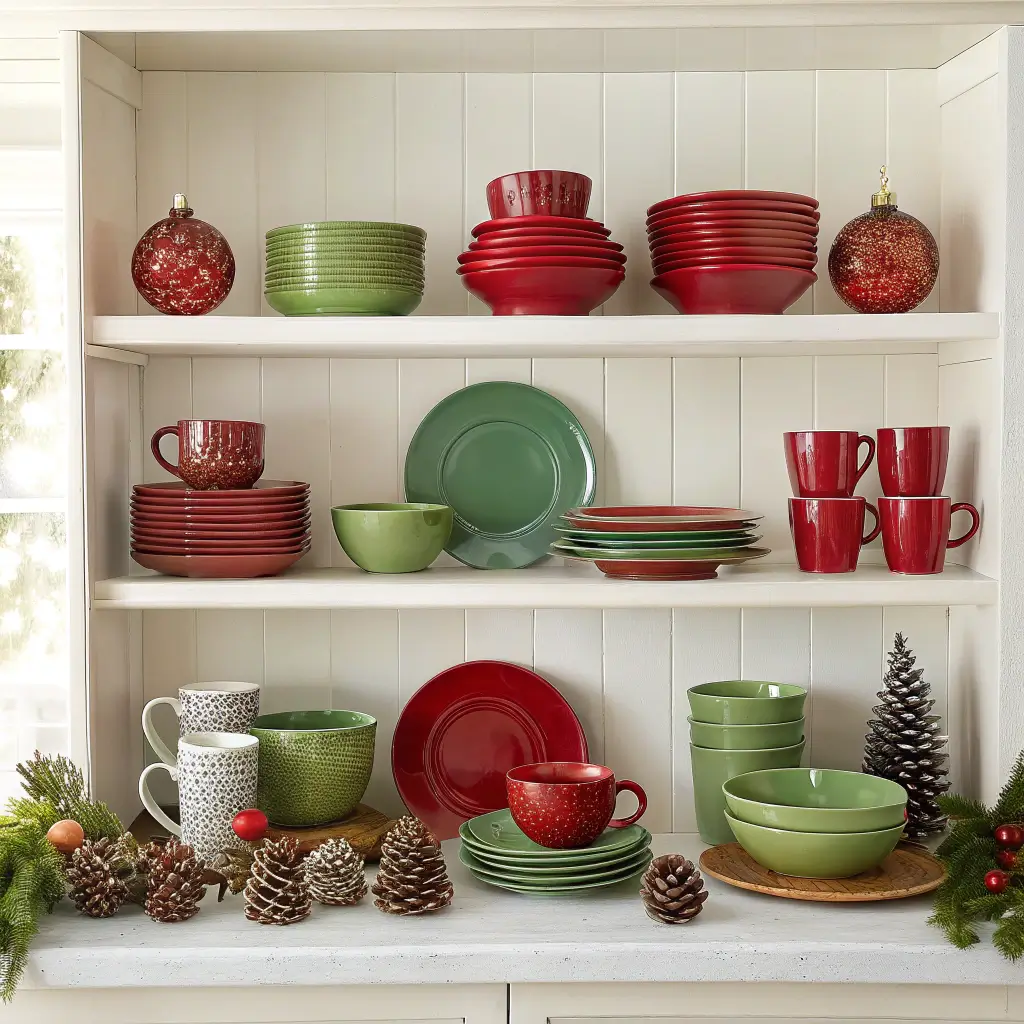
You know those Christmas dishes hiding in your attic 11 months of the year? Time to show them off! Displaying holiday dishware adds instant color and doesn’t cost a penny if you already own the pieces.
Creative Display Ideas
Open shelving makes this easy, but even with closed cabinets, you have options. Remove the everyday dishes from one glass-front cabinet and create a holiday vignette. Stack plates by color, lean larger platters against the back, and nestle mugs in front.
No glass cabinets? Create a plate wall! Those adhesive plate hangers let you arrange a festive display without drilling holes. I arrange mine in a tree shape – larger plates at the bottom, smaller ones toward the top, with a star-shaped dish as the topper.
Don’t hide your pretty holiday mugs either. Hang them from hooks under cabinets, or display them on a dedicated mug tree. Fill some with candy canes or greenery sprigs for extra festiveness.
Mixing Patterns Successfully
Here’s where people get nervous, but mixing patterns isn’t that hard. Stick to a cohesive color palette and vary the scale of patterns. Pair large plaid with small polka dots, or bold stripes with delicate florals.
My rule? Choose one dominant pattern, one supporting pattern, and one solid color to ground everything. This prevents visual chaos while keeping things interesting. If you’re still unsure, black and white patterns with pops of red never fail.
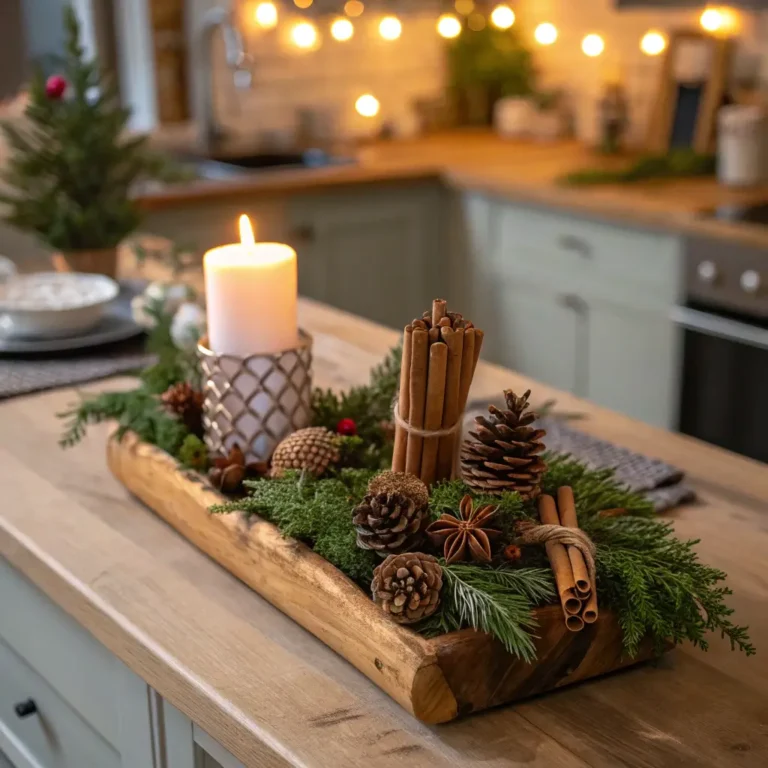
Cinnamon Stick and Pinecone Centerpiece
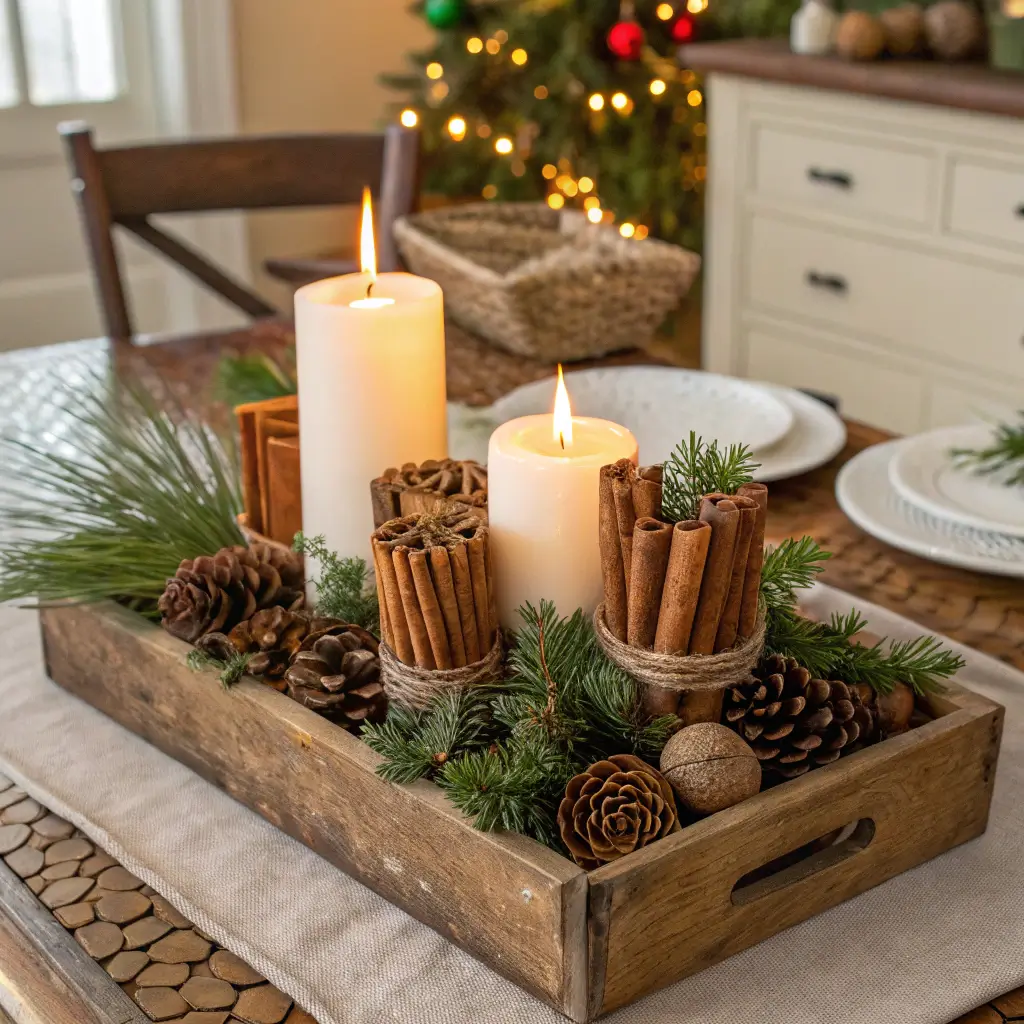
Want your kitchen to smell like Christmas all day long? A cinnamon stick and pinecone centerpiece delivers style and scent without any artificial fragrances. Plus, it costs almost nothing if you collect pinecones yourself.
Building Your Centerpiece
Start with a base – a wooden tray, shallow bowl, or even a cake stand works great. I prefer something with edges to contain the elements. Layer your materials for the best effect:
- Begin with larger pinecones as anchors
- Tuck cinnamon stick bundles between them
- Add smaller pinecones to fill gaps
- Weave in dried orange slices or star anise
- Finish with sprigs of fresh rosemary or pine
The trick is making it look effortlessly arranged rather than precisely placed. Nature isn’t perfect, so embrace some asymmetry.
Adding Extra Elements
While natural materials look beautiful alone, a few additions elevate the display. Battery-operated tea lights nestled among the pinecones create a cozy glow. Metallic spray paint on a few pinecone tips adds glamour without going overboard.
I refresh my centerpiece weekly by replacing any tired-looking greenery and giving the cinnamon sticks a gentle rub to release more scent. A light misting with cinnamon essential oil mixed with water revives the fragrance when needed.
Seasonal Fruit and Candy Bowl Arrangement

Ever notice how a bowl of fresh fruit instantly makes a kitchen feel lived-in and welcoming? Holiday fruit and candy arrangements take this concept and add festive flair. FYI, this might be the easiest decoration on this list.
Selecting Your Vessels
The container matters almost as much as what goes in it. Wooden bowls add rustic charm, while crystal or glass bowls feel more formal. Pedestal bowls or cake stands add height and importance to your display.
I use a three-bowl approach: one large bowl for fruit, one medium for nuts in shells, and one small for specialty candies. Grouping them creates more impact than a single bowl, no matter how beautiful.
Arrangement Techniques
Start with your largest items – apples, oranges, or pomegranates work beautifully. Build up from there with smaller elements:
- Fresh cranberries for color pop
- Whole walnuts or chestnuts for texture
- Clementines with leaves still attached
- Peppermint bark or chocolate coins
- Candied ginger or crystallized orange peel
The secret? Don’t just dump everything in. Place items intentionally, turning fruits so their best sides show. Tuck greenery sprigs around the edges for a finished look. This takes maybe two extra minutes but makes such a difference.
Maintaining Freshness
Nothing ruins the vibe faster than moldy fruit. Check your display every few days, removing anything past its prime. Keep backup fruits in the fridge to refresh as needed.
I learned to separate certain fruits that cause others to ripen faster. Apples, for instance, release ethylene gas that speeds ripening in nearby fruits. If you want your display to last, keep apples in their own bowl or choose fruits that play nicely together.
Also Read: 10 Cute Bedroom Christmas Decor Ideas and Tiny Tree Inspiration
Holiday Chalkboard Menu Signs
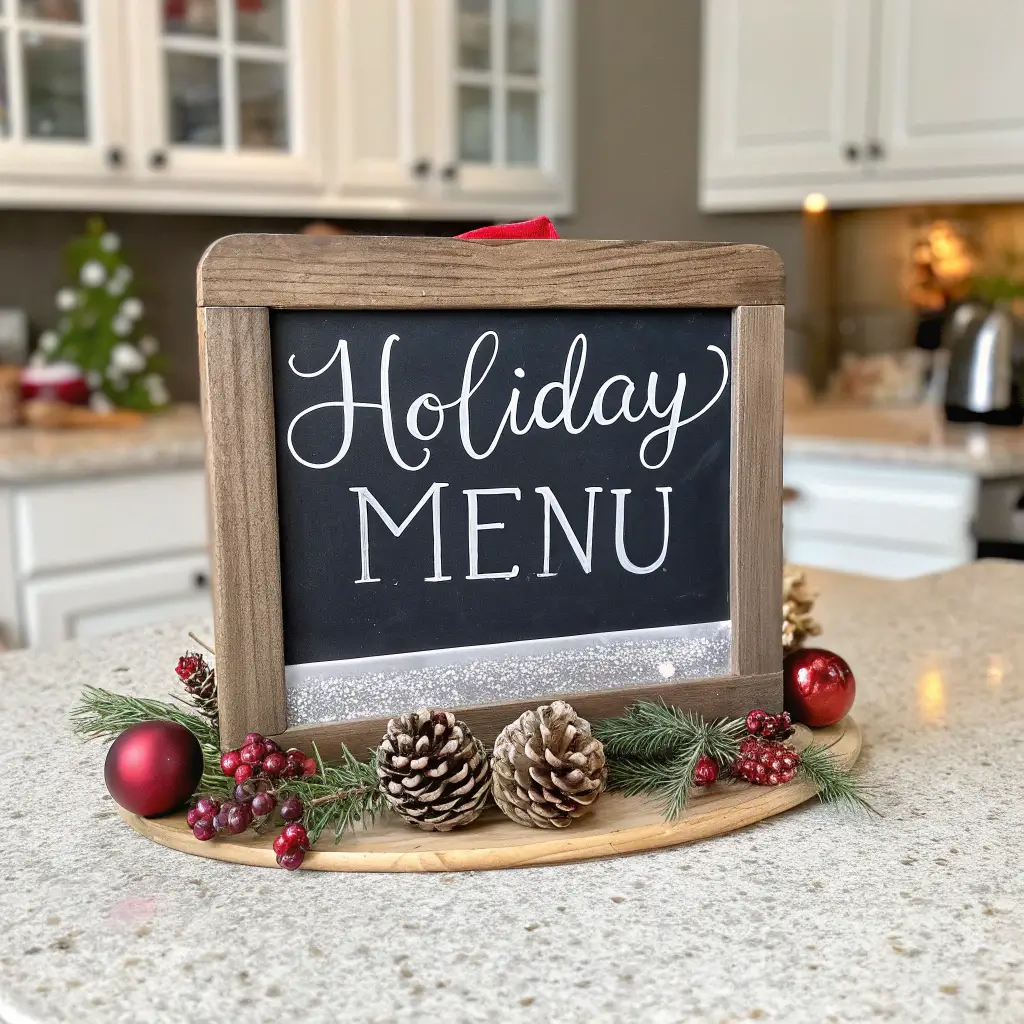
Remember when chalkboard everything was having a moment? Well, holiday menu chalkboards never went out of style in kitchens because they’re actually useful. They’re perfect for sharing cookie recipes, dinner menus, or festive drink specials.
DIY Chalkboard Options
You don’t need an actual chalkboard (though vintage ones are amazing if you find them). Chalkboard paint transforms almost any surface:
- Old picture frames with glass removed
- Wooden cutting boards you don’t use
- Cabinet doors (if you’re feeling brave)
- Metal serving trays
I painted the inside of an old window frame and it’s become my favorite kitchen feature. The panes create natural sections for different messages or drawings.
Mastering Chalk Lettering
Can’t draw? Neither can I! But here’s the thing – imperfect lettering looks charming on chalkboards. Start with regular chalk for practice, then invest in chalk markers for cleaner lines.
My foolproof method for fancy lettering:
- Print your design on regular paper
- Rub chalk on the back
- Place it on your board and trace over the letters
- The chalk transfers like carbon paper!
For daily changes, keep it simple with “Today’s Cookie: Snickerdoodles” or “Hot Cocoa Bar Open!” Save elaborate designs for special occasions.
Styling Your Chalkboard
A bare chalkboard looks unfinished. Frame it with garland, prop it on a stand with greenery at the base, or lean it against your backsplash with small decorations in front. The key is integration – make it feel like part of your overall decor, not an afterthought.
I change my messages based on what’s happening. Cookie baking day? Recipe goes up. Company coming? Welcome message. Regular Tuesday? Maybe just a cheerful “Merry & Bright” with some holly doodles.
Bringing It All Together
Creating a festive kitchen doesn’t mean implementing every single idea at once. Pick three or four that resonate with your style and space. Start with one showstopper piece – maybe that mini tree or the fairy lights – then layer in smaller touches as you go.
Remember, the best Christmas kitchen decor enhances your space without hindering its function. You still need to cook dinner, pack lunches, and live your life. Every decoration should earn its place by bringing joy without causing frustration.
What matters most? Making your kitchen feel special during this magical season. Whether you go all out with every idea or simply add a festive table runner and call it good, the important thing is creating a space that makes you smile when you walk in with your morning coffee.
The holidays come and go quickly, but the memories you make in your decorated kitchen – baking cookies, sharing meals, enjoying that perfect morning light through garland-draped windows – those stick around long after you pack away the decorations. So grab some cinnamon sticks, string up those lights, and make your kitchen the warm, welcoming heart of your holiday home. After all, isn’t that where all the best conversations happen anyway?