8 Unique Kitchen Island Christmas Decor Ideas for Your Home
You know that feeling when November rolls around and suddenly your kitchen island looks… boring? Yeah, me too. While everyone obsesses over their living room trees and mantle displays, I’ve discovered that the kitchen island holds serious holiday potential that most people completely ignore.
Last year, I threw together some random decorations on my island at the last minute, and my sister-in-law actually complimented it before she noticed my actual Christmas tree. That’s when I realized I’d been sleeping on prime decorating real estate! Your kitchen island sits right in the heart of your home’s action – where everyone gathers, snacks appear, and memories happen.
So let’s talk about turning that workspace into a festive masterpiece that’ll make your guests do a double-take. I’ve tested these eight ideas in my own home (and stolen a few brilliant concepts from Pinterest-obsessed friends), and trust me, they work like magic.
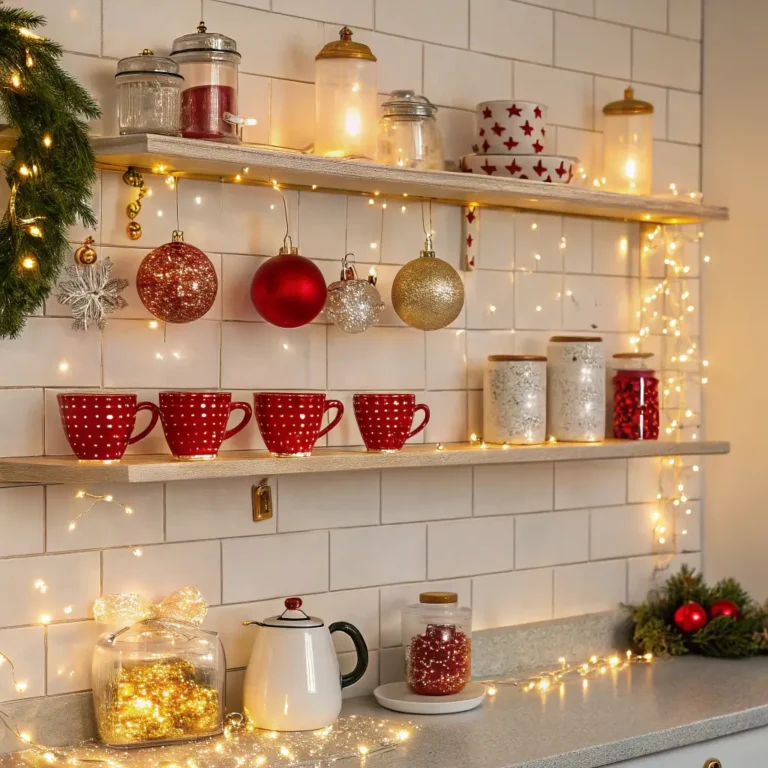
Minimalist White and Gold Holiday Setup
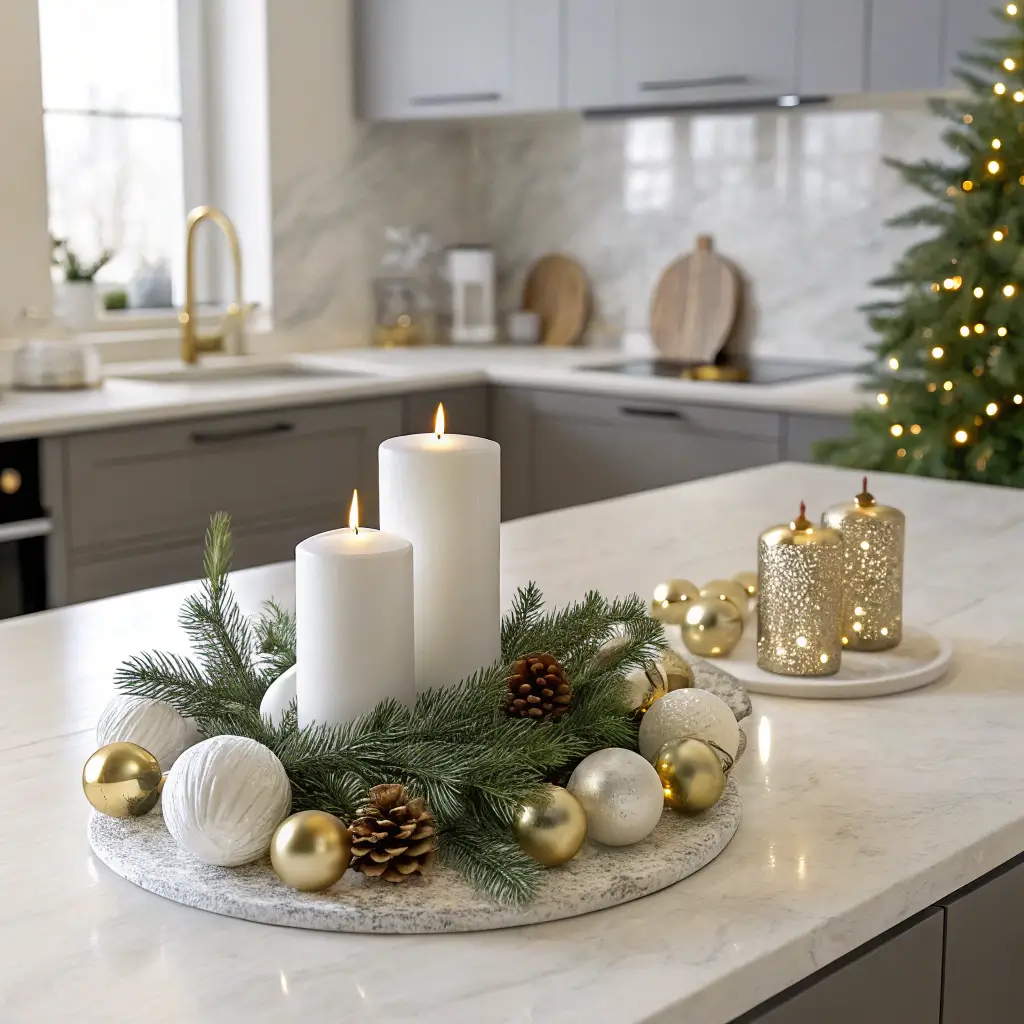
Who says Christmas decorations need to scream “SANTA WAS HERE” in your face? Sometimes less really delivers more impact, especially when you nail the execution.
I started experimenting with this white and gold theme after my husband complained our usual decorations made the kitchen look like an elf exploded. Fair point, honestly. The minimalist approach transforms your island into this sophisticated holiday centerpiece without overwhelming your cooking space.
Getting the Foundation Right
First things first – you need a crisp white table runner or some elegant placemats. I snagged mine from Target for like $15, and they’ve survived three holiday seasons already. The white creates this beautiful blank canvas that makes everything else pop.
Next, you’ll want to layer in your gold elements strategically:
- Metallic gold candle holders (varying heights work best)
- White pillar candles with gold leaf accents
- A few gold-dipped pinecones scattered casually
- Small white ceramic houses with LED lights inside
- Gold wire ribbon woven throughout
Making It Work in Real Life
Here’s what nobody tells you about minimalist decor – placement matters way more than quantity. I arrange everything in odd numbers (designer trick alert!) and leave plenty of breathing room between items. You still need space to actually use your island, right?
The best part? This setup takes maybe 20 minutes to assemble and looks like you hired a decorator. My neighbor literally asked who I hired last year. Nobody, Susan, just YouTube and determination 🙂
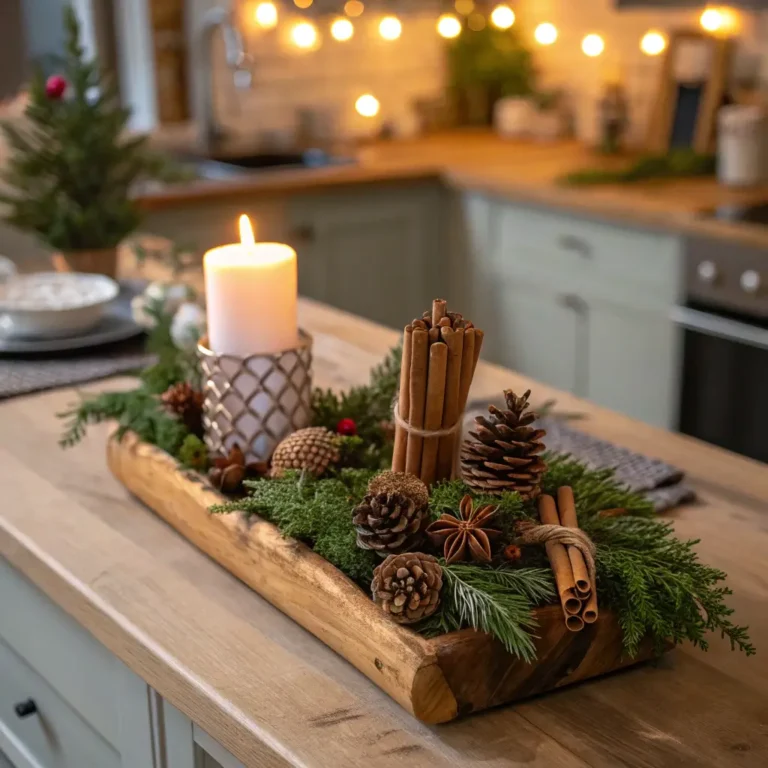
Rustic Farmhouse Christmas Centerpiece
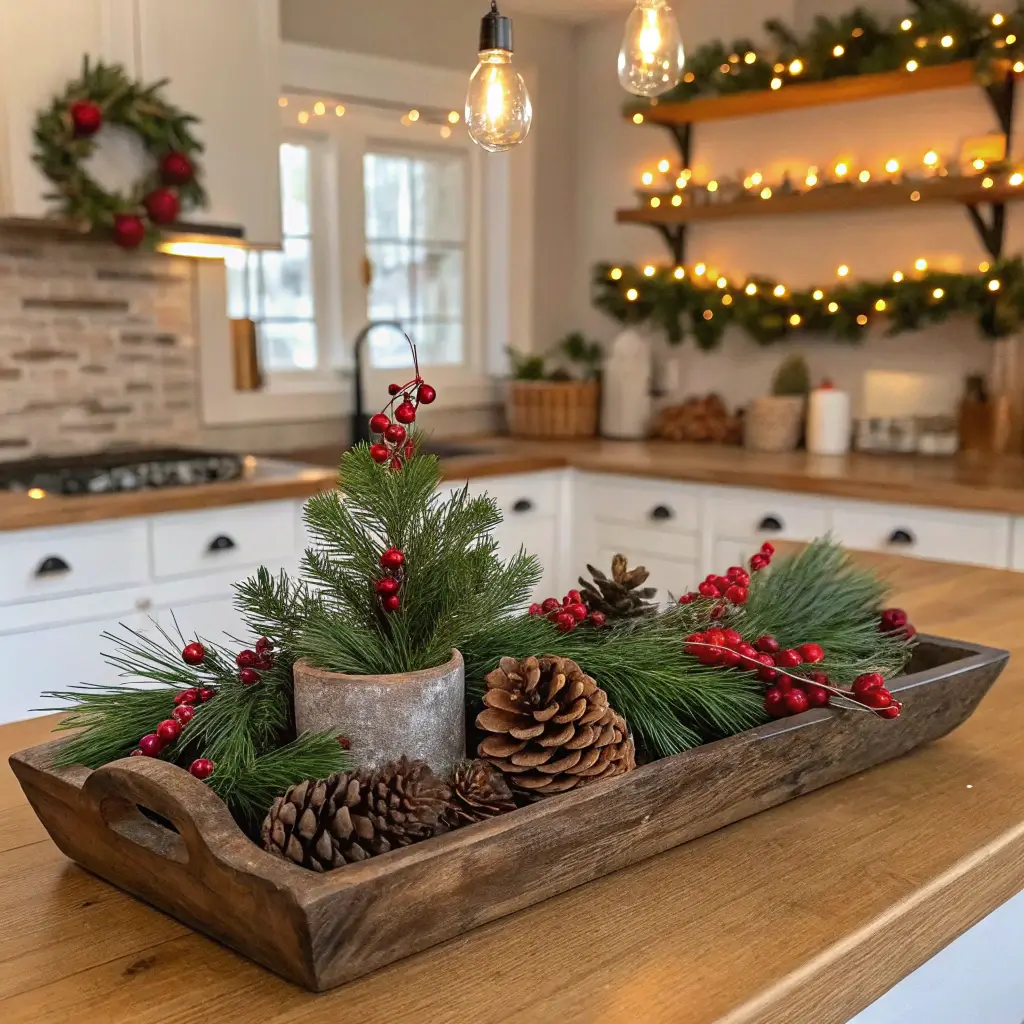
Okay, confession time – I went through a serious Joanna Gaines phase, and honestly, some habits die hard. The rustic farmhouse Christmas look brings this cozy, lived-in warmth that makes everyone want to grab cocoa and settle in.
Building Your Farmhouse Foundation
Start with a wooden tray or vintage cutting board as your base. I found mine at an antique shop for $8, but you can totally use what you already have. The wood instantly adds that farmhouse texture we’re after.
Layer these elements for maximum impact:
- Mason jars wrapped with burlap and twine
- Fresh or faux evergreen sprigs
- Red berries (real or fake, nobody will judge)
- Mini galvanized buckets filled with ornaments
- Cotton stems for that winter “snow” effect
- Plaid ribbon accents
The Secret Sauce
Want to know what really sells this look? Mix textures like crazy. Rough burlap against smooth glass, soft cotton against prickly evergreen – these contrasts create visual interest that draws people in.
I learned this trick the hard way after my first attempt looked flat and boring. Now I make sure every element brings a different texture to the party. Your eyes literally can’t help but explore all the details.
Don’t forget to add battery-operated fairy lights tucked into the mason jars. They create this magical glow when you dim the kitchen lights for dinner. Pure holiday magic, I’m telling you.
Also Read: 10 Festive Bathroom Christmas Decor Ideas for Quick Makeover
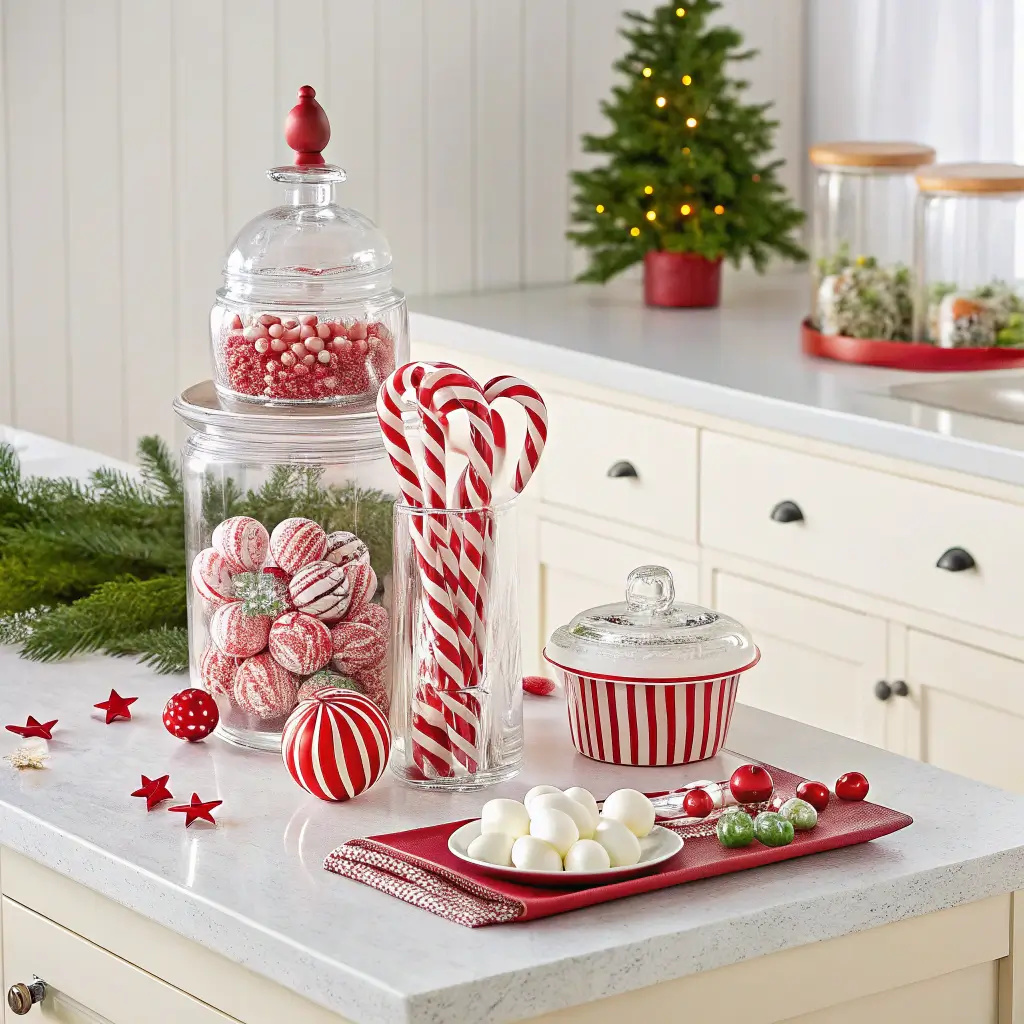
Candy Cane Themed Festive Island
Remember being a kid and thinking candy canes were basically Christmas magic in stick form? Well, turns out you can channel that energy into surprisingly stylish adult decor.
Creating Your Peppermint Paradise
This theme works because it’s instantly recognizable yet unexpectedly chic when you execute it right. Skip the cartoon-ish decorations and go for sophisticated interpretations instead.
Here’s your shopping list:
- White ceramic bowls filled with actual candy canes (various sizes)
- Red and white striped table runner or placemats
- White dishes with subtle red trim
- Clear glass hurricanes with peppermint candles
- Fresh white roses with red ribbon ties
Styling Tips That Actually Matter
The trick here? Don’t go overboard with the stripes. I made that mistake once and my kitchen looked like a circus tent threw up. Instead, use the candy cane colors as accent points while keeping your base neutral.
I love setting up a hot chocolate station on one end of the island with this theme. Get some fancy marshmallows, crushed candy canes for topping, and boom – you’ve got function meeting festive. Plus, who doesn’t want accessible hot chocolate during the holidays?
FYI, those peppermint candles from Bath & Body Works? They make your whole kitchen smell like a candy factory in the best possible way.
Evergreen Garland with Twinkling Lights
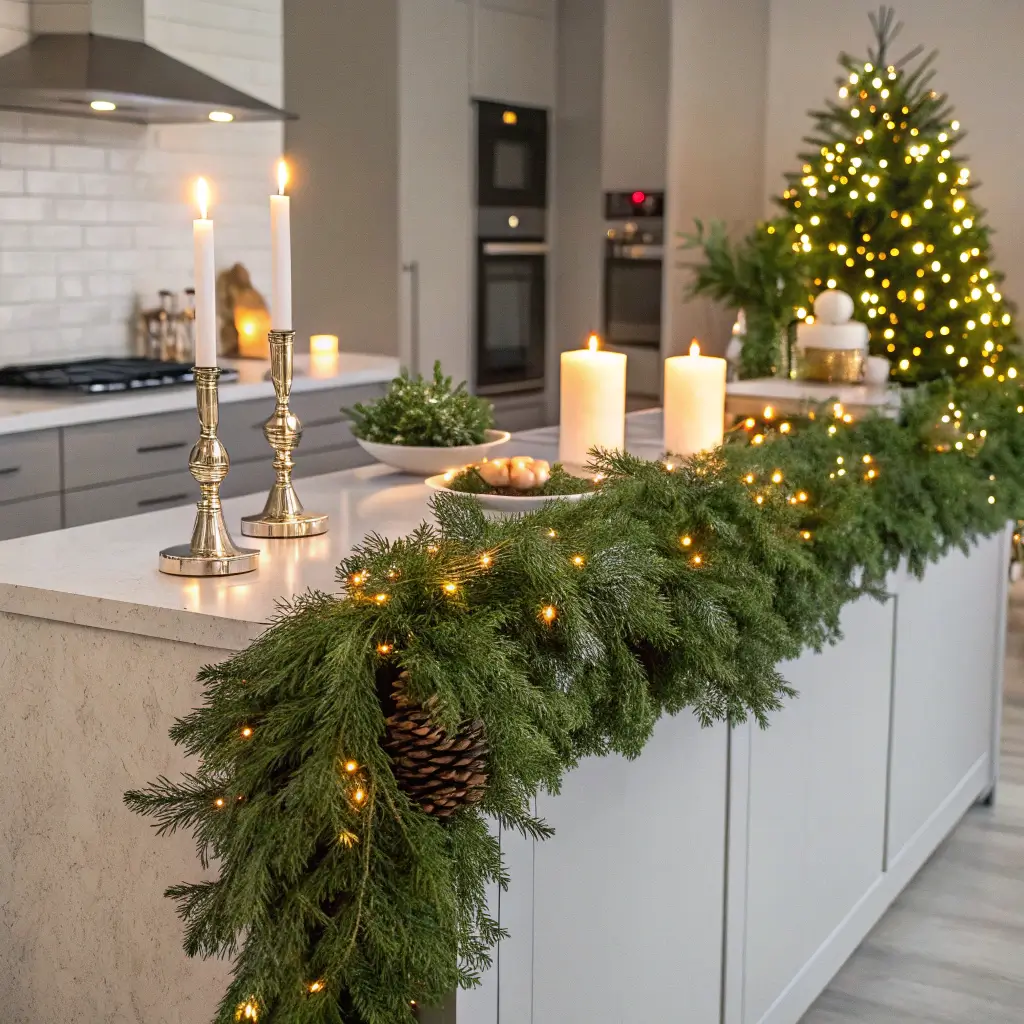
Let me paint you a picture – imagine walking into your kitchen and seeing your island wrapped in lush greenery sparkling with tiny lights. Feels like a winter wonderland, doesn’t it?
The Garland Game Plan
Real or fake garland? That’s the eternal question. I’ve done both, and here’s my take: real smells amazing but drops needles everywhere, while quality fake stuff looks nearly identical and lasts forever.
Your setup essentials:
- 12-15 feet of evergreen garland (depending on island size)
- Warm white LED string lights (battery pack hidden underneath)
- Metallic ornament picks
- Pinecones (spray some with gold paint for extra fancy points)
- Velvet ribbon woven throughout
Installation Without the Frustration
Nobody talks about how annoying garland installation can be. Here’s what actually works: use removable adhesive hooks underneath your island overhang to secure the garland. Game changer, seriously.
Start at one corner and work your way around, letting the garland drape naturally. Don’t pull it too tight – you want that relaxed, organic flow. Weave your lights through as you go rather than adding them after. Trust me on this one.
I like to cluster small ornaments in groups of three along the garland. Random placement looks messy, but intentional groupings? Chef’s kiss.
Also Read: 9 Creative Entry Table Christmas Decor Ideas for Inspiration
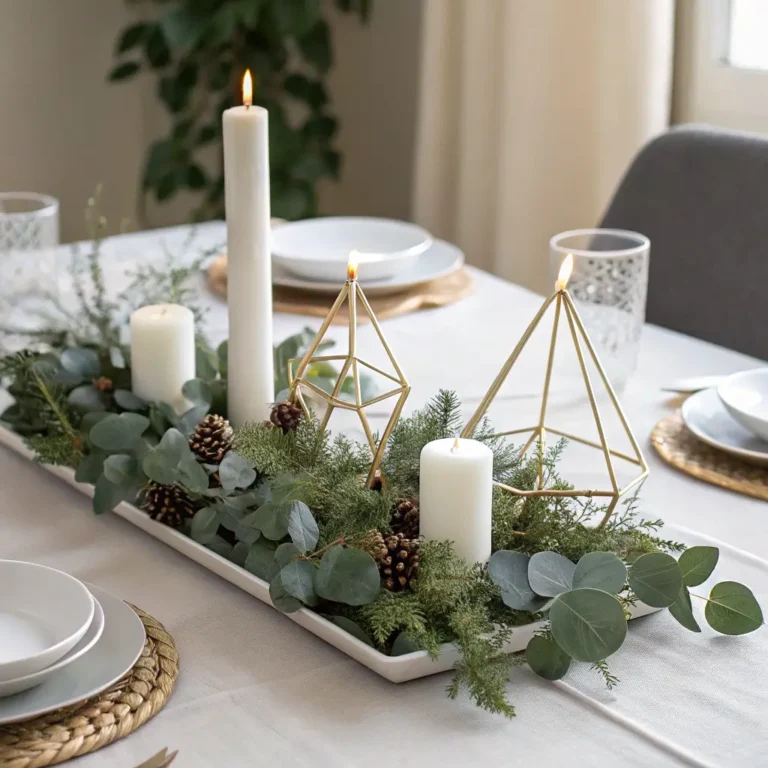
Nordic-Inspired Cozy Winter Decor
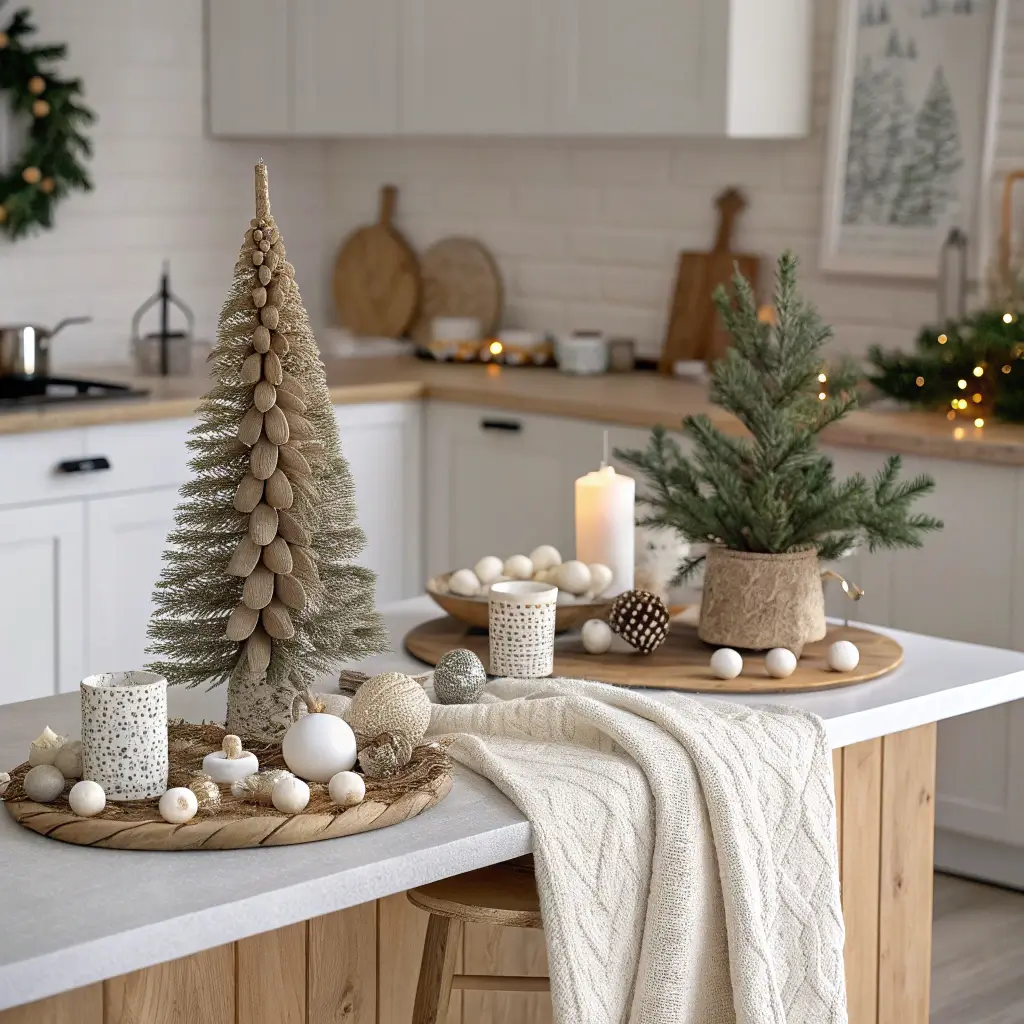
Ever notice how Scandinavians make winter look absolutely dreamy instead of dreary? Their whole hygge thing translates perfectly to kitchen island decorating.
Nailing the Nordic Vibe
This style celebrates simplicity, natural materials, and cozy textures. Think less “Christmas explosion” and more “sophisticated winter retreat.”
Essential elements include:
- Natural wood elements (cutting boards, candle holders, trivets)
- Cream and gray knit runners or placemats
- White ceramic houses or trees
- Birch logs or branches in tall vases
- Sheepskin or faux fur accents
- Simple greenery in neutral pots
Creating That Cozy Factor
The magic happens when you layer different whites and creams together. Sounds boring? It’s actually incredibly soothing and elegant. I add warmth through textures – chunky knits, smooth ceramics, rough wood.
Candles play a huge role here. I group pillar candles of varying heights on a wooden tray, surrounded by miniature pine trees and fake snow. When you light them all, it creates this incredible ambiance that makes everyone want to linger in your kitchen.
My Swedish friend taught me to add cinnamon sticks tied with twine to the display. The subtle spice scent mixed with pine? Pure winter perfection.
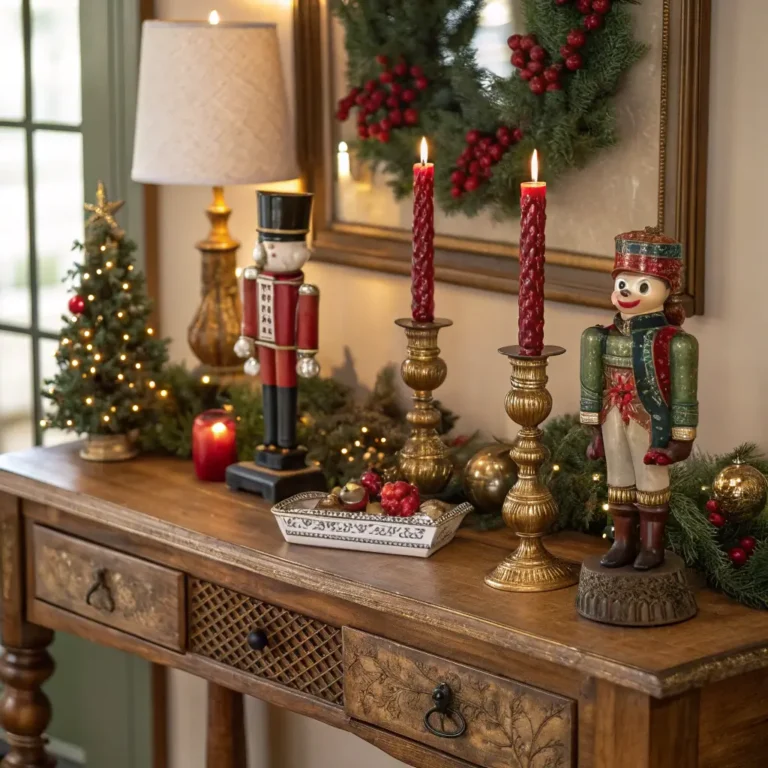
Red and Green Classic Christmas Display
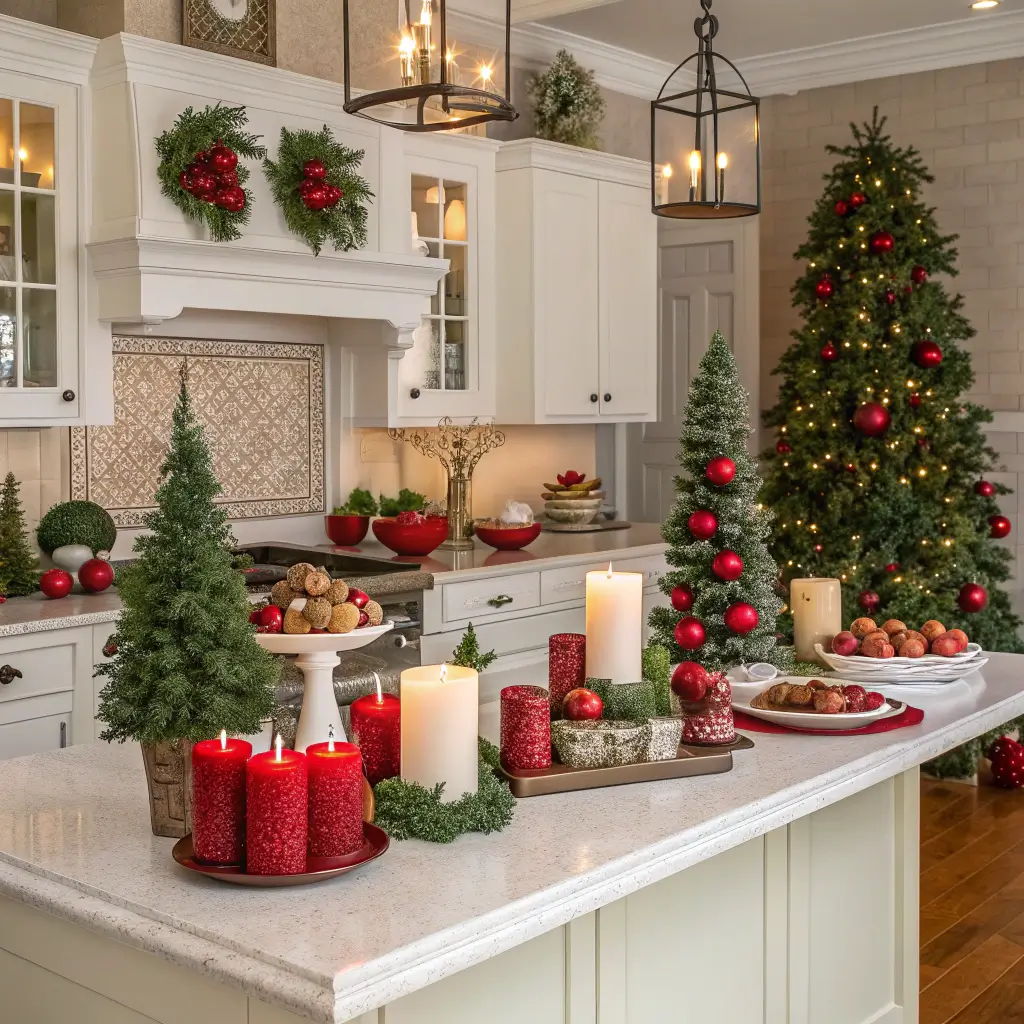
Sometimes you just want to embrace full-on Christmas traditional style, and honestly? There’s nothing wrong with that! Classic red and green done right never goes out of style.
Elevating the Traditional
The key to making traditional colors feel fresh? Quality over quantity and unexpected combinations. Skip the dollar store decorations and invest in a few stunning pieces.
Build your display with:
- Deep red amaryllis or poinsettias in white pots
- Fresh evergreen arrangements in vintage containers
- Mercury glass ornaments in jewel tones
- Plaid table runners (but sophisticated plaid, not lumberjack)
- Burgundy taper candles in brass holders
- Green glass bottles with single holly stems
Modern Twists on Classic Themes
Here’s where you can have fun with it. Instead of bright Christmas red, I go for deeper burgundies and wines. Instead of kelly green, try forest or sage. These subtle shifts make everything feel more current and sophisticated.
I also love mixing patterns – maybe a plaid runner with striped napkins, or checked dish towels with solid colored bowls. The mix keeps things interesting without looking chaotic.
Pro tip: Add fresh cranberries in water-filled vases with floating candles. Costs almost nothing but looks like something from a magazine spread.
Also Read: 10 Inspiring Christmas Outdoor Decor Ideas and Festive Cheer
DIY Mini Christmas Tree Village
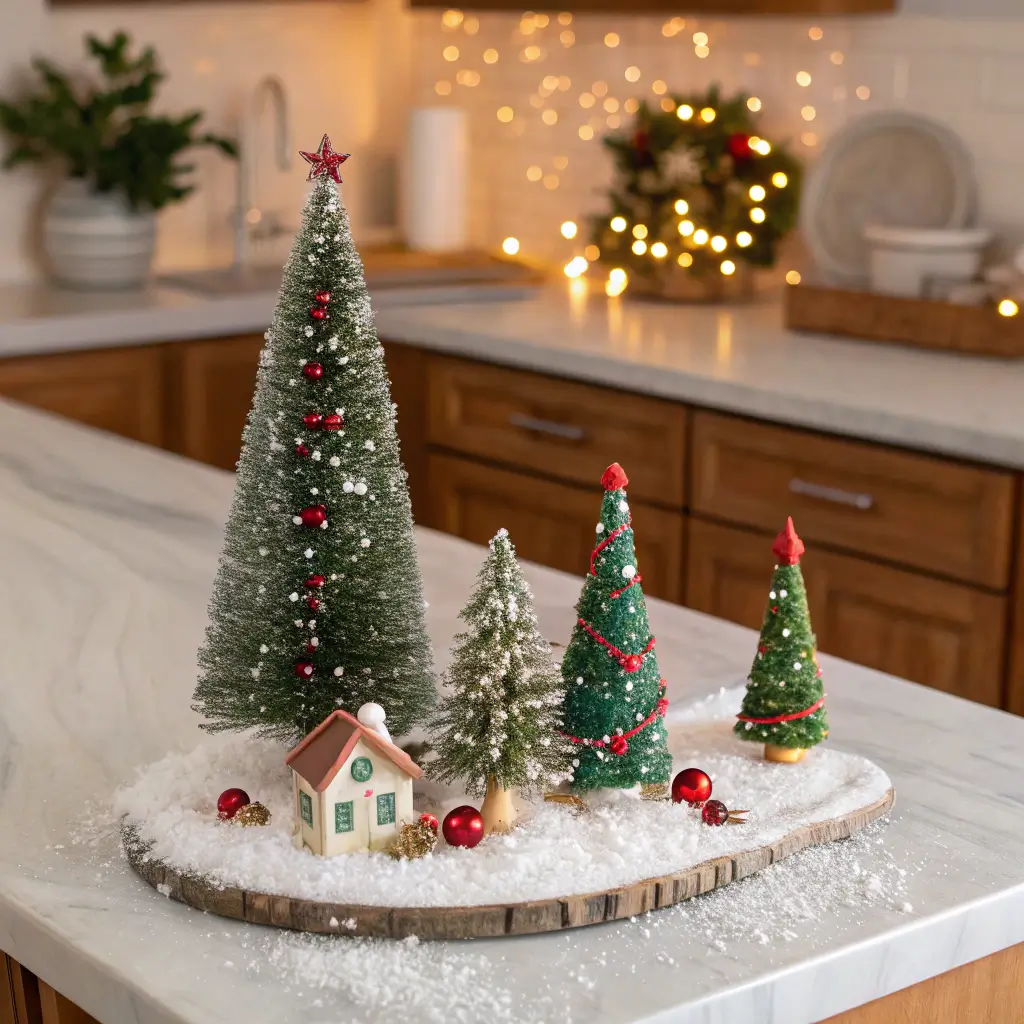
This idea came from a Pinterest fail that turned into my favorite holiday tradition. Who knew that creating a tiny forest on your kitchen island could be so addictive?
Building Your Mini Winter World
Start with a collection of small trees in varying heights – I’m talking 6 to 18 inches max. Mix real mini evergreens in pots with artificial ones for variety.
Your village essentials:
- 5-7 mini trees (odd numbers, remember?)
- Battery-operated micro lights
- Fake snow or white felt for ground cover
- Tiny houses or woodland creatures
- Mini wrapped presents (make these from jewelry boxes)
- Small mirror for an ice skating “pond”
The Assembly Process
Layout matters everything here. I create levels using cake stands and thick books covered in white fabric. This adds dimension and makes your village feel like an actual landscape rather than just stuff on a counter.
Arrange your largest trees first, then fill in with smaller ones. Tuck houses between trees, scatter tiny animals around, and definitely add those micro lights. The goal? Make people lean in to discover all the little details.
My kids love helping with this one, and honestly? Their random placement ideas usually end up looking better than my overthought arrangements. Sometimes you just gotta let chaos win, IMO.
Elegant Metallic Ornaments and Candles
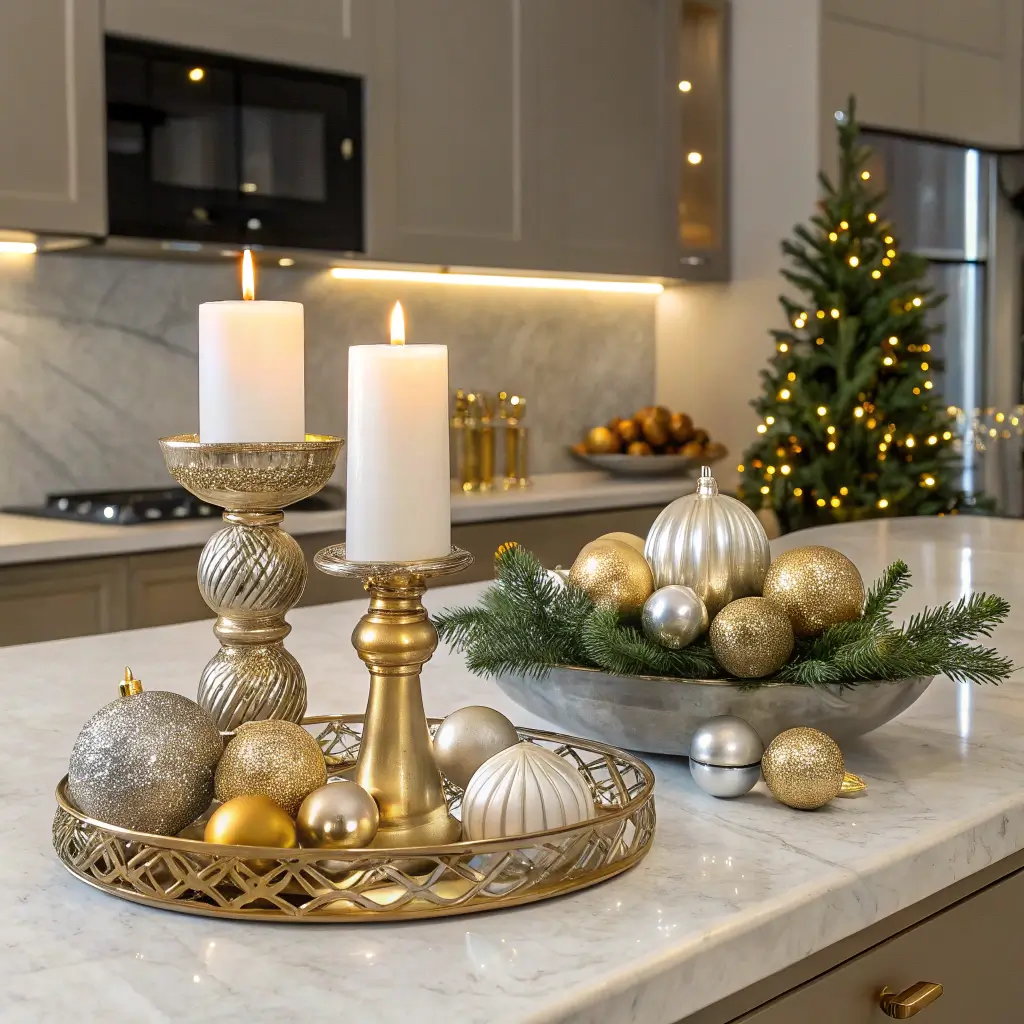
Want your kitchen island to look like it belongs in a luxury hotel lobby? This metallic approach delivers serious sophistication without trying too hard.
Choosing Your Metals
Here’s the thing about metallics – mixing them looks amazing when done right, but terrible when done wrong. My rule? Pick two metals max and make one dominant.
Create your display with:
- Silver or gold mercury glass votives
- Metallic ornaments in varying sizes
- Champagne-colored taper candles
- Mirrored chargers as bases
- Rose gold accents for warmth
- Crystal elements for extra sparkle
Styling for Maximum Impact
Group similar items together rather than spreading them out. Three silver ornaments in a glass bowl beats one ornament here, another there. Your eye reads grouped items as intentional design choices.
I arrange everything on a mirrored tray to double the sparkle effect. The reflection of candlelight on metallics creates this incredible glow that makes your whole kitchen feel magical. Plus, cleanup becomes super easy – just lift the whole tray when you need the counter space.
Don’t forget to vary your heights dramatically. Tall taper candles next to low bowls of ornaments creates visual interest that keeps people looking.
The Finishing Touch
What really sells this look? Fresh white flowers. I know, sounds weird with all the metallic, but trust me. A few white roses or ranunculus in a silver vase adds life to all that shimmer.
Making It All Work Together
After trying all these styles over the years, I’ve learned that the best decorated island reflects how you actually use your kitchen. Love baking? Leave space for your mixer. Host every holiday? Focus on creating conversation pieces.
The biggest mistake people make? Decorating their island into uselessness. You still need to cook, people! I always leave at least one-third of my island clear for actual kitchen activities.
Here’s my tried-and-true process: Set up your decor, then make a meal. Can you still function? If not, scale back. Beautiful decorations that force you to order takeout every night kind of defeat the purpose.
Also, consider your lighting situation. Most of these ideas look incredible during the day but fall flat at night without proper illumination. Those battery-operated LEDs I keep mentioning? They’re not optional – they’re essential for evening impact.
Final Thoughts
Your kitchen island deserves more than being treated like a glorified mail sorting station during the holidays. These eight ideas prove you can create something special without sacrificing functionality or breaking the bank.
Start with one concept that speaks to you and build from there. Maybe you’re a minimalist at heart, or perhaps you want ALL the traditional Christmas feels. Either way, your island can become a festive focal point that makes your kitchen the heart of holiday gatherings.
Remember, the best decorations spark joy and conversation. If your setup makes you smile every morning when you grab your coffee, you’ve nailed it. And if something doesn’t work? Change it! These aren’t permanent installations – have fun and experiment.
Now excuse me while I go rearrange my candy cane display for the third time this week. What can I say? Perfection takes practice :/