10 Gorgeous Birthday Room Decor Ideas That Impress Instantly
Let’s be real – you’re probably here because someone’s birthday is coming up and you want to create something magical without breaking the bank or your sanity. I get it.
You want that Instagram-worthy party setup that makes everyone go “wow,” but you also don’t want to spend three weeks crafting or hire a professional decorator who charges more than your monthly rent.
Here’s the thing: creating stunning birthday room decor doesn’t require a degree in interior design or a trust fund.
I’ve thrown my fair share of parties (some epic wins, some… well, let’s not talk about the Great Balloon Disaster of 2023), and I’ve learned what actually works versus what just looks good in Pinterest photos.
Balloon Cloud Ceiling
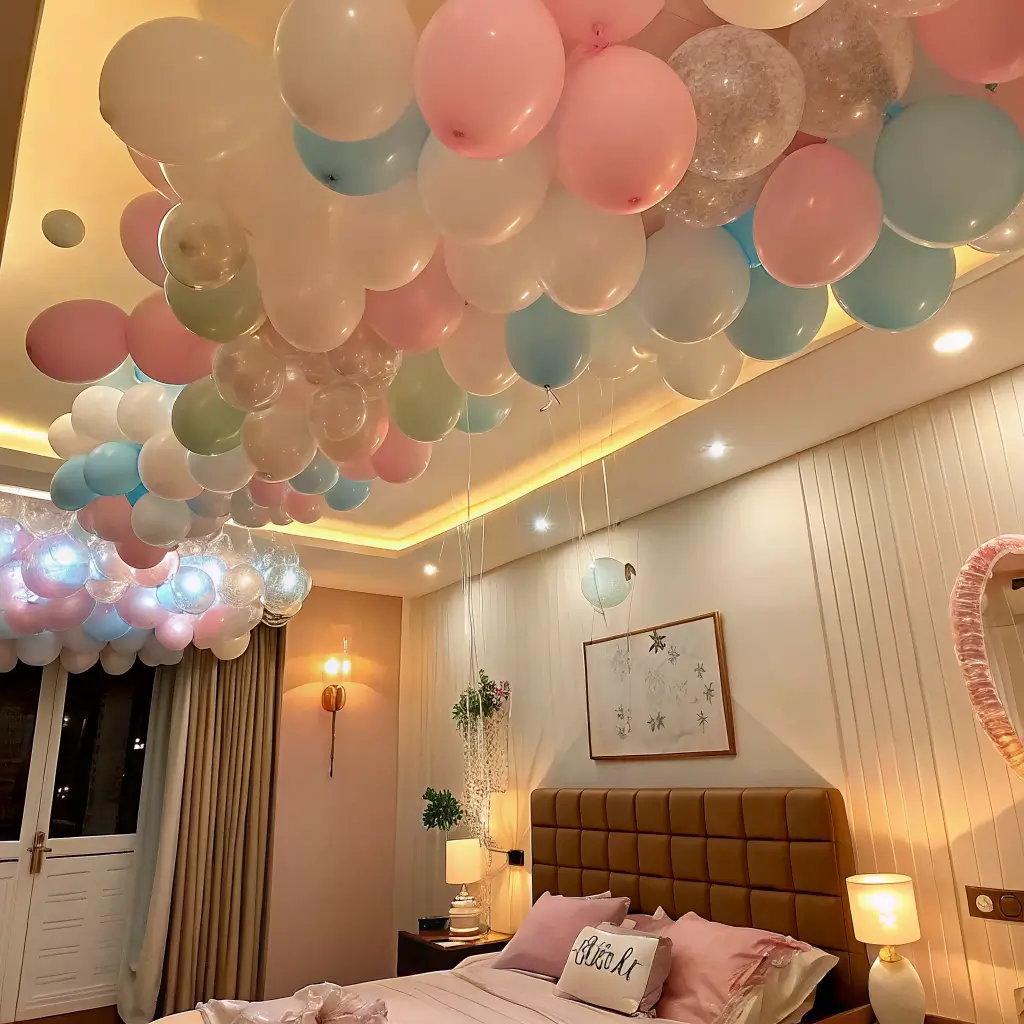
Ever walked into a room and felt like you were floating on cloud nine? That’s exactly what a balloon cloud ceiling does – it transforms any boring space into something straight out of a dream.
Creating this look is surprisingly simple, though your arms might disagree after an hour of balloon tying. You’ll need white and light gray balloons in various sizes – think of it as creating texture in the sky. The trick is clustering them at different heights using fishing line or clear thread.
Here’s what you’ll need:
- 50-80 balloons in white, light gray, and maybe some silver
- Fishing line or clear thread
- Small weights or tape for anchoring
- A helium tank (trust me, your lungs will thank you)
Start by inflating balloons to different sizes – some fully inflated, others about 75% full. This creates that natural, fluffy cloud effect. Attach them in clusters of 5-7 balloons, varying the heights so they cascade down like real clouds.
The best part? This works in literally any room. I’ve done this in tiny apartments and spacious living rooms, and it never fails to make people stop and stare. Pro tip: add a few LED string lights hidden within the clusters for an ethereal glow that’ll make your photos pop.
Fairy Light Canopy
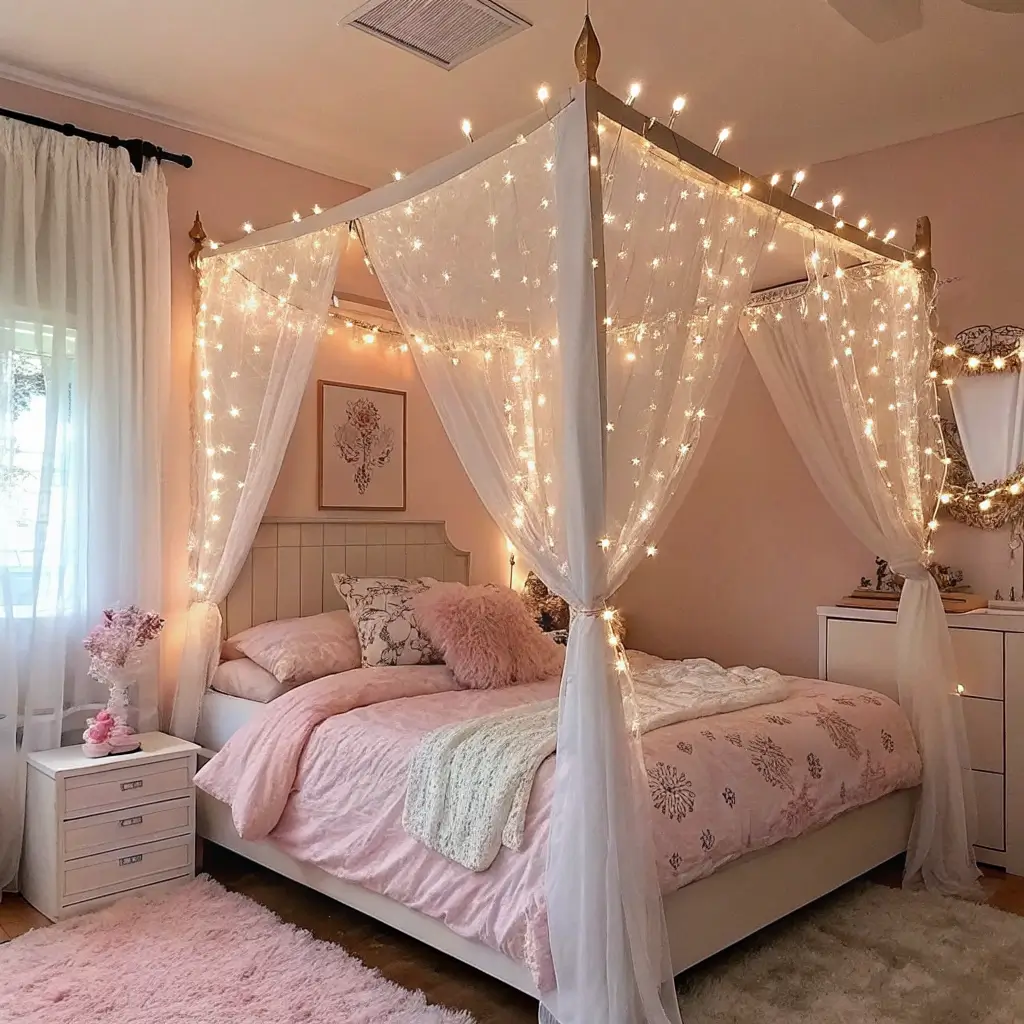
Nothing says “magical birthday vibes” quite like being surrounded by twinkling lights. A fairy light canopy creates this cozy, enchanted atmosphere that makes everyone feel special – kind of like being inside a real-life fairy tale.
You don’t need to be an electrician to pull this off. Start with the ceiling corners and work your way across, creating gentle swoops and drapes. The key is layering – use different types of lights for depth and interest.
Essential supplies:
- Multiple strands of warm white LED fairy lights
- Small hooks or adhesive clips
- Extension cords (because you’ll definitely need more outlets)
- A ladder or tall friend
I learned the hard way that cool white lights can make a party feel like a dentist’s office. Stick with warm white or soft yellow tones – they’re way more flattering for photos and create that cozy birthday magic you’re after.
The installation takes about an hour, but the effect lasts all night. Plus, you can leave them up for a few days if you want to extend that birthday glow. Just don’t blame me when you never want to take them down 🙂
DIY Paper Flower Wall
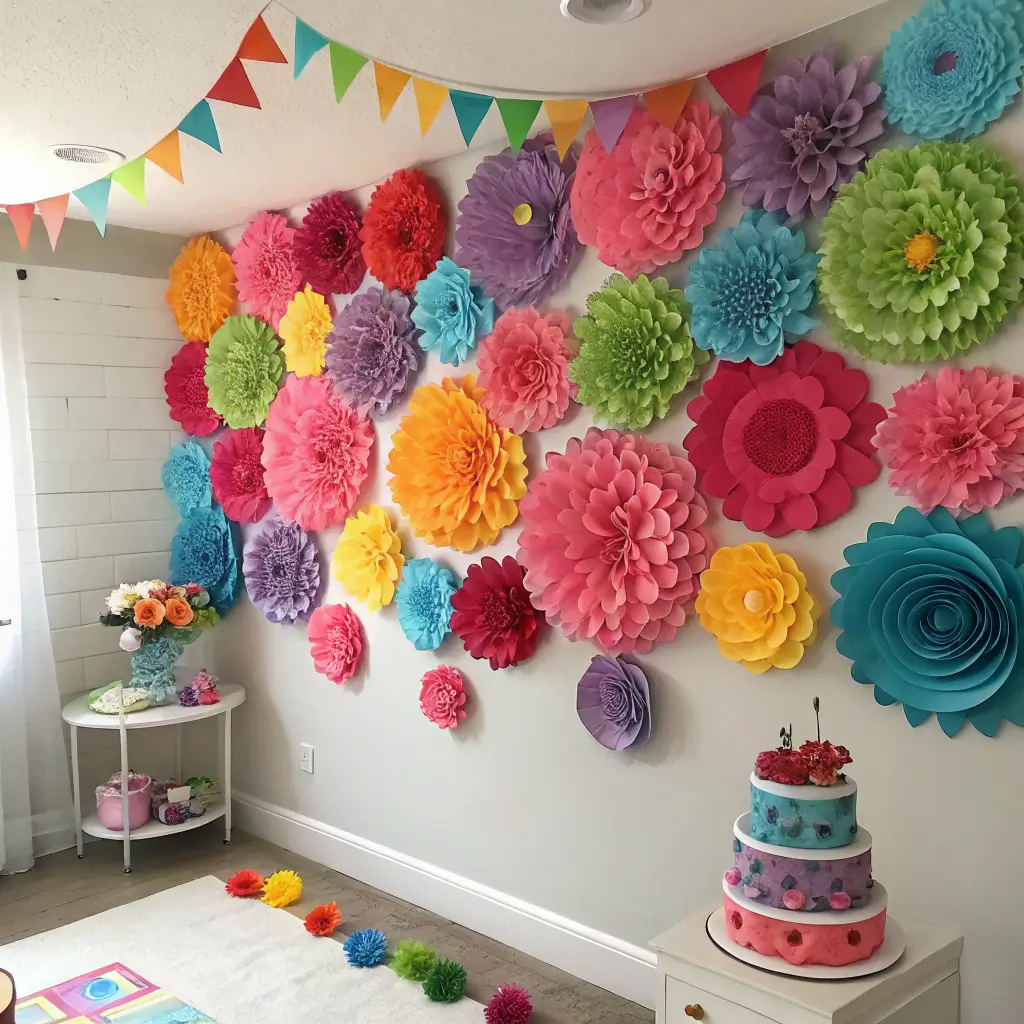
Okay, I’ll admit it – when I first heard about paper flower walls, I rolled my eyes so hard I nearly saw my brain. But after making one for my sister’s 25th birthday, I’m officially converted. These things are gorgeous, surprisingly durable, and way easier than they look.
The secret is choosing the right paper and not overthinking the process. You’re not trying to fool anyone into thinking they’re real flowers – you’re creating art that happens to be flower-shaped.
Materials you’ll need:
- Crepe paper or tissue paper in birthday colors
- Scissors (sharp ones – dull scissors will make you want to quit)
- Hot glue gun and plenty of glue sticks
- Cardboard or foam board backing
- Wire or floral stems for structure
Start with larger flowers as your base layer, then add medium and small ones for depth. Mix colors that complement your party theme, but don’t go crazy – three colors max, or it’ll look like a craft store exploded.
The whole project takes about 3-4 hours, but you can spread it over a few days. Plus, the birthday person gets to keep it afterward, which beats throwing away expensive fresh flowers that’ll be dead in a week.
Also READ: 10 Easy Simple Birthday Decor Ideas That Impress Everyone
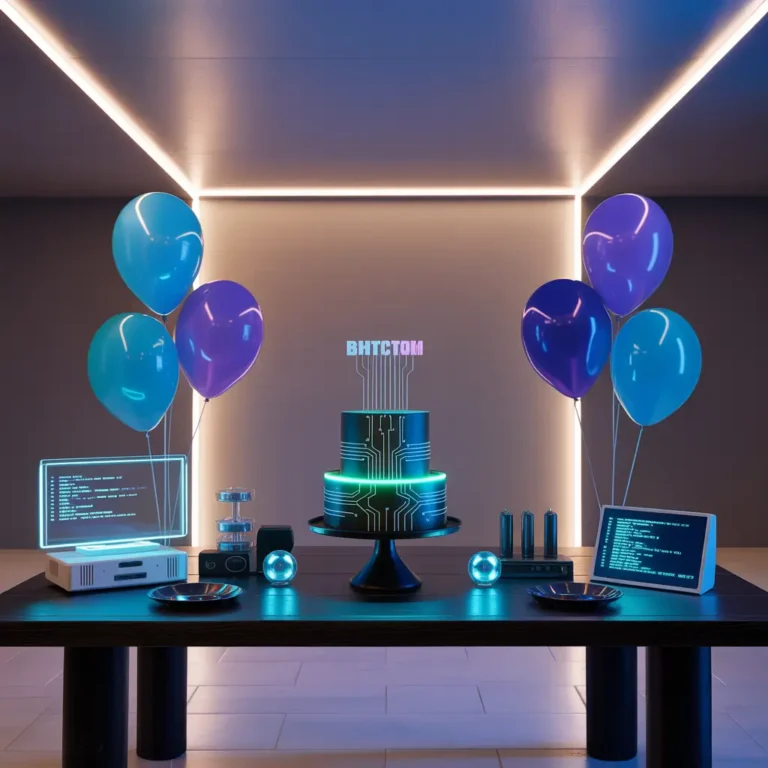
Neon Name Sign Display
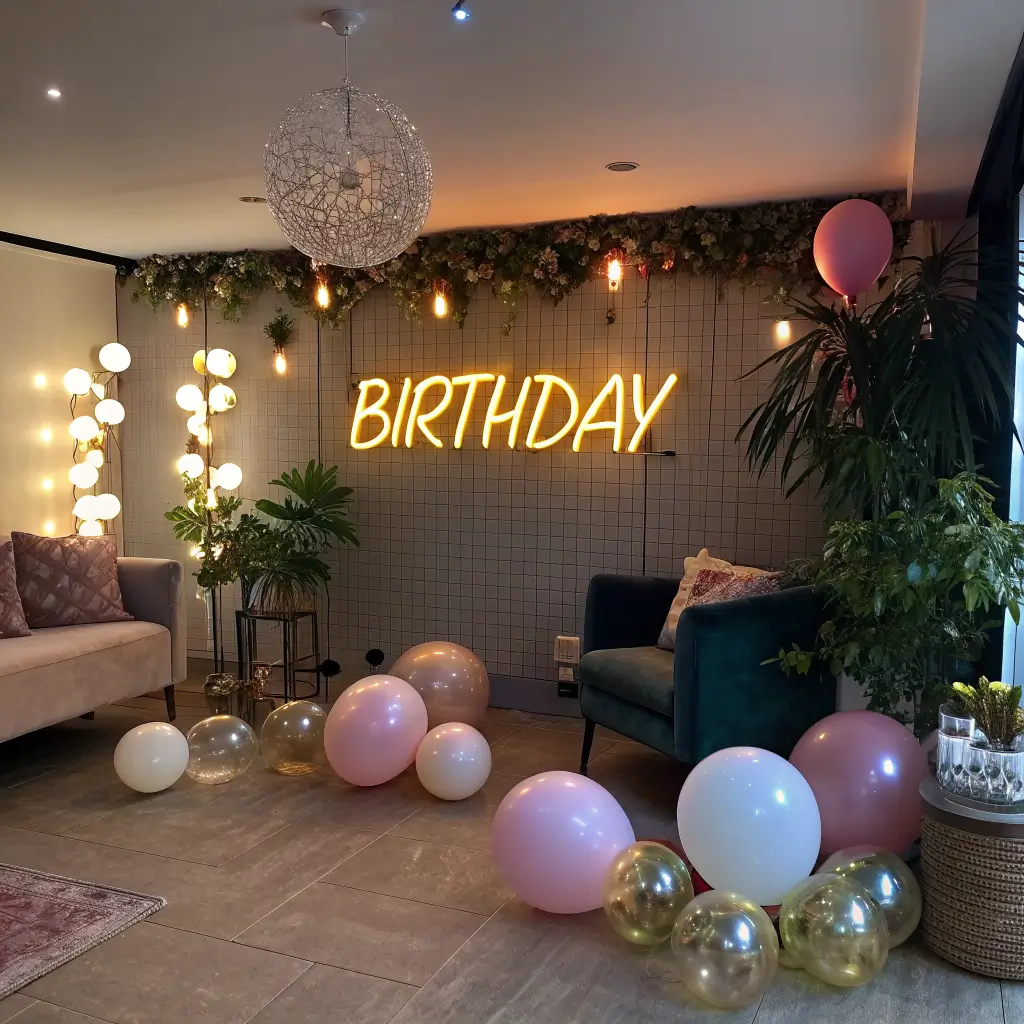
Want to make the birthday star feel like an absolute celebrity? A custom neon name sign does exactly that. Every time I see someone’s face light up when they spot their name glowing on the wall, it reminds me why these signs are worth every penny.
Now, before you panic about the cost, I’m not talking about actual glass neon signs that cost more than a car payment. LED neon strips and custom acrylic signs give you that same vibrant glow without the hefty price tag or safety concerns.
Your options include:
- Custom LED neon signs (order online, surprisingly affordable)
- DIY LED strip lights shaped into letters
- Backlit acrylic letters
- EL wire formed into script writing
The key is choosing colors that pop against your wall. If you’ve got white walls, almost any bright color works. Darker walls need lighter, more vibrant shades to really stand out.
FYI, if you’re going the DIY route with LED strips, practice the letter shapes on paper first. Trust me on this one – trying to wing it with expensive LED strips is a recipe for frustration and wonky letters.
Rainbow Balloon Arch
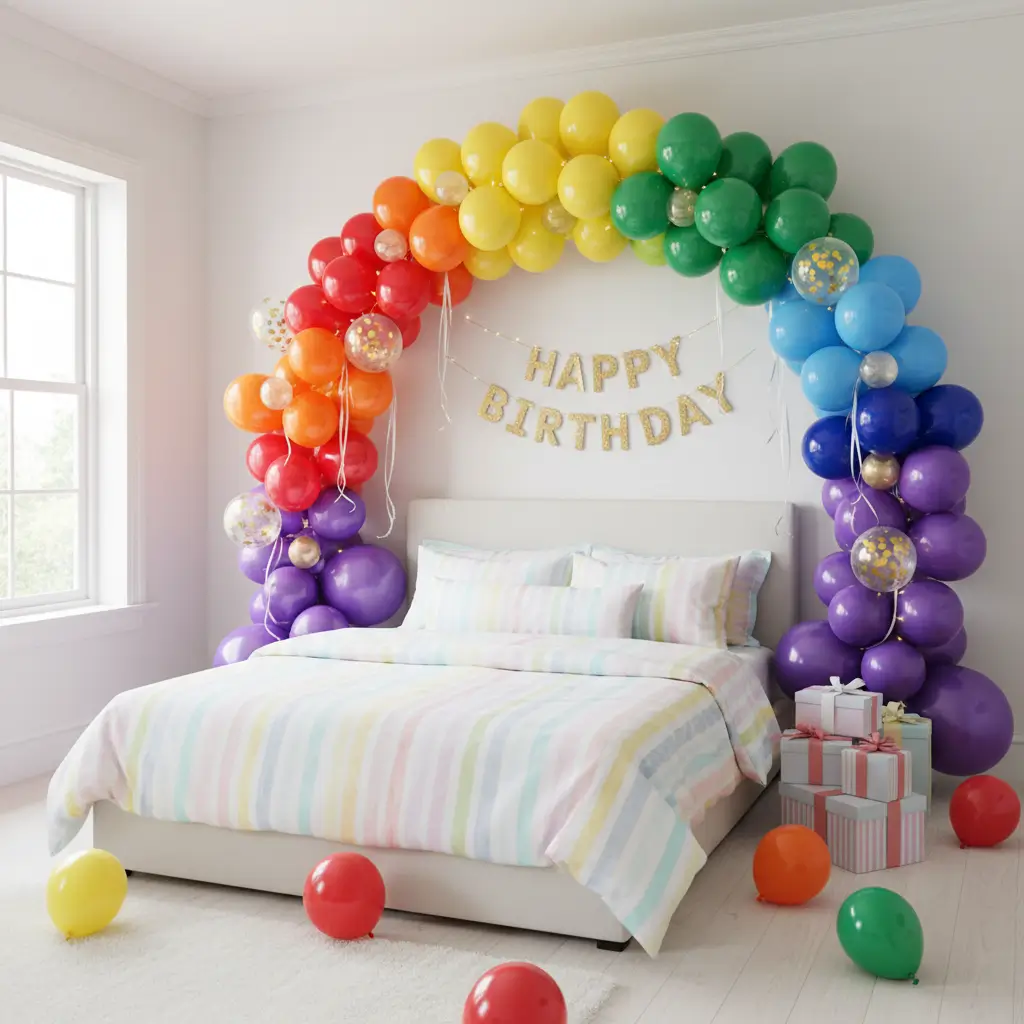
Rainbow balloon arches are having a serious moment right now, and honestly, I’m here for it. There’s something about walking under a perfect rainbow that makes everyone feel like they’re entering somewhere special.
The trick to a professional-looking arch isn’t just the colors – it’s the technique. You want smooth color transitions and consistent sizing throughout the arch.
Here’s your game plan:
- Balloons in rainbow order (ROYGBIV, remember that from school?)
- Balloon decorating strip or fishing line
- Hand pump or electric inflator
- Command hooks for mounting
Start with red and gradually transition through orange, yellow, green, blue, indigo, and violet. Use about 10-12 balloons per color section for a full arch. The secret sauce is adding white balloons between color transitions – it makes the colors pop and creates smooth blending.
I’ve made the mistake of trying to eyeball balloon sizes, and let me tell you, it shows. Use a balloon sizer or even a cardboard template to keep everything consistent. Your OCD friends will thank you, and your photos will look infinitely better.
Confetti Explosion Backdrop
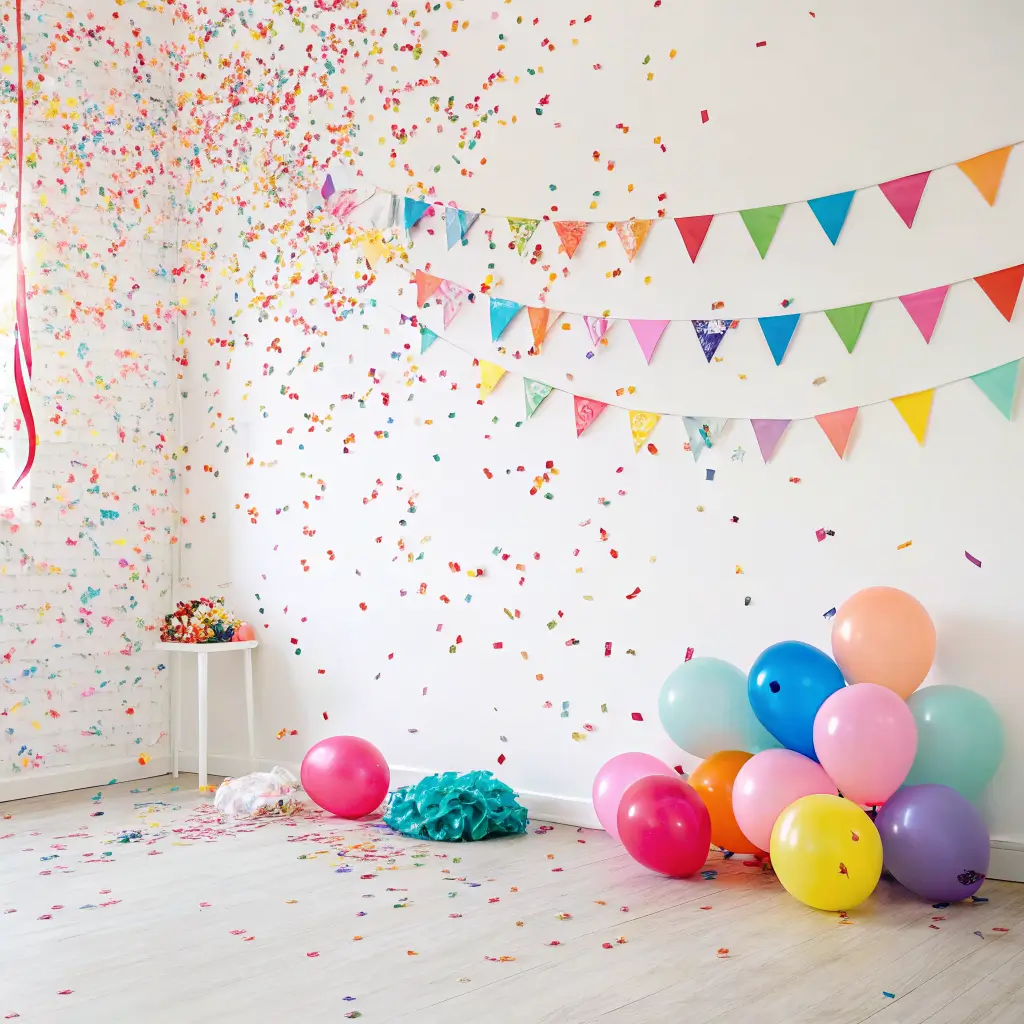
Sometimes you need a backdrop that screams “PARTY!” without actually screaming. A confetti explosion wall creates that perfect photo opportunity while adding serious visual impact to your space.
This isn’t about randomly throwing confetti at a wall and hoping for the best (though I’ve tried that approach – spoiler alert: it doesn’t work). You’re creating controlled chaos that looks intentional and Instagram-ready.
What you’ll need:
- Large sheets of colored paper or fabric
- Confetti in coordinating colors
- Spray adhesive or double-sided tape
- Streamers for added movement
- Good lighting for photos
Create your base backdrop first – solid colors work best because they don’t compete with the confetti. Then comes the fun part: strategically placing confetti to look like it’s mid-explosion. Start dense in one corner and let it scatter across the backdrop.
Add some streamers flowing from the “explosion point” to give the illusion of movement. The whole effect should look like someone just popped the world’s most photogenic confetti cannon.
Also Read: 10 Creative Birthday Party Decor Ideas for Stunning Setup
Themed Table Centerpieces
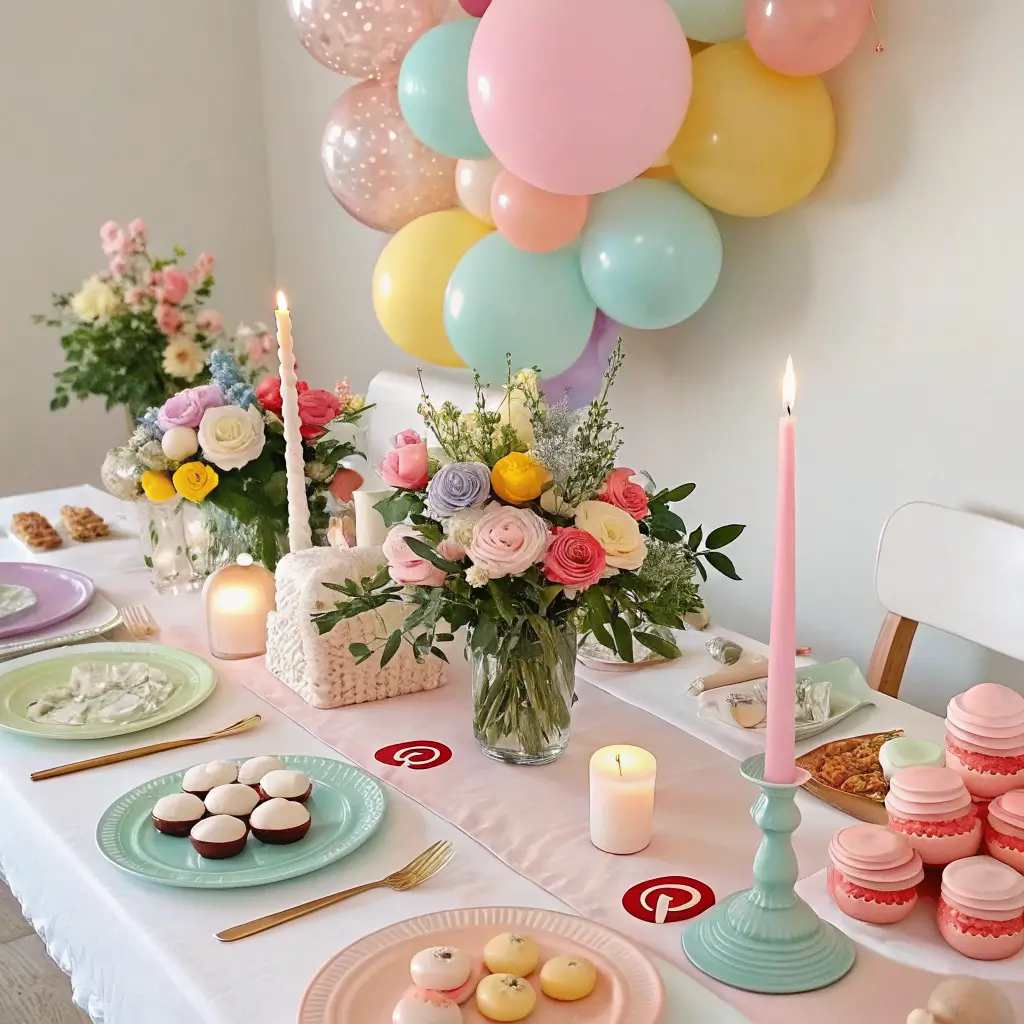
Centerpieces are where you can really let your creativity shine without going overboard. They’re like the jewelry of party decor – small but mighty in terms of impact.
The best centerpieces tell a story about the birthday person. Are they obsessed with succulents? Create mini succulent gardens. Love vintage vibes? Mason jars with fairy lights and dried flowers. Into modern minimalism? Geometric terrariums with air plants.
Centerpiece essentials:
- Containers that match your theme
- Filler materials (flowers, lights, decorative objects)
- Varying heights for visual interest
- Something personal to the birthday person
I always create centerpieces in odd numbers – groups of three or five look more natural than even numbers. And here’s a pro tip: make them low enough that people can actually talk across the table. Nobody wants to play peek-a-boo around a massive floral arrangement during dinner.
The key is repetition with variation. Use the same color palette and general style, but change up the heights and specific elements so each table feels unique while still cohesive.
Hanging Tassel Garland
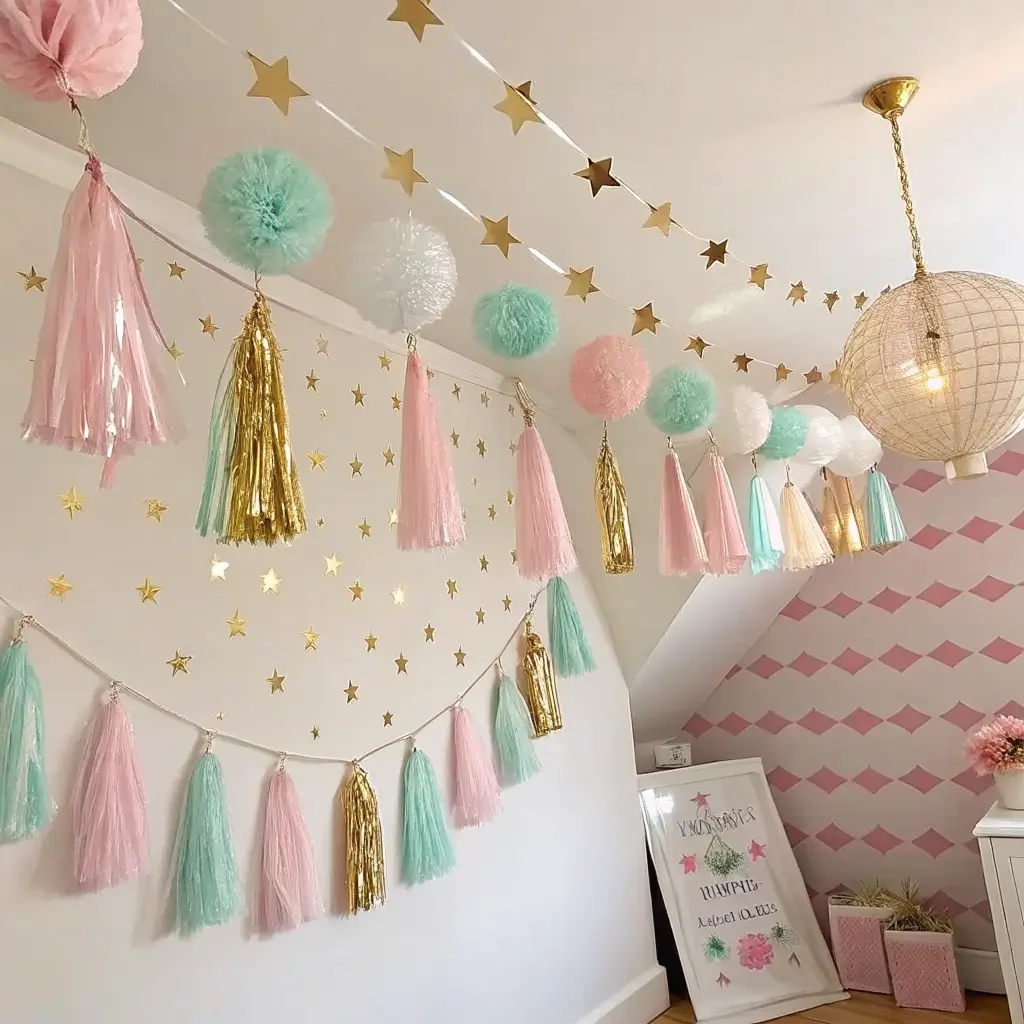
Tassel garlands are like the confetti of the ceiling world – they add movement, color, and festive vibes without overwhelming the space. Plus, they’re ridiculously easy to make, which is always a win in my book.
You can buy pre-made tassels, but making your own lets you customize colors perfectly and costs way less. It’s also oddly therapeutic – perfect for those pre-party jitters.
DIY tassel supplies:
- Tissue paper or crepe paper in party colors
- Scissors
- String or fishing line
- Ruler for consistent sizing
Cut your paper into rectangles, then make fringe cuts about 2/3 of the way up. Roll tightly, twist the top, and secure with string. Boom – custom tassels that match your exact color scheme.
Hang them at varying lengths for the most dynamic look. I like to create clusters of 3-5 tassels at different heights, then space these clusters evenly across the ceiling or along walls.
The movement they create is magical – every little air current makes them dance, adding life to your party space. And unlike balloons, they won’t deflate halfway through the party :/
Personalized Photo Wall
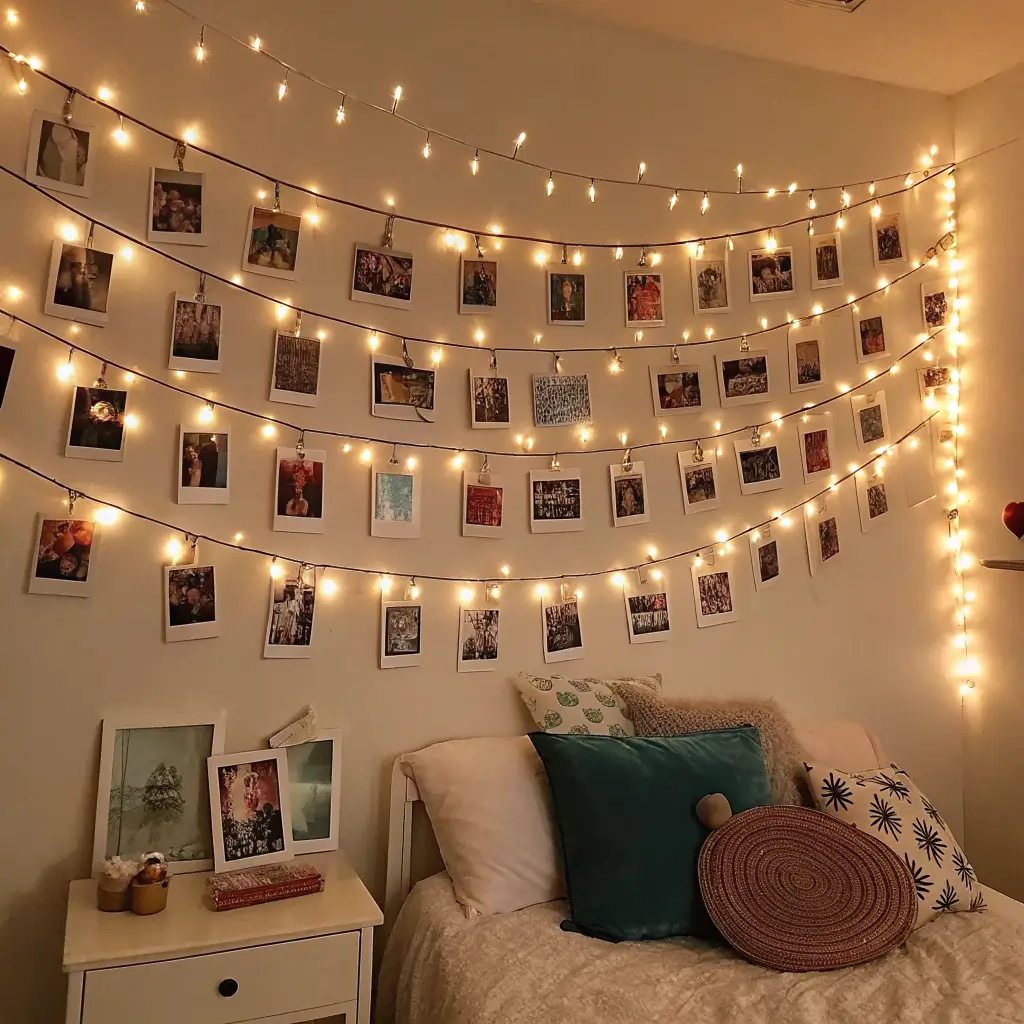
A photo wall celebrating the birthday person’s life is guaranteed to be a hit. It’s like a greatest hits album, but in picture form, and everyone loves reminiscing about good times.
The trick is curation – you want enough photos to tell a story without overwhelming the wall. Think quality over quantity, and choose pictures that span different eras and relationships.
Photo wall essentials:
- Mix of photo sizes for visual interest
- Coordinating frames or a cohesive hanging system
- String lights for added warmth
- Small decorative elements between photos
I like to organize photos chronologically or by theme – childhood, school years, adventures, family, friends. It creates a natural flow that people can follow as they explore the wall.
Don’t forget to leave space for new photos from the party itself! Set up a small instant camera station nearby so guests can add to the wall throughout the night. It becomes interactive art that grows as the party progresses.
Also Read: 10 Amazing Birthday Decor for Him Ideas That Wow Everyone
Glow-in-the-Dark Stars
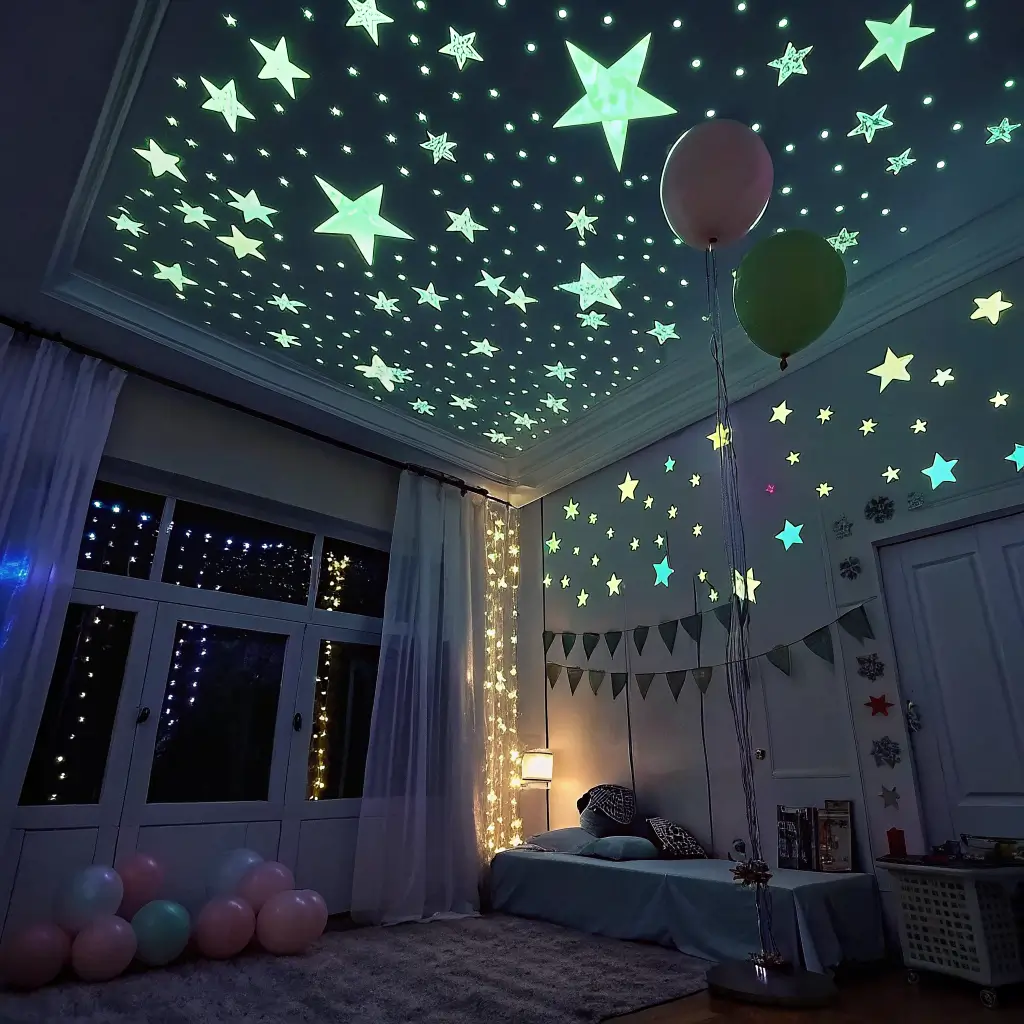
Here’s where we get a little nostalgic – glow-in-the-dark stars aren’t just for kids’ bedrooms anymore. When done right, they create this magical, dreamy atmosphere that makes any birthday feel special.
The key is going beyond the basic star stickers you remember from childhood. Modern glow-in-the-dark materials are brighter, last longer, and come in way more options than those green plastic stars from the ’90s.
Upgrade your star game with:
- Different sizes and shapes of glow elements
- Constellation patterns for a sophisticated look
- Mixed colors (blues, greens, purples)
- 3D elements for depth and texture
Create actual constellation patterns on the ceiling – Orion, the Big Dipper, or even make up your own birthday constellation. It gives people something to discover and talk about as the night goes on.
The best part happens when you dim the lights for cake time. Suddenly, your ceiling transforms into a magical starscape that makes the birthday wish feel extra special. It’s those little moments of wonder that make parties memorable.
Bringing It All Together
Look, you don’t need to use every single one of these ideas – that would be sensory overload, not party magic. Pick 2-3 elements that speak to you and the birthday person’s style, then execute them well rather than trying to do everything mediocrely.
The best birthday room decor tells a story about the person you’re celebrating while creating an atmosphere where everyone feels welcome and excited to be there. Whether that’s a dreamy fairy light canopy or a bold neon sign display, the magic happens when you put thought and care into creating something special.
Remember, the goal isn’t perfection – it’s creating joy. Some of my favorite party memories come from the slightly imperfect moments when something didn’t go exactly as planned, but everyone laughed and rolled with it anyway. That’s the real party magic right there.
So grab your supplies, put on some good music, and start creating. Your birthday person is going to absolutely love whatever you put together, especially knowing you took the time to make their day feel extraordinary. And honestly? You might just have as much fun creating it as they do celebrating in it.