10 Cute Pink Birthday Decor Ideas for a Magical Celebration
Let’s be real – pink birthday parties never go out of style. Whether you’re planning for your little princess who’s obsessed with all things rosy, or you’re throwing a chic millennial pink celebration for yourself (no judgment here!), pink decor hits different.
I’ve thrown my fair share of pink-themed parties, and trust me, there’s something magical about transforming a space into a cotton candy dreamland.
But here’s the thing – pink doesn’t have to mean basic. You can create stunning, sophisticated looks that’ll have your guests snapping photos before they even grab a slice of cake.
Ready to dive into some seriously gorgeous pink party ideas that actually work? Let’s get this pink party started!
Pink Balloon Arch Party Entrance
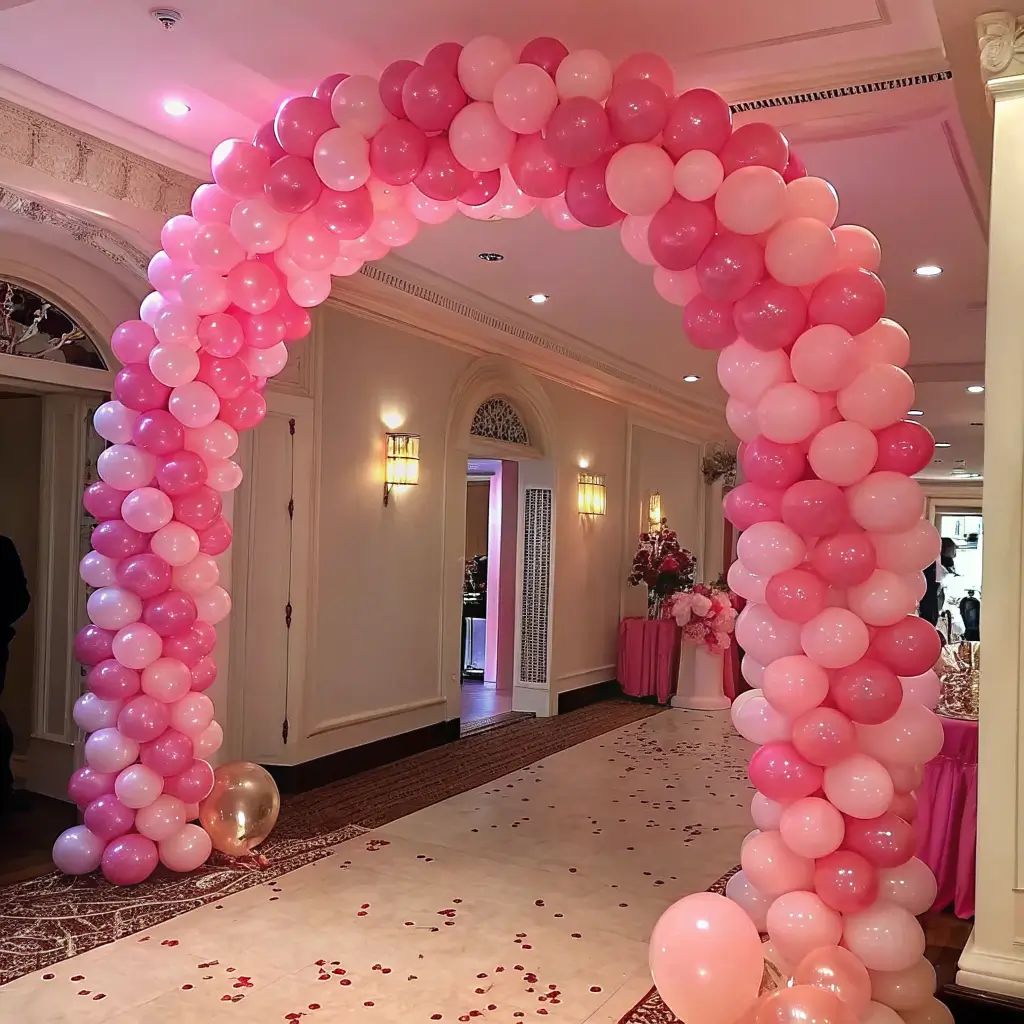
Nothing says “welcome to the party” quite like walking through a stunning balloon arch. I’m talking about that moment when your guests step through and immediately feel like they’ve entered a fairytale – that’s the power of a well-executed pink balloon arch.
Creating the Perfect Pink Gradient
The secret sauce here is mixing different shades of pink. Don’t just grab one shade and call it a day – that’s amateur hour. I love combining blush pink, rose gold, dusty rose, and hot pink balloons to create depth. The gradient effect makes your entrance look professionally designed, even if you’re totally winging it.
Start with your lightest shade at the bottom and gradually work your way up to the deepest pink at the top. This creates a natural flow that draws the eye upward and makes your entrance feel grand. Pro tip: throw in some white or cream balloons to break up the pink and add visual breathing room.
Size Matters (And So Does Placement)
Your balloon arch should be proportional to your space. A tiny arch in a huge doorway looks sad, while an oversized arch in a small space feels overwhelming. I learned this the hard way at my niece’s party – the arch was so big, people had to duck to get through!
For standard doorways, aim for an arch that’s about 8-10 feet wide and 7-8 feet tall. Position it so guests naturally walk through it to enter your main party area. This creates that “wow” moment right from the start.
Assembly Tips That Actually Work
Here’s what nobody tells you about balloon arches – they’re way easier than they look. Use a balloon decorating strip (seriously, these things are game-changers) and inflate your balloons to slightly different sizes for a more organic look. Attach the balloons by threading the tied end through the holes in the strip.
The key is working in clusters of 4-5 balloons in similar shades, then moving to your next color group. This prevents that awkward “striped” look that screams DIY disaster.
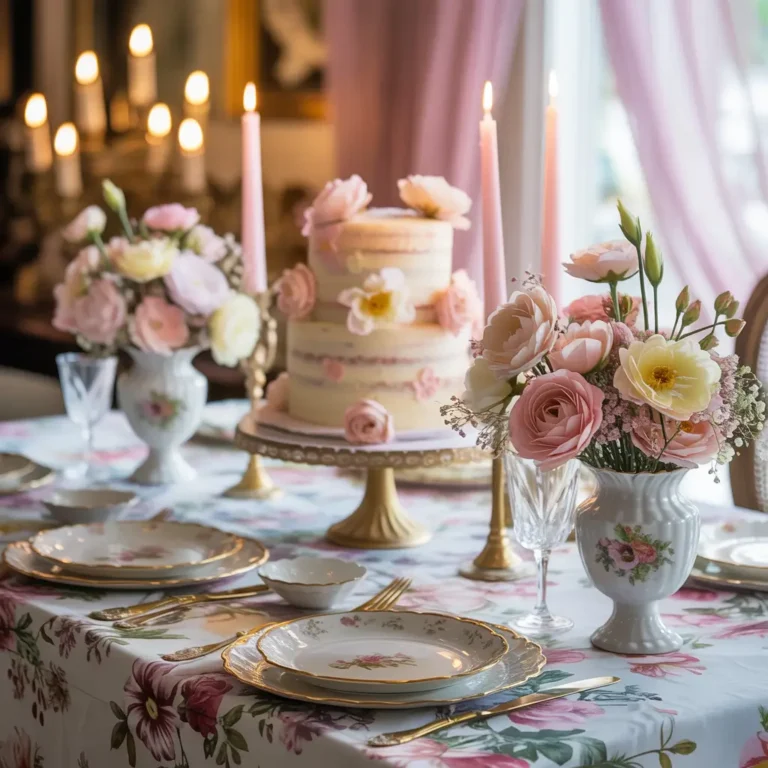
Ombre Pink Cake Table Setup
Your cake deserves a stage, and an ombre pink setup gives it exactly that. This isn’t just about throwing a pink tablecloth down and hoping for the best – we’re creating a focal point that makes your cake look like it belongs in a magazine.
Layering Your Pink Tones
The magic happens in the layering. Start with your deepest pink as your base tablecloth, then add lighter pink runners or overlays. I love using different textures too – maybe a satin base with a tulle overlay, or a matte cotton with some sparkly accents.
Don’t forget about height variation! Use cake pedestals, vintage books, or decorative boxes covered in pink fabric to create different levels. This adds visual interest and makes your display look intentional rather than flat.
Backdrop Elements That Pop
Behind your cake table, create a backdrop that complements without competing. A simple pink fabric backdrop works, but why not take it up a notch? I’ve had great success with:
- Cascading pink streamers in varying lengths
- Pink paper flowers arranged in an ombre pattern
- Balloon clusters attached to the wall
- String lights woven through pink tulle
The goal is to frame your cake beautifully while adding depth to your photos. Remember, this spot will probably get the most pictures, so make it count!
Styling the Surface
Keep your cake table styling cohesive but not cluttered. Add some smaller pink treats, maybe some macarons or pink-frosted cupcakes, to fill out the display. Fresh flowers in complementary shades work beautifully too – think peonies, roses, or even pink carnations if you’re budget-conscious.
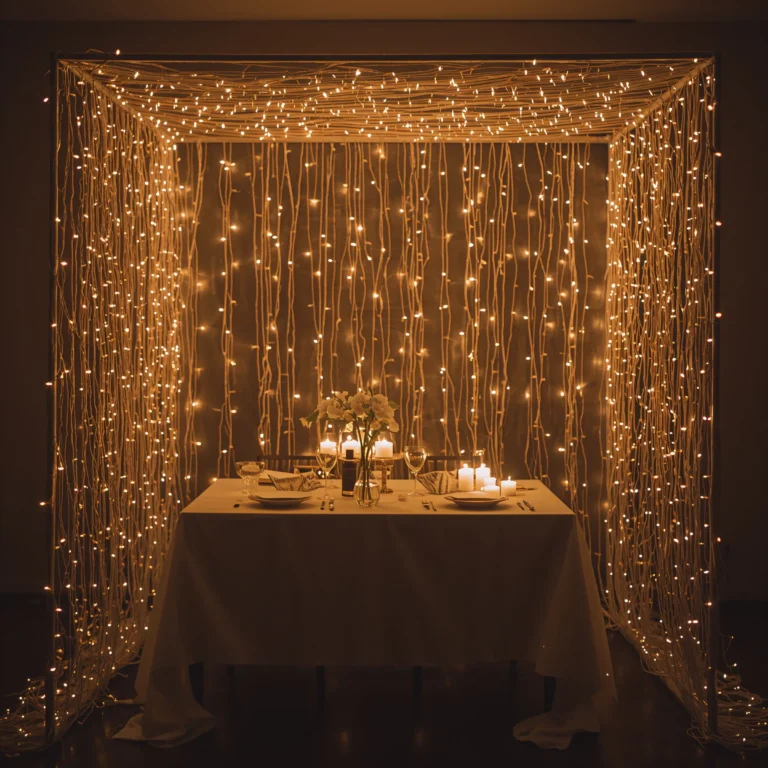
Pink Floral Backdrop with Fairy Lights
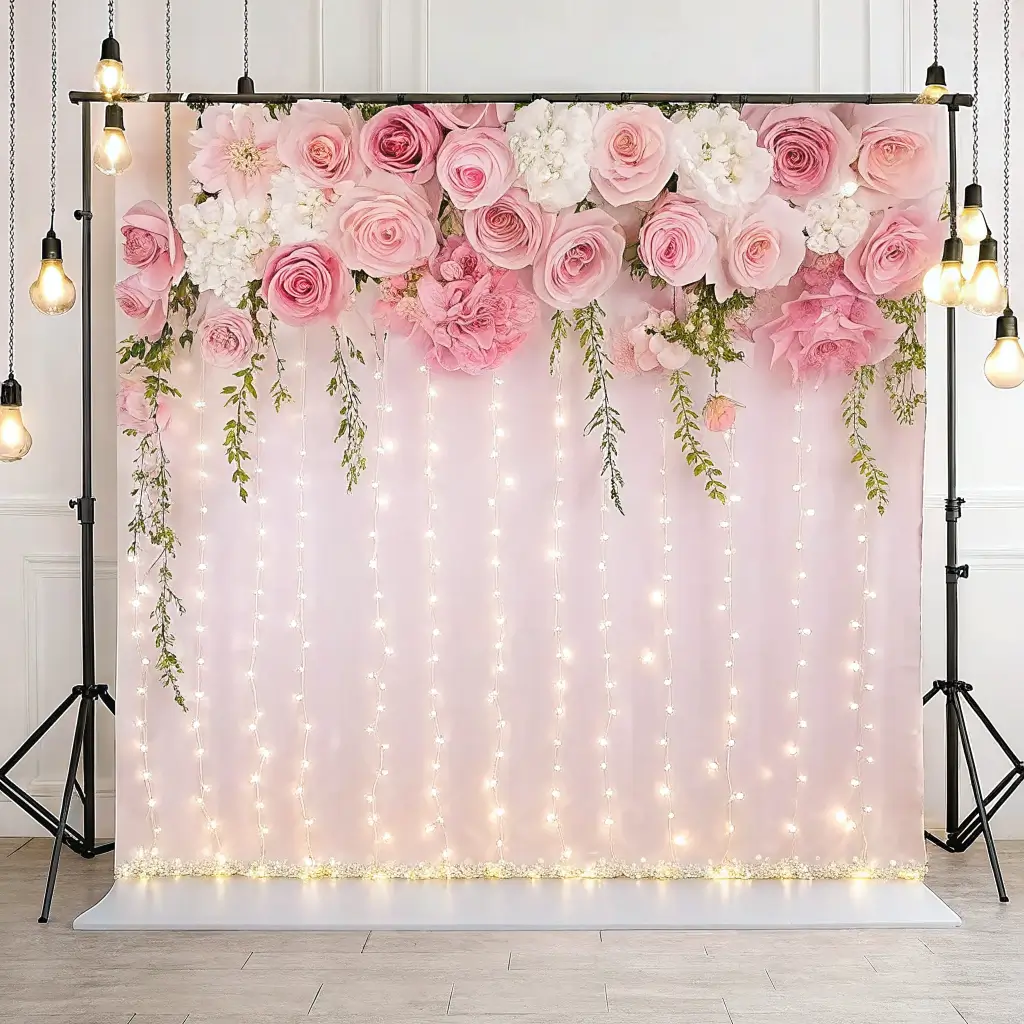
Want to create pure magic? Combine pink flowers with twinkling fairy lights, and you’ve got yourself a backdrop that looks like it cost a fortune but didn’t break the bank. This setup works for photos, behind the gift table, or as a general party focal point.
Choosing Your Flowers
You don’t need real flowers for this to look amazing (though if your budget allows, go for it!). High-quality silk flowers can look incredibly realistic, especially in photos. I prefer mixing different types of pink flowers – roses, peonies, hydrangeas, and some greenery for balance.
The trick is varying the sizes and shades. Large statement flowers draw the eye, while smaller blooms fill in gaps and add texture. Don’t go too matchy-matchy – real gardens aren’t perfectly coordinated, and neither should your backdrop be.
Fairy Light Integration
Here’s where the magic happens. Weave warm white fairy lights throughout your floral arrangement, but don’t go overboard. The lights should enhance the flowers, not overpower them. I like to focus the lights around the center of the arrangement and let them fade toward the edges.
Battery-operated LED string lights work best because you’re not limited by outlet placement. Plus, they don’t get hot, so you don’t have to worry about damaging your flowers or creating a fire hazard.
Installation Made Simple
Create your backdrop on a large piece of chicken wire or a wooden frame. This gives you something to attach your flowers to and makes the whole thing portable. Start with your larger flowers and greenery to establish the basic shape, then fill in with smaller blooms and finally add your lights.
If you’re renting your venue, check their policies about wall attachments first. Sometimes it’s easier to create a freestanding backdrop using a wooden frame or even a large picture frame as your base.
Also Read: 10 Gorgeous Birthday Table Decor Ideas for Every Celebration
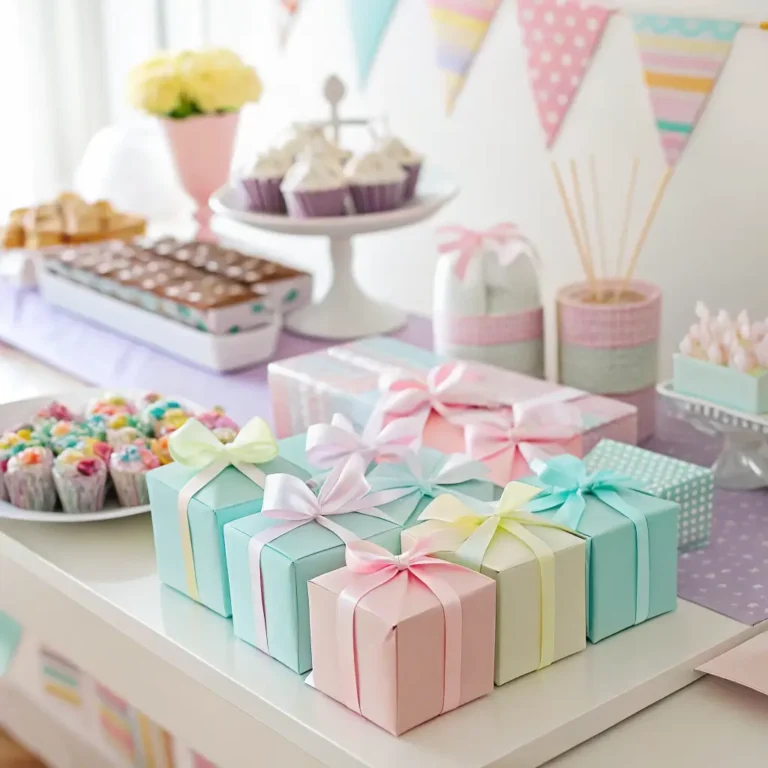
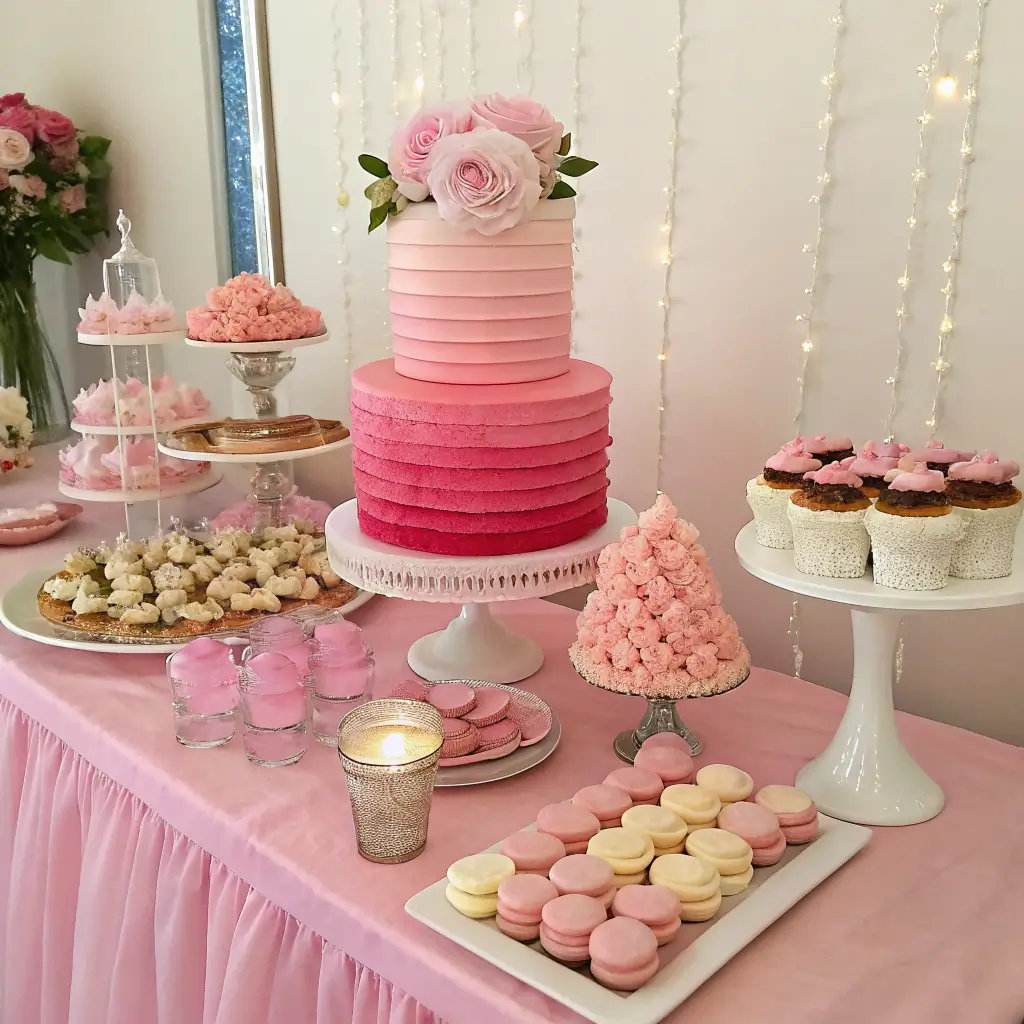
Pastel Pink Dessert Table Display
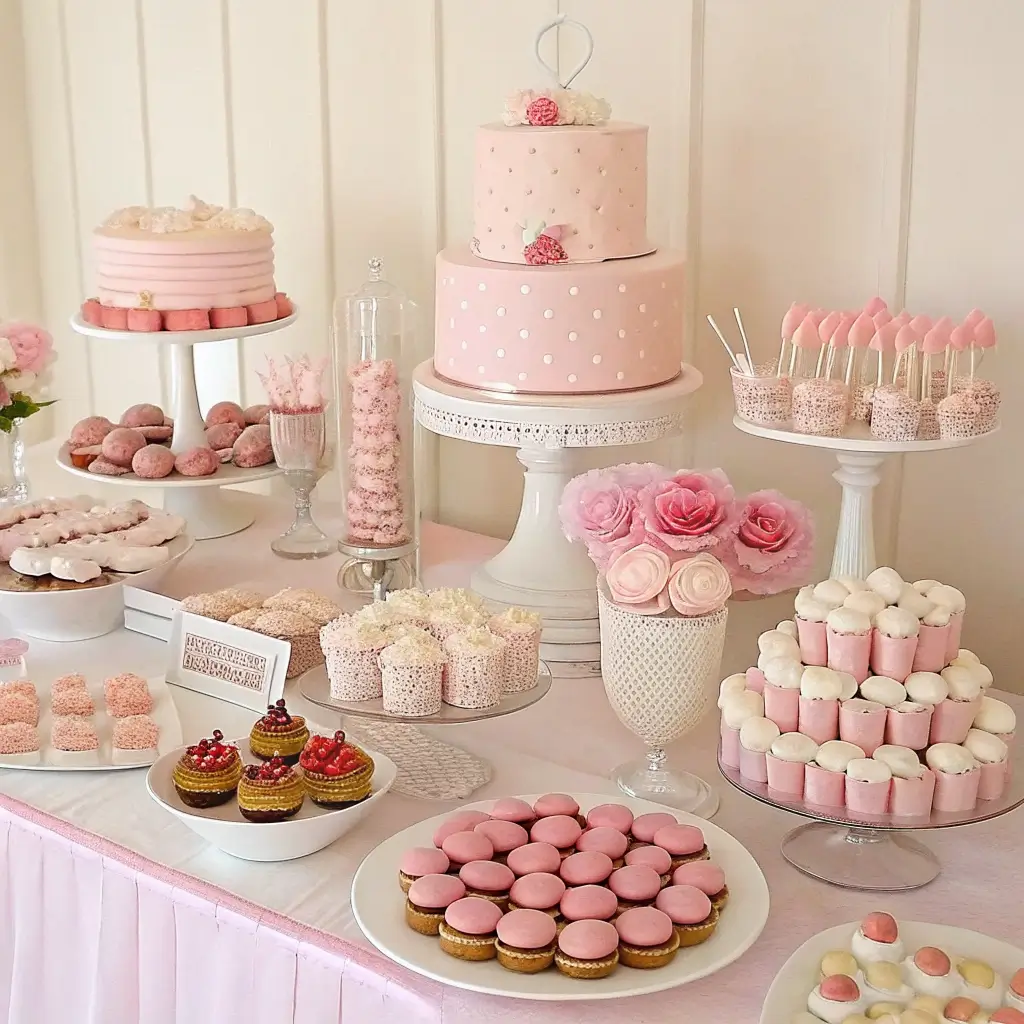
A dessert table is basically edible decor, so why not make it as pretty as it is delicious? A pastel pink theme lets you play with different treats while maintaining a cohesive look that’s Instagram-ready.
Color Coordination Strategy
Stick to a palette of soft pinks, whites, and maybe a touch of gold for elegance. This doesn’t mean everything has to be pink-flavored (though pink lemonade cupcakes are pretty amazing). You can achieve the look through frosting colors, decorative elements, and serving pieces.
Think pink macarons, white chocolate-dipped strawberries with pink drizzle, vanilla cupcakes with pink buttercream, and maybe some pink cotton candy for that whimsical touch. The key is variety in texture and height while maintaining color harmony.
Display Techniques That Work
Use different heights to create visual interest – cake stands, tiered serving trays, and even upturned bowls covered with pretty fabric work great as risers. This prevents your table from looking flat and makes everything more accessible to guests.
Label your treats with cute pink and white signs. Not only does this help guests know what they’re grabbing, but it also adds to the overall aesthetic. I love using small chalkboards with pink chalk or printed labels on pink cardstock.
Serving Pieces and Accessories
Invest in some pretty serving pieces in whites, clear glass, or soft metallics. These work for multiple parties and instantly elevate your display. Pink paper goods can work, but mixing in some reusable pieces makes everything look more upscale.
Don’t forget practical elements like small plates, napkins, and serving utensils. Choose these in coordinating colors, and suddenly even the functional stuff becomes part of your decor.
Pink and Gold Confetti Balloons
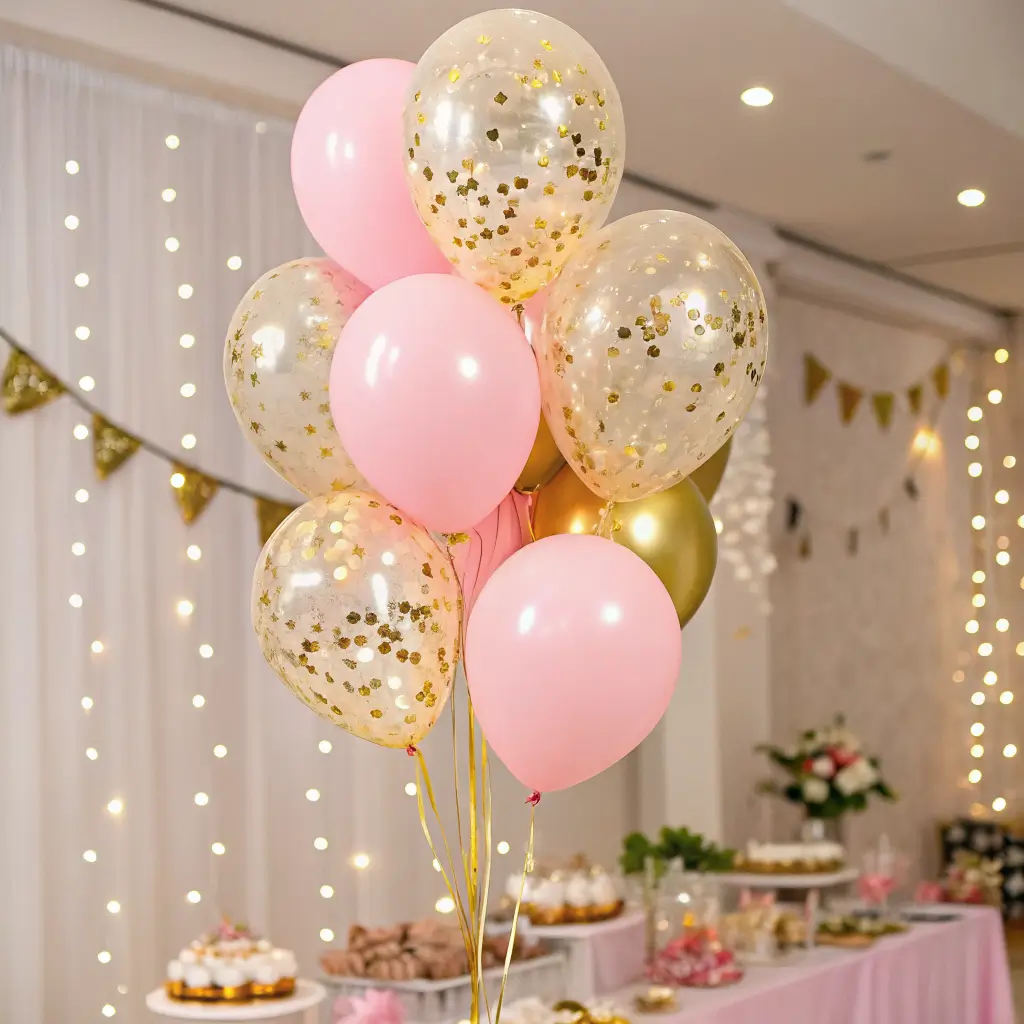
Confetti balloons are like regular balloons’ glamorous older sister – they bring instant sophistication and fun to any party setup. The pink and gold combination hits that sweet spot between playful and elegant.
Confetti Selection and Preparation
Not all confetti is created equal, especially when it comes to balloons. Tissue paper confetti works better than plastic because it’s lighter and moves more naturally inside the balloon. Cut your own from pink and gold tissue paper, or buy pre-made confetti in coordinating shades.
The ratio matters too – I like about 60% pink confetti to 40% gold for a balanced look that’s not too overwhelming. Add the confetti before inflating, and give the balloon a good shake to distribute it evenly.
Inflation Techniques for Best Results
Here’s a pro tip that changed my confetti balloon game: use a small amount of Hi-Float or balloon treatment before adding confetti. This helps the confetti stick to the sides of the balloon instead of all settling at the bottom.
Inflate slowly and don’t overdo it – slightly under-inflated confetti balloons actually look better because the confetti has more room to move around. Plus, they’re less likely to pop unexpectedly (learned that one the hard way!).
Strategic Placement Ideas
Confetti balloons work best as accent pieces rather than the main event. Mix them in with regular pink balloons in your arrangements, or use them as table centerpieces tied to small weights. They’re also perfect for photo props – guests love holding them for pictures.
Consider the lighting in your space too. Confetti balloons look amazing with good lighting because the metallic pieces catch and reflect light beautifully. Position them where they’ll get some natural light or near your party lighting for maximum impact.
Pink Themed Tableware & Centerpieces
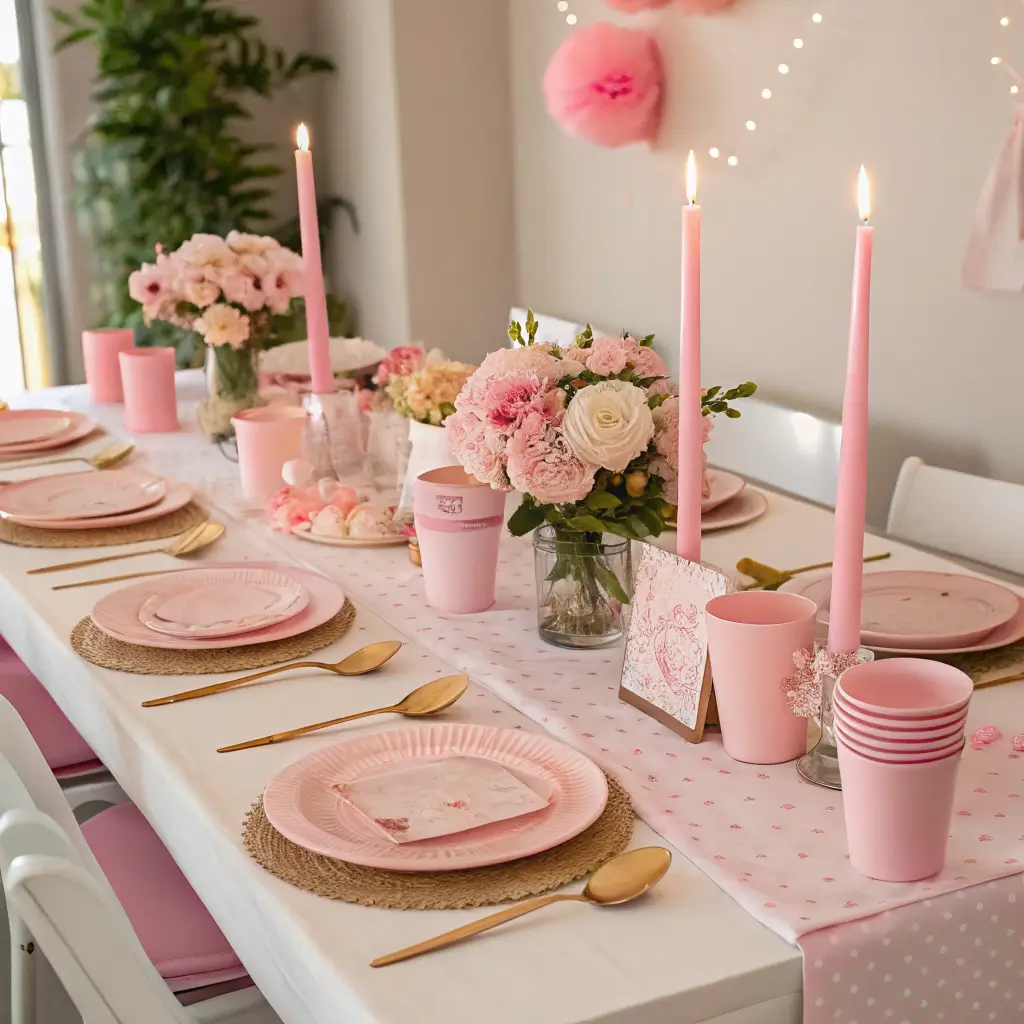
Your table setting sets the tone for the entire dining experience. Pink-themed tableware doesn’t have to look like a little kid’s tea party – with the right approach, you can create something sophisticated and memorable.
Mixing Patterns and Textures
Don’t be afraid to mix different shades and patterns of pink. A solid blush pink tablecloth with rose gold chargers and white plates with pink trim creates layers of interest. Throw in some textured elements like woven placemats or linen napkins for depth.
The key is sticking to a consistent color family while varying the intensity and finish. Matte and glossy finishes together create visual interest, and mixing warm and cool pinks adds sophistication.
Centerpiece Ideas That Wow
Skip the single flower in a vase – that’s so last decade. Instead, create centerpieces with varying heights and elements. I love combining fresh flowers, candles, and decorative objects in coordinating colors.
Try grouping different sized vases with pink flowers, adding some battery-operated fairy lights, and including a few decorative elements like pink glass balls or small figurines. The goal is to create something interesting to look at without blocking conversation across the table.
Practical Considerations
Remember that people actually need to eat at these tables! Keep centerpieces low enough that guests can see each other, and make sure there’s enough space for plates, glasses, and serving dishes. Nobody wants to play Jenga with the decor just to pass the salt.
Choose tableware that’s actually functional too. Those super delicate paper plates might look pretty, but they’re useless if they can’t hold a slice of cake without folding in half. Balance aesthetics with practicality for the best guest experience.
DIY Pink Paper Lantern Garland
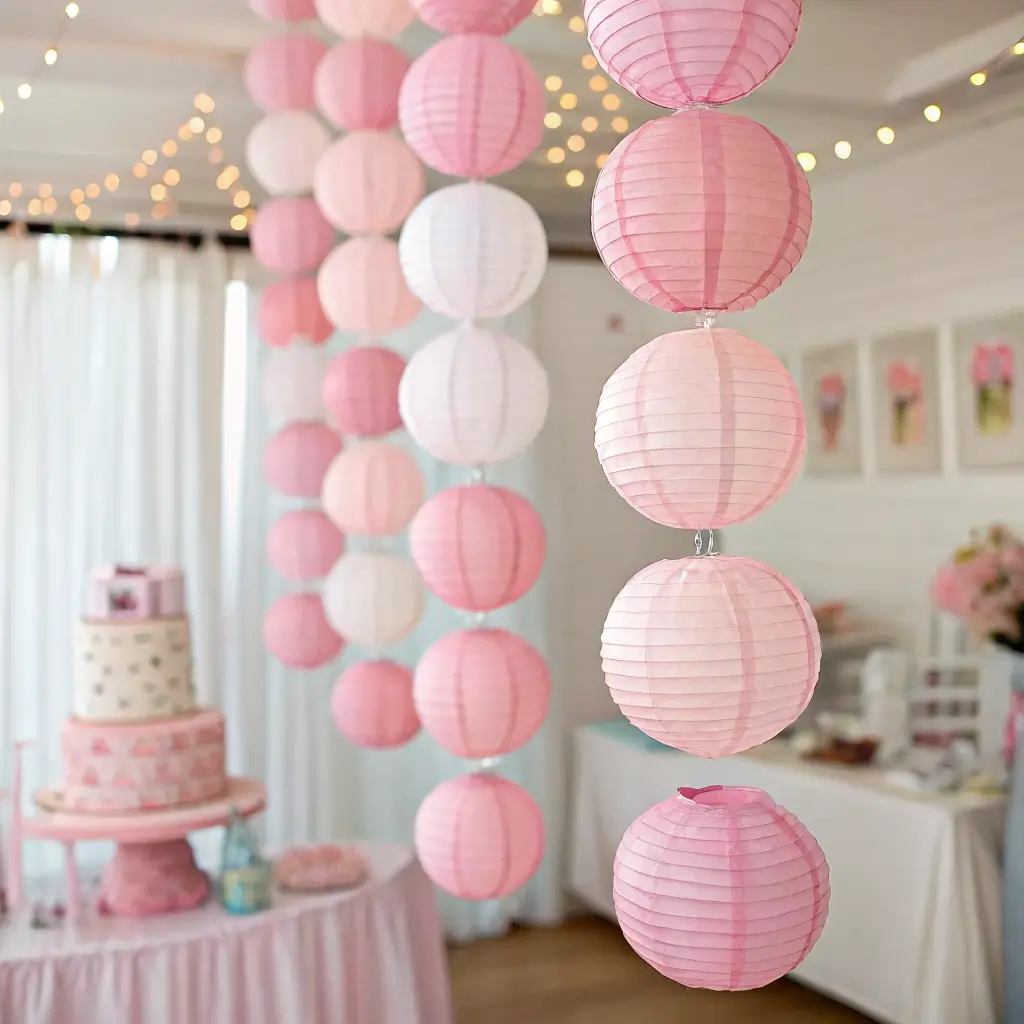
Paper lanterns bring instant whimsy and charm to any party space, and creating a garland with them adds movement and visual flow to your decor. Plus, this is one of those projects that looks way more complicated than it actually is.
Paper Selection and Preparation
Choose papers in different shades of pink – I like to use at least three different tones for depth. Tissue paper works beautifully and is budget-friendly, but you can also use crepe paper or even lightweight scrapbook paper for different textures.
Cut your paper into rectangles of varying sizes. This creates a more organic, handmade look that’s way more interesting than perfectly uniform lanterns. I typically use pieces ranging from 6×8 inches to 10×12 inches.
Assembly Techniques
The basic lantern technique is simple: fold your paper in half lengthwise, cut slits from the fold toward the open edge (leaving about an inch uncut), then unfold and roll into a cylinder, securing with glue or tape.
For the garland, string your lanterns onto fishing line or thin wire, spacing them about 6-8 inches apart. Vary the heights slightly by adjusting how high each lantern sits on the string – this creates a more natural, flowing look.
Hanging and Display Options
These garlands work beautifully draped along walls, hung from the ceiling, or even wrapped around stair railings. The key is to let them have some natural drape rather than pulling them taut – the gentle curves add to the whimsical effect.
Consider the scale of your space when deciding on length and number of garlands. One long garland can work for a small space, while larger areas might need multiple shorter garlands at different heights for proper visual impact.
Pink Candy Buffet Station
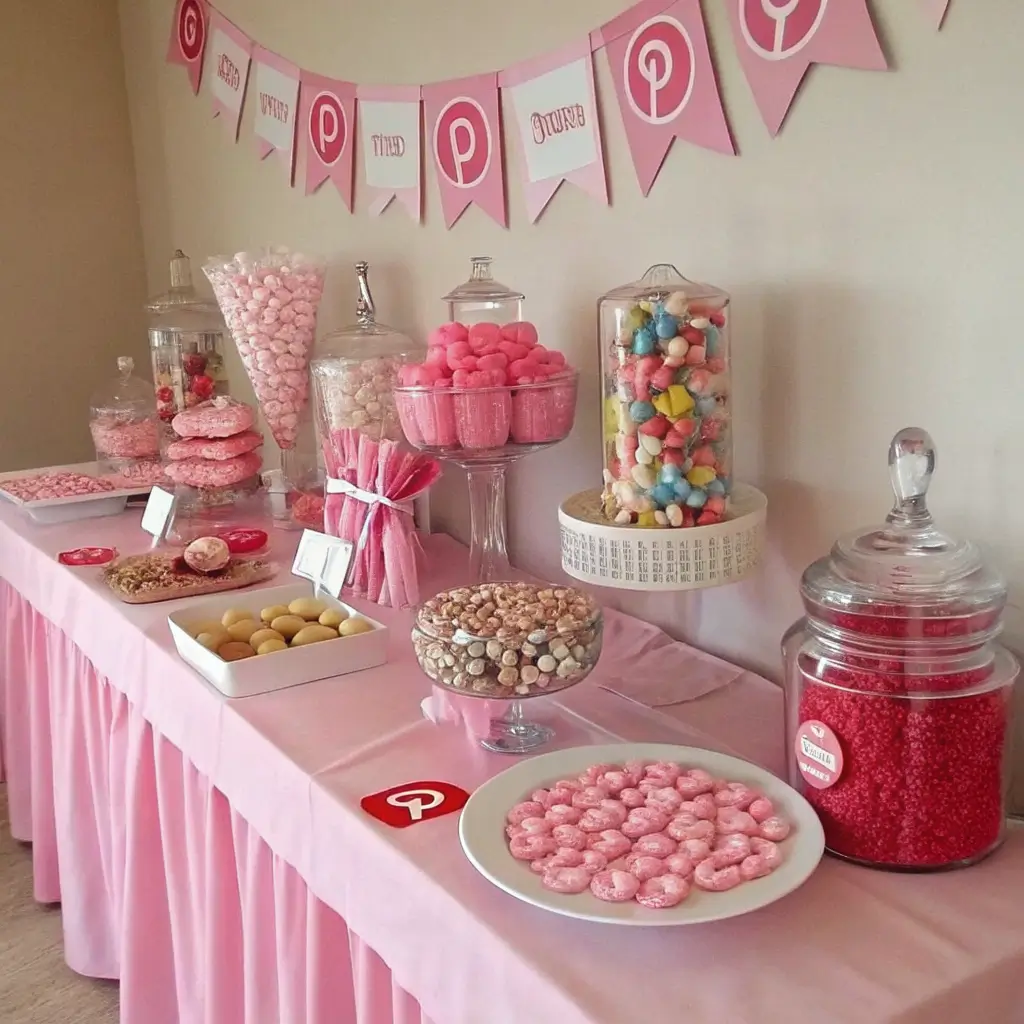
A candy buffet is like a dessert table’s fun younger cousin – it’s all about color, variety, and letting guests create their own sweet experience. A pink-themed candy buffet can be absolutely stunning when done right.
Candy Selection Strategy
The secret to a great candy buffet is variety in both color and texture. You want different shades of pink, from pale blush to hot pink, plus some white and maybe a touch of gold for sophistication. Think pink gummy bears, strawberry hard candies, pink chocolate-covered pretzels, and cotton candy.
Don’t forget about different textures – smooth chocolates, chewy gummies, crunchy candies, and fluffy cotton candy create visual and taste variety. I always include some classic favorites alongside more unique options to please all ages.
Display Container Ideas
Glass containers in different shapes and sizes create the most impact. Apothecary jars, fishbowls, tall cylinders, and small bowls all work together to create an interesting landscape. The transparency lets the candy colors shine while maintaining a cohesive look.
Label each container with cute signs – this helps guests know what they’re choosing and adds to the overall aesthetic. I like using small chalkboards or printed labels in coordinating colors.
Setup and Flow Considerations
Arrange your containers at different heights using risers or stands. This creates visual interest and makes everything more accessible. Place the most popular items (usually chocolate!) at eye level and in easy-to-reach spots.
Don’t forget the practical elements – small bags or containers for guests to fill, scoops for each candy type, and maybe some wet wipes for sticky fingers. These functional items can be part of your decor if you choose them in coordinating colors.
Pink Birthday Chair & Banner Setup
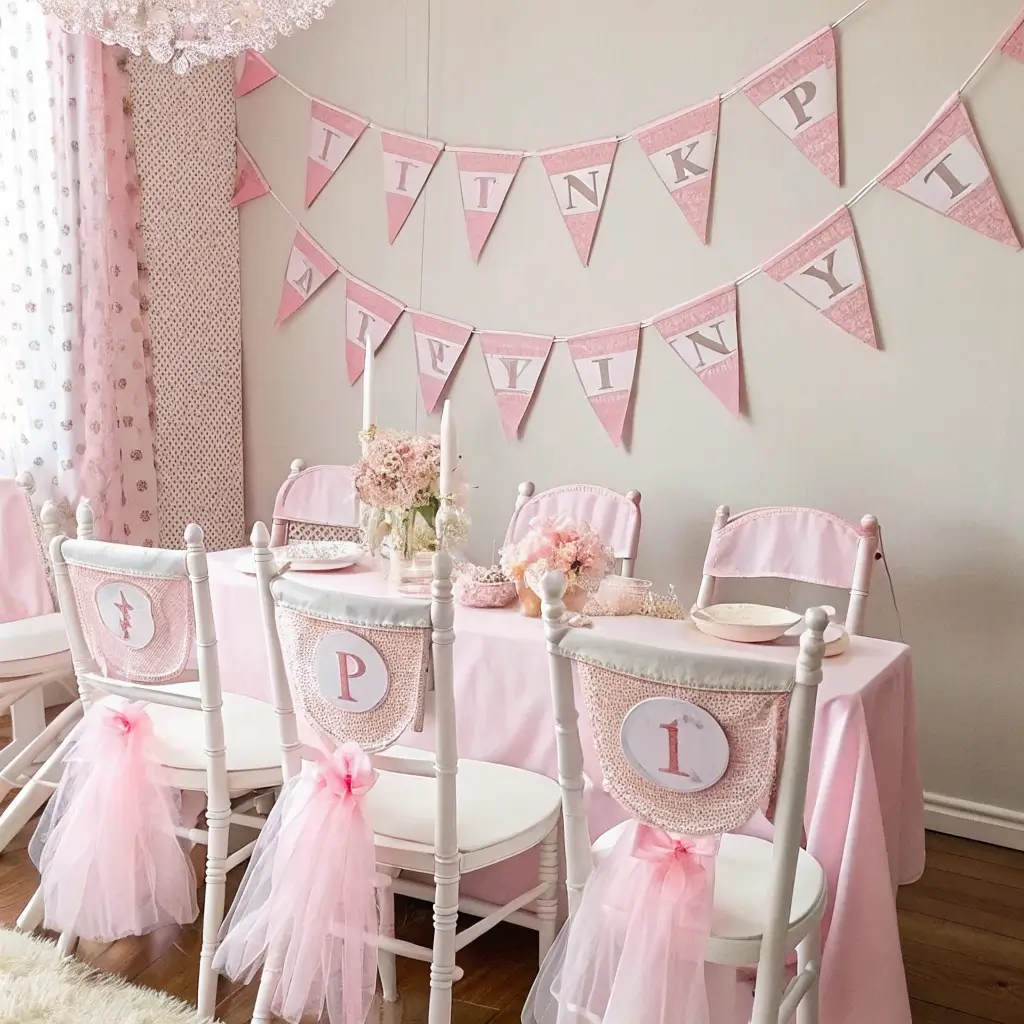
The birthday person deserves a special seat, and a decorated chair with coordinating banner creates a perfect photo opportunity while making them feel truly celebrated.
Chair Decoration Techniques
Transform any chair into a birthday throne with the right decorations. Tulle is your best friend here – wrap it around the chair back, tie it in bows, or create a flowing backdrop effect. Layer different shades of pink tulle for depth and richness.
Add some sparkle with ribbon, fairy lights, or even some artificial flowers. The goal is to make the chair look special without making it uncomfortable to sit in. Remember, the birthday person will actually be using this chair!
Banner Design and Placement
Your banner should complement the chair without competing with it. I love creating banners with the birthday person’s name or age in coordinating pink shades. Mix different fonts and sizes for visual interest, and don’t be afraid to add some decorative elements like stars or hearts.
Position the banner where it frames the chair nicely in photos. This might be directly behind the chair, off to one side, or even above it, depending on your space and lighting.
Photo Opportunity Optimization
Think about how this setup will look in photos – after all, this is probably where most of the birthday pictures will happen. Consider the background, lighting, and angles when positioning everything.
Make sure there’s enough space around the chair for people to gather for group photos, and consider the height of your decorations relative to where people will be sitting or standing for pictures.
Pink Tulle Party Tent Decoration
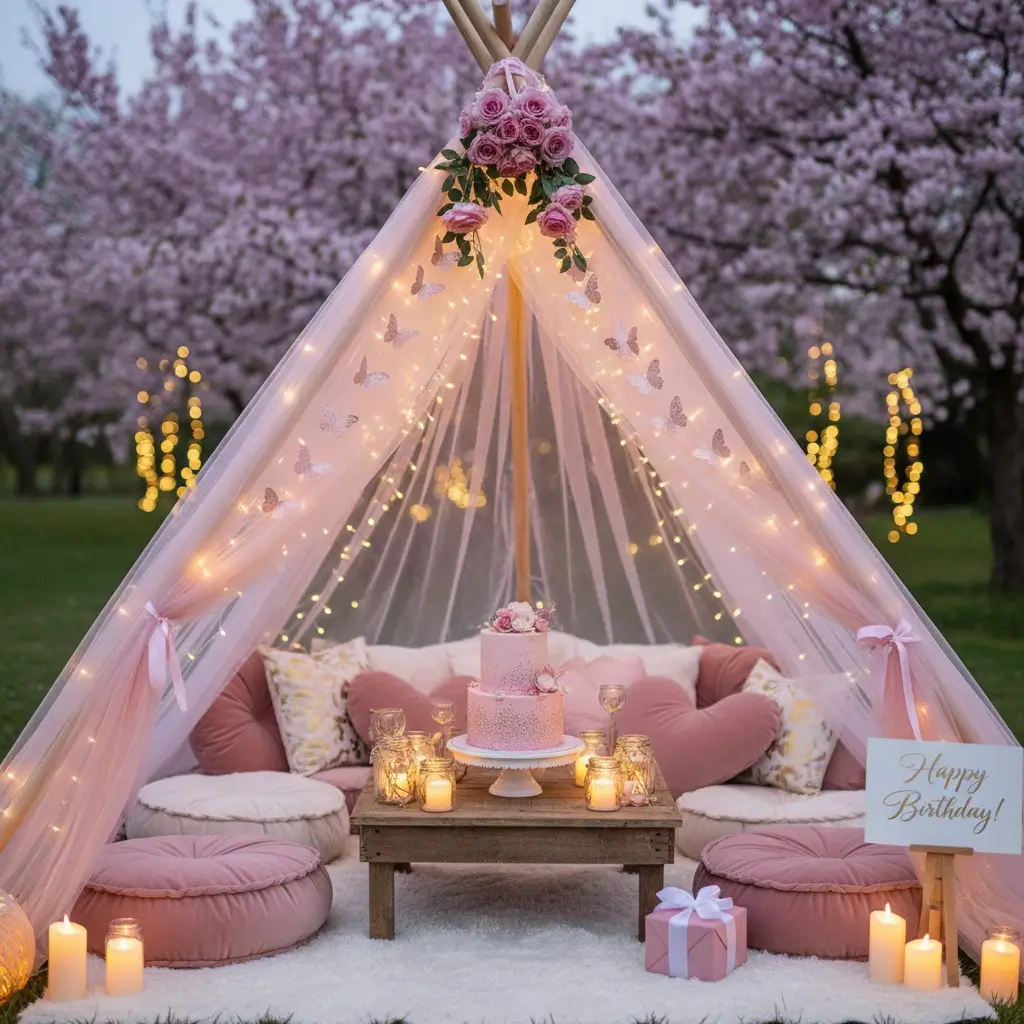
Creating a dreamy tent or canopy effect with pink tulle instantly transforms any space into something magical. This works whether you’re decorating an actual tent for an outdoor party or creating a canopy effect indoors.
Tulle Selection and Quantity
You’ll need more tulle than you think – it’s better to have too much than too little. Choose different shades of pink tulle for depth, and consider mixing in some white or cream for balance. The quality matters too – stiffer tulle holds its shape better, while softer tulle creates more romantic draping.
Calculate roughly 2-3 yards of tulle per foot of space you want to cover, depending on how full you want the effect to be. It’s always better to overestimate and have leftover tulle than to run short mid-project.
Installation Methods
For outdoor tents, you can attach tulle directly to the tent frame using zip ties, clips, or even safety pins. For indoor spaces, create anchor points using ceiling hooks, command strips, or even tall furniture pieces.
The key is creating gentle draping rather than tight stretching. Let the tulle flow naturally – this creates that dreamy, romantic effect you’re after. Work in sections, stepping back frequently to assess the overall look.
Lighting Integration
Tulle and lighting are a match made in party heaven. String lights woven through the tulle create an absolutely magical effect, especially as the sun sets
Wrapping Up Your Pink Party Paradise
There you have it – ten pink birthday decor ideas that’ll transform your celebration from basic to absolutely breathtaking! From that show-stopping balloon arch entrance to the dreamy tulle tent finale, each element works together to create a cohesive pink wonderland that your guests will be talking about for months.
The beauty of these ideas is their flexibility. You don’t have to use every single one to create an amazing party – pick and choose the elements that work best for your space, budget, and style. Maybe you’re all about that candy buffet life, or perhaps the floral backdrop with fairy lights is calling your name. Trust me, even incorporating just 2-3 of these ideas will elevate your party game significantly.
Remember the Golden Rules
Keep your pink palette cohesive but not monotonous – mixing different shades and textures is what separates the pros from the amateurs. Don’t forget about the practical stuff either – your decorations should enhance the party experience, not complicate it. And most importantly, have fun with it! The best parties happen when the host is relaxed and enjoying themselves.
Final Thoughts
Planning a pink birthday party doesn’t have to stress you out or break the bank. With a little creativity and these tried-and-true ideas, you can create something truly special that celebrates your birthday star in style. Whether you’re going full-on princess fantasy or chic millennial pink sophistication, the key is in the details and the love you put into every element.
So go ahead, embrace the pink, and get ready to throw a party that’s absolutely picture-perfect. Your future self (and your Instagram feed) will thank you! 🙂
Now stop scrolling through party inspiration and start planning – that pink paradise isn’t going to create itself!