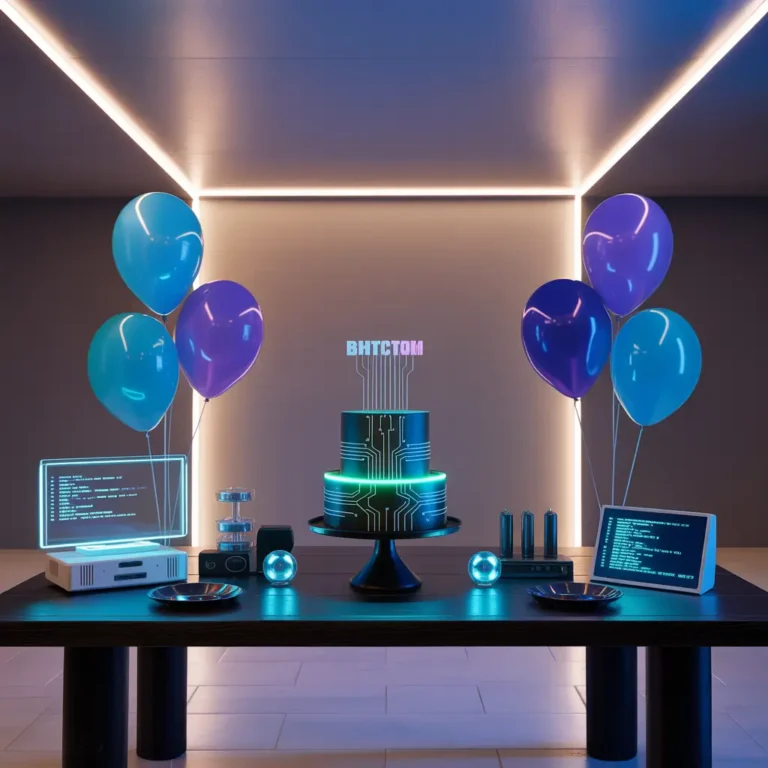
10 Beautiful Aesthetic Birthday Decor Ideas for Elegant Setups
Let’s be real – you’re scrolling through Pinterest at 2 AM again, aren’t you? Looking for that perfect birthday party setup that screams “I have my life together” while secretly hoping it doesn’t require a degree in interior design or your entire paycheck. Well, friend, you’ve landed in the right place.
I’ve been down this rabbit hole more times than I care to admit, and after throwing parties that ranged from “Pinterest fail” to “how did I even pull this off,” I’ve cracked the code on aesthetic birthday decor that actually works.
These aren’t those impossible DIY projects that look amazing in theory but leave you crying over hot glue burns at midnight.
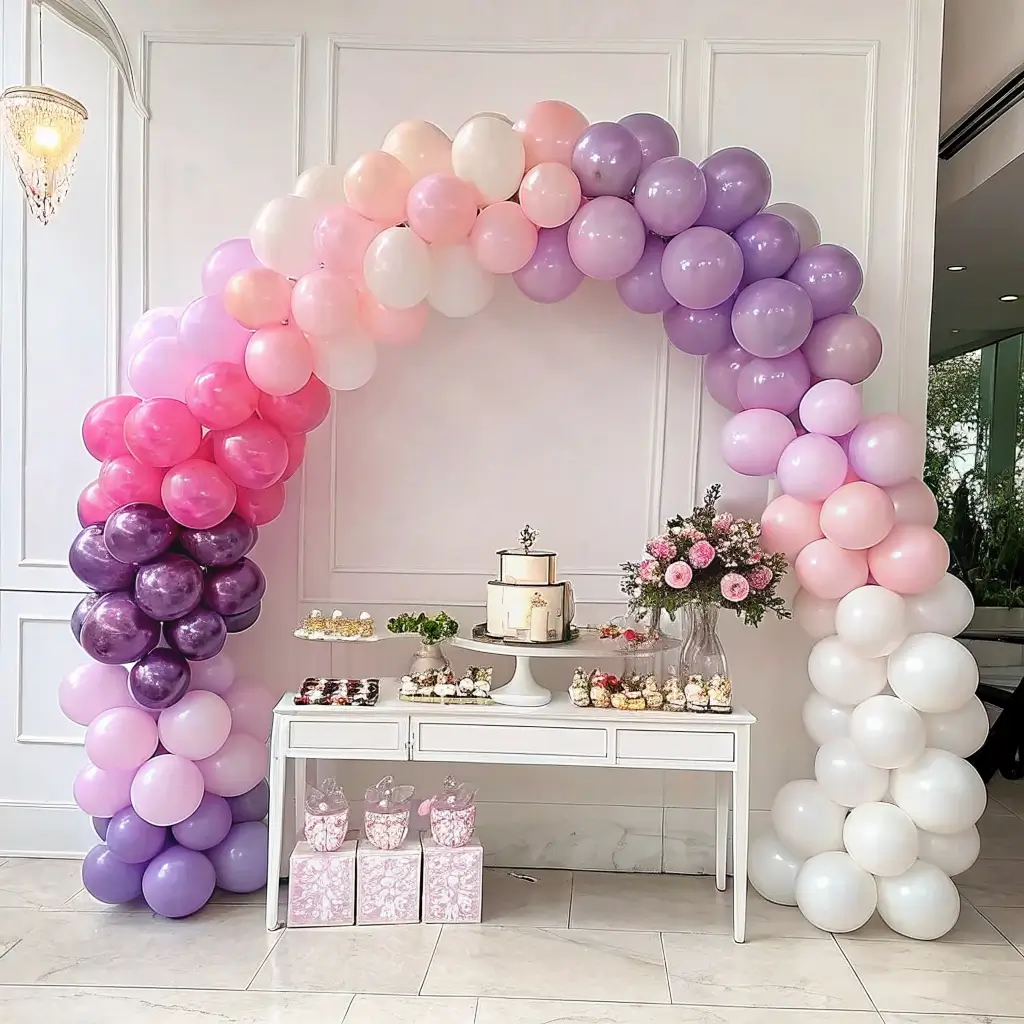
Pastel Balloon Arch: The Crown Jewel of Party Decor
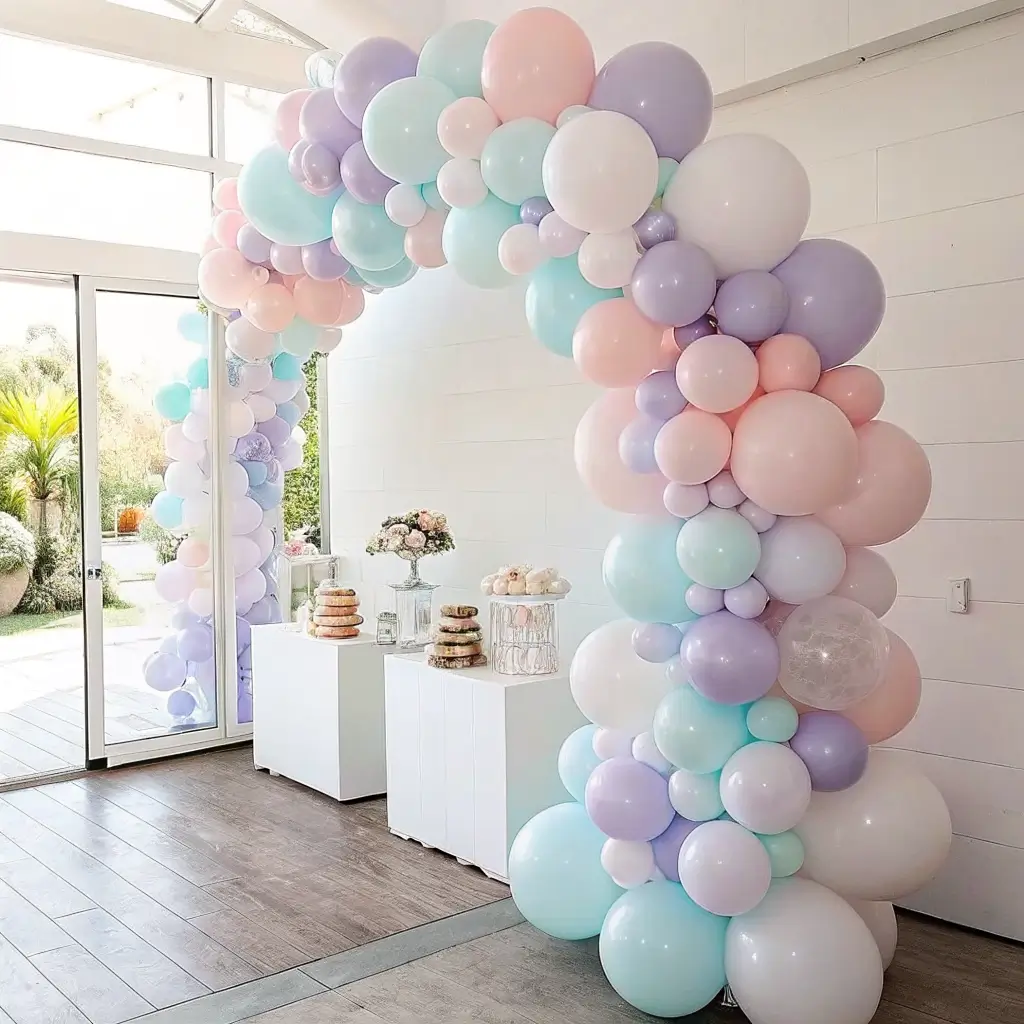
Can we talk about how balloon arches went from “fancy wedding thing” to “must-have for literally every celebration”? And honestly, I’m not mad about it. A pastel balloon arch is like the cherry on top of your party sundae – it instantly elevates everything.
Here’s what makes pastel arches so genius: they photograph beautifully, work with almost any theme, and give you that dreamy, soft aesthetic without looking like a unicorn exploded. I learned this the hard way after my first attempt involved neon colors that could probably be seen from space.
Creating Your Pastel Masterpiece
The secret sauce is in the color selection. Stick to 3-4 complementary pastel shades – think blush pink, sage green, lavender, and cream. Any more than that and you’ll end up with what I call “Easter basket chaos.”
You’ll want different balloon sizes for texture. Mix 11-inch, 5-inch, and a few 16-inch balloons for visual interest. Pro tip: inflate them to slightly different levels. Perfectly uniform balloons look robotic, and we’re going for that effortless, organic vibe.
Key supplies you’ll actually need:
- Balloon decorating strip (trust me, fishing line is not your friend here)
- Electric balloon pump (your lungs will thank you)
- Command hooks for hanging
- Floral wire for securing
The best part? You can prep this the night before. Just keep it away from any heat sources unless you want to wake up to deflated dreams.
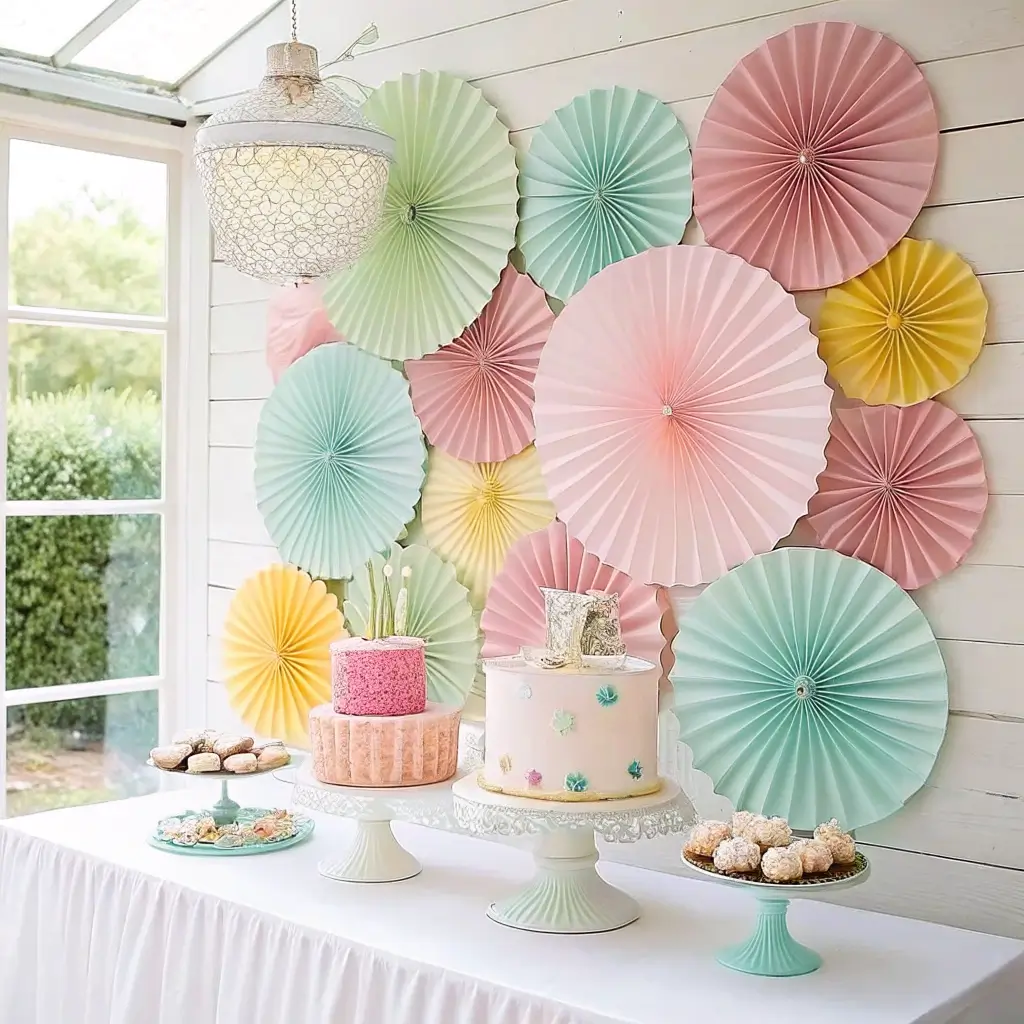
Minimalist Dessert Table: Less is Actually More
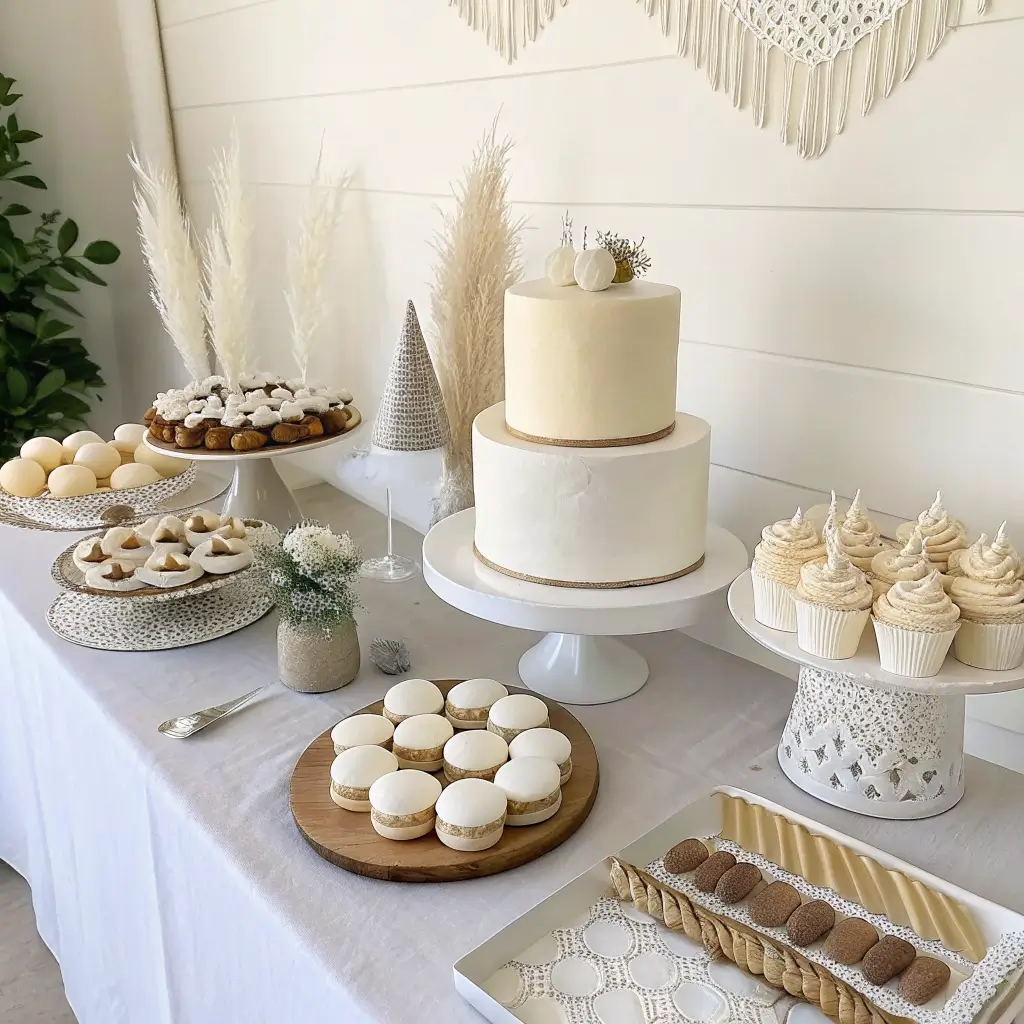
Remember when dessert tables looked like candy stores had a collision? Yeah, we’re not doing that anymore. The minimalist dessert table trend is where it’s at, and it’s perfect for those of us who appreciate clean lines and don’t want to spend three days baking seventeen different treats.
I discovered this approach after realizing that elaborate dessert spreads often left guests overwhelmed and half the food untouched. Sometimes the most stunning impact comes from restraint – revolutionary concept, right?
The Art of Strategic Simplicity
Choose one show-stopping centerpiece – maybe a gorgeous naked cake or an elegant tart. Then add 2-3 complementary treats that share a color palette or theme. Think macarons in matching pastels, simple sugar cookies, or elegant cake pops.
The magic happens in the presentation. Use different heights with cake stands, marble boards, or even stacked books wrapped in pretty paper. White or neutral serving pieces let your treats be the stars, and fresh flowers or greenery add that organic touch.
Essential elements for success:
- Varying heights for visual interest
- Cohesive color scheme (2-3 colors max)
- Quality over quantity approach
- Fresh elements like flowers or fruit
FYI, this approach also saves your sanity and budget. Win-win situation if you ask me.
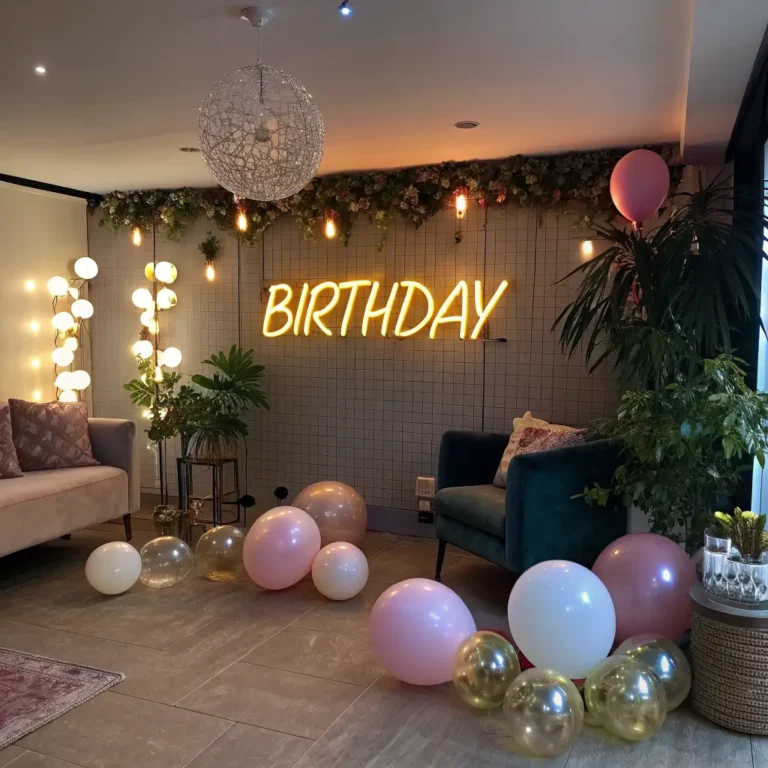
Boho-Chic Hanging Lanterns: Instant Atmosphere Magic
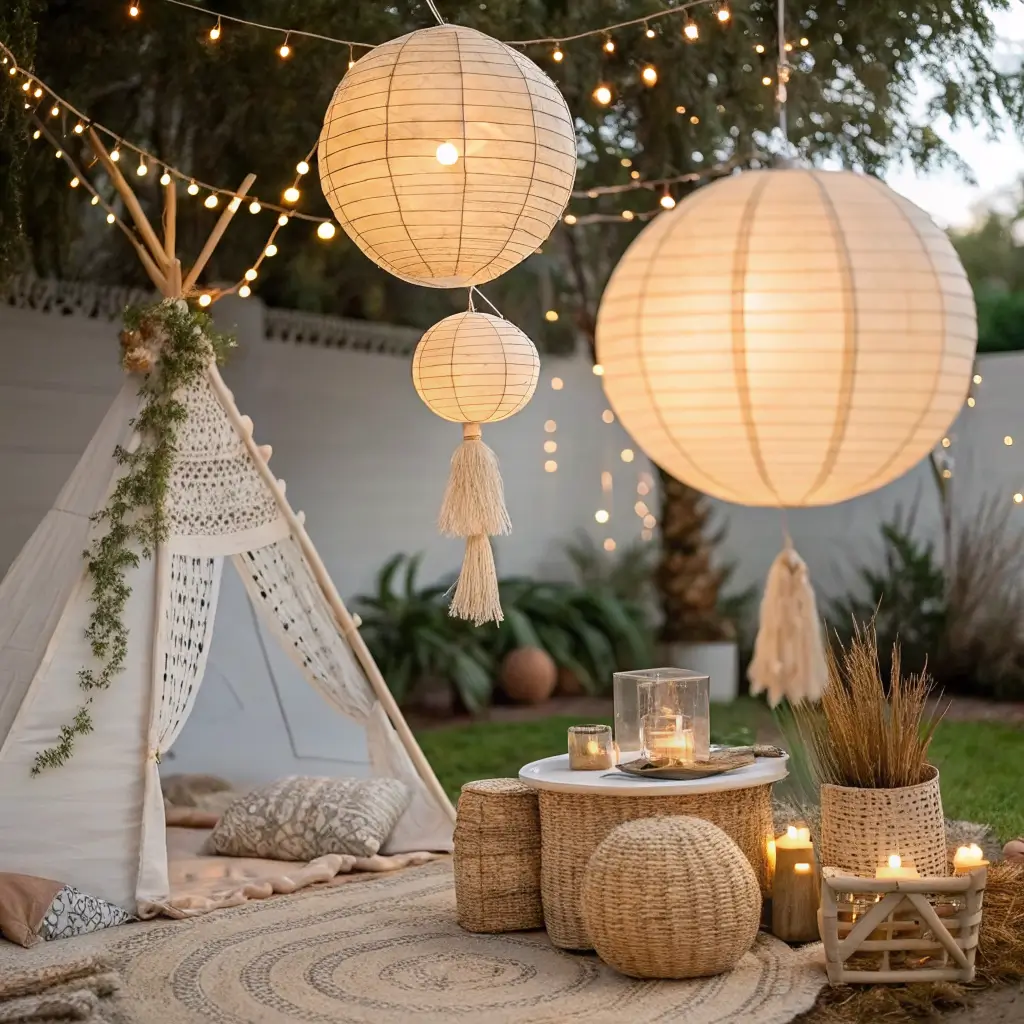
Want to know the fastest way to transform any space from “meh” to “magical”? Hanging lanterns. These beauties create instant ambiance and work whether you’re partying indoors or outside.
I fell in love with this look after attending a friend’s backyard birthday where paper lanterns in warm tones completely transformed her basic patio into something that felt like a dreamy outdoor café. The soft, diffused light they create is incredibly flattering – your guests will thank you for the Instagram-worthy lighting.
Mastering the Boho Lantern Look
The key is mixing different sizes and textures while sticking to a cohesive color story. Combine paper lanterns, fabric versions, and maybe some woven basket-style ones for that perfectly imperfect boho vibe.
Hang them at varying heights – this isn’t a military formation. Some should graze just above head height while others float higher up. Use fishing line or thin rope for hanging, and if you’re indoors, ceiling hooks or a tension rod system works perfectly.
Color combinations that never fail:
- Warm whites and creams with natural textures
- Dusty rose, terracotta, and sage green
- Deep jewel tones for evening parties
- Monochromatic whites for elegant simplicity
The best part about lanterns? They work for any age and any theme. From boho chic to modern minimalist, these adaptable beauties have your back.
Also Read: 10 Creative Birthday Decor Ideas for Unique Party Looks
Fairy Light Photo Wall: Because Everyone Needs a Photo Op
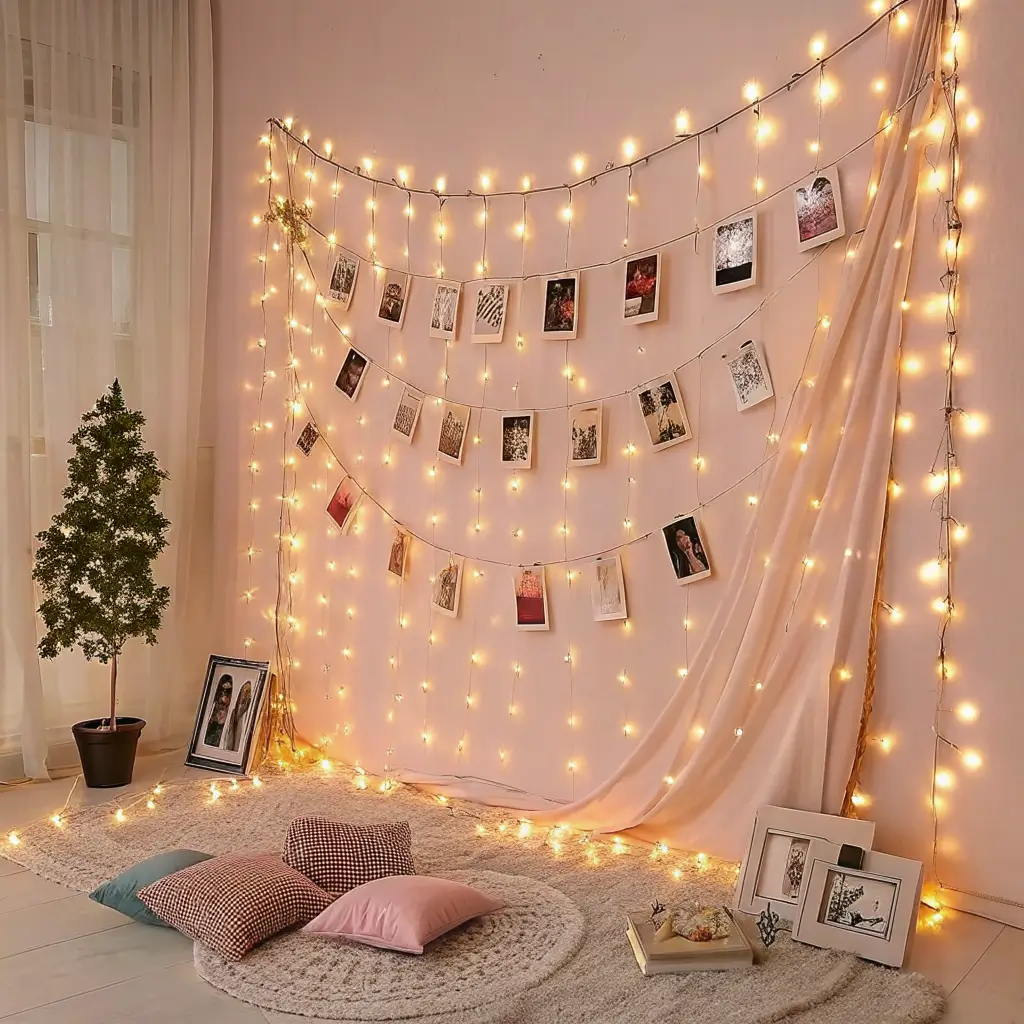
Let’s address the elephant in the room – people want photos at parties. Instead of fighting it, why not create a designated spot that’s so gorgeous everyone will want to pose there? A fairy light photo wall is like having a professional photo studio, minus the professional price tag.
I learned this lesson after watching guests awkwardly try to find good lighting all night at a party. Now I always create an intentional photo spot, and it becomes a natural gathering place that adds to the party atmosphere.
Building Your Light-Up Backdrop
Start with a blank wall or create a backdrop using a large piece of fabric or even a bedsheet in a neutral color. Then comes the fun part – the lights. Warm white fairy lights create the most flattering glow, but you can experiment with different colors if they match your theme.
Create patterns with the lights – drape them in gentle swags, spell out words, or create a cascading waterfall effect. The key is density; you want enough lights to create impact but not so many that it looks like a Christmas explosion.
Pro installation tips:
- Use small clear hooks or removable adhesive clips
- Test your pattern with tape before committing to hooks
- Battery-operated lights give you more flexibility
- Add a timer function so you don’t have to remember to turn them off
Bonus points if you add some fresh greenery or flowers woven through the lights. It softens the look and adds that organic touch that makes everything feel more intentional.
Floral Table Garland: Nature’s Party Decoration
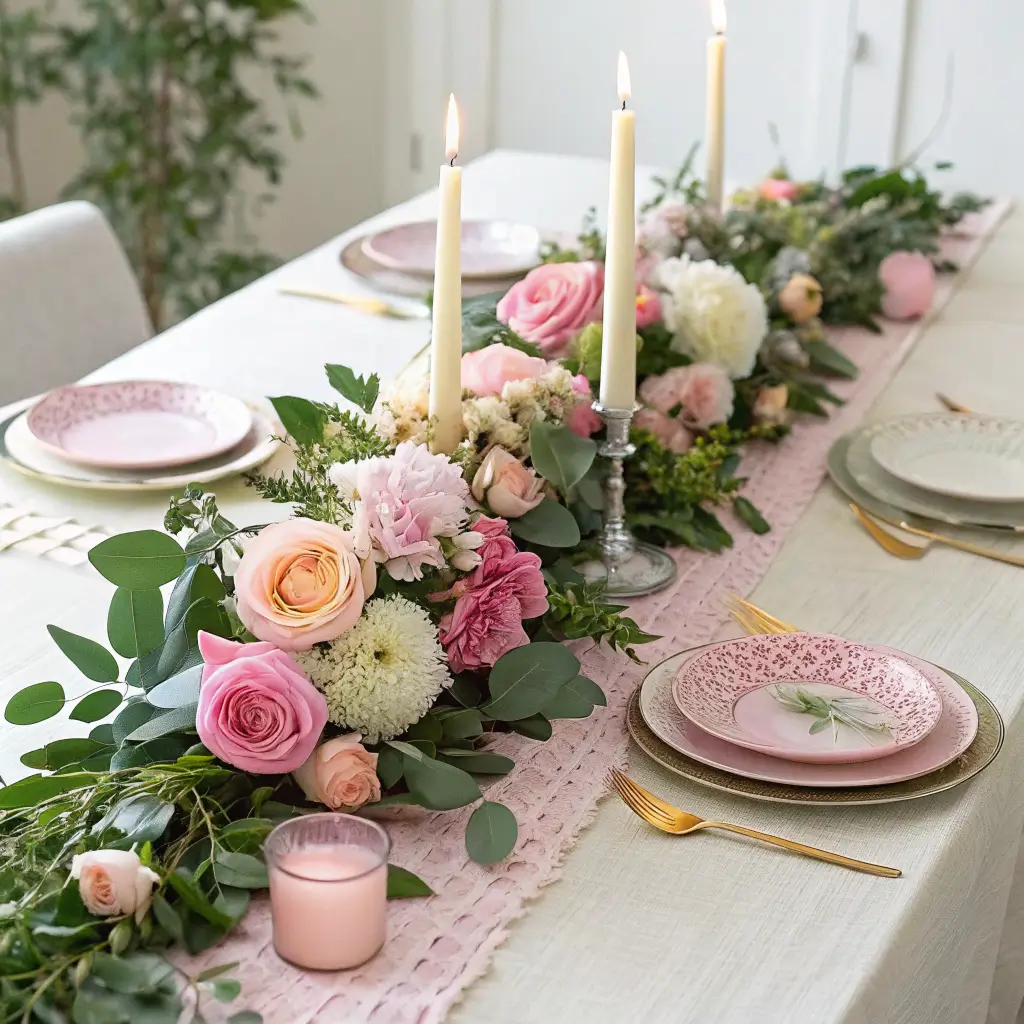
There’s something about fresh flowers that instantly makes everything feel more special, doesn’t there? A floral table garland running down the center of your table creates this lush, garden-party vibe that’s both elegant and approachable.
I used to think table flowers meant expensive arrangements in vases, but garlands changed my whole perspective. They’re more cost-effective, create better conversation flow (no one’s talking around a giant centerpiece), and photograph beautifully from every angle.
Creating Your Floral Runner
The secret is mixing different textures and heights. Combine fresh flowers with greenery, maybe some berries or interesting branches. Eucalyptus is your best friend here – it’s affordable, lasts forever, and smells amazing.
You don’t need a florist’s budget for this. Hit up your local grocery store or farmer’s market. Focus on one or two flower types in complementary colors rather than trying to include every bloom in existence.
Budget-friendly flower choices:
- Carnations (seriously, they’re having a moment)
- Chrysanthemums in fall colors
- Baby’s breath for texture
- Grocery store roses
- Seasonal branches from your yard
Lay your greenery first as the foundation, then tuck in flowers and other elements. The beauty is in the imperfection – this should look like it grew naturally along your table.
Metallic Confetti Balloons: Sparkle Without the Cleanup
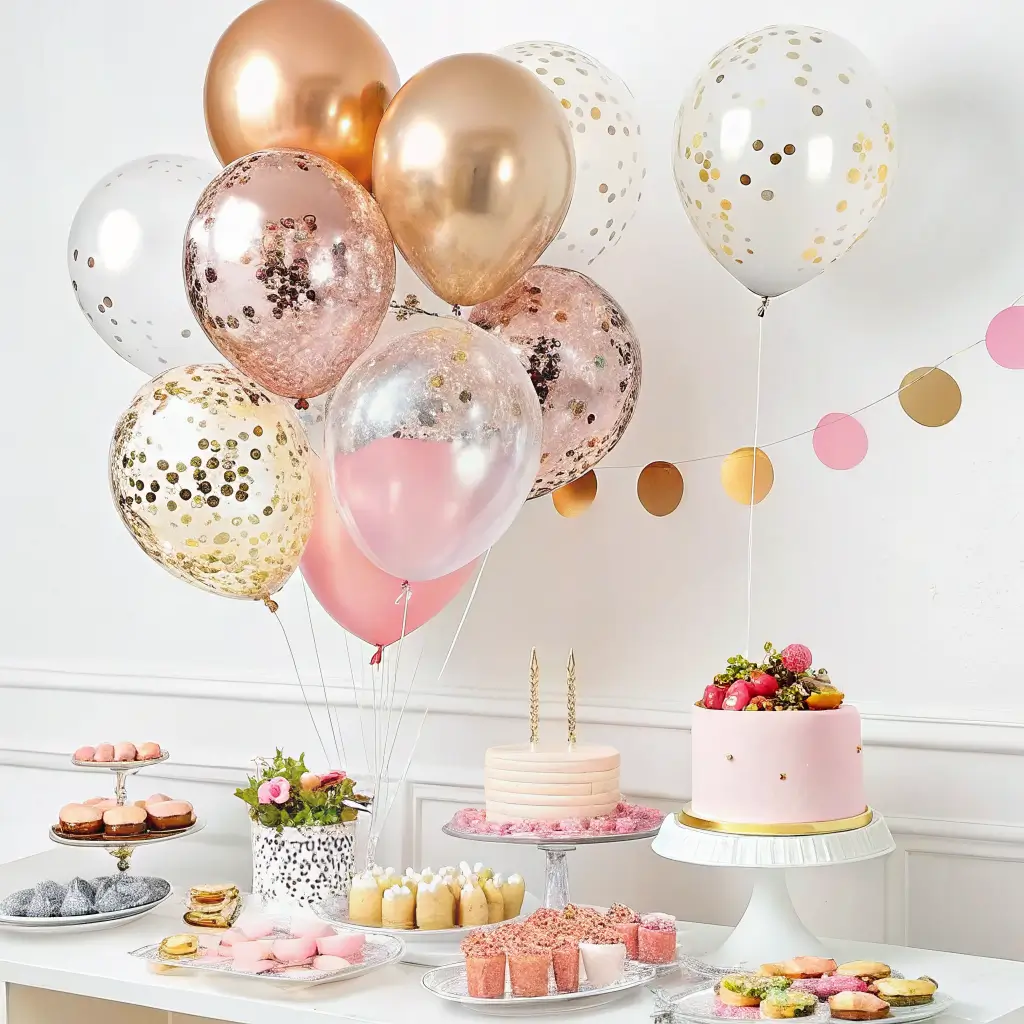
Regular balloons are fine, but metallic confetti balloons are party magic in latex form. They add glamour and movement without requiring any special skills or expensive equipment. Plus, they photograph incredibly well – that confetti catches light beautifully.
I discovered these at a friend’s party where they were scattered around the room, and I couldn’t stop staring at how the confetti moved inside as people walked by. It’s like having tiny snow globes floating around your party.
Confetti Balloon Success Secrets
The trick is in the confetti choice and balloon preparation. Metallic confetti works better than paper because it’s lighter and moves more freely. Gold, silver, and rose gold are classic choices that work with almost any color scheme.
Before inflating, add a small amount of confetti to each balloon. Don’t go overboard – a tablespoon is plenty. Too much and it clumps together instead of floating gracefully.
Pro tips for perfect confetti balloons:
- Rub the balloon on fabric before inflating to create static
- Use helium for floating balloons or air for table decorations
- Mix sizes for visual interest
- Tie with ribbon that matches your color scheme
The static from rubbing helps the confetti stick to the sides initially, then it moves around as the balloon moves. It’s oddly mesmerizing and adds this dynamic element to your decor.
Also Read: 10 Gorgeous Jewel Tone Wedding Decor Ideas to Inspire You
Vintage Paper Fan Backdrop: Retro Charm Made Easy
Sometimes the most stunning backdrops are the simplest ones. Vintage paper fans create this gorgeous textured wall that looks way more complicated than it actually is. I love this option because it’s budget-friendly, completely customizable, and gives you that handmade charm without actually requiring crafting skills.
The vintage aesthetic is having such a moment right now, and paper fans tap into that nostalgic feeling while still looking fresh and modern. Plus, they’re lightweight and easy to transport if you’re decorating somewhere other than home.
Designing Your Fan Wall
Mix different sizes and colors within your chosen palette. The key is creating visual rhythm – don’t just randomly stick them up there. Think about balance and flow as you arrange them.
Start with your largest fans as anchor points, then fill in with medium and small sizes. Overlap some for depth and dimension. The goal is to create a cohesive look that feels intentional, not chaotic.
Color scheme ideas that work:
- Monochromatic blues from navy to powder blue
- Warm sunset tones in coral, peach, and gold
- Classic black and white with metallic accents
- Soft pastels in pink, lavender, and mint
You can buy pre-made fans or make your own from decorative paper. IMO, buying them saves time and often looks more polished, but DIY gives you complete color control.
Ombre Balloon Garland: Gradient Goals
If regular balloon garlands are good, ombre balloon garlands are absolutely stunning. There’s something about that gradual color transition that feels so sophisticated and modern. It’s like having a sunset captured in balloon form.
I’ll be honest – my first attempt at an ombre garland looked more like a color wheel explosion than a graceful gradient. The secret is in the planning and patience with the color progression.
Mastering the Ombre Effect
Choose your color family first – maybe blues from navy to sky blue, or pinks from deep rose to blush. You’ll need at least 4-5 shades to create a smooth transition. Any fewer and it looks choppy rather than flowing.
Plan your gradient before you start inflating. Lay out your balloons by color and arrange them in the order you want. This prevents that “oops, I ran out of the middle shade” moment that I definitely didn’t experience multiple times.
Ombre arrangement strategy:
- Start with your darkest shade on one end
- Gradually transition through your middle tones
- End with your lightest shade
- Mix in some white balloons for softness
- Vary balloon sizes within each color section
The transition should feel natural, like watching a sunrise or sunset. Take your time with the color placement – this is where the magic happens.
Rustic Wooden Sign Decor: Personal Touch Perfection
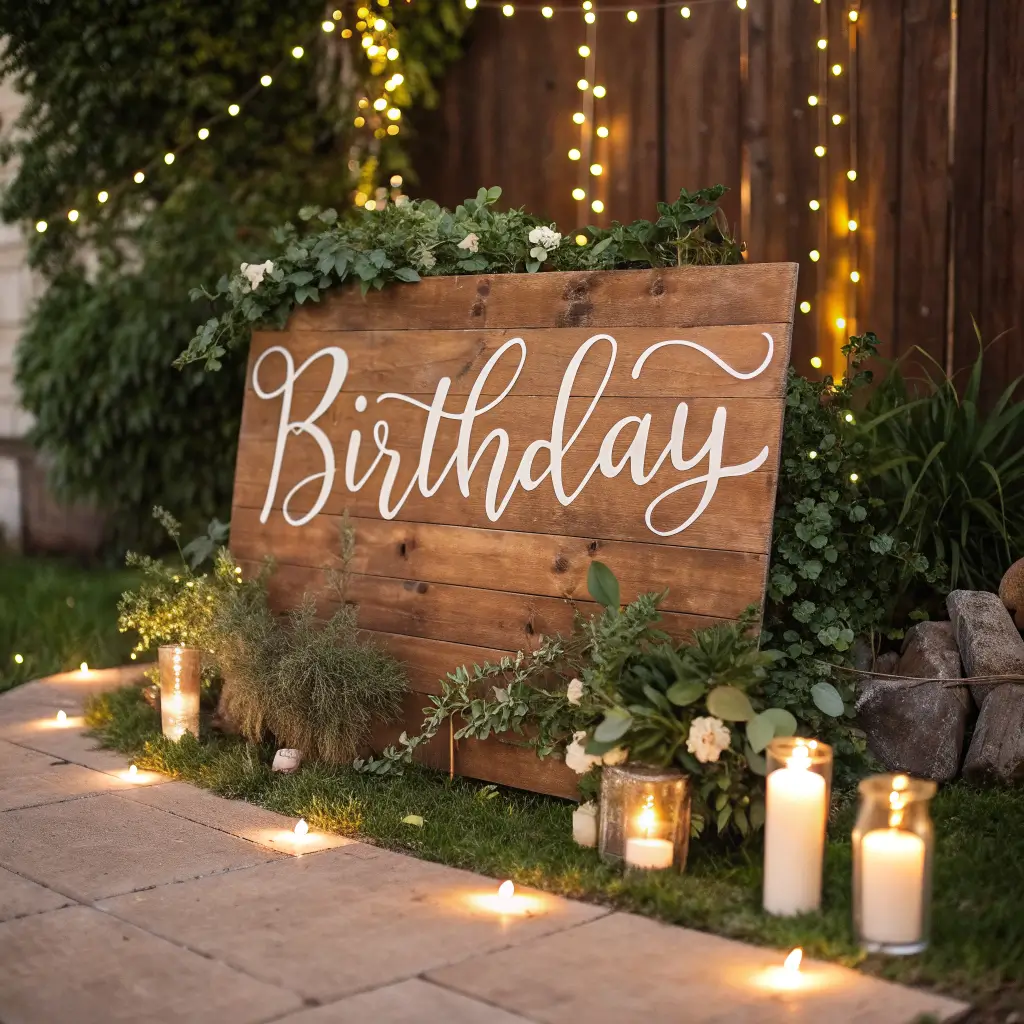
Want to add personality to your party without breaking the bank? Rustic wooden signs are your answer. They’re completely customizable, work with almost any theme, and add that personal touch that makes guests feel special.
I started making these after getting tired of generic party decorations that could belong to anyone. There’s something about seeing your name or a personal message beautifully displayed that makes the whole celebration feel more meaningful.
Creating Your Custom Signage
You don’t need to be a master carpenter for this. Simple wooden boards from the hardware store work perfectly. Sand them lightly for a smooth finish, then paint or stain them in your desired color.
For the lettering, you have options:
- Hand-paint if you’re feeling artistic
- Use vinyl letter stickers for clean lines
- Print and transfer designs
- Hire someone on Etsy for custom work
The beauty of rustic signs is that imperfection adds character. Slightly uneven lettering or weathered wood just adds to the charm.
Popular sign ideas:
- Birthday person’s name and age
- Inspirational quotes or song lyrics
- Directional signs for different party areas
- Photo booth instructions
- Menu descriptions for food stations
Place them strategically around your party space – propped on easels, leaning against walls, or hanging from ribbons.
Also Read: 10 Elegant Wedding Car Decor Ideas to Wow Your Guests
Balloon and Flower Ceiling Installation: Overhead Drama
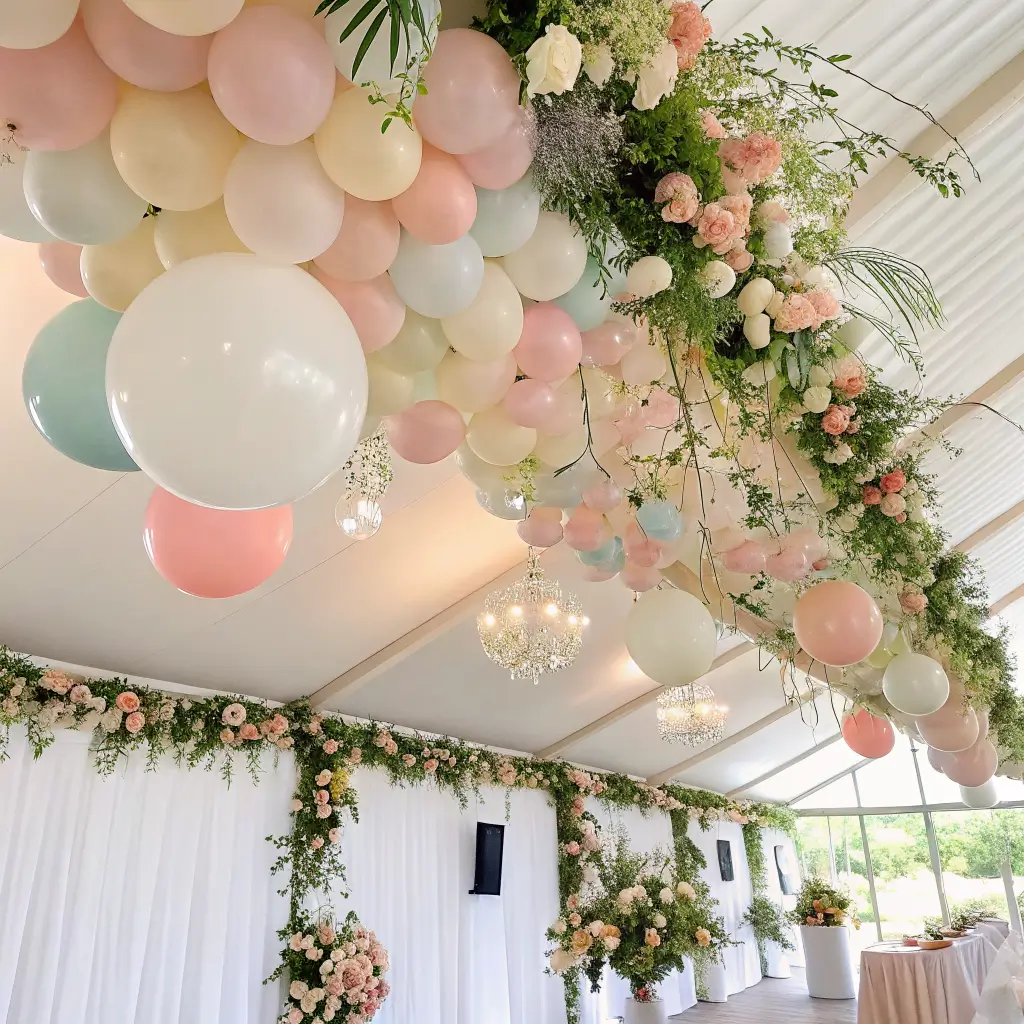
Ready to completely transform your space? A balloon and flower ceiling installation creates this incredible overhead canopy that makes everything feel magical. It’s like being inside a garden party dream.
This was inspired by a wedding I attended where the ceiling was covered in hanging installations. Everyone spent the entire night looking up and taking photos. The impact is absolutely stunning, and it works whether you’re in a backyard tent or your living room.
Planning Your Ceiling Masterpiece
This project requires some planning and the right hanging system. You’ll need ceiling hooks, fishing line, and a good ladder. Safety first – make sure your ceiling can handle the weight and that everything is securely fastened.
Mix different elements for texture and visual interest. Combine balloons in various sizes with fresh or silk flowers, greenery, and maybe some hanging crystals or beads for sparkle.
Installation strategy:
- Map out your design on paper first
- Install hanging points before inflating balloons
- Work in sections rather than trying to do everything at once
- Have a helper for safety and efficiency
- Test the weight with a few elements before committing to the full design
The key is creating clusters and varying heights. You want it to feel organic and flowing, not like a rigid grid pattern.
Final Thoughts: Making Magic Happen
Here’s the thing about aesthetic party decor – it’s not about perfection or spending a fortune. It’s about creating an atmosphere that makes people feel special and gives them something beautiful to remember.
I’ve learned that the best parties happen when you focus on a few key elements and execute them well rather than trying to do everything at once. Pick 2-3 ideas from this list that speak to you and your style, then commit to making them amazing.
Remember, your guests aren’t coming to judge your decorating skills – they’re coming to celebrate with you. The most important ingredient in any party is the joy and love you put into it. Everything else is just pretty packaging 🙂
Now stop scrolling Pinterest and start planning. Your aesthetic birthday party awaits, and trust me, it’s going to be absolutely gorgeous.