15 Beautiful Aesthetic Room Decor DIY Ideas for Small Spaces
You know that feeling when you scroll through Pinterest and see those gorgeous rooms that look like they belong in a magazine? Yeah, I used to think those spaces required a trust fund and an interior designer on speed dial.
Turns out, I was completely wrong – and I’m about to show you exactly why.
Creating an aesthetic room doesn’t mean dropping your entire paycheck at West Elm. Some of my favorite room transformations have come from DIY projects that cost less than a fancy dinner.
Trust me, once you master these ideas, your friends will think you hired a professional decorator (and you can just smile mysteriously when they ask).
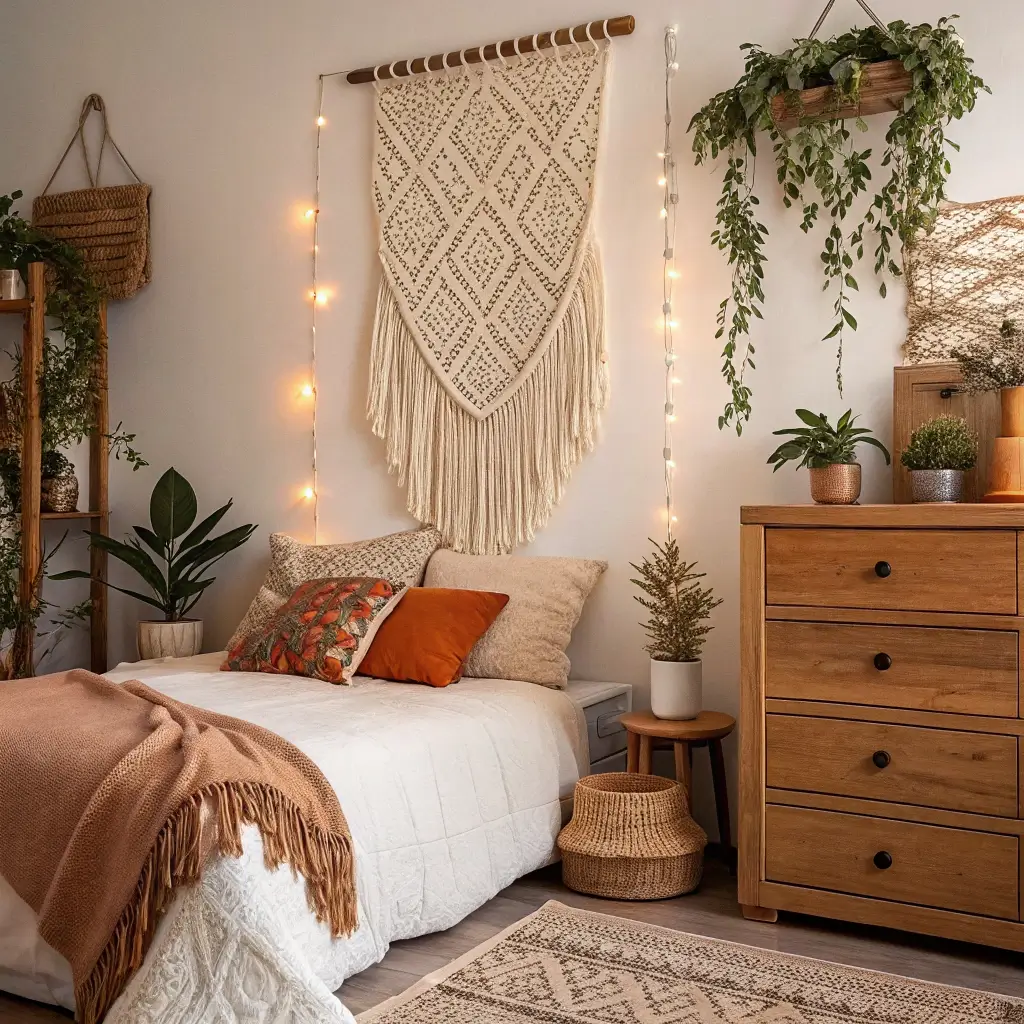
Fairy Light Photo Wall
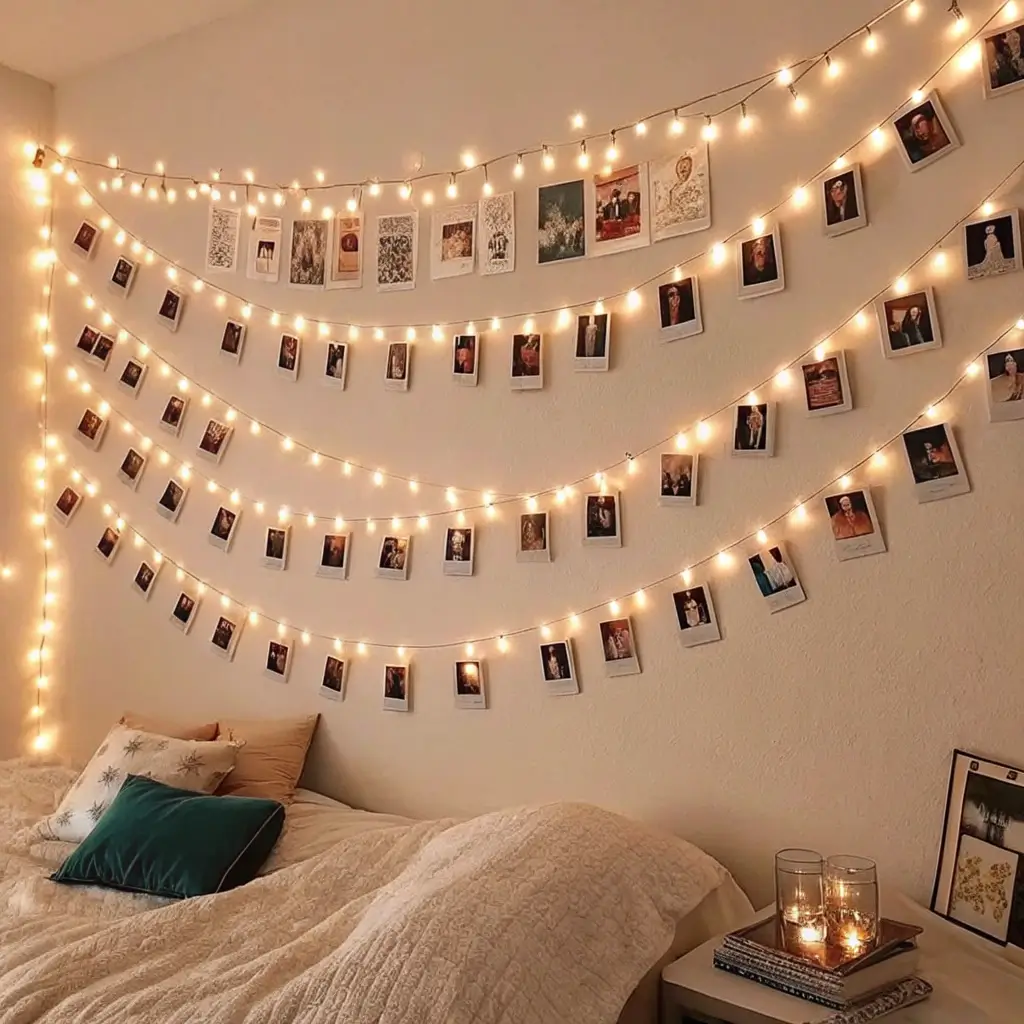
Remember when fairy lights were just for Christmas? Those days are long gone, my friend. Creating a fairy light photo wall has become my go-to recommendation for anyone wanting instant aesthetic vibes without the commitment of paint or wallpaper.
Here’s what makes this project absolutely genius: you’re combining two things everyone already has – photos and string lights. I started mine with a basic strand of warm white LED lights (about $15) and arranged them in a zigzag pattern across my wall. The trick? Use clear command strips to create invisible anchor points that won’t damage your walls.
Making It Personal
You don’t need professionally printed photos either. I literally printed mine on regular paper using my home printer, and they look amazing when backlit by the fairy lights. Mix in some Polaroids, concert tickets, or even dried flowers between the photos for extra texture. The whole setup takes maybe an hour, and suddenly your wall looks like it belongs in an Urban Outfitters catalog.
Want to level this up? Try using clip-on fairy lights so you can easily swap out photos whenever you feel like refreshing your space. It’s basically Instagram in real life, except way cooler because it’s actually in your room.
DIY Canvas Quote Art
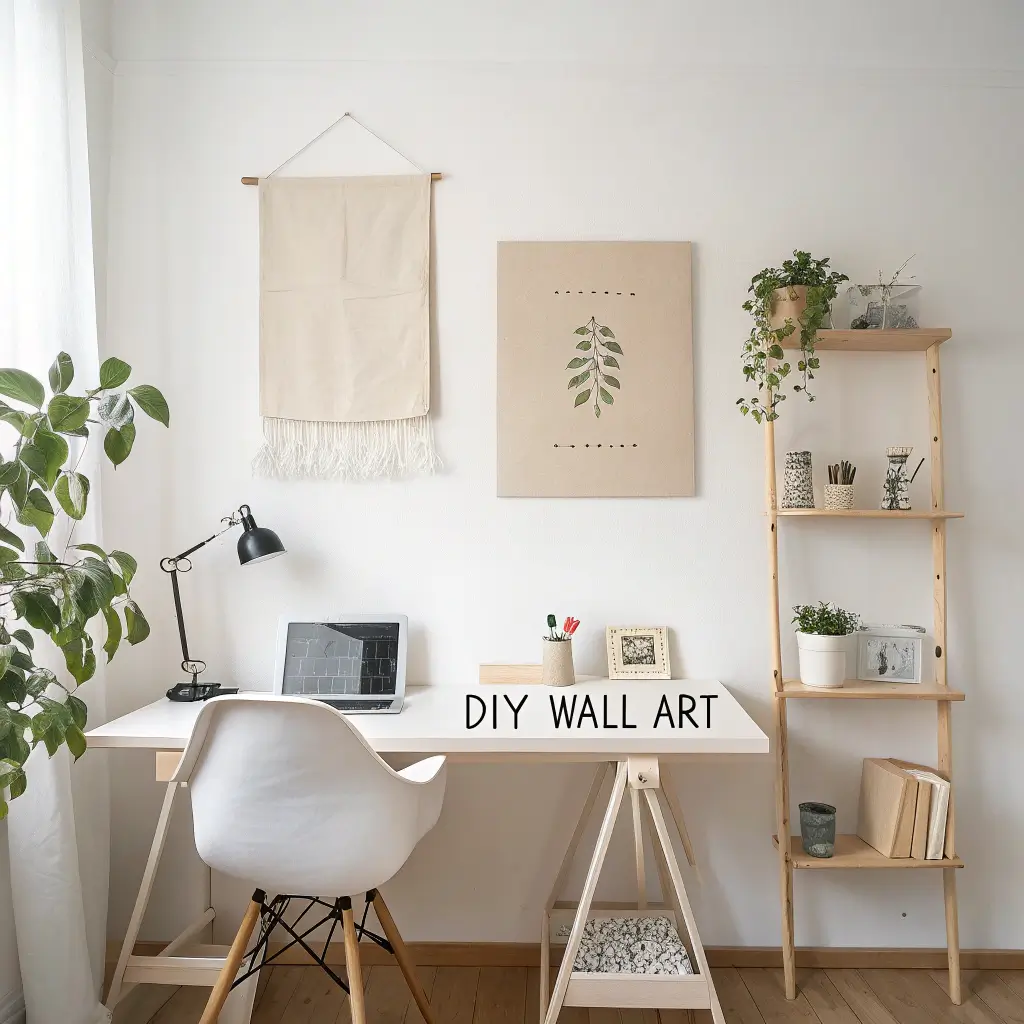
Who decided that canvas art needs to cost $100+? Not me, that’s for sure. Making your own canvas quote art is ridiculously easy, and you get to choose exactly what message speaks to you. No more settling for generic “Live, Laugh, Love” prints that everyone and their mother has.
I grabbed three small canvases from the dollar store (yes, really) and some acrylic paint I already had. The secret to making it look professional? Plan your layout with pencil first. I cannot stress this enough – freehand painting rarely ends well unless you’re actually artistic (which I’m definitely not).
Typography Tips That Actually Work
Pick a simple font style and stick with it. Mixing cursive with block letters might seem creative, but it usually just looks messy. I learned this the hard way when my first attempt looked like a ransom note. Now I use painter’s tape to create clean lines for geometric letters, and it looks like I actually know what I’m doing.
For color schemes, stick to two or three colors max. Black text on white canvas? Classic. Navy on blush pink? Chef’s kiss. The beauty of DIY canvas art is you can customize it to match your exact room aesthetic, something you’ll never get from mass-produced store art.
Aesthetic Floating Shelf Styling
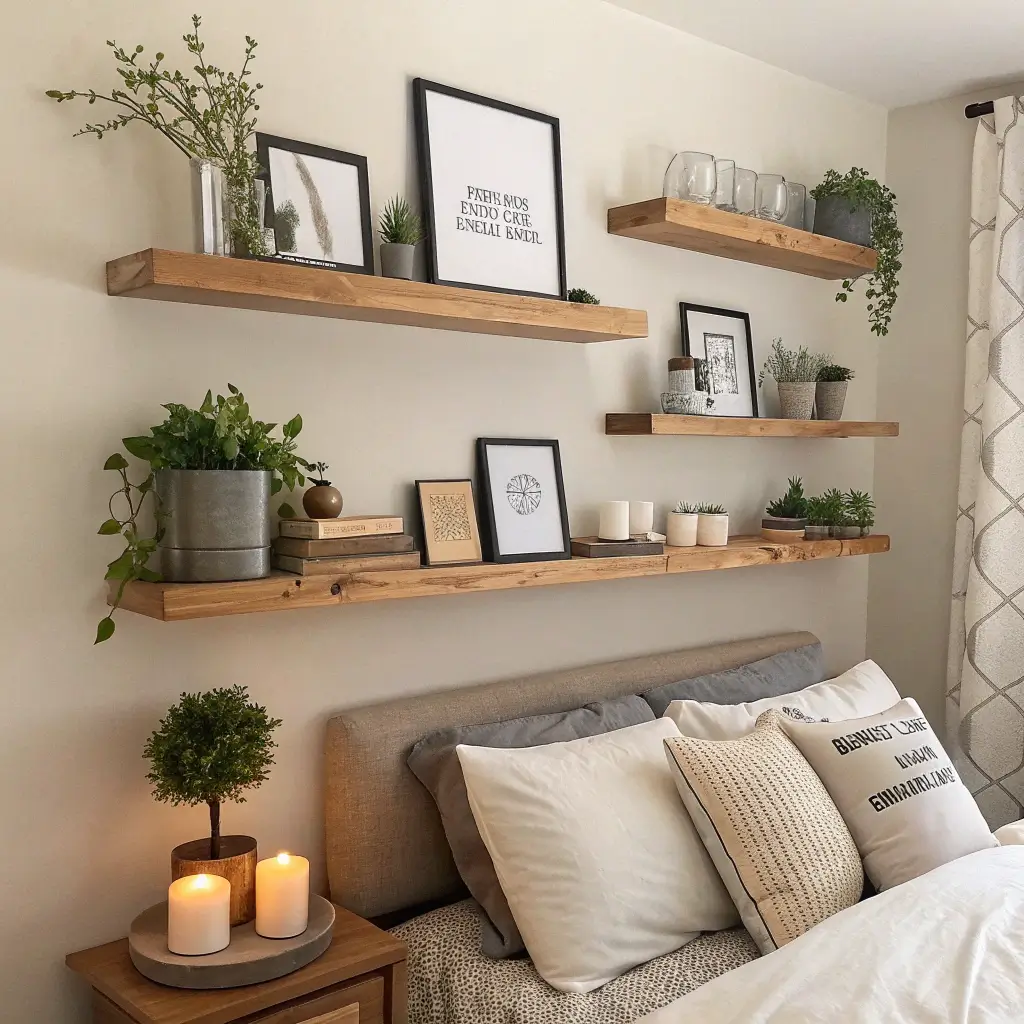
Floating shelves might seem basic, but styling them properly? That’s where the magic happens. I’ve rearranged my floating shelves approximately 847 times (slight exaggeration), and I’ve finally cracked the code to making them look effortlessly aesthetic.
The rule of thirds isn’t just for photography – it works brilliantly for shelf styling too. Divide your shelf mentally into three sections and vary the height of objects in each section. Sounds complicated? It’s really not. Think tall (plant or vase), medium (stacked books), and small (decorative object).
The Styling Formula That Never Fails
Start with your books – and please, for the love of all that’s aesthetic, organize them by color or size. I know some people think organizing books by color is sacrilege, but we’re going for looks here, not library efficiency. Stack some horizontally, stand others vertically, and suddenly your old textbooks look intentional.
Layer in some plants (fake ones totally count if you’re a plant killer like me), add a small mirror or picture frame leaning against the wall, and throw in something unexpected like a vintage camera or a cool rock you found. The key is making it look casually curated, not like you tried too hard.
Also Read: 15 Amazing DIY Crafts Room Decor Ideas to Brighten Your Space
Paper Butterfly Wall Decor
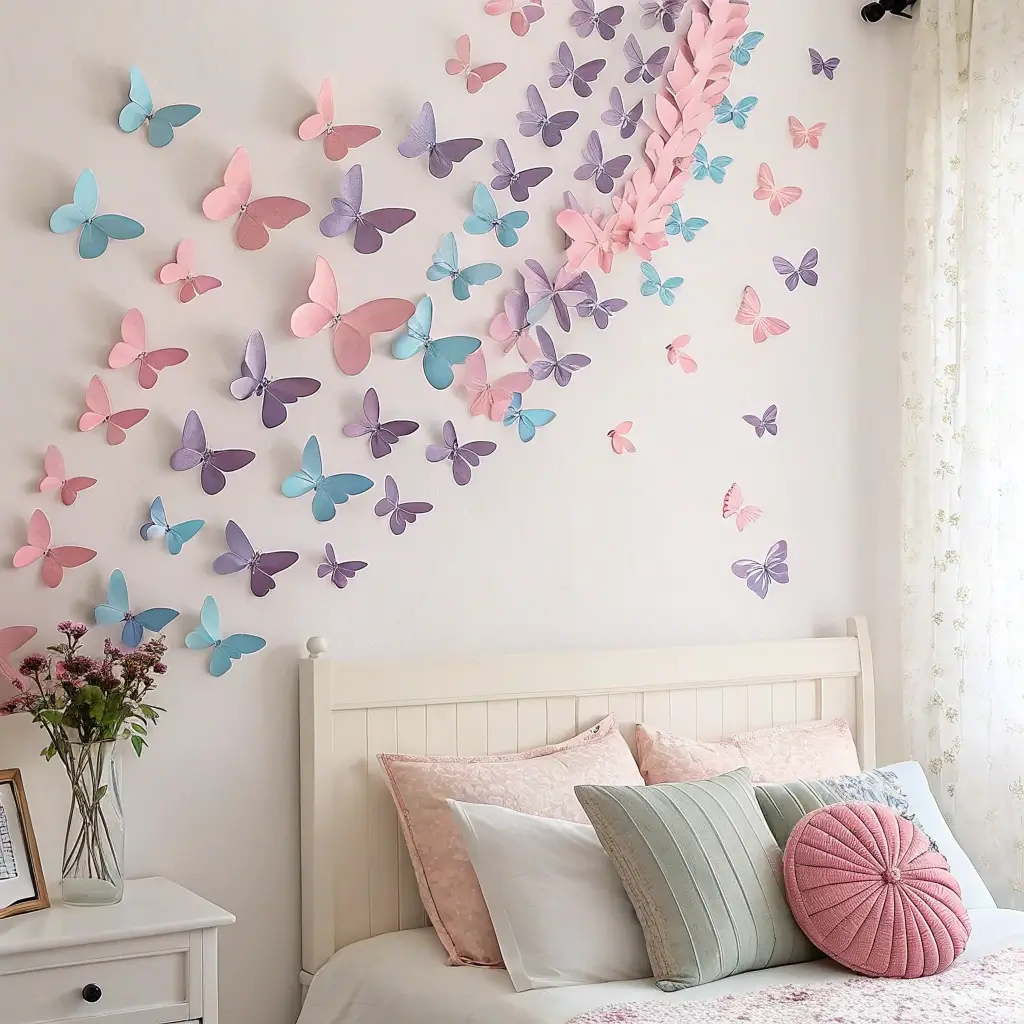
This one’s going to sound kindergarten-level simple, but stick with me. Paper butterfly wall decor has become surprisingly sophisticated, and it costs practically nothing to create. I made an entire butterfly migration on my bedroom wall for less than the price of a Starbucks latte.
You’ll need cardstock in whatever colors match your vibe (I went with a gradient from white to dusty pink), a butterfly template (Pinterest has millions), and some double-sided tape. The trick that makes this look expensive? Fold each butterfly down the middle before attaching it to the wall – this creates shadows and dimension that flat cutouts could never achieve.
Creating Movement and Flow
Don’t just randomly scatter them around like confetti. Create a flow pattern that guides the eye – maybe they’re flying from your window toward your bed, or swirling around a mirror. I arranged mine to look like they’re emerging from behind my bookshelf, and honestly? It looks like art installation material.
Pro tip: Mix different sizes and slightly different shades of the same color family. This creates depth that makes people do a double-take. My roommate literally asked if I bought them from some fancy home decor store. Nope, just me, scissors, and a Netflix binge session.
Vintage Book Stack Decor
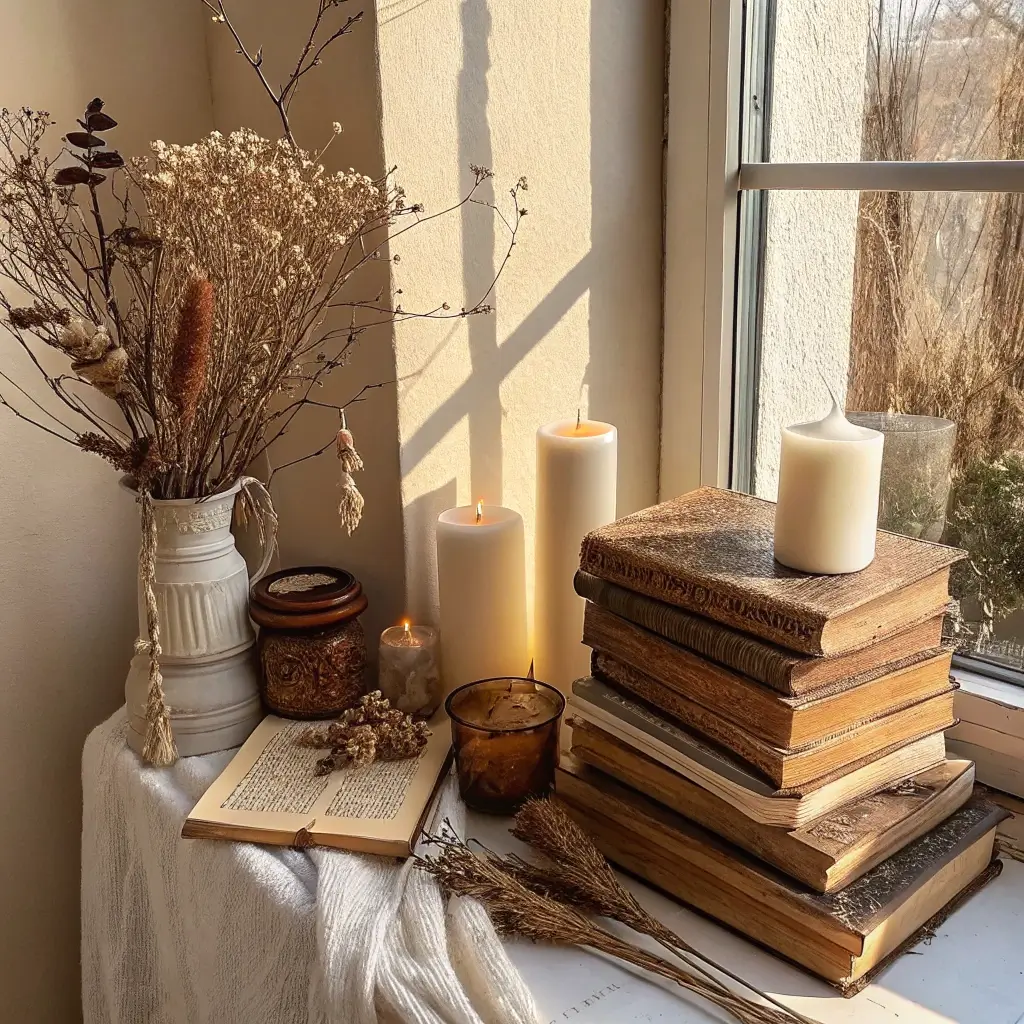
Have old books lying around that you’ll never read again? Congratulations, you’ve got decor gold sitting right there. Vintage book stack decor has become my favorite way to add height and interest to any surface, and it costs literally nothing if you already own books.
The secret sauce here is being intentional about your stacks. Don’t just pile them up randomly – remove the dust jackets from hardcovers to reveal those gorgeous cloth spines underneath. Sometimes the naked books look way better than their flashy covers. Who knew your old chemistry textbook had such a pretty green spine?
Styling Your Book Stacks
Create varying heights by making multiple stacks of different sizes. I like to top each stack with something interesting – a small plant, a candle, or even just a pretty stone. This transforms a pile of books from “I’m too lazy to shelve these” to “I’m incredibly cultured and aesthetic.”
Color coordination takes this to the next level. Group books with similar spine colors together, or go for a rainbow effect if you’re feeling bold. I went through a phase where I wrapped all my books in brown kraft paper and wrote the titles in calligraphy. Extra? Maybe. Gorgeous? Absolutely.
DIY LED Neon Wall Sign
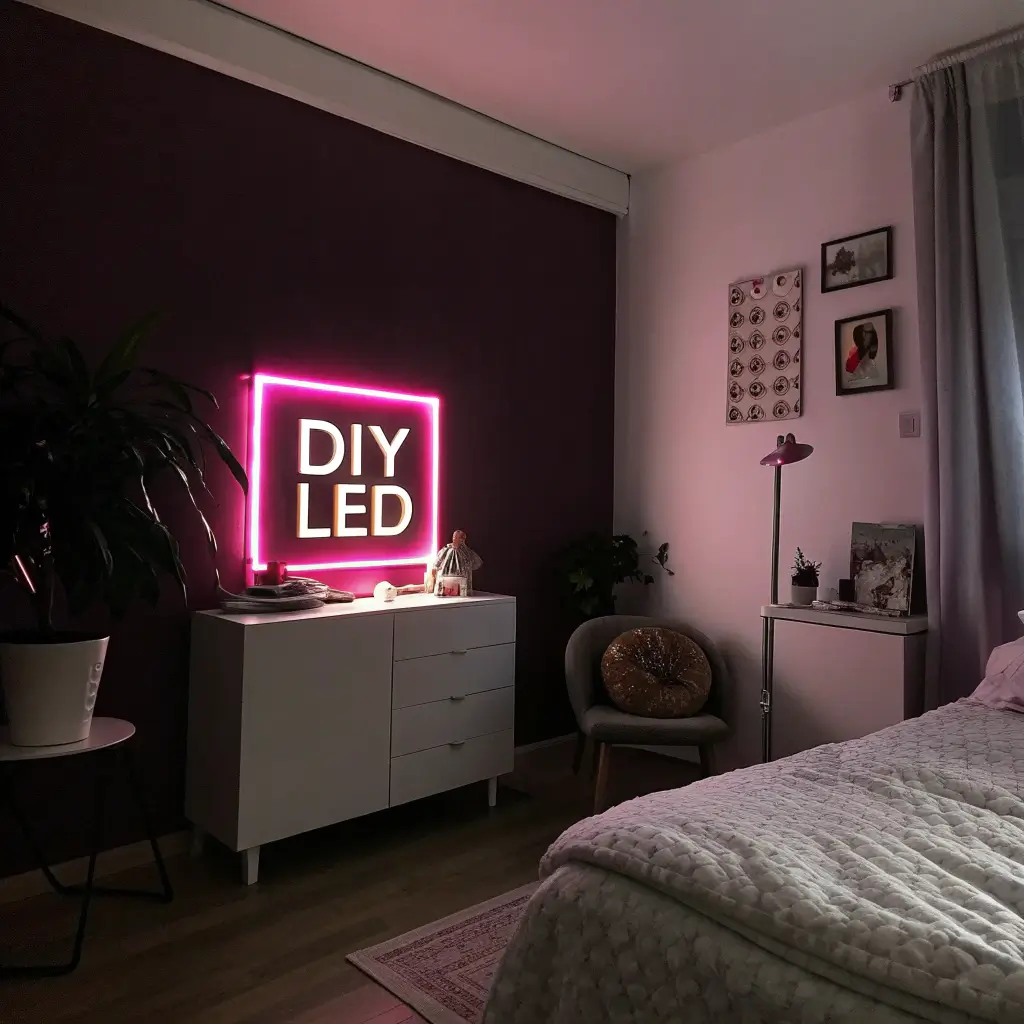
Real neon signs cost a fortune and require professional installation. LED neon flex? That’s a different story. I made a custom LED neon sign for my room that looks exactly like the real thing, and people cannot believe I made it myself.
You’ll need LED neon flex rope (about $20-30 online), clear fishing line or thin wire for shaping, and a power adapter. The hardest part is deciding what you want your sign to say. Keep it short – the more complex your design, the more frustrating it’ll be. I learned this after attempting “Nevertheless, she persisted” and ending up with something that looked like spaghetti.
Shaping and Mounting Your Sign
Start simple with a single word or basic shape. I made a small lightning bolt for my first attempt, and it turned out so well I immediately made three more. Use wire to create your shape first, then wrap the LED rope around it. This gives you a guide and keeps everything looking crisp.
Mount it using clear command strips so the sign appears to float on your wall. The glow at night is absolutely unreal – it’s like having your own personal aesthetic cave. Just don’t blame me when all your friends start begging you to make them one too.
Also Read: 15 Inspiring Easy DIY Room Decor Ideas for Small Rooms
Washi Tape Wall Patterns

Whoever invented washi tape deserves a Nobel Prize, IMO. This stuff has saved my security deposit more times than I can count. Creating wall patterns with washi tape gives you the look of wallpaper or painted designs without any of the commitment or mess.
I’ve done everything from geometric mountains behind my bed to a full subway tile pattern in my bathroom (yes, really). The best part? If you hate it, you just peel it off. No repainting, no regrets, no angry landlords.
Geometric Patterns That Pop
Start with a simple pattern like triangles or hexagons. Use a level and measuring tape unless you want wonky lines that’ll drive you crazy every time you look at them. Trust me on this – I tried eyeballing it once and had to redo the entire wall at 2 AM because I couldn’t sleep knowing it was crooked.
Mix different widths and colors of tape for more complex designs. I created an entire Art Deco-inspired pattern using just black and gold tape, and it looks like expensive wallpaper. The whole project took a Sunday afternoon and cost less than $20. Meanwhile, actual wallpaper would’ve cost hundreds and taken days to install properly.
Minimalist Mirror Corner Setup

Creating a minimalist mirror corner might be the easiest way to make your room look twice as big and three times as aesthetic. You don’t need some massive floor mirror that costs a fortune – multiple smaller mirrors arranged thoughtfully work even better.
I found three different shaped mirrors at thrift stores (total cost: $15) and arranged them in a corner with a small shelf underneath. The trick is keeping everything else in that corner super simple. One plant, maybe a candle, and that’s it. The mirrors do all the heavy lifting by reflecting light and creating depth.
The Power of Reflection
Position your mirrors to reflect something pretty – maybe your fairy light wall or a window with a nice view. Avoid reflecting your messy desk or laundry pile (learned that lesson the hard way). The right angle can make your room look like it belongs in an architectural magazine.
Add a small LED strip light behind one of the mirrors for an ethereal glow effect. It’s like having permanent golden hour lighting, which we all know is the most flattering light ever invented.
Pressed Flower Frame Art
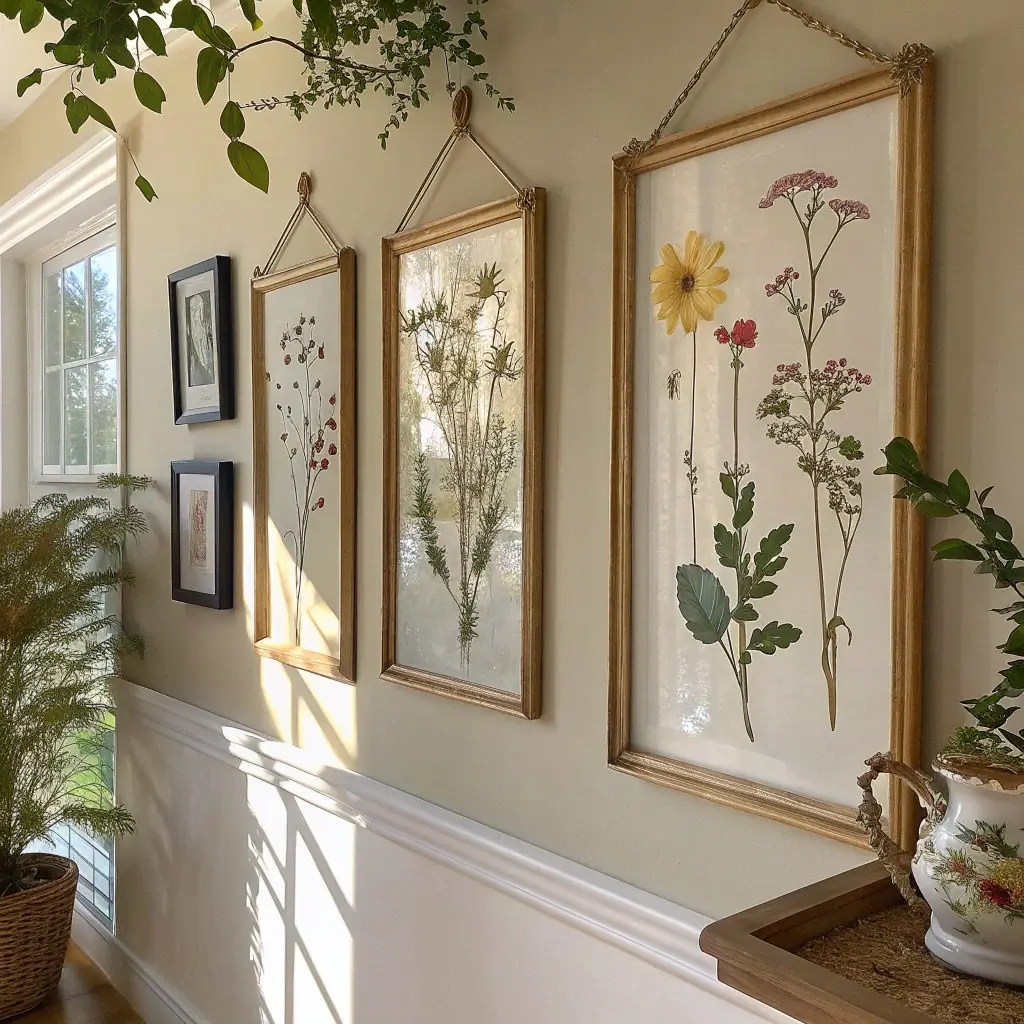
Remember when you tried to press flowers in books as a kid? Turns out that childhood hobby makes for gorgeous adult room decor. Pressed flower art looks expensive and delicate, but it’s actually one of the easiest DIY projects on this list.
Pick flowers from your garden (or, let’s be real, “borrow” some from that overgrown park nearby) and press them between parchment paper in heavy books. After about two weeks, you’ve got perfectly preserved flowers that look like they came from a Victorian botanical collection.
Framing Your Botanical Treasures
The presentation is everything here. Use simple frames with white or cream backgrounds to let the flowers be the star. I like to arrange them in a grid pattern – nine small frames with one flower each looks way more impressive than one big frame with all the flowers crammed in.
Write the flower names in pretty calligraphy underneath if you want to go full botanical illustration vibes. Or keep it minimal with just the flowers floating on white space. Either way, people will think you bought these from some fancy artisan shop.
Also Read: 15 Budget-Friendly Room Decor DIY Ideas You’ll Love
DIY Macrame Wall Hanging
Yes, macrame is having a moment, and no, you don’t need to be a crafting genius to make your own. I taught myself from YouTube videos while binge-watching reality TV, so if I can do it, literally anyone can. DIY macrame wall hangings add that boho texture that makes a room feel finished.
Start with a simple pattern using just square knots and gathering knots. You’ll need macrame cord (about $10-15), a wooden dowel or branch, and patience. The first one might look a little wonky, but that’s just “rustic charm,” right?
Making It Your Own
The beauty of macrame is you can make it as simple or complex as you want. My first piece was literally just straight hanging cords with a few knots at the bottom. Still looked amazing on my wall. Now I’m making pieces with beads woven in and multiple textures of cord.
Add dried flowers or fairy lights woven through your macrame for extra aesthetic points. I added some dried pampas grass to mine, and now it looks like something from an expensive boutique. The whole project cost maybe $20 and took one evening while watching Netflix.
Aesthetic Pegboard Display
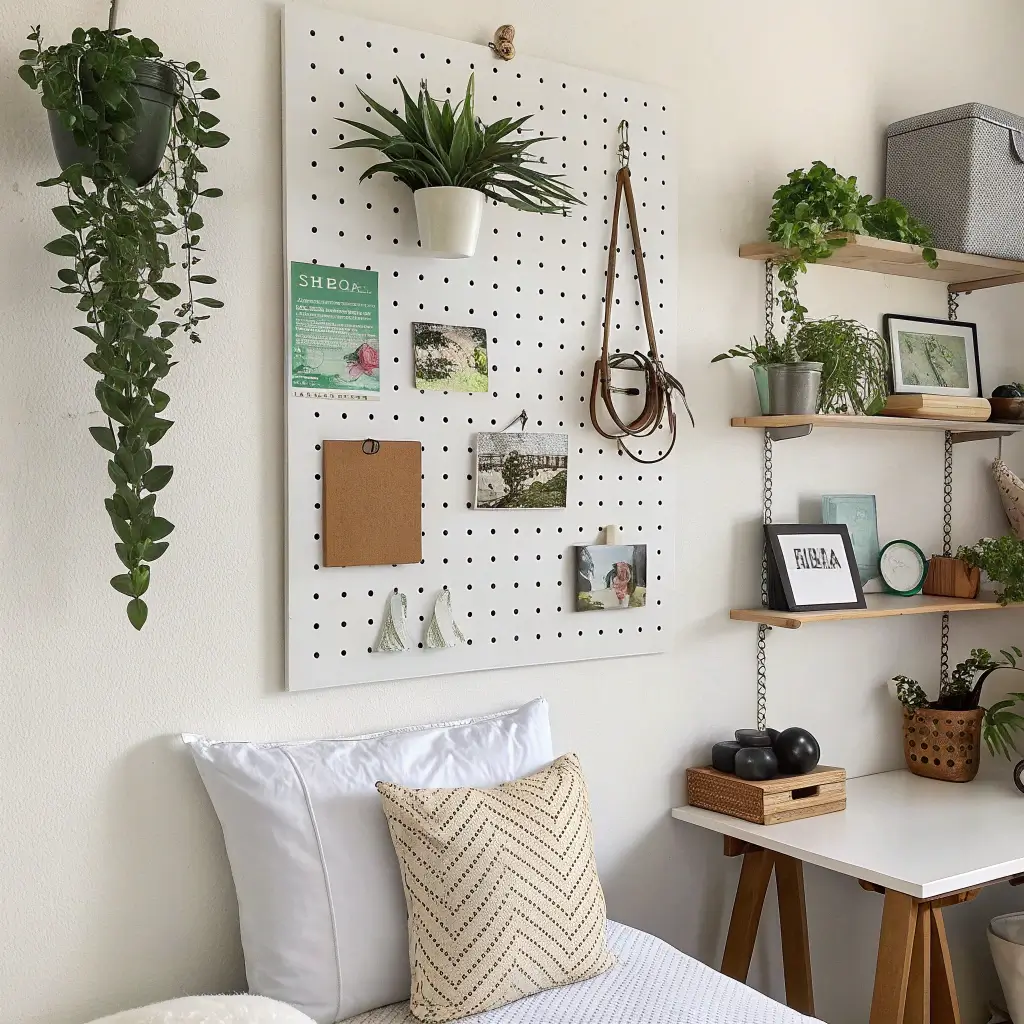
Pegboards aren’t just for garages anymore. An aesthetic pegboard display lets you change your wall decor whenever you want without putting new holes in the wall. It’s basically the Swiss Army knife of room decor.
Paint your pegboard in a soft, aesthetic color (I went with sage green) and mount it on your wall. Now you’ve got infinite possibilities for display arrangements. Hang plants, photos, accessories, or even use it as a mood board that you can update whenever inspiration strikes.
Functional Meets Beautiful
The genius of pegboard is it’s actually useful while looking gorgeous. I use mine to display my jewelry so it doubles as decor and organization. S-hooks, small shelves, and tiny baskets turn it into a customizable gallery wall that actually serves a purpose.
Change up your display seasonally or whenever you’re bored. Currently, mine has dried flowers, some vintage postcards, and my growing collection of enamel pins. Last month it was all Halloween themed. The flexibility is absolutely unmatched 🙂
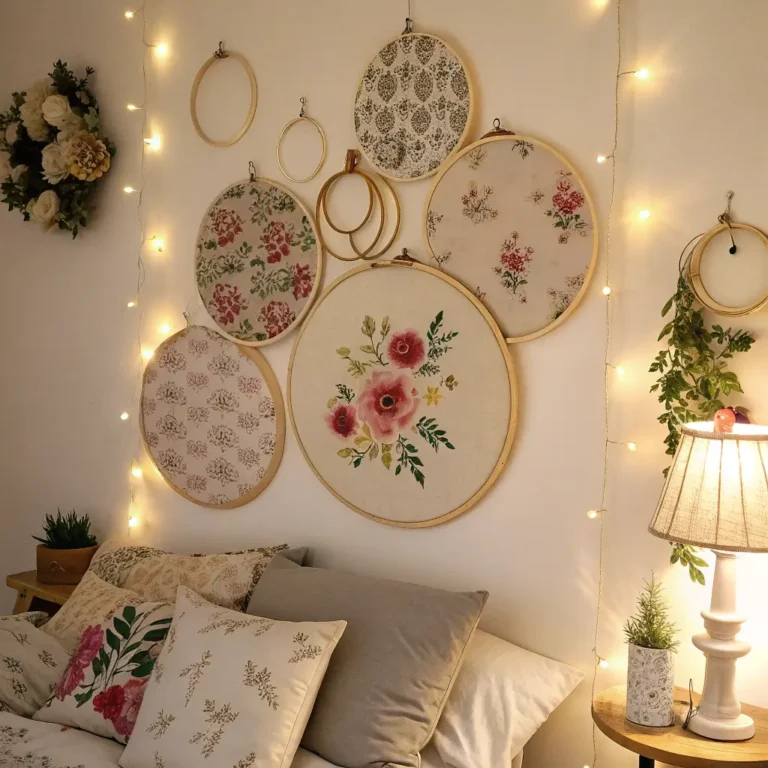
Soft Fabric Wall Tapestry

Before you buy that expensive tapestry online, hear me out: you can make your own soft fabric wall tapestry using literally any fabric that speaks to you. I made mine from a vintage scarf I found at a thrift store for $4. Four. Dollars.
The key is choosing fabric with an interesting pattern or texture. Vintage sheets, scarves, or even shower curtains (yes, really) can work. Mount it using a thin curtain rod or wooden dowel at the top for that intentional, finished look.
Creating Textile Interest
Layer different fabrics for a more complex look. I have a sheer white curtain behind a macrame piece, and the shadows it creates are absolutely dreamy. You can also gather fabric at certain points to create dimension – just use small clear push pins to create subtle ruffles or draping.
This works especially well behind a bed as a headboard alternative. Way cheaper than buying an actual headboard, and you can change it whenever you want a room refresh.
DIY Clay Trinket Tray

Making your own clay trinket trays is basically adult Play-Doh time, except the results actually look sophisticated. Air-dry clay costs about $5, and you can make multiple trays that would easily sell for $30+ each in boutique stores.
Roll out your clay, cut it into organic shapes (perfect circles are overrated), and gently curve up the edges. The imperfect, handmade look is actually what makes these pieces special. My first attempt looked like a drunk pancake, but once I painted it and used it for my rings, everyone wanted to know where I bought it.
Finishing Touches That Elevate
Paint your trays with metallic edges or speckled patterns for that ceramic artist vibe. I use a toothbrush to splatter paint for a terrazzo effect – sounds weird, works perfectly. Seal everything with mod podge for durability.
Make different sizes for different purposes: tiny ones for rings, medium for keys and coins, larger ones for perfume bottles or as a catch-all on your desk. Suddenly your surfaces look intentionally styled instead of just cluttered.
Cozy Floor Cushion Setup

Who needs a couch when you can create a cozy floor cushion setup that’s way more aesthetic and versatile? I started this in my dorm room out of necessity (no space for real furniture) and never looked back.
Mix and match different sizes and textures of cushions and pillows. The key is having varying heights and sizes so it doesn’t look like you just threw pillows on the floor. Large floor cushions as a base, medium pillows for back support, and small decorative ones for visual interest.
Creating Your Floor Oasis
Position your setup near a window or in a corner to create a defined space. Add a soft rug underneath and maybe a small side table (even a stack of books works) for your coffee or book. This becomes the perfect reading nook, meditation space, or just somewhere to sit that isn’t your bed.
Throw in some fairy lights overhead or a salt lamp nearby for ambiance. I’ve had entire friend groups prefer sitting in my floor cushion corner over my actual furniture. There’s something about being close to the ground that feels cozy and intimate.
Recycled Glass Jar Lanterns
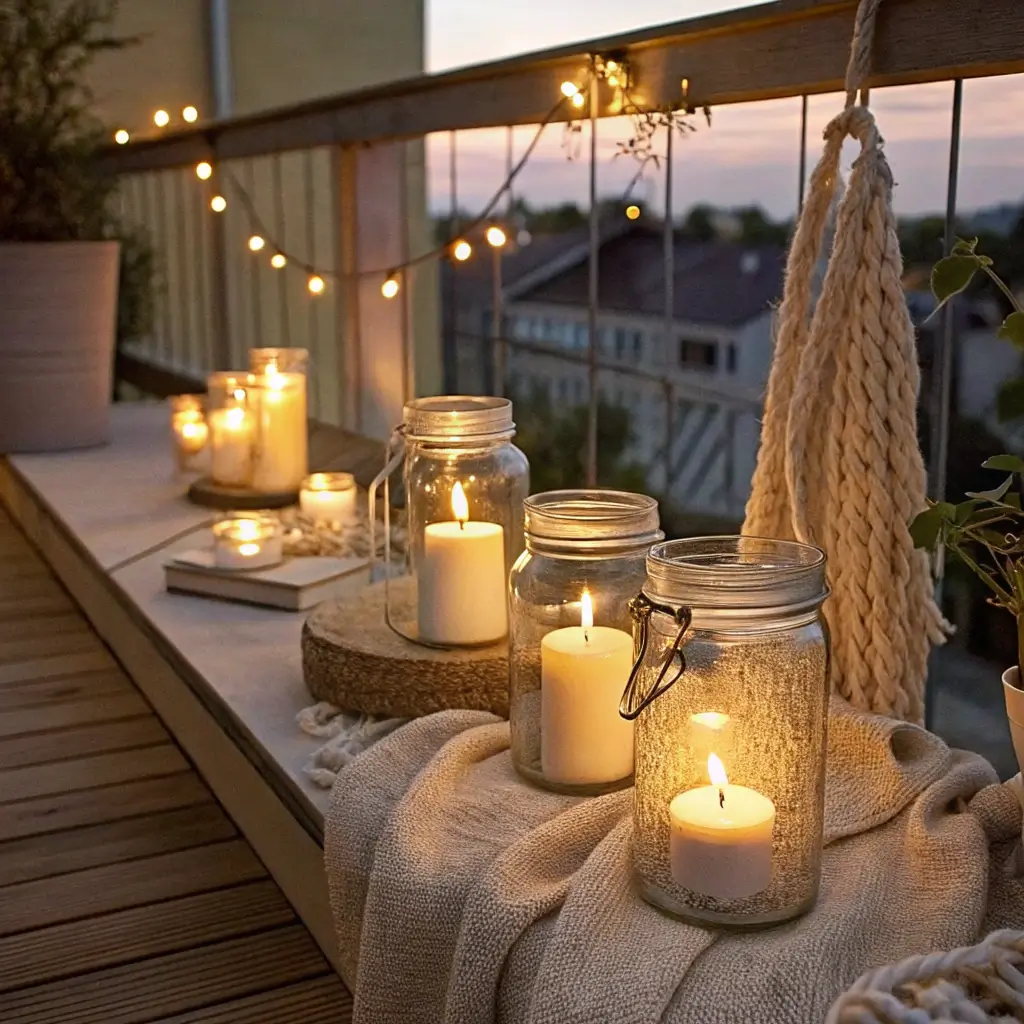
Before you recycle those pasta sauce jars, consider this: recycled glass jar lanterns are having a serious moment, and they cost literally nothing to make. I’ve turned everything from pickle jars to wine bottles into aesthetic lighting that looks like it came from Anthropologie.
Clean your jars thoroughly (nobody wants their room smelling like pickles), then wrap them with wire or twine for hanging. Drop in some battery-powered fairy lights or LED candles, and boom – instant ambiance. The way light refracts through the glass creates the most beautiful patterns on your walls.
Advanced Jar Lantern Techniques
Want to level up? Try frosting your jars with glass spray paint for a softer, diffused light. Or wrap them partially with macrame for that boho vibe. I’ve even used glass paint markers to create patterns that throw colored shadows when lit.
Hang them at different heights from a branch or rod for a chandelier effect. I have five different sized jars hanging in my corner, and at night it looks like a fairy garden. The whole setup cost me exactly zero dollars since I used jars I already had and leftover Christmas lights.
Wrapping It Up
So there you have it – fifteen ways to transform your space into an aesthetic paradise without selling a kidney. The best part about all these DIY projects? They’re completely customizable to your personal style. Whether you’re going for minimalist zen or maximalist chaos, there’s something here for you.
Start with one or two projects that really speak to you. Don’t feel like you need to tackle everything at once – I’ve been slowly adding to my room’s aesthetic for years, and honestly, the evolution is part of the fun. Your room should grow with you, and these DIY projects make that possible without breaking the bank every time you want a change.
Remember, the most aesthetic room is one that feels authentically you. Sure, we all want that Pinterest-perfect space, but at the end of the day, your room should make YOU happy. So grab some supplies, put on your favorite playlist, and start creating. Your future self will thank you every time you walk into your newly transformed space.
Who knows? Maybe you’ll be the next person whose room goes viral on TikTok. And when people ask where you got all your decor, you can casually drop that you made it all yourself. Nothing feels quite as good as that, trust me 😉