15 Creative Album Cover Wall Decor Ideas to Transform Your Space
Alright, let’s have a real talk for a second. Your walls are looking a little… beige, aren’t they? You’ve stared at that same blank canvas for months (or maybe years), dreaming of a space that actually feels like you.
You want something that sparks joy, starts conversations, and doesn’t look like it was copied and pasted from a generic furniture catalog.
But where do you even start? Custom art is expensive, and mass-produced prints can feel so impersonal.
What if I told you the perfect, most personal art collection is probably sitting in a crate on your floor or tucked away in a closet? I’m talking about your records.
Those glorious 12×12 squares of cardboard aren’t just gateways to musical bliss; they’re pieces of art history, personal time capsules, and the absolute key to unlocking a room with killer vibes.
I’ve been a vinyl junkie and interior design dabbler for years, and I can tell you from experience that nothing ties a room together like the album art you love.
It’s a story, a memory, and a color palette all in one. So, let’s ditch the boring and dive into 15 ridiculously creative ways to use album covers as wall decor. Trust me, your walls will thank you.
15 Creative Album Cover Wall Decor Ideas
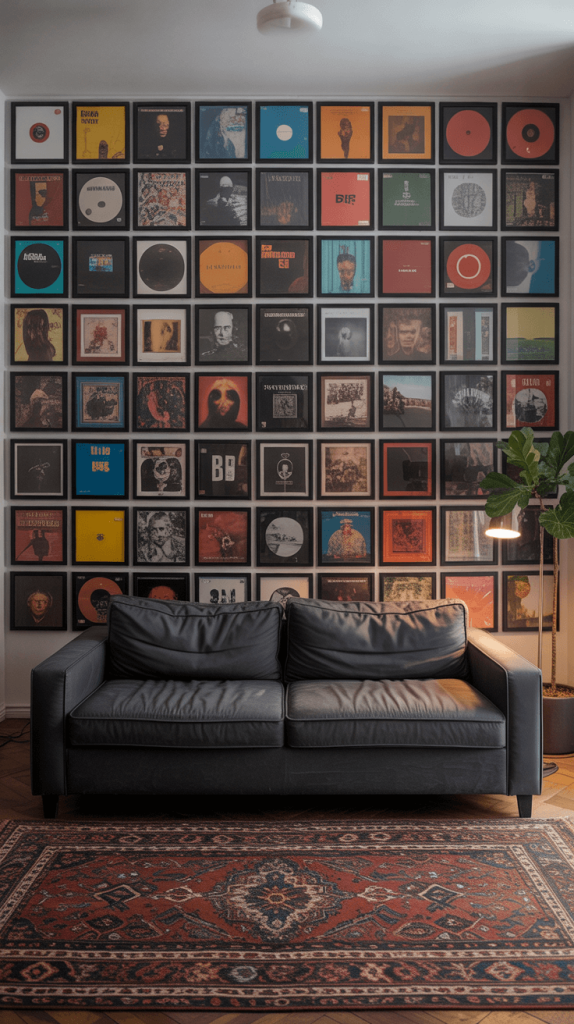
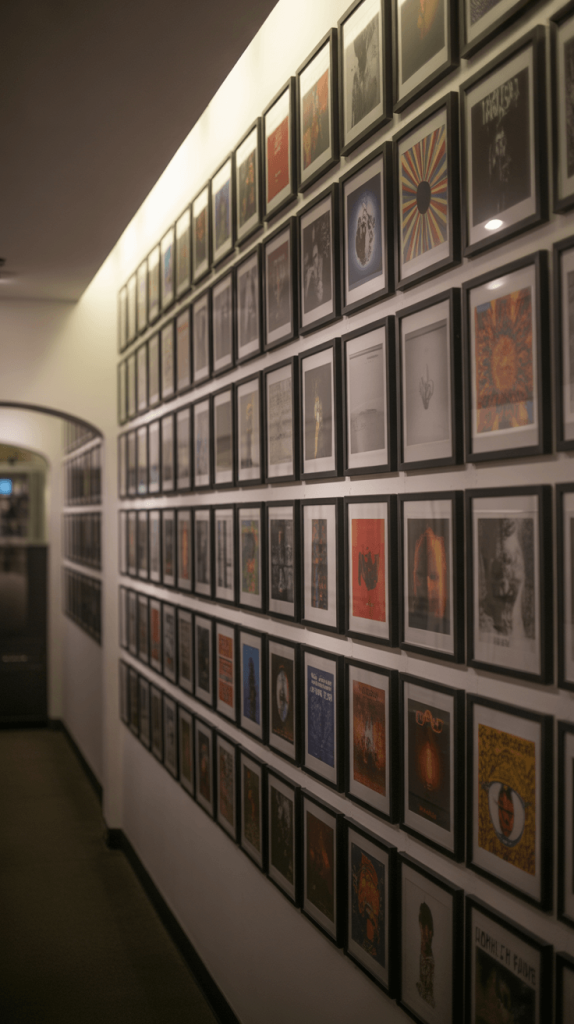
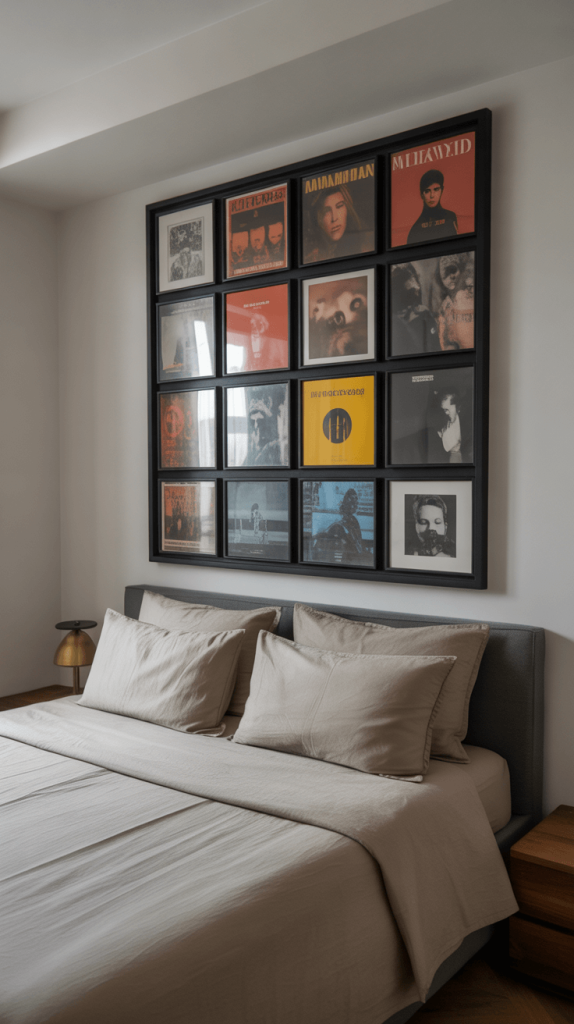
1. Create a Statement Wall with a Gallery of Albums
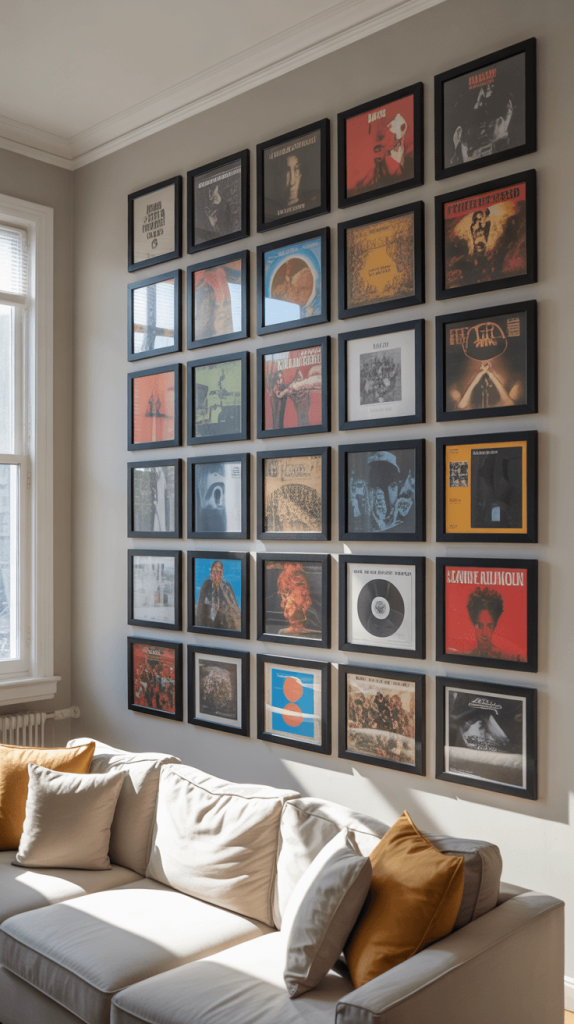
Let’s start with the big one. The granddaddy of all album wall ideas. This isn’t just hanging a few records; this is creating a massive, impactful focal point that screams your personality from the moment someone walks in.
Why it works: A gallery wall is a visual symphony. It creates rhythm, texture, and a powerful narrative.
It shows off the breadth of your taste, tells your story, and frankly, it just looks cool. I did this in my own living room, and it’s the first thing anyone comments on. Every. Single. Time.
How to pull it off without losing your mind:
- Plan, plan, plan! Don’t just start hammering nails willy-nilly. Lay out all the albums on the floor first. Play with the arrangement until it feels balanced. Do you want a clean grid? A more organic, scattered look? A heart shape? (Yes, I’ve seen it, and it’s awesome).
- Mix it up. Don’t just use the albums. Incorporate other elements like a small shelf with a plant, a vintage microphone, or even a mirror to break up the squares and add depth.
- Think about spacing. Keep it consistent. Whether you choose 2 or 4 inches between each frame, stick to it for a polished look.
Pro Tip: Use simple album frames that you can find online or at any craft store. They’re inexpensive and make the whole process look professional. For a more rustic feel, you can even use wooden clothespins on a wire, but frames give it that “this is intentional art” feel.
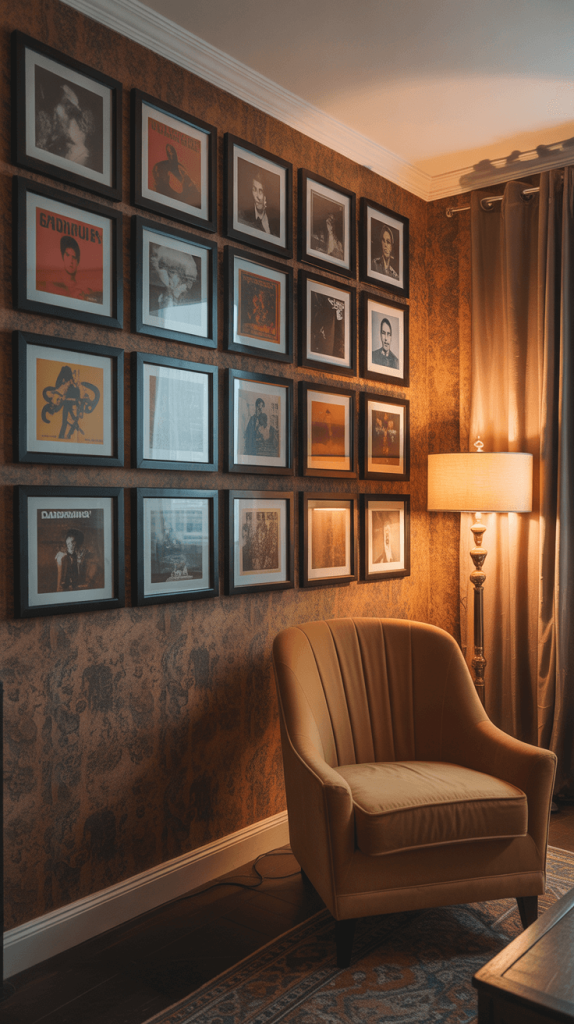
2. Frame Your Favorite Album Art for a Classic Look
Maybe a full-blown gallery wall feels like too much commitment. I get it. You’re a minimalist at heart.
That’s where this idea shines. Instead of a chorus of albums, you pick the lead singer.
Why it works: Choosing one or two iconic albums to frame elevates them to high art. It gives them the respect they deserve and creates a powerful, singular statement.
It’s like having your own personal Mona Lisa, but, you know, with way better music.
How to choose the one:
- Go for iconic. Is there an album that defines a chapter of your life? Dark Side of the Moon, Rumours, Thriller? That’s your guy.
- Consider the artwork itself. Does it have colors that match your room’s palette? Is it a photograph or a painting that stands on its own as art? Think Pink Floyd’s Wish You Were Here or anything by Roger Dean.
- Quality matters. Since it’s a solo act, make sure the sleeve is in good condition. A beat-up copy of The Beatles’ White Album might look cool in a collage, but framed alone, its flaws will be front and center.
FYI, a nice, simple black frame almost always works, but don’t be afraid to get a fancy matted frame for a truly gallery-quality presentation.
3. Incorporate Floating Shelves for a Dynamic Display
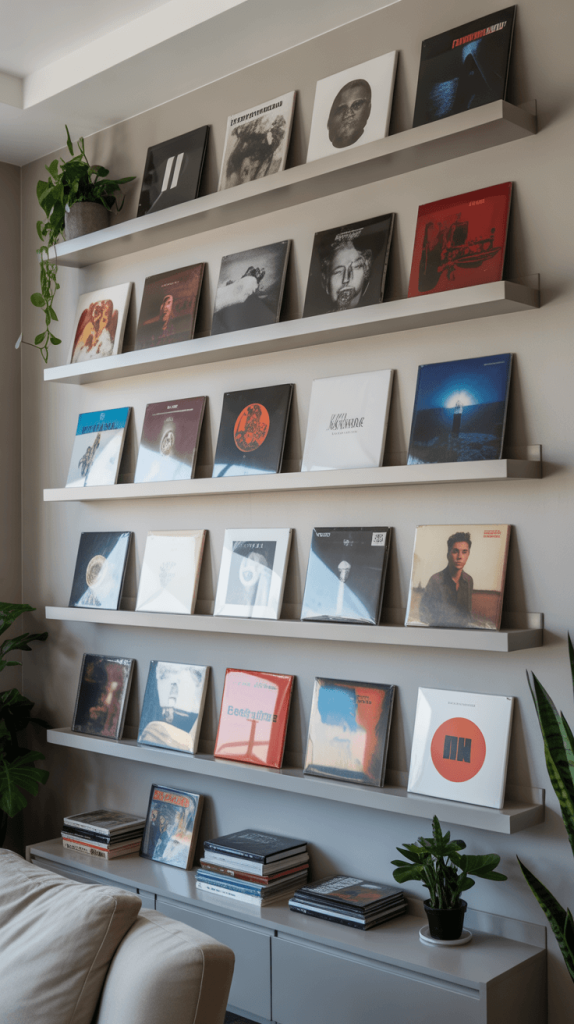
Floating shelves are the Swiss Army knife of home decor, and they are a perfect partner for your vinyl.
This method is fantastic because it’s non-committal and easily changeable. Feeling nostalgic? Swap out Nevermind for Pet Sounds. It’s that easy.
Why it works: It adds dimension. The albums aren’t flat against the wall; they lean out towards you, creating shadows and depth.
It feels lived-in and casual, like a cool record store display.
My personal setup: I have three long, thin floating shelves stacked above my turntable. It’s my “now playing” and “up next” station. It’s functional and decorative. Win-win.
Getting it right:
- Sturdy shelves are a must. Vinyl is heavy. Make sure those shelves are anchored properly into studs or with heavy-duty drywall anchors. A collapsing shelf is a great way to turn your prized possessions into kindling. :/
- Lean them. You can simply lean the albums against the wall on the shelf. For extra security, use a slim bookend, but it’s usually not necessary.
- Create layers. Don’t just line up albums. Place a small plant, a figurine, or a book in between a few records to break the line and add interest.
Also Read: 15 Creative Hallway Wall Decor Ideas to Transform Your Space Instantly
4. DIY Album Cover Clocks

Okay, hear me out. This sounds a little kitschy, and it can be if you’re not careful. But done right, a DIY album cover clock is a fantastic, functional conversation piece.
Why it works: It combines nostalgia with utility. You get to stare at a piece of art you love and know whether you’re late for work.
It’s a perfect project for a beloved album that might have seen better days—maybe the vinyl is scratched, but the cover is still glorious.
How to make it (the easy way):
- Acquire a clock mechanism kit. You can find these at any craft store or online for under $10.
- Carefully measure and mark the center of the album cover.
- Drill a clean hole for the clock mechanism’s stem to fit through.
- Assemble the clock according to the kit’s instructions.
IMO, this works best with bold, graphic covers. Think London Calling by The Clash, Unknown Pleasures by Joy Division, or Abbey Road by The Beatles. You want something where the clock hands won’t completely obscure the art.
5. Create a Collage of Album Covers
Remember making collages for school projects? This is the grown-up, infinitely cooler version. Instead of framing whole albums, you take the best parts and create a brand new piece of art.
Why it works: It allows you to feature dozens of artists in one space. It’s a kaleidoscope of your musical taste.
This is a great solution if you have albums with damaged sleeves or if you’ve acquired a bunch of cheap, beat-up records just for the art.
How to execute your masterpiece:
- Get a large backing board. A large foam board or a pre-made canvas will work.
- Cut and arrange. Carefully cut out the most interesting parts of the covers—the faces, the logos, the coolest graphics. Lay them all out before you glue anything down. Overlap them, rotate them, create a flow.
- Mod Podge is your best friend. Use a decoupage glue like Mod Podge to adhere everything down and seal it with a top coat for a finished look.
This project is messy, creative, and 100% unique to you. No one else in the world will have the same collage.
6. Use Album Covers as a Part of a Themed Room
This is where you level up from “cool wall” to “next-level interior design.” Your album art shouldn’t just live on the wall; it should talk to the rest of the room.
Why it works: It creates a cohesive and immersive experience. The room tells a single story, and the albums are a chapter in that book.
Theme ideas to get you started:
- A 70s Bohemian Den: Shag rug, macramé wall hangings, lots of plants, and albums like Fleetwood Mac, Joni Mitchell, and Led Zeppelin.
- A Moody, Industrial Lounge: Exposed brick (or fake brick wallpaper), Edison bulb lighting, leather furniture, and albums from Joy Division, The Smiths, or Portishead.
- A Bright, Pop Art Kitchen: Bold colors, clean lines, and albums from The B-52’s, Devo, or anything with a fun, cartoonish vibe.
The key is to choose albums that visually complement your chosen color scheme and style. It shows a next-level attention to detail.
Also Read: 15 Creative Bathroom Wall Decor Ideas to Transform Your Space
7. Create a Border of Album Covers Around the Room
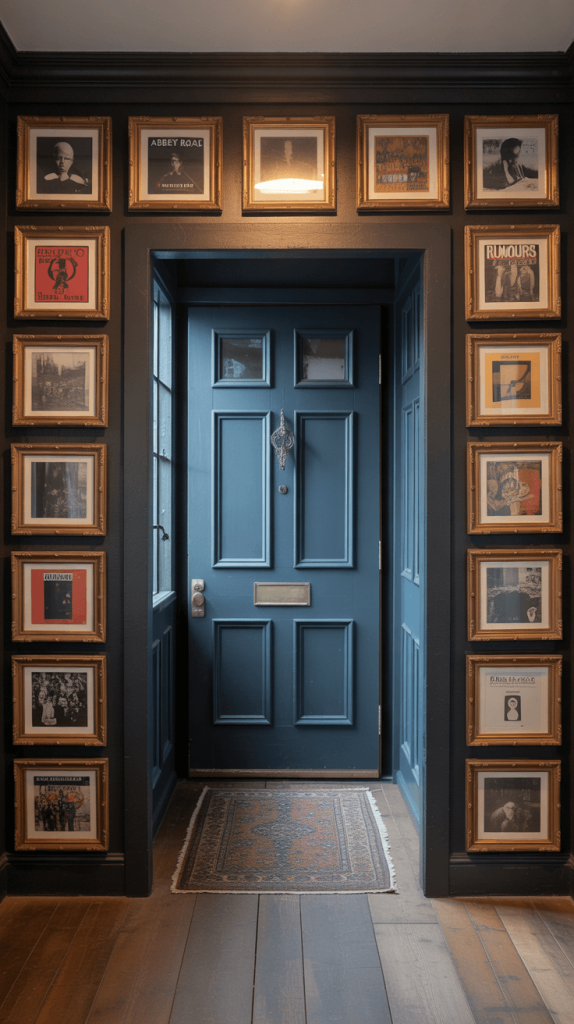
Who says art has to be at eye level? Think outside the box—or in this case, around the top of the room.
This idea uses album covers like a modern, musical crown molding.
Why it works: It draws the eye up, making the room feel larger. It’s a unexpected surprise that people might not notice immediately, but when they do, it’s a real “wow” moment.
How to make it work:
- Choose a consistent color theme. Since the albums will be wrapping the entire room, a random mix might feel too chaotic. Maybe you use only black-and-white covers, or only albums with a strong red accent. This creates a unified border.
- Use simple mounting. You don’t need heavy frames for this. Use adhesive putty or simple clips to keep them secure without damaging your walls or the albums.
- Perfect for high-traffic areas. This is a great idea for a hallway or a room where you don’t have a lot of free wall space for a big gallery.
8. Turn Your Albums Into a Vertical Wall Display
Short on space? Go vertical! This idea uses height to your advantage, creating a column of music that guides the eye upward.
Why it works: It’s a space-saving powerhouse. It can fit on a narrow strip of wall between two doors, next to a window, or in a tight hallway.
It adds interest without consuming precious real estate.
Execution is simple:
- Stack ‘em high. You can use a vertical stack of floating shelves, each holding one album.
- Use a vertical frame. Some companies make multi-album frames that stack 3-4 albums vertically in a single, tall frame.
- Get creative with hardware. You can use a vertical metal bar with adjustable clips, almost like a standing recipe holder, but for your records.
This is a sleek, modern way to display a curated set of albums, like your top five favorites of all time.
9. Display Albums with Color-Coordinated Frames
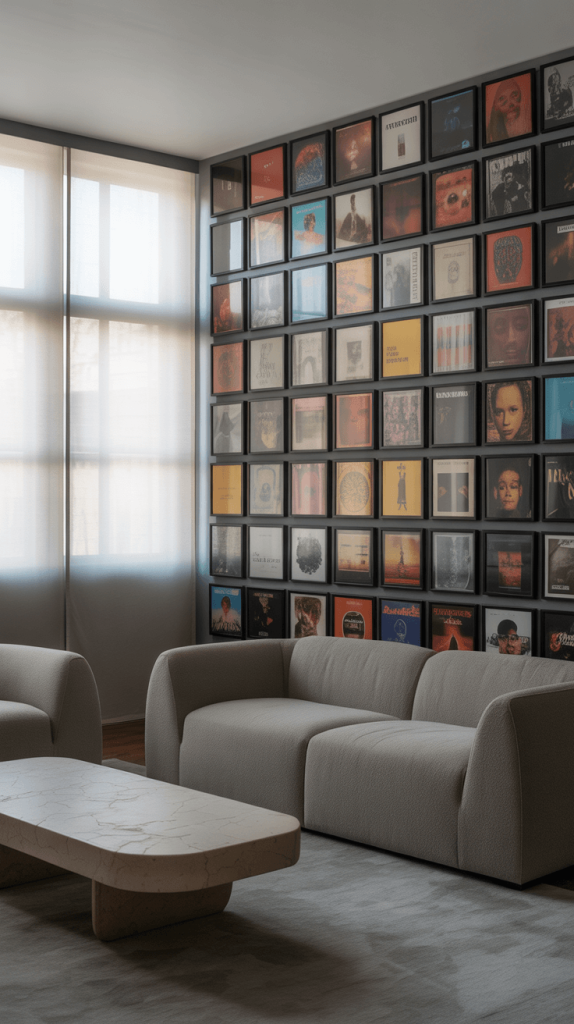
So you’ve got your albums picked out for your gallery wall, but it still feels a little… messy? Here’s a designer secret: unity through color.
Instead of focusing on the color of the albums, focus on the color of the frames.
Why it works: The consistent frame color acts as a neutral border, containing the chaos of wildly different album art and making the entire display feel curated and intentional.
It lets the art pop while the frames provide a calming structure.
Color choices:
- Black or White Frames: The classic choice. They go with everything and never look out of place.
- Metallic Frames (Gold, Silver, Bronze): Adds a touch of glamour and sophistication. Perfect for a living room or dining area.
- A Bold Color (e.g., Navy Blue, Forest Green): This is for the brave! Choosing a colored frame that picks up a minor tone from several of your albums can create a incredibly stylish and modern look.
This one trick can elevate your display from “music fan” to “interior design pro.”
Also Read: 15 Stunning Crochet Wall Decor Ideas to Transform Your Home Easily
10. Use Large-Scale Album Covers for Maximum Impact
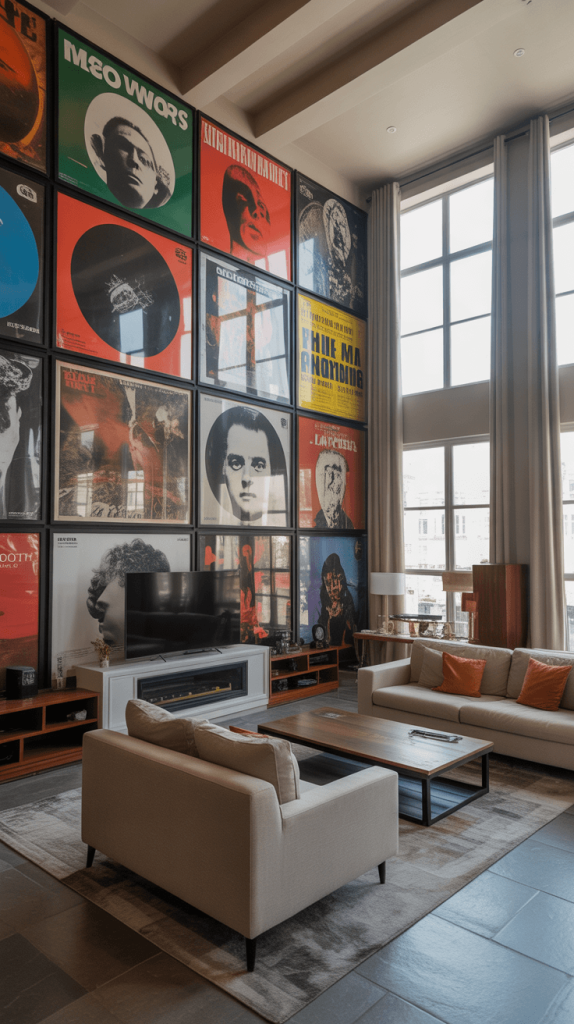
Sometimes, bigger is better. If you have a massive, empty wall that’s begging for something dramatic, why not blow up your favorite album cover to poster size?
Why it works: It’s instant drama. A giant, hyper-detailed piece of art has undeniable presence.
It becomes the undeniable focal point of the entire room.
How to do it (ethically):
- High-Resolution is key. You can’t just blow up a low-res JPEG from Google. The result will be a pixelated mess. You need to source a high-resolution scan of the artwork.
- Check the legality. While making a print for personal use is generally a gray area but often overlooked, be mindful of copyright. This is best done for your own personal enjoyment, not for profit.
- Professional printing. Use a online or local print shop to get it done on quality poster paper or even canvas for a real fine-art feel.
Imagine the cover of Pink Floyd’s Animals or David Bowie’s Aladdin Sane staring down at you from a four-foot-wide canvas. Powerful stuff.
11. Incorporate Album Covers into Your Furniture
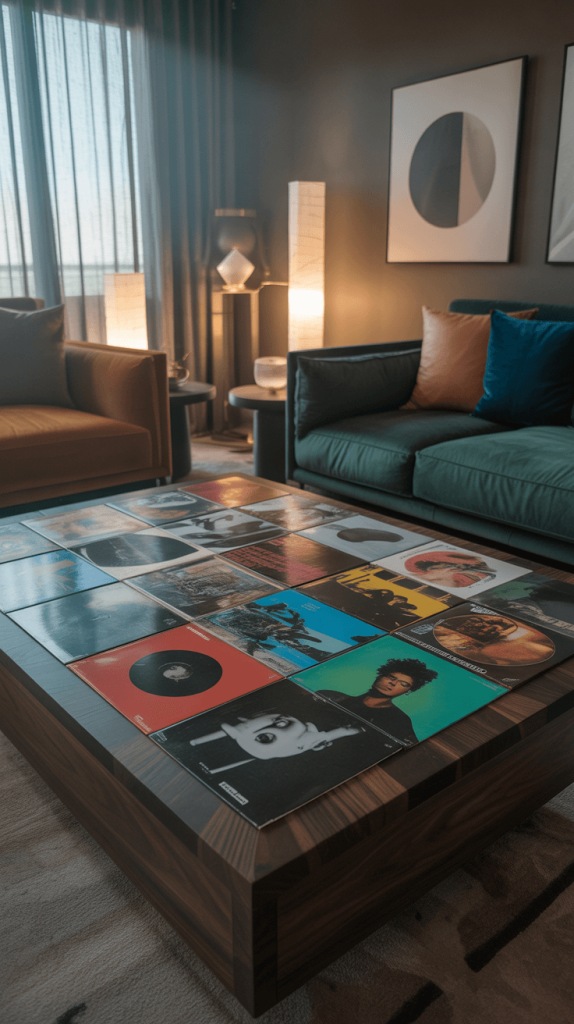
Why stop at the walls? Let’s get your furniture in on the action. This is a surefire way to create a one-of-a-kind statement piece.
Why it works: It’s the ultimate expression of a music-themed space. It’s functional, creative, and utterly unique.
Ideas to spark your creativity:
- Decoupage a Table: Take a cheap coffee table or side table and decoupage it with cut-out pieces of album covers. Seal it with a durable glass top or many layers of clear sealant.
- Line Bookshelves: Use album covers as the backing for your bookshelves. Simply cut them to size and tape or tack them to the back of the shelves. When you remove the books, you see a peek of the art behind.
- Album Cover Headboard: Create a headboard for your bed by mounting a grid of framed albums. Talk about waking up to the music!
This takes more effort, but the payoff is a functional piece of art that you’ll use every day.
12. Design a Multi-Album Frame for Space-Saving
We’ve touched on this with vertical displays, but multi-album frames deserve their own spotlight.
These are special frames designed to hold 4, 9, or even 12 albums in a single, grid-like frame.
Why it works: It gives you the look of a meticulous gallery wall with the ease of a single purchase and installation.
It’s clean, organized, and perfect for those who love the grid look but hate the hassle of measuring 16 individual frames.
What to look for:
- Deep enough shelves: Ensure the frame is deep enough to hold the album without squishing it.
- Clear acrylic front: Many have a clear cover to protect the albums from dust while still keeping them visible and accessible.
- Easy to change: The best designs allow you to easily slide one album out and replace it with another, so you can rotate your display with your mood.
This is arguably the most efficient way to display a curated collection in a small space.
13. Incorporate Your Vinyl Collection in the Display

Why hide the records? The vinyl itself is a beautiful object. This idea combines the sleeve art with the classic look of the black disc, creating a display that celebrates the entire package.
Why it works: It adds a new textural element—the glossy sheen of the vinyl against the matte cardboard of the sleeve. It tells the whole story of your collection.
How to show it off:
- Shelving with a ledge: Use a shelf deep enough to hold the album cover standing up, with a groove or a small ledge in front to display the vinyl leaning against the wall.
- A dedicated “Now Playing” stand: This is a must-have for any turntable setup. It’s a small stand that holds the album currently spinning. It’s a functional display piece!
- Shadow box frames: Use a deep shadow box frame to display the album cover with the record mounted in front of it, perhaps even with the needle gently resting on it (just make sure it’s not actually touching!).
This method appeals to the true audiophile who loves the ritual of playing a record as much as the music itself.
14. Create a Retro Album Display with Neon Lights
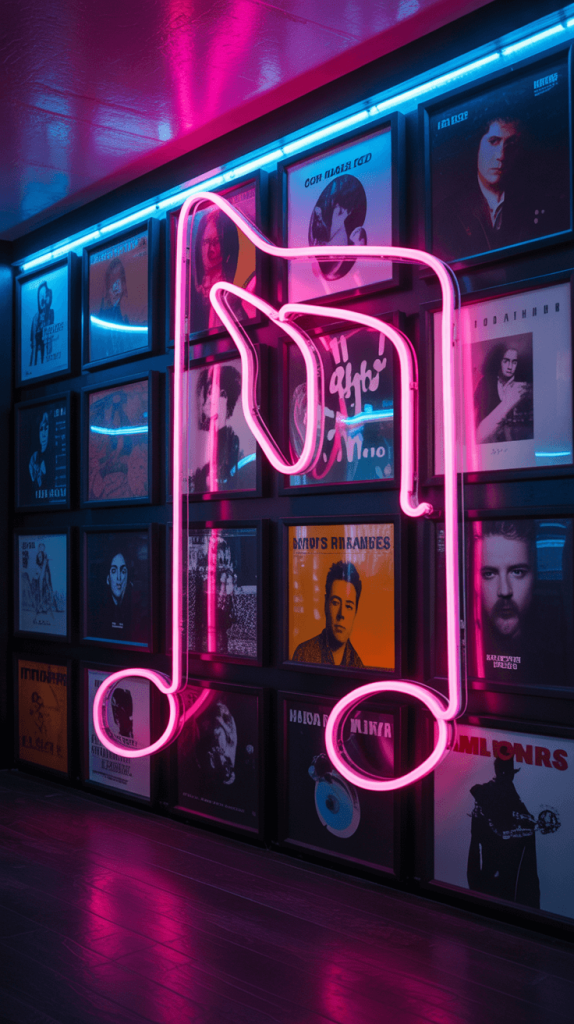
Want to really crank the vibe to eleven? Add some neon. This combination is pure magic, instantly injecting a retro, rock-and-roll, or synthwave atmosphere into your room.
Why it works: Neon is visceral. It adds color, light, and an undeniable mood. Paired with the nostalgic feel of vinyl records, it creates an immersive environment that feels like a slice of the 1980s.
How to nail the look (without wiring your house for a nightclub):
- LED is your friend. Real neon is expensive and fragile. Thankfully, amazing LED neon flex signs are available online in every shape and color imaginable. They’re safe, cool to the touch, and energy-efficient.
- Choose a musical theme. Get a neon sign in the shape of a guitar, a treble clef, your favorite band’s logo, or just a cool phrase like “Hotel California” or “Let It Be.”
- Position it strategically. Place the neon sign above or within your album display. The light will wash over the covers, making the colors pop and creating incredible shadows in the evening.
This is the ultimate idea for a home bar, a game room, or a dedicated music room. It’s a total mood.
15. Mix Album Covers with Other Art Forms
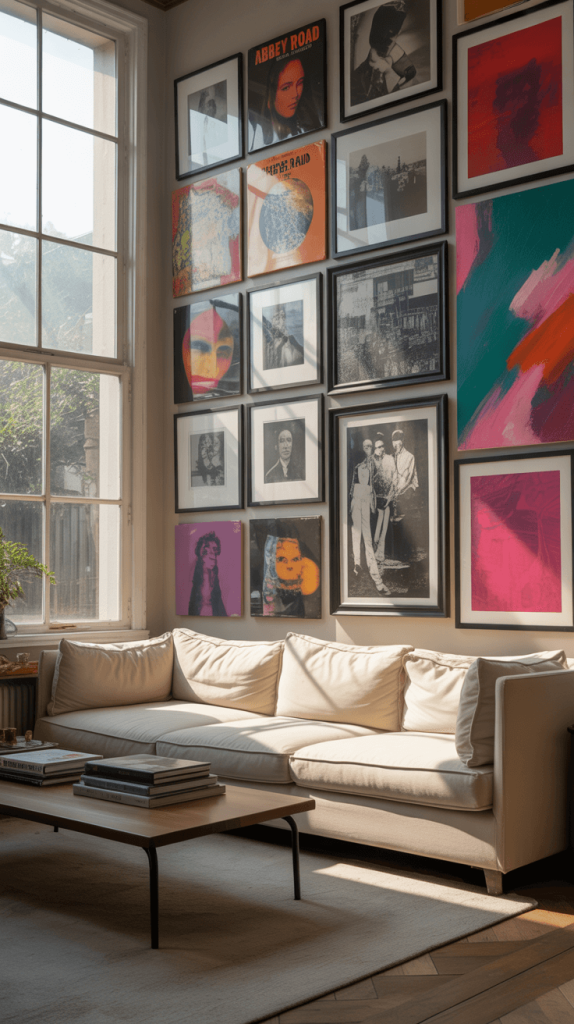
Your wall shouldn’t be a museum exhibit with one type of art. The most interesting interiors mix mediums, textures, and periods. Don’t be afraid to pair your album covers with other things you love.
Why it works: It creates a collected, curated, and deeply personal feel. It shows that your identity isn’t just one thing—you’re a complex human with a range of interests!
What to mix in:
- Concert posters: The obvious and perfect choice. They share the musical theme but often have a different artistic style.
- Photographs: Your own travel photos or vintage prints.
- Paintings or prints: From other artists you admire.
- Wall hangings: Tapestries, metal signs, or antique mirrors.
- Objects: Mount a vintage guitar, a saxophone, or a collection of hats on the wall alongside the albums.
The key is to find a visual thread that ties it all together, like a consistent color scheme or frame style. This makes the eclectic mix feel intentional, not chaotic.
Conclusion
Whew! See? I told you there was a world of possibility beyond that boring beige. Your album collection is more than just music; it’s a toolkit for building a space that is undeniably, uniquely yours.
Whether you go for the bold statement of a giant gallery wall or the subtle coolness of a floating shelf display, you’re not just decorating—you’re telling your story.
So what are you waiting for? Go pull those records out of the crate. Lay them out on the floor. Start playing with arrangements.
Find that frame you’ve been meaning to hang for two years. Don’t overthink it. The best rooms evolve over time, just like your music taste.
Start with one frame. See how it feels. I promise, once you get that first piece of your musical history up on the wall, you’ll be hooked.
Now, if you’ll excuse me, all this talk has made me realize I need to find a place for my original pressing of Sgt. Pepper’s… right after I move this couch. 🙂