10 Stunning Bow Birthday Decor Ideas to Wow Your Guests
Let’s be real here – you’re probably scrolling through Pinterest at 2 AM, desperately searching for birthday party ideas that don’t look like they came straight from a dollar store clearance bin.
Well, guess what? You’ve hit the jackpot because bow decorations are having a major moment, and I’m about to spill all the secrets on how to nail this trend without breaking the bank or your sanity.
I’ve been throwing parties for years (some epic wins, some spectacular fails – we don’t talk about the Great Cake Disaster of 2019), and let me tell you, bows are the ultimate game-changer.
They’re elegant, versatile, and somehow manage to make everything look more expensive than it actually is. Plus, they work for literally any age – from your toddler’s second birthday to your grandmother’s 80th celebration.
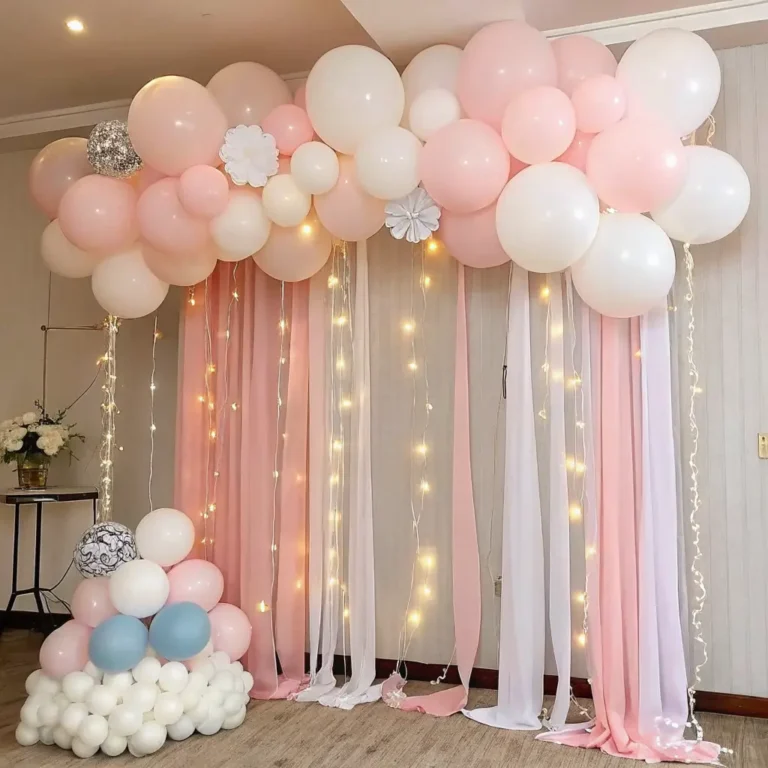
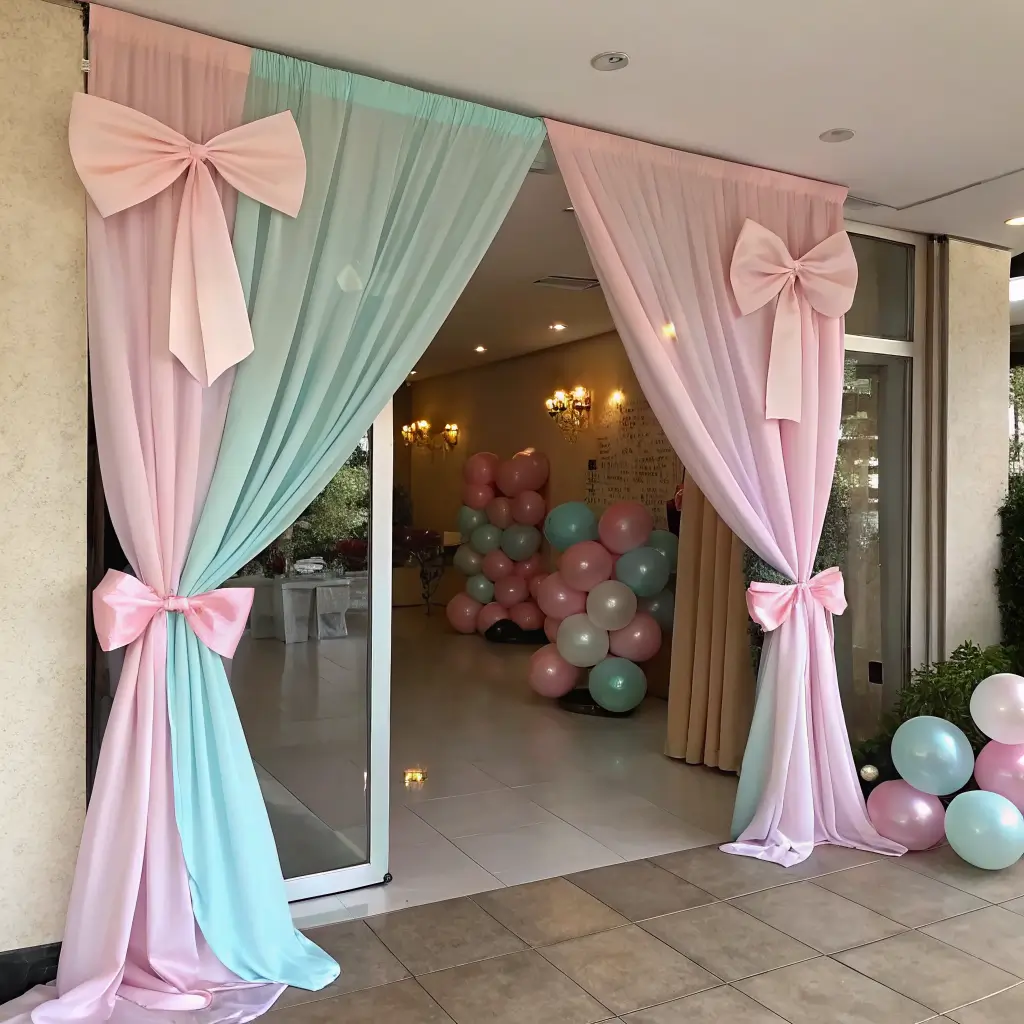
Balloon Arch with Oversized Bows
This is where the magic happens, folks. Balloon arches are already Instagram gold, but add some oversized bows? You’ve just created a photo backdrop that’ll have your guests fighting over who gets the best shot.
I discovered this trick completely by accident when I was setting up my niece’s fifth birthday party. The balloon arch looked gorgeous, but something felt missing. Then I spotted some leftover fabric from another project and thought, “Why not make a massive bow?” Best. Decision. Ever.
Here’s how you nail this look: Start with your standard balloon arch – you can go classic with matching colors or get wild with an ombré effect. The key is positioning your oversized bows at strategic points along the arch. I usually place one large bow at the center and two smaller (but still substantial) bows on either side.
Pro tip: Use wire-edged ribbon for your bows. Trust me on this one. Regular ribbon will droop faster than your energy levels after planning this entire party, but wire-edged ribbon holds its shape like a champ. You can find gorgeous options in satin, organza, or even metallic finishes.
For the bow construction, you’ll want to go big or go home. I’m talking 12-18 inch loops minimum. Create your bow separately, then attach it to the balloon arch using floral wire or zip ties (hidden behind the bow, obviously). The contrast between the round balloons and the structured bow creates this amazing visual tension that photographs beautifully.
Color coordination is everything here. If you’re doing a pink and gold theme, maybe go with blush pink balloons and a deep rose gold bow. The slight color variation adds depth without looking chaotic. And please, for the love of all things party-related, secure everything properly. Nobody wants their gorgeous arch collapsing mid-celebration.
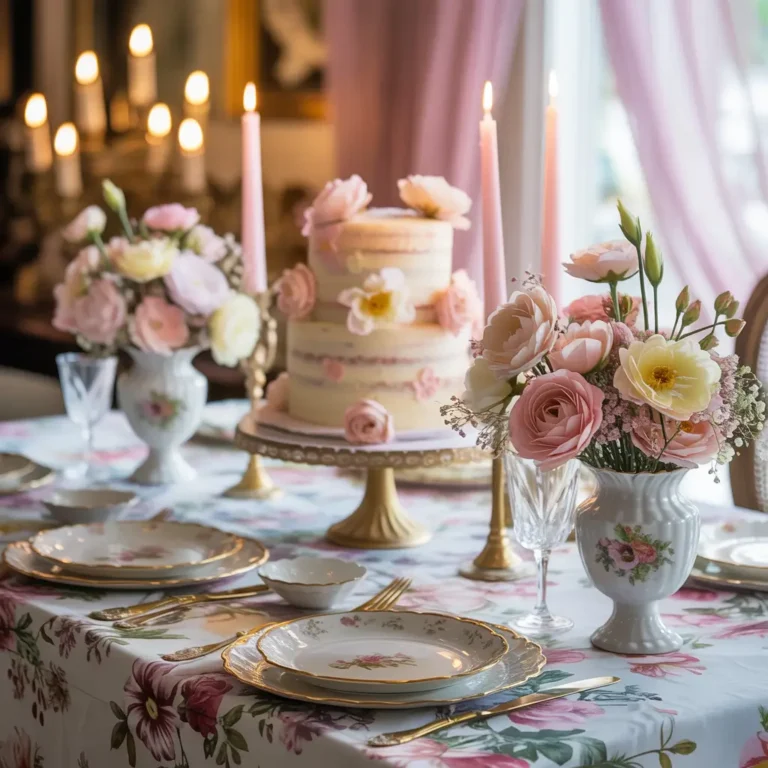
Ribbon Bow Centerpiece for Tables
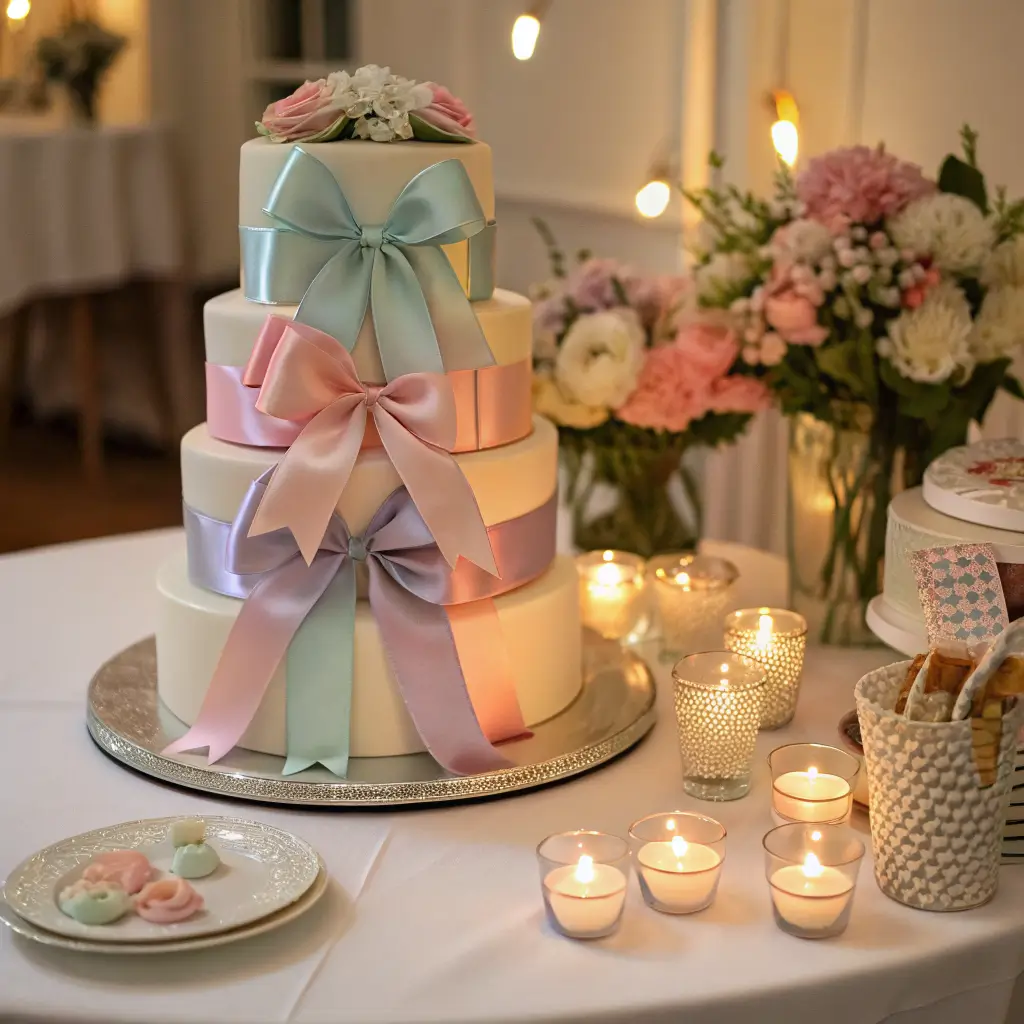
Table centerpieces can make or break your party aesthetic, and honestly? Most people overthink them. You don’t need elaborate floral arrangements that cost more than your monthly coffee budget. Sometimes the most elegant solution is also the simplest.
Ribbon bow centerpieces are pure genius because they’re customizable, reusable, and photograph like a dream. I started making these after getting frustrated with traditional centerpieces that blocked conversation across the table. Ever tried to chat with someone while peering around a massive flower arrangement? It’s awkward.
Start with a solid base – I love using glass cylinders or even repurposed mason jars for a more casual vibe. Fill them with something that adds weight and visual interest. Colored sand, small ornaments, or even wrapped candies work perfectly. Then comes the star of the show: your bow.
Here’s where you can get creative with textures and patterns. Velvet ribbon screams luxury, while gingham gives off those perfect picnic vibes. Metallic ribbons catch the light beautifully, especially if you’re having an evening celebration. I’ve even used burlap ribbon for rustic-themed parties, and it looked absolutely stunning.
The bow itself should be proportional to your container. A tiny bow on a large vase looks lost, while an enormous bow on a small jar looks ridiculous. Aim for the bow to be about one-third the height of your container. Attach it with double-sided tape or a small dab of hot glue (carefully – nobody wants melted plastic in their party photos).
Want to level up this idea? Create varying heights by using different sized containers on each table. Group them in odd numbers – three or five containers per table work best. Your guests will think you hired a professional party planner, but really, you just understood the power of a well-placed bow.
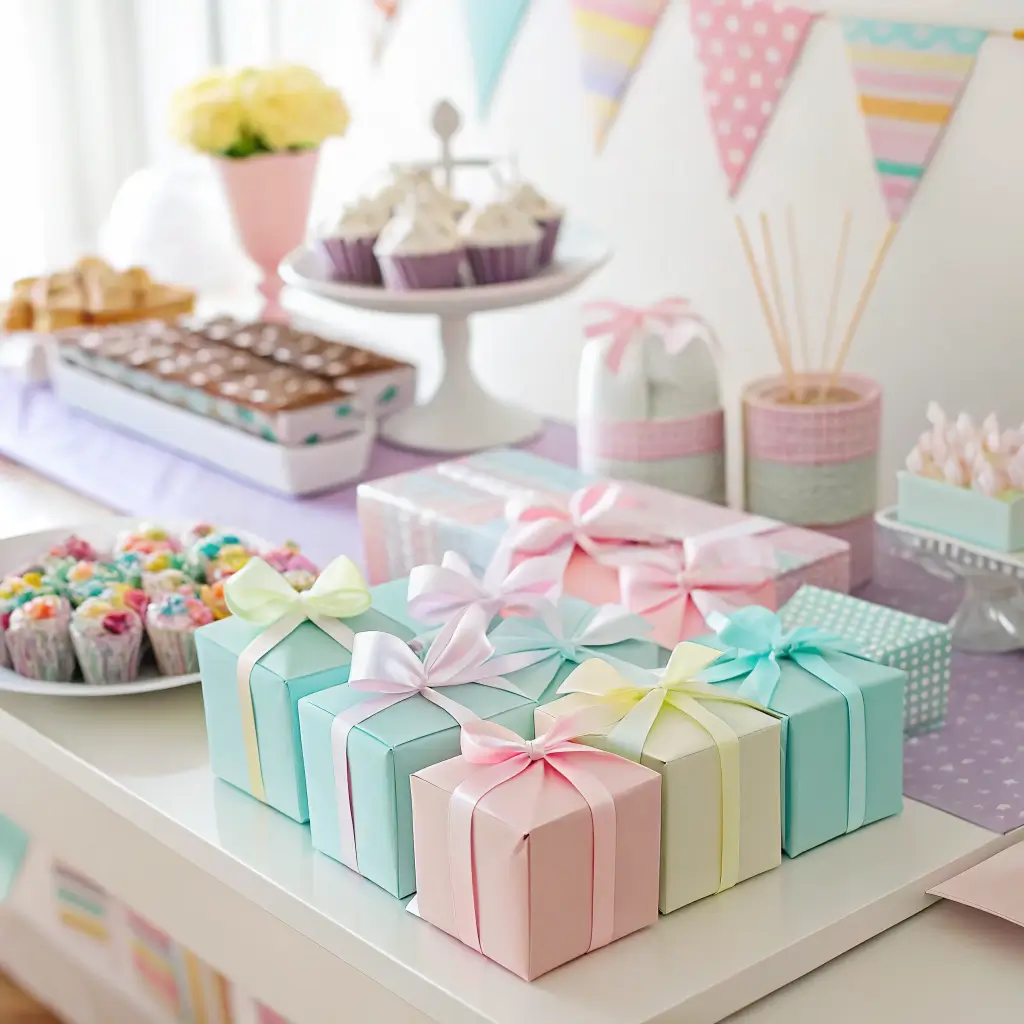
Gift Box Stack Decor with Mini Bows
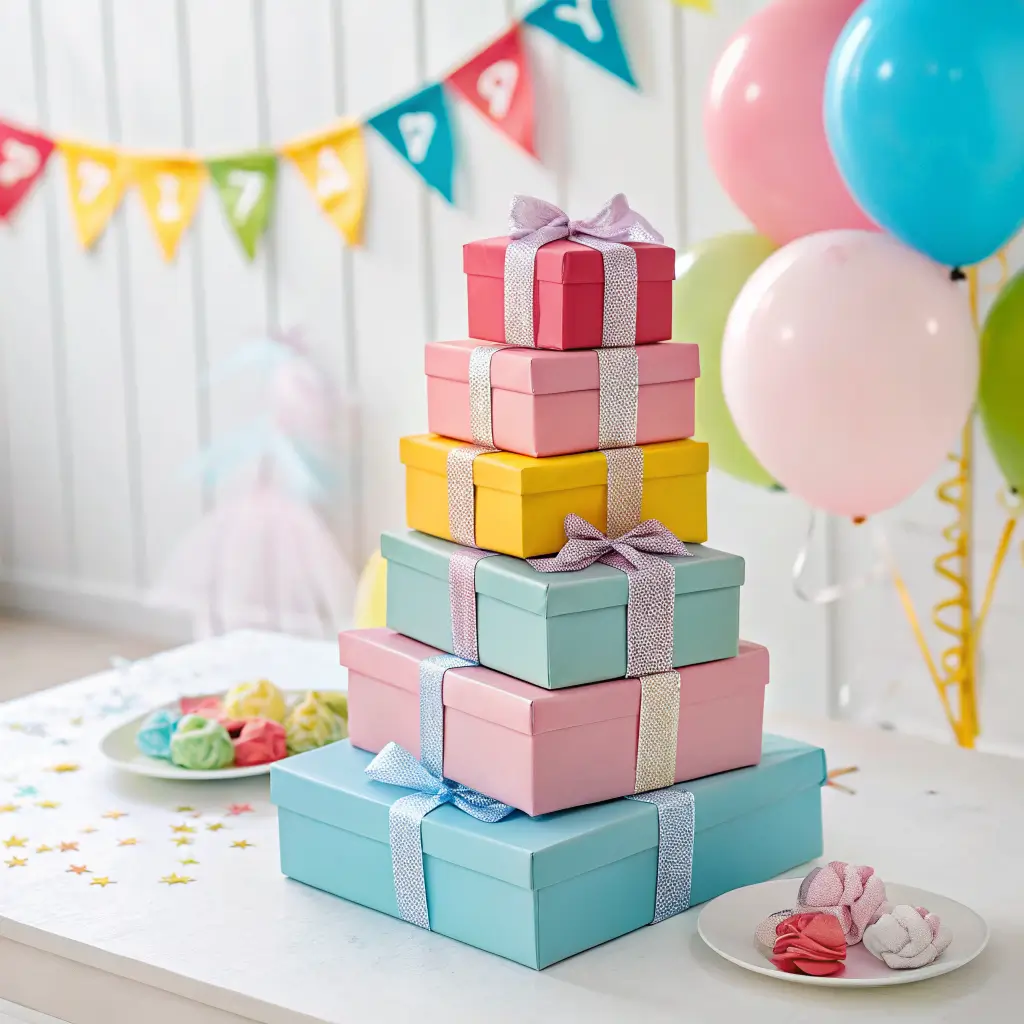
This decoration idea is basically cheating because it looks incredibly sophisticated but requires zero artistic talent. I’m talking about stacking beautifully wrapped empty boxes and adorning them with perfectly tied mini bows. It’s like creating presents that never get opened – which, let’s face it, is sometimes better than the actual gift inside 🙂
The beauty of this concept lies in its versatility. You can create towering stacks for dramatic floor displays or smaller arrangements for side tables. I’ve used this trick for everything from baby showers to milestone birthdays, and it never fails to impress.
Start collecting boxes in various sizes – shoe boxes, jewelry boxes, even Amazon delivery boxes work if you cover them properly. Wrap each box in coordinating paper or fabric. Here’s a secret: you don’t need expensive wrapping paper. Kraft paper with colorful ribbons looks incredibly chic, and solid-colored tissue paper creates an elegant, minimalist vibe.
The mini bows are where this idea really shines. Instead of traditional ribbon bows on top, create small, perfectly formed bows and attach them to the corners or sides of each box. This unexpected placement adds visual interest and prevents the display from looking too predictable.
I like to vary the bow sizes slightly – not dramatically, but enough to create movement. Use different textures too. Satin bows mixed with grosgrain ribbon, or metallic accents paired with matte finishes. The key is maintaining a cohesive color palette while playing with texture and placement.
Pro tip: Secure your stacks properly, especially if you have curious kids at the party. A few strategically placed dots of removable adhesive between boxes will prevent any toppling disasters. Nobody wants their gorgeous display becoming a game of present Jenga.
Also Read: 10 Gorgeous Birthday Room Decor Ideas That Impress Instantly
Chair Backs Decorated with Satin Bows
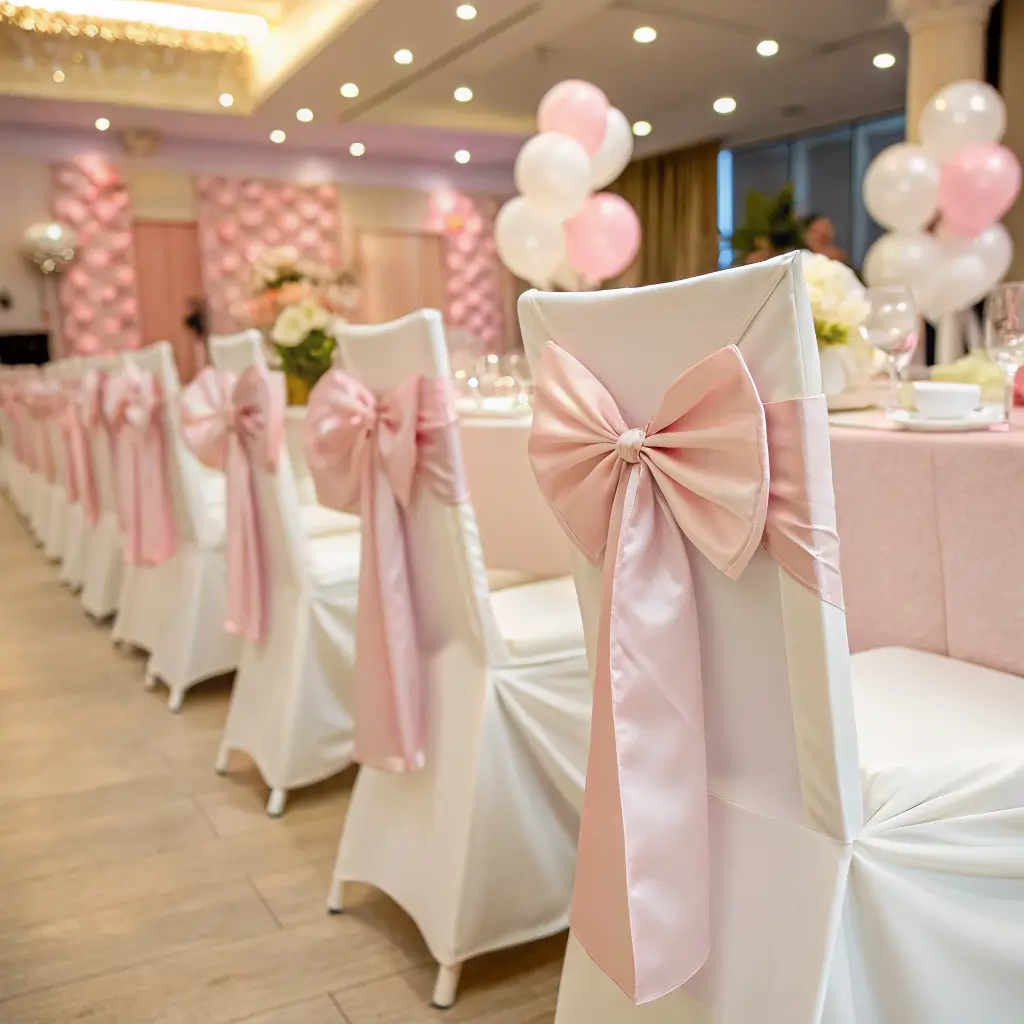
Want to transform your dining room chairs into something worthy of a fancy restaurant? Satin bow chair decorations are your answer. This idea works whether you’re using your everyday dining chairs, rented Chiavari chairs, or even folding chairs that you’re trying to make look less… folding chair-ish.
I stumbled onto this decoration method when planning my sister’s bridal shower. We had these basic wooden chairs that looked fine but weren’t exactly screaming “celebration.” Adding satin bows to the chair backs completely transformed the space. Suddenly, our regular dining room looked like an upscale event venue.
The technique is surprisingly simple. Cut ribbon lengths that are long enough to tie around your chair back with generous tails for the bow. I usually measure about 2.5 times the width of the chair back, but this varies depending on how full you want your bow to look.
Satin ribbon is non-negotiable here. Other materials just don’t have the same elegant drape and light-catching properties. The way satin catches and reflects light adds this subtle glamour that elevates the entire space. Plus, satin ties beautifully and holds its shape throughout the event.
Color strategy matters tremendously. If your chairs are dark wood, lighter colored bows create beautiful contrast. For white or light-colored chairs, you can go bold with jewel tones or keep it soft with pastels. I’ve found that metallic satin ribbons work universally well – they complement almost any color scheme while adding that touch of luxury.
Position the bow slightly off-center for a more organic, less formal look. And here’s something I learned the hard way: tie the bows before your guests arrive. Trying to perfect bow placement while people are waiting to sit down is stressful and unnecessary.
Cake Toppers Featuring Edible Bows
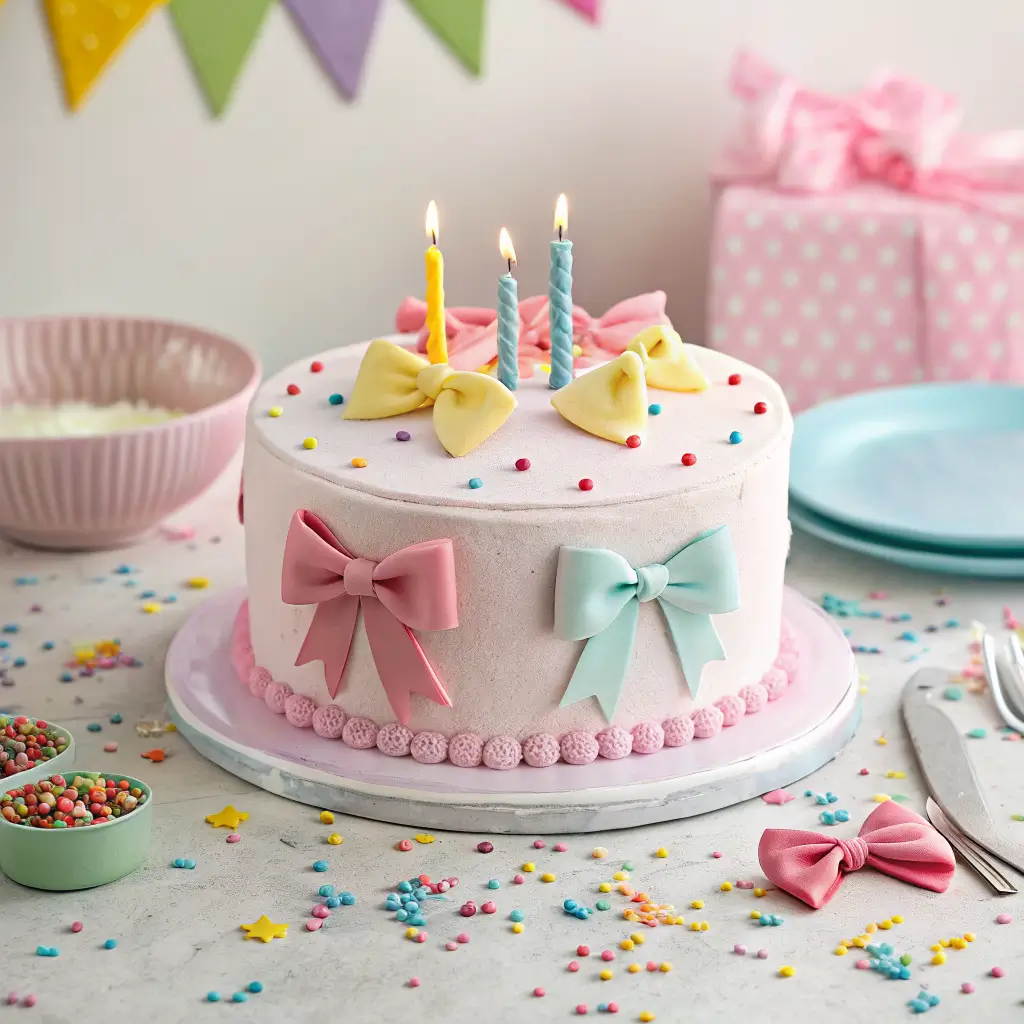
Let’s talk about cake toppers that actually taste good. I’m so over those plastic decorations that you have to awkwardly remove before cutting the cake. Edible bow toppers solve this problem while looking absolutely adorable.
Making edible bows isn’t as complicated as you might think, and the results are seriously impressive. I started experimenting with these after watching too many baking shows and thinking, “How hard could it be?” Turns out, not very hard at all, but the impact is huge.
Fondant bows are the most popular option, and for good reason. Fondant is forgiving, holds its shape well, and can be colored to match any theme. You can buy pre-made fondant or make your own – honestly, the store-bought stuff works perfectly fine for this application. Roll it out, cut bow shapes, and assemble using a tiny bit of water as “glue.”
But here’s where it gets fun: you’re not limited to fondant. Chocolate bows are absolutely stunning and taste infinitely better. Melt chocolate, spread it thin on parchment paper, cut bow shapes while it’s still slightly soft, then carefully assemble once it’s set. White chocolate takes food coloring beautifully if you want to match specific colors.
Gum paste is another fantastic option for more structured, realistic-looking bows. It dries harder than fondant, so your bow will maintain its shape perfectly. The downside? It’s not as tasty as chocolate, but it’s still completely edible.
For positioning, place your edible bow slightly off-center on the cake top. This creates visual interest and makes the cake look professionally decorated. If you’re feeling ambitious, create multiple small bows and scatter them around the cake’s border.
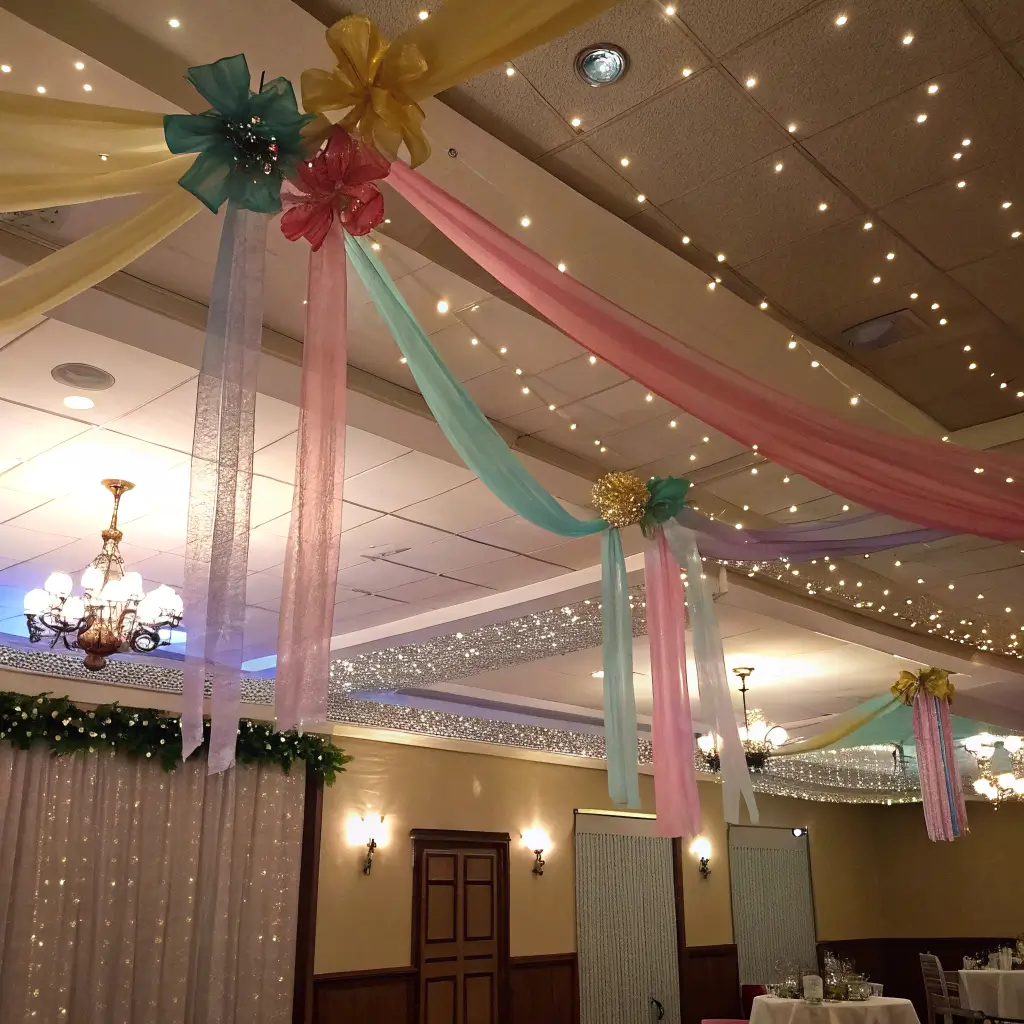
Bow Garland Across the Wall
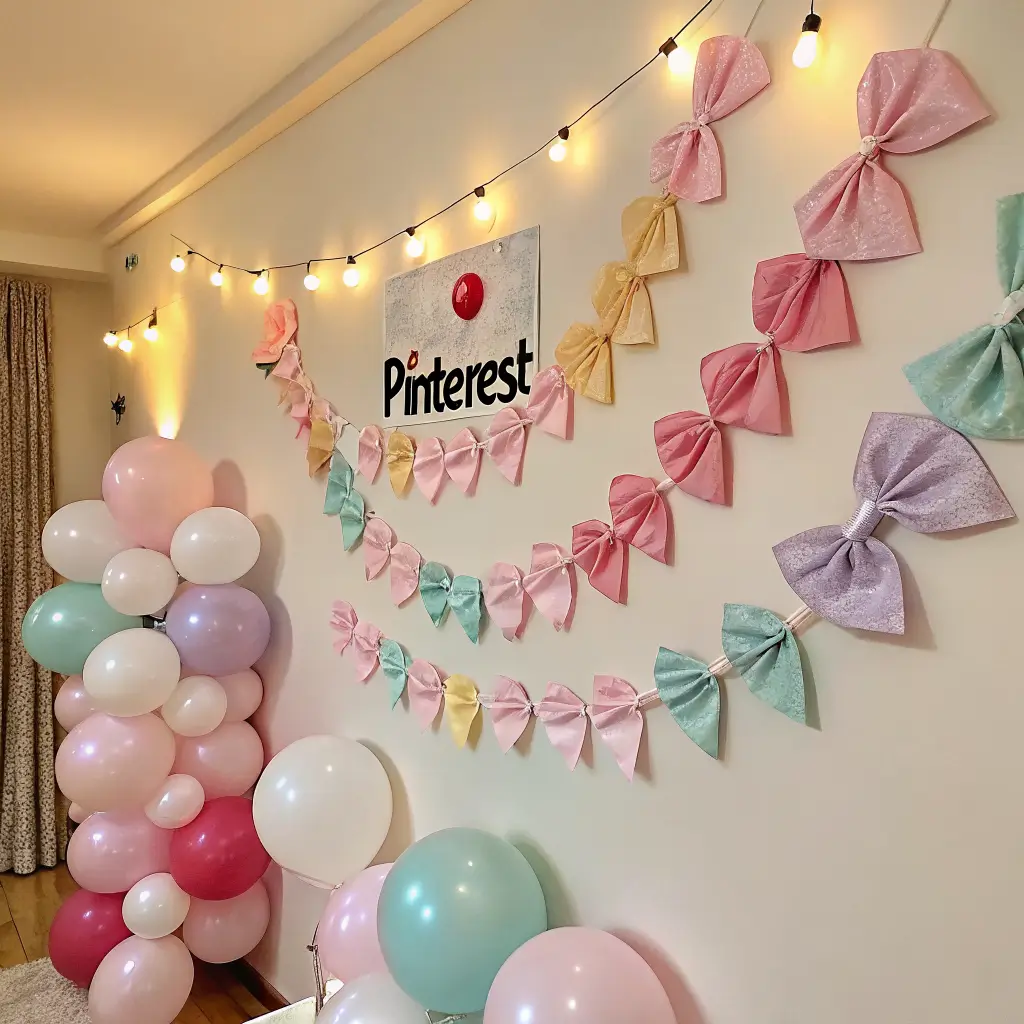
Wall garlands are having a serious moment, and bow garlands take this trend to the next level. I love this decoration because it creates impact without requiring any permanent changes to your space – perfect for renters or anyone who doesn’t want to put holes in their walls.
The concept is beautifully simple: create a series of bows and string them together to form a garland. But the execution is where you can get really creative. I’ve made bow garlands using everything from traditional ribbon to fabric scraps, and each version has its own personality.
Start by deciding on your bow size and spacing. Smaller bows placed closer together create a delicate, feminine look. Larger bows with more space between them feel more dramatic and modern. I typically aim for 6-8 inch spacing between bow centers, but this depends on your wall size and the overall look you’re going for.
For construction, you have several options. You can tie individual bows onto a length of fishing line or thin ribbon. Alternatively, create your bows separately and attach them using small safety pins or clips. The second method is great because you can reuse the bows for other projects later.
Color gradation creates stunning visual effects. Start with one color on the left and gradually transition to another color on the right. Ombré bow garlands photograph beautifully and add sophisticated color depth to your space. Even using different shades of the same color family creates this gorgeous tonal variation.
Hang your garland using removable adhesive hooks or small nails if you don’t mind tiny holes. The key is ensuring the garland has a gentle curve rather than hanging perfectly straight – this creates more natural, organic movement.
Also Read: 10 Easy Simple Birthday Decor Ideas That Impress Everyone
DIY Paper Bow Wall Art
Paper bow wall art is perfect for anyone who loves crafting but doesn’t want to invest in expensive materials. Plus, paper bows can be made in literally any color or pattern, giving you complete creative control over your party aesthetic.
I discovered this technique when I was planning a party on a seriously tight budget. Ribbon was getting expensive, but I had tons of scrapbook paper sitting around. The paper bows turned out so cute that I’ve continued making them even when budget isn’t an issue.
The paper choice makes all the difference. Cardstock works beautifully because it holds its shape well and has enough weight to look substantial. Scrapbook paper with patterns adds visual interest – polka dots, stripes, or even floral patterns can look amazing depending on your theme. Metallic paper creates gorgeous light-catching effects.
For construction, cut two rectangles for the bow loops and one smaller rectangle for the center knot. Score the paper lightly where you want to create folds – this gives you clean, professional-looking creases. Assemble using double-sided tape or glue dots for a clean finish.
Arrangement is everything with paper bow wall art. Create clusters of different sized bows rather than spacing them evenly. This organic grouping looks more intentional and artistic. I like to start with one large bow as a focal point, then add medium and small bows around it.
You can mount individual bows directly to the wall using removable adhesive, or create a larger piece by mounting multiple bows on a canvas or poster board. The canvas approach is great because you can reuse it for future parties or even keep it as permanent decor.
Curtain Tieback Bows for Party Entry
First impressions matter, and curtain tieback bows at your party entrance set the tone before guests even step inside. This decoration idea transforms ordinary doorways into elegant party entrances that immediately signal “something special is happening here.”
I started using this technique after realizing that most party decorations focus on the main party area, but the entrance gets overlooked. Your guests’ excitement should start building the moment they arrive, and entrance decorations are crucial for creating that anticipation.
The setup is surprisingly straightforward. If you have existing curtains or drapes near your entrance, simply add decorative bow tiebacks. If you don’t have curtains, create temporary ones using lightweight fabric or even streamers. The key is choosing materials that complement your overall party theme.
For outdoor parties, this works beautifully with porch columns or fence posts. Drape fabric between posts and secure with oversized bows. The flowing fabric creates movement and elegance, while the bows add that perfect finishing touch.
Material selection impacts the entire vibe. Organza creates ethereal, fairy-tale effects perfect for princess parties or romantic celebrations. Burlap works beautifully for rustic or outdoor themes. Satin screams elegance and works for more formal celebrations.
Consider the practical aspects too. If it’s windy, choose heavier fabrics that won’t blow around constantly. If kids will be running through the entrance, make sure everything is secured properly and won’t create tripping hazards.
Color coordination with your main party palette is essential. The entrance should feel connected to the main party space, not like a completely separate event. Use the same color family but maybe in different shades or textures to create cohesion.
Hanging Ribbon Bow Chandelier
This is the showstopper decoration that’ll have everyone asking “How did you make that?” A hanging ribbon bow chandelier creates a stunning focal point that works equally well over dining tables, dessert stations, or dance floors.
I’ll be honest – this project requires a bit more time and patience than some of the others, but the results are absolutely worth it. The first time I made one for my friend’s 30th birthday party, guests were taking photos of the chandelier almost as much as they were taking photos of each other.
Start with a base structure. You can use an embroidery hoop, a wire wreath form, or even a hula hoop for larger installations. The base will be completely hidden by ribbons, so don’t worry about it being pretty – focus on structural integrity.
Create bows in varying sizes and attach them to ribbon streamers of different lengths. This creates beautiful movement and depth. I typically make 15-20 bows for a standard-sized chandelier, but this depends on your base size and desired fullness.
The hanging mechanism is crucial for safety. Use strong fishing line or thin cable to support the weight. Test your hanging point thoroughly before the party – you don’t want your gorgeous chandelier crashing down mid-celebration. If you’re renting a venue, check their policies about hanging decorations.
Color variation within the same family creates stunning effects. Different shades of pink, or various metallics, or even different textures in the same color all work beautifully. The key is maintaining enough similarity that it looks intentional rather than random.
Lighting considerations can elevate this decoration even further. If you can position your chandelier near existing lighting, the ribbons will catch and reflect light beautifully. Some people even add battery-operated LED string lights within the chandelier for extra sparkle.
Also Read; 10 Creative Birthday Party Decor Ideas for Stunning Setup
Bow-Themed Party Favors
Party favors are often an afterthought, but bow-themed favors tie your entire decoration scheme together while giving guests something memorable to take home. Plus, they’re usually much more appreciated than random trinkets that end up in junk drawers.
The beauty of bow-themed favors is their versatility. You can go simple with bow-topped treat bags, or get elaborate with handmade bow accessories. I’ve found that the most successful party favors are either useful or edible – preferably both.
Bow hair accessories are perfect for parties with female guests of any age. Little girls love them, teenagers think they’re cute, and adults appreciate well-made accessories. You can make simple bow clips using ribbon and bobby pins, or get fancier with headbands or hair ties.
For mixed-gender parties, bow-topped treat containers work beautifully. Fill small boxes or bags with candies, cookies, or other treats, then top with a perfectly tied bow. The container becomes part of the favor – guests can reuse the boxes for storage or gift-giving.
DIY bow-making kits are surprisingly popular favors. Include pre-cut ribbon pieces, instructions, and maybe a small clip or hair tie. Guests can make their own bows at home, extending the party experience beyond the actual
Conclusion
You now have ten solid ways to make bows the star of your next birthday bash. Bows aren’t just for gift wrapping anymore; they’re versatile, stylish, and surprisingly easy to pull off. You don’t need a degree in event planning to make these work.
Pick one idea that sparks joy, or mix and match a few if you’re feeling ambitious. Start small if you’re new to DIY decor. A few chair backs or a simple garland can transform a room without overwhelming you.
Remember, perfection isn’t the goal here. Your guests care about the vibe, not whether every loop is symmetrical. I’ve attended parties where the decor was “rustic” (read: slightly messy), and everyone still had a blast.
So, grab some ribbon, fire up the glue gun, and let your creativity run wild. You’ve got this. And if a bow looks a little wonky? Just call it “artisanal” and keep moving. 🙂