15 Whimsical Cute DIY Room Decor Ideas for a Stylish Touch
Remember that time you walked into someone’s room and thought, “Wow, this looks straight out of Pinterest?” Well, guess what – you can totally create that same vibe without spending your entire paycheck at Target.
I’ve spent countless weekends crafting, hot-gluing, and occasionally cursing at tangled fairy lights, and I’m here to share the DIY projects that actually work (and won’t make you want to throw your glue gun across the room).
Let’s get real for a second – we all want our rooms to look amazing, but who has the budget for those fancy designer pieces? That’s where these 15 cute DIY room decor ideas come in clutch.
Each one takes minimal skill, basic supplies, and maybe an afternoon of your time. Plus, you’ll get that sweet satisfaction of saying “Oh, I made that” when someone compliments your decor.
Mini Fairy Light Jars
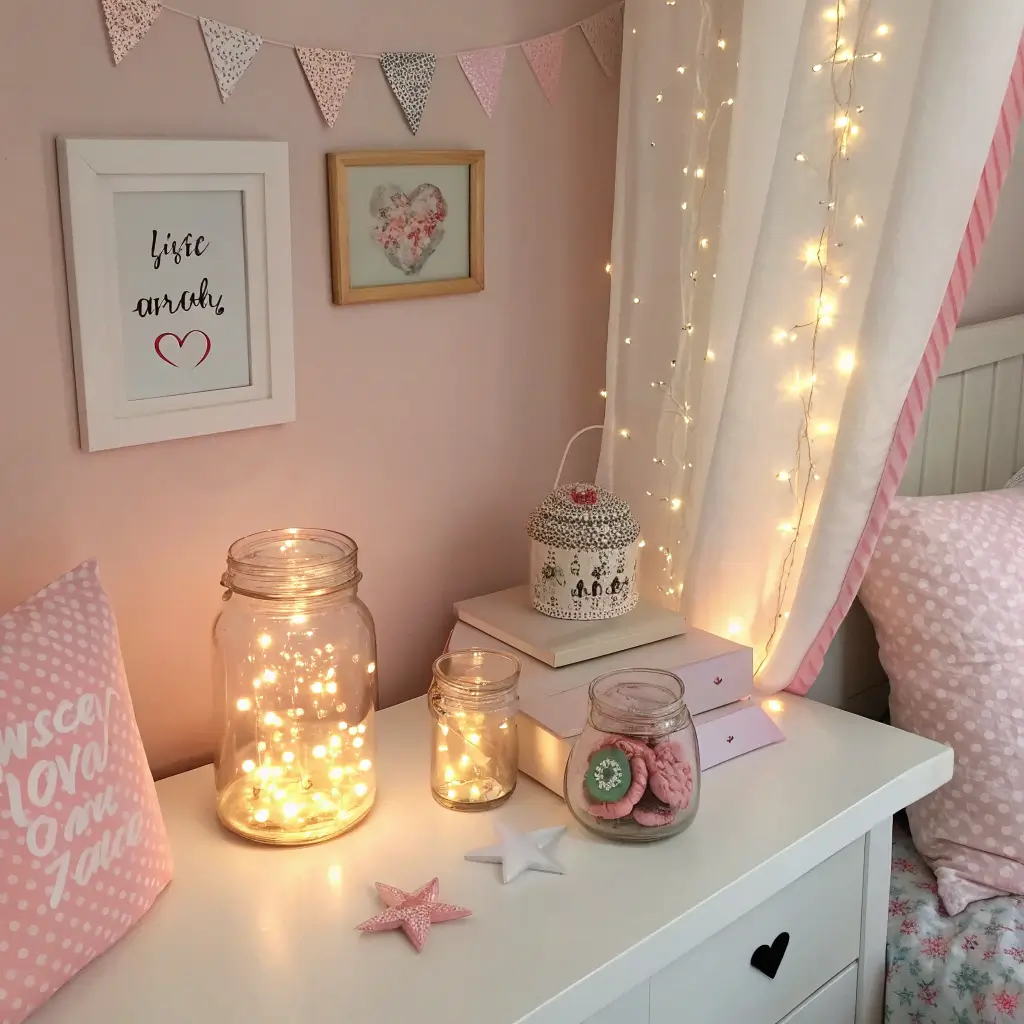
Why These Little Beauties Work Magic
You know those boring empty jars sitting in your recycling bin? They’re about to become your new favorite mood lighting. Mini fairy light jars create this dreamy, cozy atmosphere that makes everything feel instantly more magical – and IMO, they’re way better than those expensive lamps everyone’s buying.
I started making these after accidentally breaking my bedside lamp (long story). Now I’ve got like seven of them scattered around my room, and honestly? Best accident ever. The soft glow creates perfect ambiance whether you’re reading, studying, or just scrolling through TikTok at 2 AM.
How to Make Them Without Going Crazy
Here’s what you need to transform those sad jars into lighting masterpieces:
- Mason jars (any size works, but medium ones look best)
- Battery-powered LED string lights (get the warm white ones, trust me)
- Frosted glass spray paint (optional but adds that dreamy effect)
- Ribbons or twine for decoration
- Hot glue gun (your new best friend)
Start by cleaning your jars thoroughly – nobody wants grimy fairy lights. If you’re feeling fancy, spray the outside with frosted glass paint for that soft, diffused look. Once dry, carefully coil your fairy lights inside, leaving the battery pack outside. You can hide the battery pack by wrapping ribbon around the jar’s neck or tucking it behind wherever you display the jar.
Pro Tips That’ll Save Your Sanity
Want to level up your fairy light game? Add some dried flowers or fake snow inside the jar before adding the lights. Creates this whole enchanted forest vibe that looks way more expensive than it actually is. Also, invest in lights with timers – nothing kills the mood faster than having to get up to turn them off when you’re already cozy in bed.
Handmade Wall Tassel Hangings

The Boho Touch Your Walls Are Begging For
Ever notice how those trendy boutiques always have amazing wall hangings that cost like $80? Yeah, we’re not doing that. Handmade wall tassels give you that same boho-chic look for literally a fraction of the price. Plus, making them is oddly therapeutic – like meditation, but you end up with cute decor instead of just inner peace.
I got into making these when my best friend asked me to help decorate her dorm room. We made five different tassel hangings in one afternoon, fueled by iced coffee and terrible reality TV. Now everyone thinks she hired an interior designer. The secret? It’s literally just yarn and patience.
Your Step-by-Step Guide to Tassel Paradise
Let’s break down what you’ll need:
- Yarn or macrame cord (mix colors for extra pizzazz)
- Wooden dowel or branch (for that rustic touch)
- Scissors (sharp ones, please)
- Cardboard (for wrapping)
- Optional: beads, feathers, or pompoms
Cut a piece of cardboard about 12 inches long. Wrap your yarn around it about 30-40 times – this creates one tassel. Slide it off carefully, tie a piece of yarn tightly around the top, then cut the bottom loops. Boom, you’ve got a tassel! Make several in different lengths and colors, then attach them to your dowel with more yarn.
Making It Look Professional (When You’re Definitely Not)
The trick to professional-looking tassels? Trim them evenly after they’re hanging. I learned this the hard way after my first attempt looked like it got attacked by scissors-wielding toddlers. Also, mixing textures – like combining regular yarn with some metallic thread – instantly elevates the whole piece.
Personalized Photo Collage Frames
Because Your Memories Deserve Better Than Your Phone Screen
Listen, we all have approximately 5,000 photos on our phones that never see the light of day. Personalized photo collage frames fix that problem while making your room feel more like, well, yours. No more staring at blank walls wondering what to put there – your memories become the art.
I started doing this after realizing I had zero printed photos despite taking pictures of literally everything. Now my room tells my story through images, and it’s way more meaningful than any generic wall art could be. Plus, it’s a great conversation starter when people come over.
Creating Your Gallery Wall Without the Stress
Here’s your supply list:
- Various sized frames (thrift stores are goldmines for these)
- Printed photos (mix sizes for visual interest)
- Spray paint (to unify mismatched frames)
- Double-sided tape or command strips
- Optional: decorative paper for matting
First, lay out your frames on the floor to plan your arrangement. Take a photo of the layout (genius, right?) so you remember where everything goes. If your frames are different colors, spray paint them all the same shade for a cohesive look. Print your photos slightly smaller than the frame openings – this gives you room to add decorative paper as matting if you want to get fancy.
The Secret to Not Ruining Your Walls
Can we talk about how terrifying it is to hammer nails into walls? That’s why command strips are your best friend here. They hold surprisingly well and won’t leave you explaining holes to your landlord. Arrange your frames starting from the center and working outward – it creates better balance than starting from one side.
Also Read: 15 Beautiful Aesthetic Room Decor DIY Ideas for Small Spaces
DIY Macrame Plant Hangers
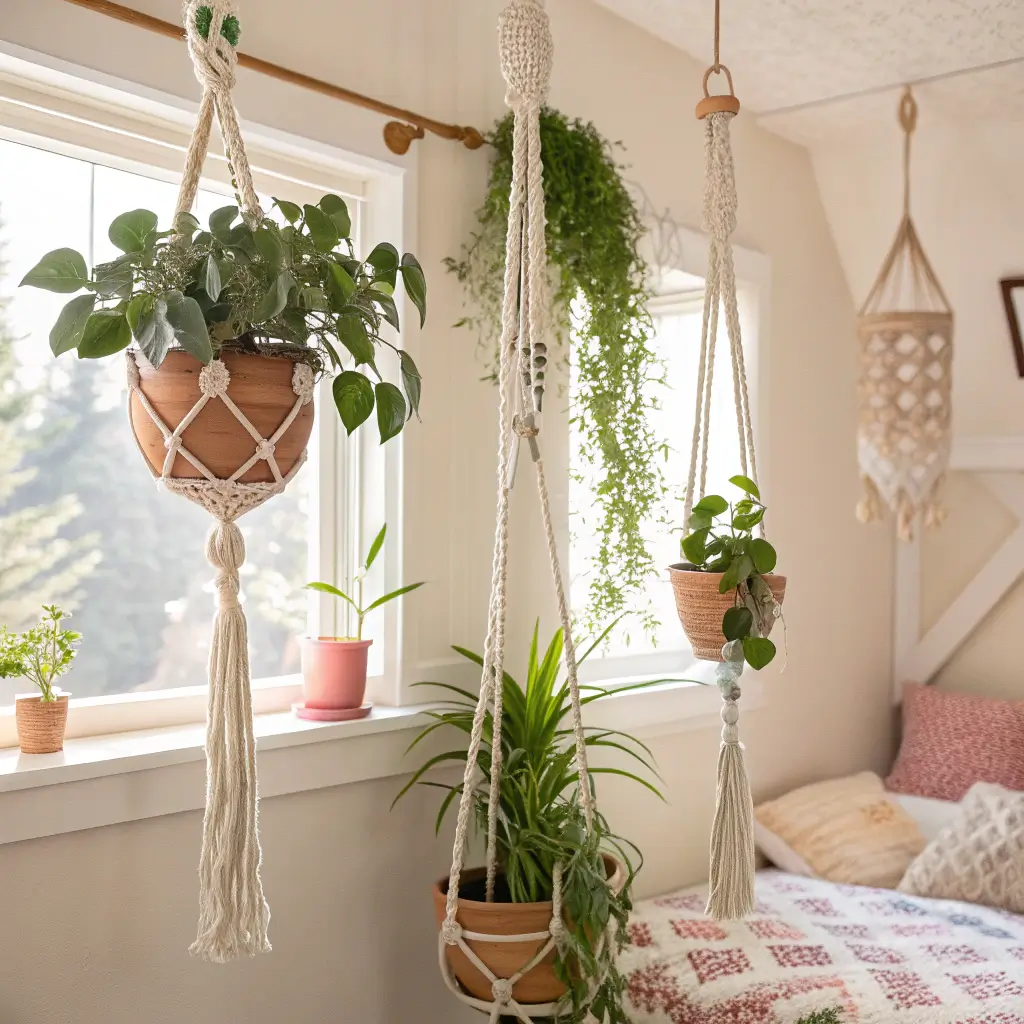
Bringing the Outdoors In (Without the Dirt Everywhere)
Plant parents, this one’s for you! DIY macrame plant hangers let you display your green babies at different heights, creating this jungle vibe that makes your room feel alive. And before you say “I can’t keep plants alive,” these work just as well with fake plants. No judgment here 🙂
My first macrame hanger looked like a tangled mess that even my cat wouldn’t play with. But after watching approximately 47 YouTube tutorials, I finally got the hang of it. Now I’ve got them everywhere, and my room looks like an urban jungle that would make any influencer jealous.
Knot Your Average Tutorial
Gather these supplies:
- Macrame cord (3mm works best for beginners)
- Metal or wooden ring (for hanging)
- Scissors
- Measuring tape
- Plant pot (to measure against)
Cut eight pieces of cord, each about 8 feet long. Fold them in half and attach to your ring using a lark’s head knot. Now comes the fun part – creating the pattern. Use square knots to create the net that holds your pot. Space them evenly and test with your pot frequently to ensure it fits.
Tips to Avoid Macrame Meltdowns
Always make your hanger slightly smaller than you think – the weight of the plant will stretch it out. Also, practicing knots with regular string first saves you from wasting good cord. And here’s a game-changer: use washi tape to mark where your knots should go for even spacing.
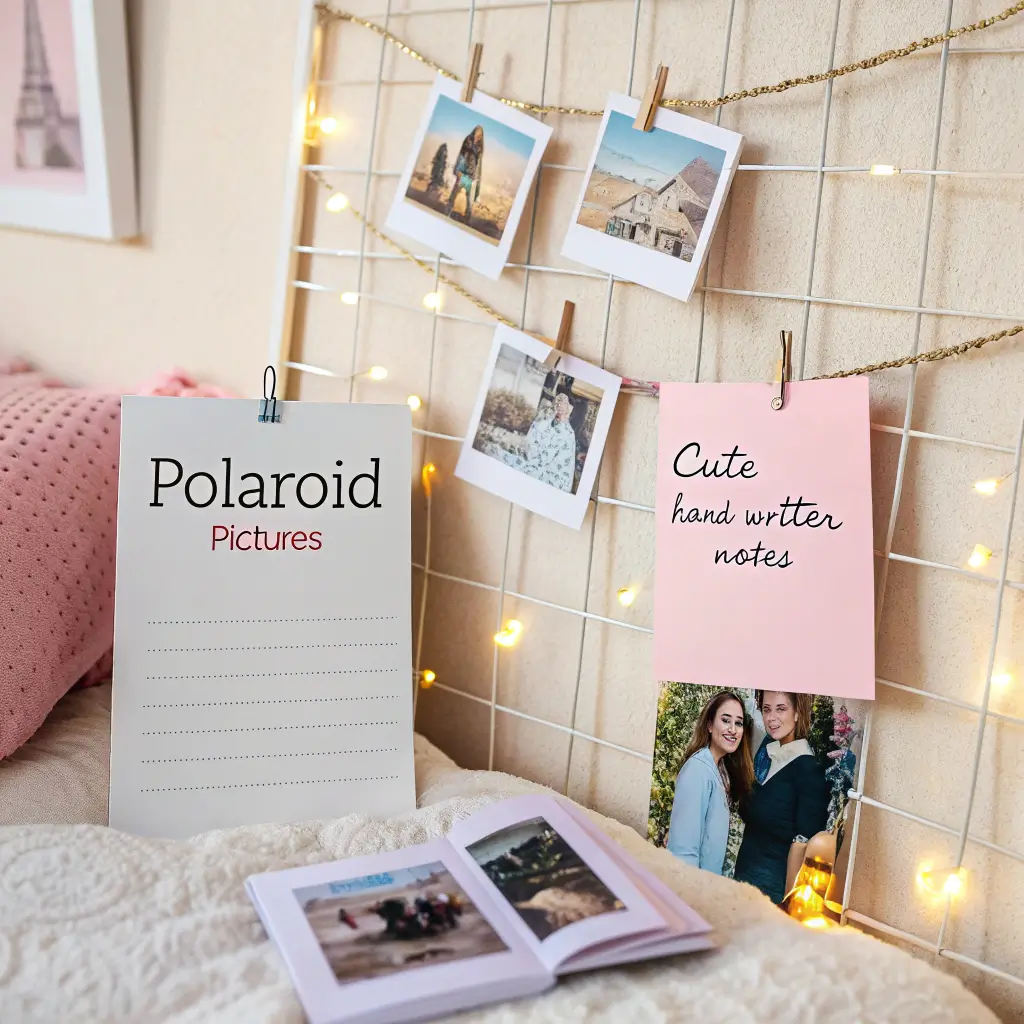
Cute Polaroid String Display

Instant Nostalgia That Actually Looks Good
Remember when everyone was obsessed with Polaroid cameras? Well, that trend never really died, and Polaroid string displays prove it. Whether you use actual Polaroids or print photos in that style, stringing them up creates this casual, lived-in vibe that makes your room feel like home.
I discovered this after inheriting my mom’s old Polaroid camera. Instead of letting those instant photos pile up in a box, I started displaying them. Now it’s become this ongoing project where I add new memories as they happen. It’s like a visual diary on my wall.
Setting Up Your Memory Lane
You’ll need:
- Polaroid photos or printed equivalents
- String, wire, or fairy lights
- Mini clothespins or clips
- Nails or command hooks
- Optional: decorative elements like dried flowers
Decide where you want your display – above your bed, around a mirror, or along a whole wall. String your line (fairy lights work amazing for this) and secure with hooks. Use mini clothespins to attach photos, leaving some space between each one. Mix in other elements like postcards, ticket stubs, or pressed flowers for variety.
Making It Look Intentionally Effortless
The key to a good Polaroid display? Embrace the imperfection. Don’t measure exact spaces between photos – that slightly chaotic arrangement looks way more authentic. Also, varying the heights of multiple strings creates visual interest that a single straight line can’t match.
Upcycled Tin Can Pencil Holders

Trash to Treasure (But Make It Cute)
Who knew those soup cans could become the organizational tools of your dreams? Upcycled tin can pencil holders prove that sometimes the best DIY projects come from literal garbage. Plus, there’s something satisfying about turning would-be trash into functional decor.
My desk used to look like a craft store exploded on it – pens everywhere, scissors MIA, and don’t even get me started on the washi tape situation. These tin can holders changed everything. Now my supplies actually have homes, and my desk looks Pinterest-worthy instead of chaotic.
Transform Those Cans Like a Boss
Here’s what you need:
- Clean tin cans (various sizes work great)
- Decorative paper or fabric
- Mod Podge or strong glue
- Paint (spray or acrylic)
- Embellishments (ribbons, buttons, whatever)
Remove labels and wash cans thoroughly. File down any sharp edges (safety first, people). Paint the cans or wrap them in decorative paper using Mod Podge. Once dry, add your personal touches – maybe some rope wrapped around for texture or painted patterns for a modern look.
Organization Hacks That Actually Work
Group different sized cans together for a tiered effect. Glue them to a wooden base if you want a permanent organizer. Pro tip: drill holes in the bottom and mount them on a pegboard for vertical storage that saves desk space.
Also Read: 15 Amazing DIY Crafts Room Decor Ideas to Brighten Your Space
Floating Bookshelf Decor
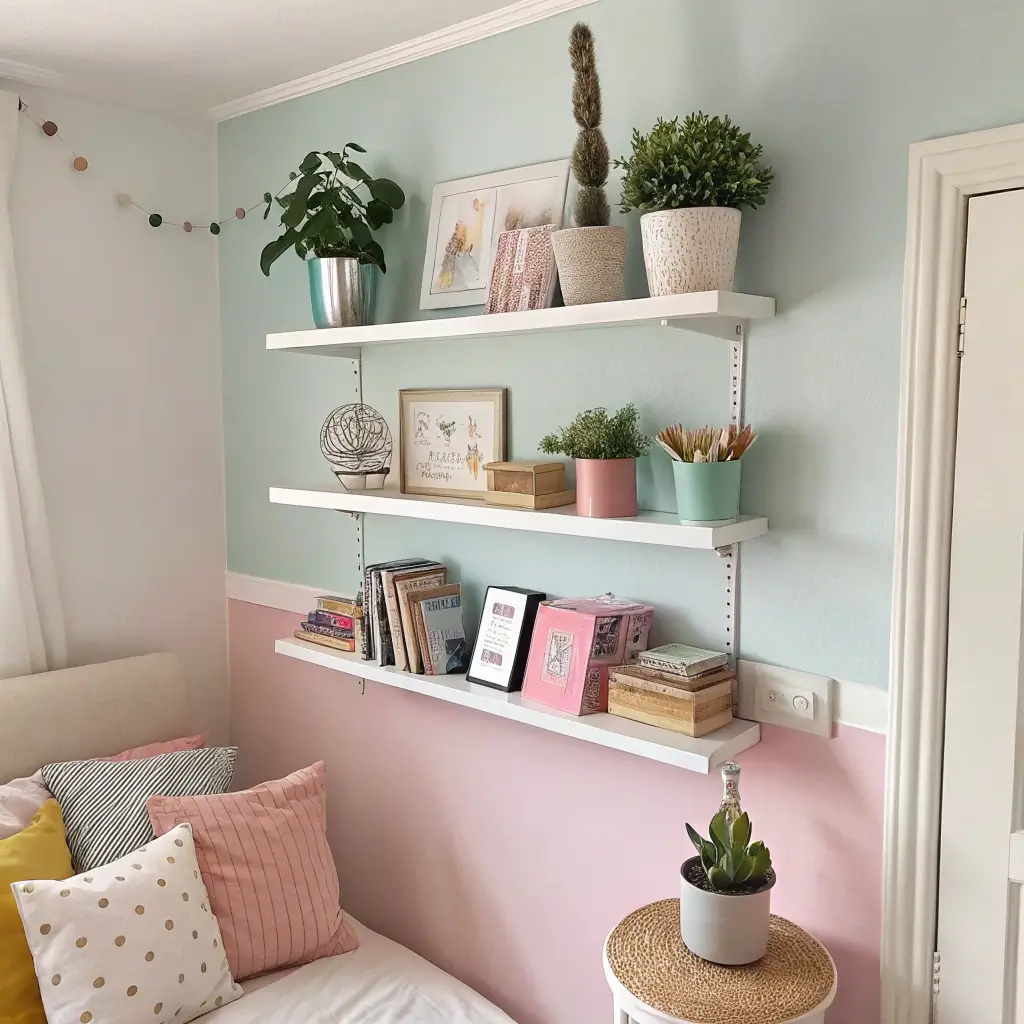
The Illusion That’ll Make People Do a Double-Take
Nothing says “I’m intellectual and mysterious” quite like books floating on your wall. Floating bookshelf decor creates this mind-bending effect that makes people stop and stare. Plus, it’s way cooler than regular shelves and takes up zero floor space.
I installed my first floating shelf after running out of room on my regular bookshelf (book addiction is real, folks). The number of times people have asked “How are those staying up?” makes all the installation effort worth it. It’s like having a magic trick built into your wall.
Creating Literary Magic on Your Walls
You’ll need:
- L-shaped brackets (small ones work best)
- Screws and wall anchors
- Books you don’t mind drilling into (paperbacks work great)
- Level (crooked books aren’t cute)
- Drill
Choose a sacrificial book – preferably a thick paperback you don’t care about. Attach the bracket to the wall, then screw through the bracket into the book’s back cover. Stack other books on top to hide the bracket. The bottom book becomes invisible, creating that floating effect.
Styling Your Floating Library
Mix horizontal and vertical book arrangements for visual interest. Add small plants or decorative objects between book stacks. And here’s a designer secret – arrange books by color for an Instagram-worthy rainbow effect that’ll make everyone think you hired a professional.
Painted Mason Jar Vases
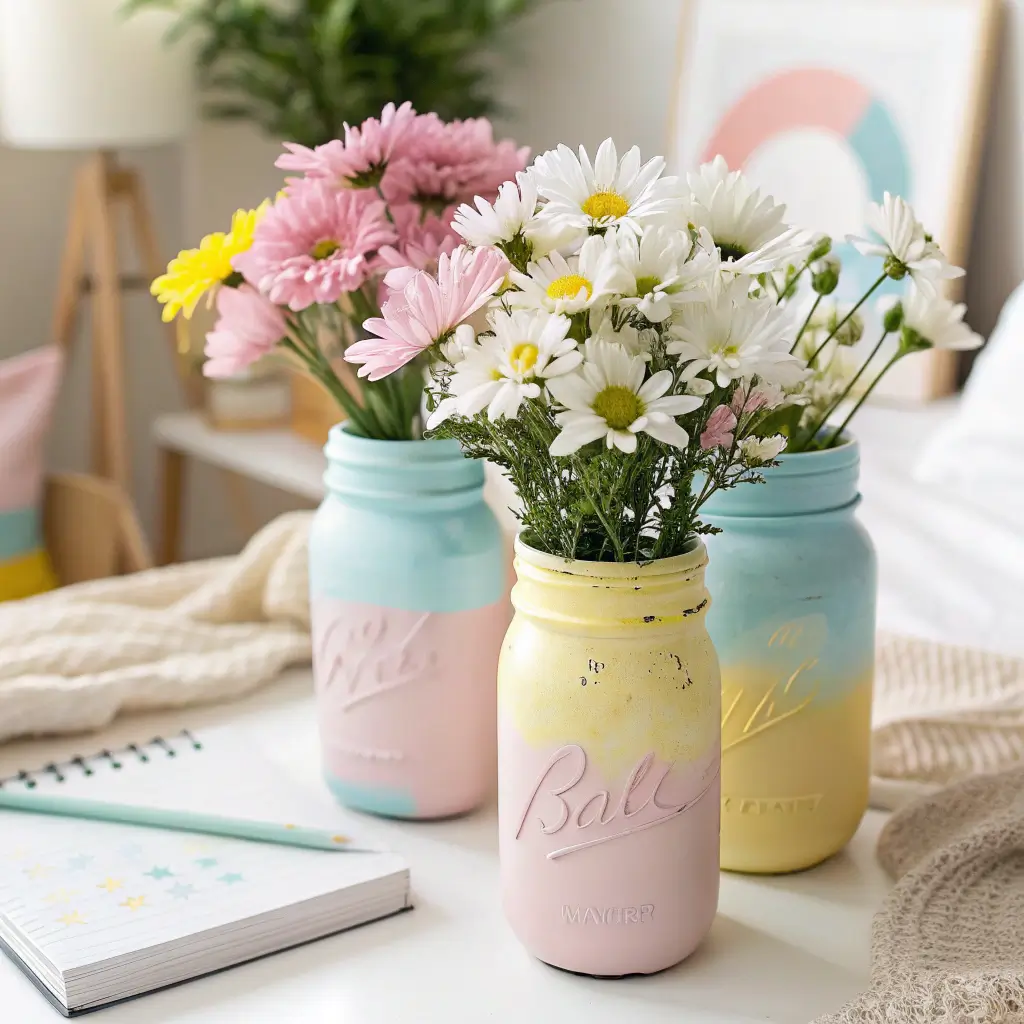
From Basic to Beautiful in 30 Minutes
Mason jars are basically the Swiss Army knife of DIY decor. Painted mason jar vases transform these humble containers into sophisticated decor pieces that look like they came from an expensive home goods store. The best part? You can customize them to match literally any color scheme.
My obsession started when I needed centerpieces for a party but had approximately zero budget. Twenty dollars and a few hours later, I had gorgeous vases that people still ask about. Now I make them as gifts because who doesn’t love something handmade that actually looks good?
Your Guide to Jar Perfection
Gather these supplies:
- Mason jars (various sizes)
- Chalk paint or acrylic paint
- Paintbrushes or sponges
- Sandpaper (for distressing)
- Sealer spray
Clean jars thoroughly and let dry completely. Apply thin coats of paint – thick coats will peel, trust me on this one. For that trendy distressed look, sand lightly after the paint dries. Seal everything with spray to make them water-resistant if you’re using real flowers.
Design Ideas That’ll Blow Your Mind
Try ombre effects by blending two colors while the paint’s still wet. Or create a mercury glass effect with metallic spray paint and vinegar (YouTube this technique – it’s wild). Group odd numbers of jars together for better visual impact, and vary the heights for a professional designer look.
DIY Felt Animal Wall Art

Adorable Art That Won’t Judge Your Lack of Drawing Skills
Can’t draw to save your life? Same. That’s why DIY felt animal wall art is perfect – no artistic talent required, but the results look professionally crafted. These cute creatures add personality to any room without the commitment (or smell) of actual pets.
I started making these after seeing similar pieces selling for ridiculous prices on Etsy. My first attempt was supposed to be a cat but looked more like a potato with whiskers. Now, after some practice, I’ve got a whole zoo on my wall that actually resembles actual animals.
Crafting Your Felt Menagerie
Here’s what you need:
- Felt sheets (multiple colors)
- Fabric glue or needle and thread
- Scissors
- Paper for templates
- Embroidery hoops or frames
- Optional: buttons, beads for eyes
Draw or print animal templates (Pinterest is your friend here). Cut out felt pieces and layer them to create dimension. Glue or sew pieces together, adding details like whiskers or spots. Mount in embroidery hoops or frames for a polished look.
Making Them Look Less “Kindergarten Craft”
The secret to sophisticated felt art? Keep the color palette minimal – two or three colors max per piece. Also, using different textures of felt adds depth that makes them look less flat. And please, for the love of all that’s holy, make sure your edges are cut cleanly.
Also Read: 15 Inspiring Easy DIY Room Decor Ideas for Small Rooms
Colorful Washi Tape Wall Patterns

The Renter-Friendly Way to Amazing Walls
Washi tape is basically the superhero of apartment living. Colorful washi tape wall patterns let you create stunning geometric designs, frames, even faux wallpaper without any permanent damage. Your landlord will never know, and your security deposit stays safe.
I discovered this trick during my sophomore year when my dorm walls looked like a prison cell. One afternoon and ten rolls of tape later, I had an accent wall that made my RA ask if I was an art major. (Spoiler: I wasn’t.)
Design Your Temporary Masterpiece
You’ll need:
- Washi tape (various colors and patterns)
- Measuring tape
- Level or ruler
- Pencil (for marking)
- X-acto knife (for clean edges)
Plan your design first – geometric patterns work best. Mark light pencil guides on the wall. Apply tape carefully, pressing down edges to avoid peeling. For perfect corners, overlap tape and cut with an X-acto knife. Build your pattern gradually, stepping back frequently to check the overall look.
Patterns That’ll Make People Think You’re a Design Genius
Try a herringbone pattern for sophistication, or create a large triangle mountain range for that trendy minimalist vibe. Grid patterns make great photo backdrops, while diagonal stripes create the illusion of a bigger room. FYI, metallic washi tape catches light beautifully and adds unexpected glamour.
Handmade Resin Coasters for Desk

Functional Art That Protects Your Furniture
Let’s talk about handmade resin coasters – they’re basically tiny pieces of art that also happen to save your desk from coffee rings. Once you start making these, you’ll want to put them everywhere. Warning: friends will definitely ask you to make them sets.
My journey into resin crafting started after spilling coffee on my new desk (RIP to that wood finish). Store-bought coasters felt boring, so I decided to make my own. Several YouTube tutorials and one very messy kitchen later, I had coasters that looked like they belonged in a fancy boutique.
Diving Into Resin Without Losing Your Mind
Here’s your supply list:
- Epoxy resin kit (get one meant for beginners)
- Silicone coaster molds
- Gloves and mask (safety isn’t optional)
- Dried flowers, glitter, or color pigments
- Stirring sticks
- Plastic cups for mixing
Mix resin according to package directions – this isn’t the time to eyeball measurements. Add your decorative elements to the molds first, then pour resin slowly to avoid bubbles. Use a toothpick to pop any bubbles that appear. Let cure for 24-48 hours before demolding.
Pro Tips for Resin Success
Work in a well-ventilated area – resin fumes aren’t a joke. Cover your workspace with plastic because this stuff gets everywhere. And here’s a game-changer: use a heat gun or hair dryer to remove bubbles after pouring. Creates that crystal-clear finish that makes people think you’re a resin wizard.
Boho Dreamcatcher Corner

Catching Dreams and Compliments
Creating a boho dreamcatcher corner instantly transforms any boring space into a cozy retreat. Whether you believe in their dream-catching powers or just think they look cool, these beauties add texture and interest to empty corners that need some love.
My dreamcatcher obsession started at a music festival where every other tent had them. Instead of buying overpriced ones from vendors, I learned to make my own. Now my room’s corner looks like a bohemian paradise, and I sleep better (coincidence? Maybe not).
Weaving Your Own Dream Space
Gather these materials:
- Metal or wooden hoops (various sizes)
- String, yarn, or suede lace
- Feathers (craft store or naturally molted)
- Beads and charms
- Hot glue gun
Start by wrapping your hoop with suede or yarn. Create the web pattern by tying string across the hoop in a pattern – there are tons of tutorials online for different styles. Attach feathers and beads to hanging strings at the bottom. Layer multiple dreamcatchers at different heights for maximum impact.
Styling Your Boho Paradise
Mix different sized dreamcatchers for a collected-over-time look. Add fairy lights woven through the webs for nighttime magic. Incorporate dried flowers or pampas grass around your dreamcatcher corner to complete that boho vibe everyone’s after.
Cute Corkboard Message Wall
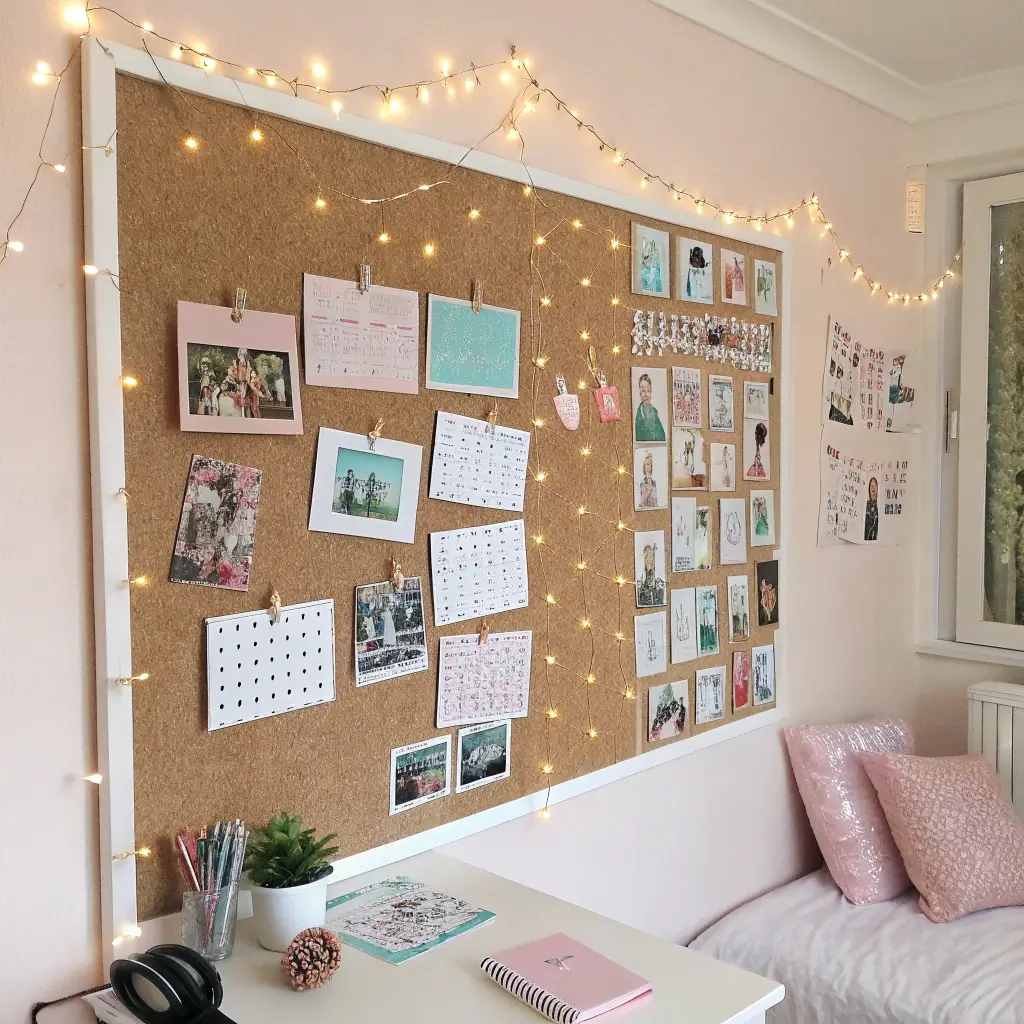
Organization That Doesn’t Look Boring
Gone are the days of ugly office corkboards. Cute corkboard message walls combine function with style, giving you a place to pin important stuff while actually enhancing your decor. It’s organization for people who hate traditional organizing.
I created my first decorative corkboard after losing three important assignments in the black hole that was my desk. Now everything important gets pinned up, and my wall looks like an artistic installation instead of an office supply store explosion.
Building Your Beautiful Command Center
You’ll need:
- Cork tiles or large corkboard
- Fabric or decorative paper
- Spray adhesive
- Decorative pins or thumbtacks
- Paint for frame (if applicable)
- Ribbon or washi tape for sections
Cover your cork with fabric using spray adhesive, pulling tight for a smooth finish. If using tiles, arrange them in a pattern before covering. Create sections with ribbon or washi tape for different categories. Paint the frame if you have one, or create a border with washi tape.
Making It Actually Useful (And Pretty)
Organize by zones – maybe one section for schedules, another for inspiration. Use matching pins for a cohesive look. Add some permanent decorative elements like artificial flowers or mini lights so it looks good even when it’s not full of notes.
DIY Paper Flower Garland

Forever Flowers That’ll Never Die on You
Real flowers are beautiful but expensive and temporary. DIY paper flower garlands give you that floral beauty year-round without the maintenance or wilting disappointment. Plus, you can match them exactly to your room’s color scheme.
My paper flower phase began when I wanted flowers for a party but had champagne taste on a beer budget. Three hours and one Netflix binge later, I had garlands that looked better than real flowers. Now they’re permanent fixtures because taking them down feels wrong.
Crafting Your Paper Garden
Here’s what you need:
- Tissue paper or crepe paper (various colors)
- Floral wire or pipe cleaners
- Scissors
- String or twine
- Hot glue gun
Cut tissue paper into rectangles, stack 6-8 sheets, and accordion fold. Secure the center with wire, then carefully separate and fluff each layer to create petals. Make flowers in various sizes and colors. Attach to string with hot glue, spacing them evenly.
Flower Power Design Tips
Mix flower sizes and styles for a more natural look. Add paper leaves between flowers for realism. Hang multiple garlands at different heights for a cascading effect that photographs beautifully. These also make amazing headboards when hung horizontally above your bed.
Decorative LED Bottle Lights
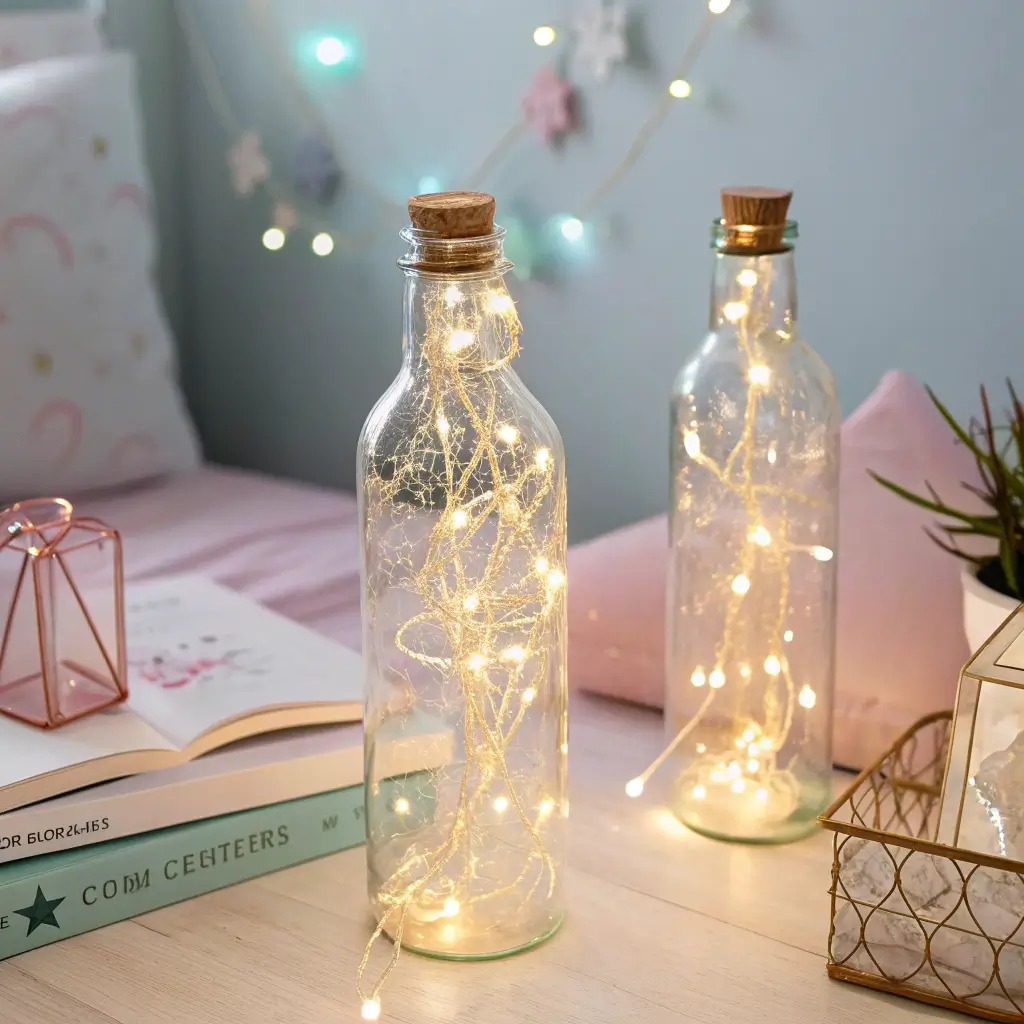
Turning Empty Bottles Into Light Sculptures
Those pretty bottles you can’t bear to throw away? Time to give them new life. Decorative LED bottle lights transform empty wine or unique bottles into stunning ambient lighting that makes your room feel like a fancy restaurant.
I started doing this after a friend’s birthday party left me with several beautiful bottles I couldn’t toss. Now they’re conversation pieces that provide perfect mood lighting for movie nights or study sessions. The best part? People always assume they’re expensive designer lamps :/
Illuminating Your Bottle Collection
You’ll need:
- Empty bottles (wine, vintage soda, whatever looks cool)
- Cork LED light strings (battery-powered)
- Optional: glass paint or frosting spray
- Decorative elements (ribbons, charms)
Clean bottles thoroughly and remove labels (unless they’re cool vintage ones). Insert cork lights – they’re designed specifically for bottles and fit most openings. For colored effects, use glass paint on the inside or outside of clear bottles. Add decorative elements around the neck if desired.
Creating Your Light Installation
Group bottles of different heights and colors for visual interest. Place them on floating shelves or windowsills where light can reflect. Mix clear and colored bottles for depth. And here’s a secret – bottles with interesting shapes or textures create the best light patterns on walls.
Wrapping Up Your Room Transformation
So there you have it – fifteen DIY projects that’ll transform your space from basic to absolutely incredible. The best part about all these ideas? You can start with just one and build your collection over time. Your room doesn’t need to be perfect overnight (mine definitely wasn’t).
Remember, the goal isn’t perfection – it’s creating a space that feels like you. Some projects might turn out exactly as planned, others might need a few attempts. That’s totally normal and honestly part of the fun. Every “mistake” teaches you something for the next project.
Start with whatever project excites you most. Maybe it’s those fairy light jars calling your name, or perhaps you’re ready to tackle that macrame plant hanger. Whatever you choose, just start. Your future self will thank you when you’re chilling in your newly decorated room, surrounded by things you actually made with your own hands.
And hey, when someone inevitably asks where you got that amazing decor? You get to hit them with the ultimate flex: “Oh, I made it myself.” Trust me, that feeling never gets old. Now grab that hot glue gun and let’s make some magic happen! Your room’s glow-up starts now.


