15 Easy DIY Aesthetic Room Decor Ideas to Try This Weekend
Remember when you walked into that one friend’s room and thought, “How the heck does their space look like it belongs on Pinterest while mine looks like a storage unit exploded?” Yeah, I’ve been there too.
After spending way too many hours scrolling through Instagram and feeling personally attacked by everyone’s perfect aesthetic rooms, I finally decided to stop whining and actually do something about it.
Here’s the thing – creating an aesthetic room doesn’t require selling a kidney or having an interior design degree.
I’ve tested, failed, and occasionally succeeded with countless DIY projects, and I’m about to share the ones that actually work.
Trust me, if I can pull these off with my questionable crafting skills, you definitely can too.
Floating Bookshelf Wall Display
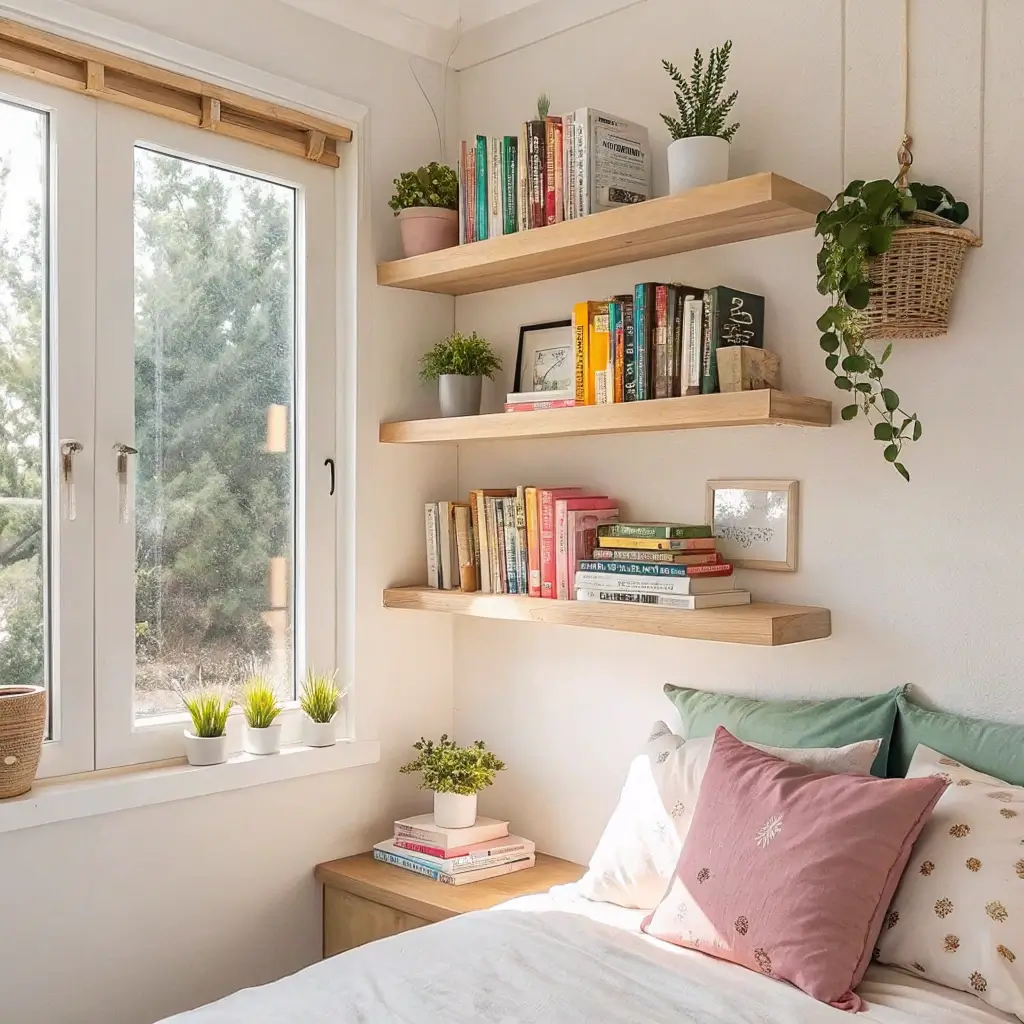
Let’s kick things off with something that looks way harder than it actually is. Floating bookshelves create this magical illusion that your books are literally defying gravity, and people always ask me how I did it. The secret? L-brackets and a hardcover book you’re willing to sacrifice (sorry, not sorry to that old statistics textbook).
You basically screw an L-bracket into your wall, slip the bottom cover of your sacrificial book over it, and stack other books on top. The bracket stays hidden, and suddenly you’re a wizard. I’ve got three of these bad boys in my room, and they never fail to get comments. Plus, they free up so much floor space compared to traditional bookshelves.
Want to level this up? Arrange your books by color for that rainbow effect everyone’s obsessed with. Or go monochrome if you’re feeling minimalist. The best part is you can rearrange them whenever you get bored, which, let’s be honest, happens every few months when you see a new trend on TikTok.
Materials You’ll Need:
- Sturdy L-brackets (get the good ones, not the flimsy dollar store versions)
- Wall anchors if you’re not hitting studs
- A drill and screws
- One sacrificial hardcover book
- Your actual book collection
Fairy Light Mason Jar Lanterns
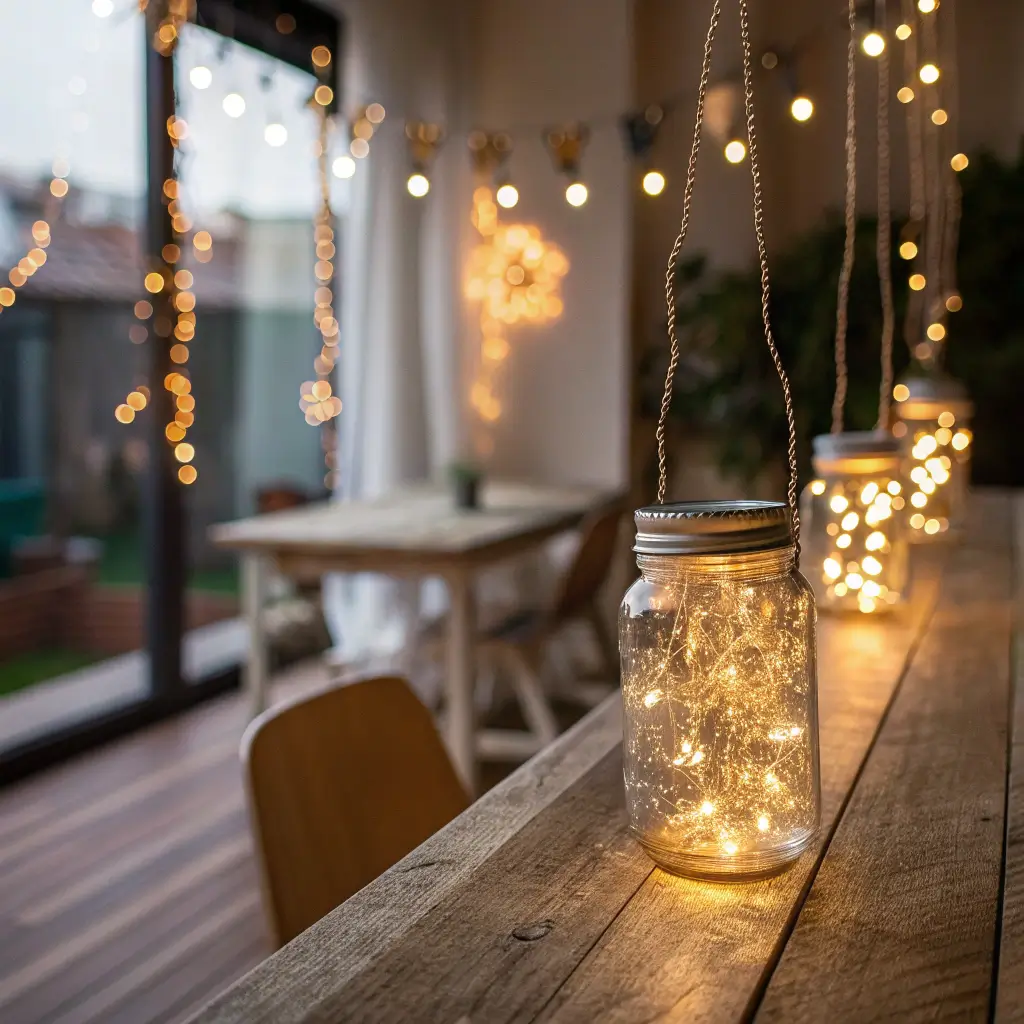
Okay, who doesn’t love fairy lights? They’re basically the duct tape of room decor – they make everything better. But instead of just stringing them around your room like everyone else, we’re going to get fancy with mason jars.
I stumbled upon this idea when I had leftover jars from my failed attempt at meal prepping (we don’t talk about that). You stuff battery-powered fairy lights into mason jars, and boom – instant magical lanterns. The glass creates this dreamy, diffused glow that regular exposed fairy lights just can’t match.
Here’s my pro tip: use different sized jars and colored fairy lights for variety. I’ve got warm white ones for everyday vibes and color-changing ones for when I’m feeling extra. Hang them at different heights from your ceiling using fishing line, or cluster them on a shelf. FYI, these also make killer mood lighting for those late-night study sessions or Netflix binges.
The battery-powered ones last surprisingly long, but if you’re near outlets, you can use plug-in versions. Just drill a small hole in the jar lid for the cord – it’s easier than you’d think.
Macrame Plant Hangers
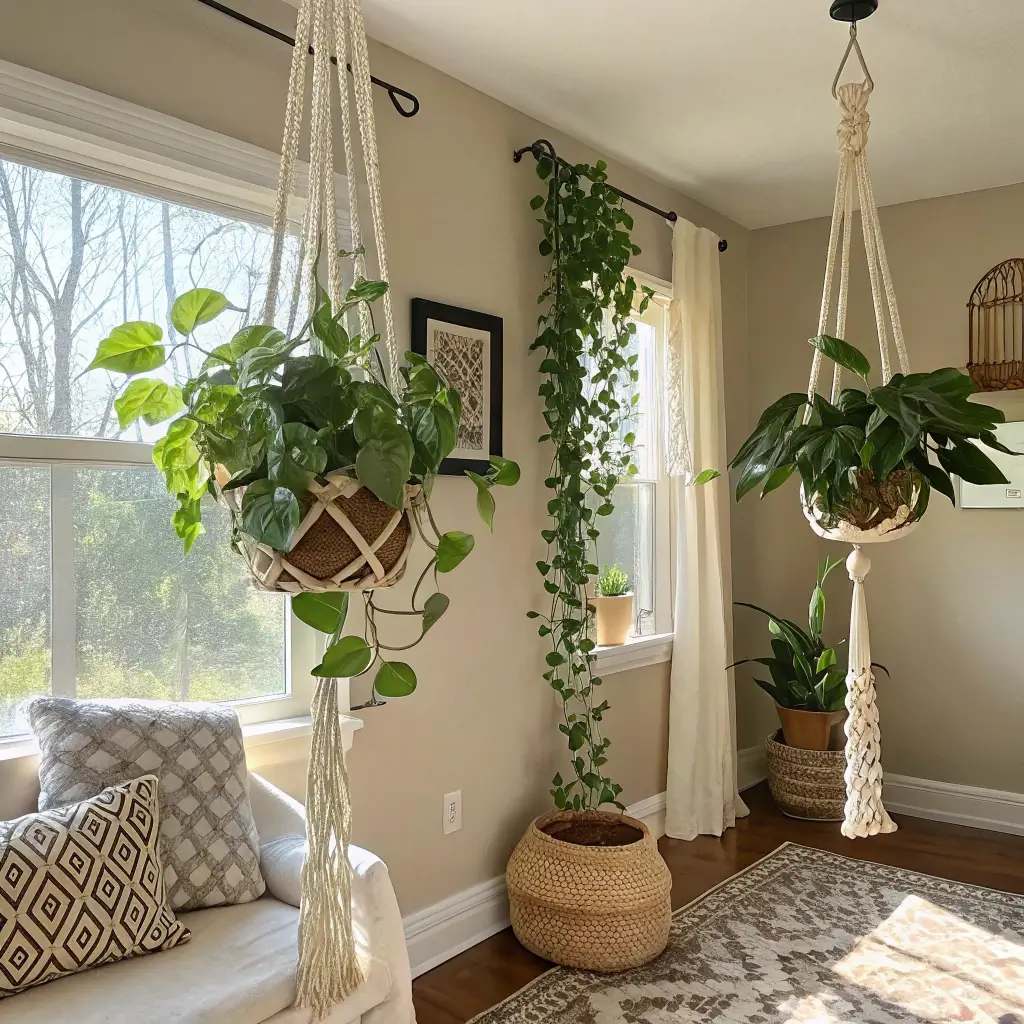
Remember when macrame was something only your grandma did? Well, it’s back, and it’s cooler than ever. I learned macrame during lockdown (along with everyone else and their mother), and creating plant hangers became my weird obsession.
The beauty of macrame plant hangers is that they add vertical interest to your room without taking up any floor or surface space. Perfect for us serial plant collectors who’ve run out of windowsill real estate. Plus, there’s something therapeutic about knotting rope while binge-watching your favorite show.
You only need to learn like three basic knots, and YouTube University has your back. I started with simple designs and now I’m making these elaborate multi-tier hangers that look way more complicated than they are. The materials cost next to nothing – just some macrame cord and a metal ring.
Quick Starter Tips:
- Start with cotton macrame cord (3-4mm thickness is perfect)
- Practice your knots on shorter pieces first
- Use a plant pot with a lip so it doesn’t slip through
- Measure twice, knot once (learned that the hard way)
Also Read: 15 Creative DIY Room Decor for Teens Ideas That Wow
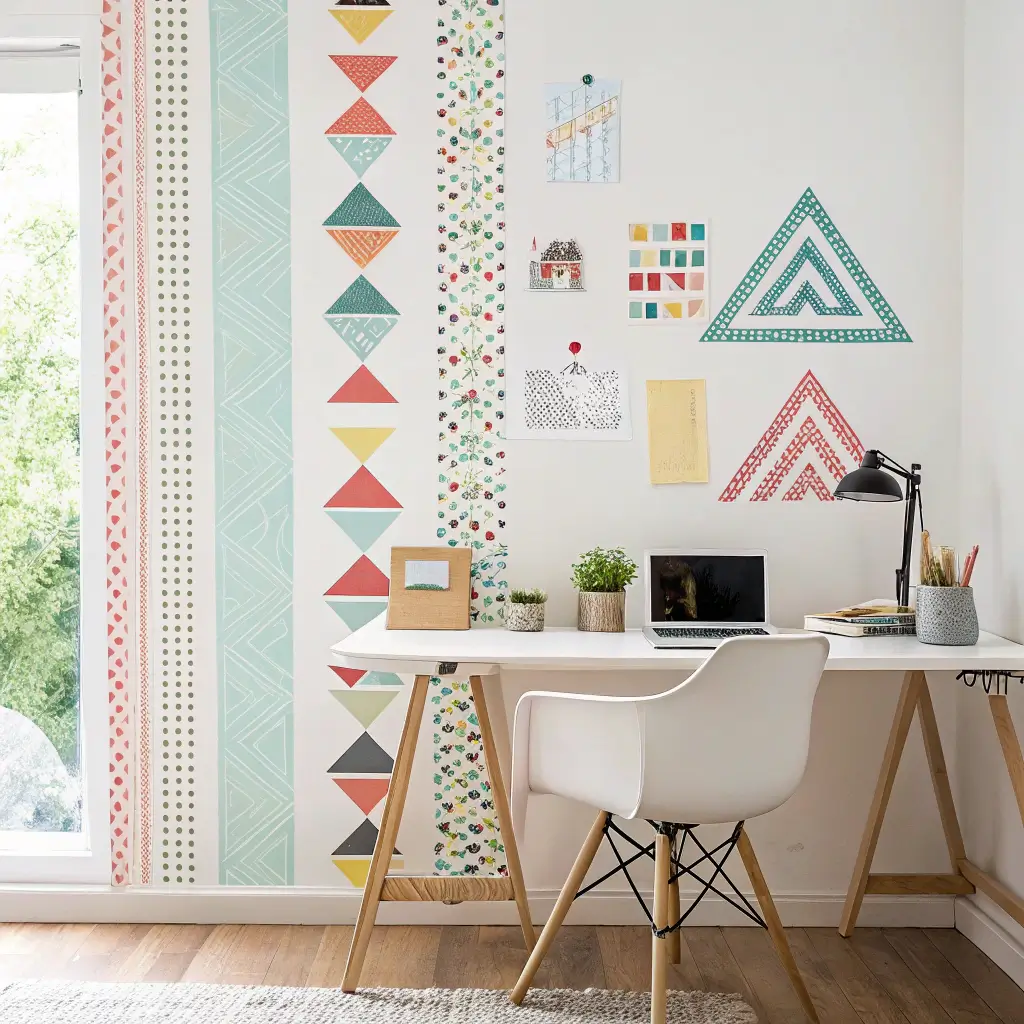
Minimalist Geometric Wall Art
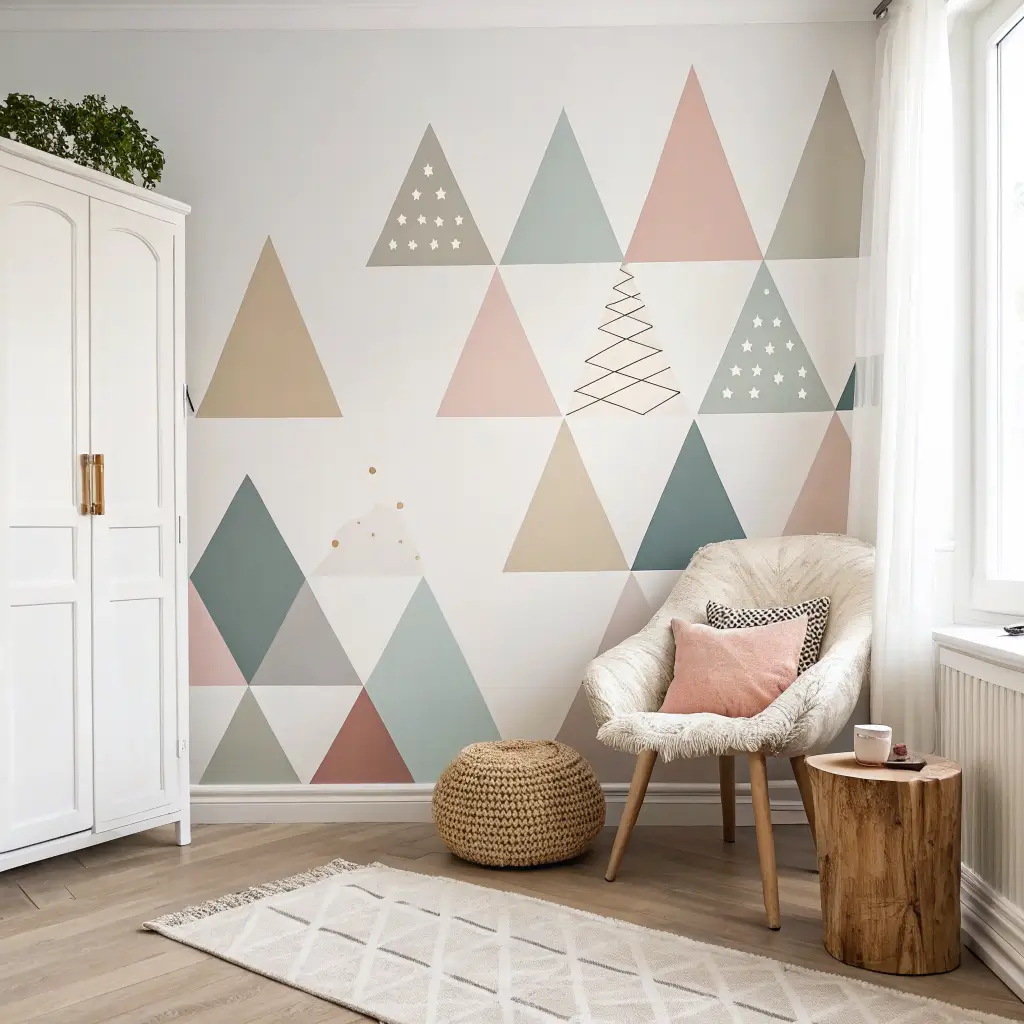
Who says you need to drop serious cash on wall art? Some painter’s tape and leftover paint can create gallery-worthy pieces. I discovered this when I was trying to cover up a suspicious stain on my wall (don’t ask).
The trick is using painter’s tape to create clean, geometric shapes on canvas or directly on your wall. Think triangles, hexagons, or abstract patterns. Paint between the lines, peel off the tape while the paint’s still slightly wet, and watch the magic happen. The satisfaction of peeling that tape is honestly better than popping bubble wrap.
I’ve made about five of these now, and each one gets easier. My favorite is this mountain-scape design using different shades of blue and grey. It cost me maybe $15 total and looks like something from West Elm. Not to brag, but my friends think I bought it from some fancy boutique.
DIY Polaroid Photo Collage
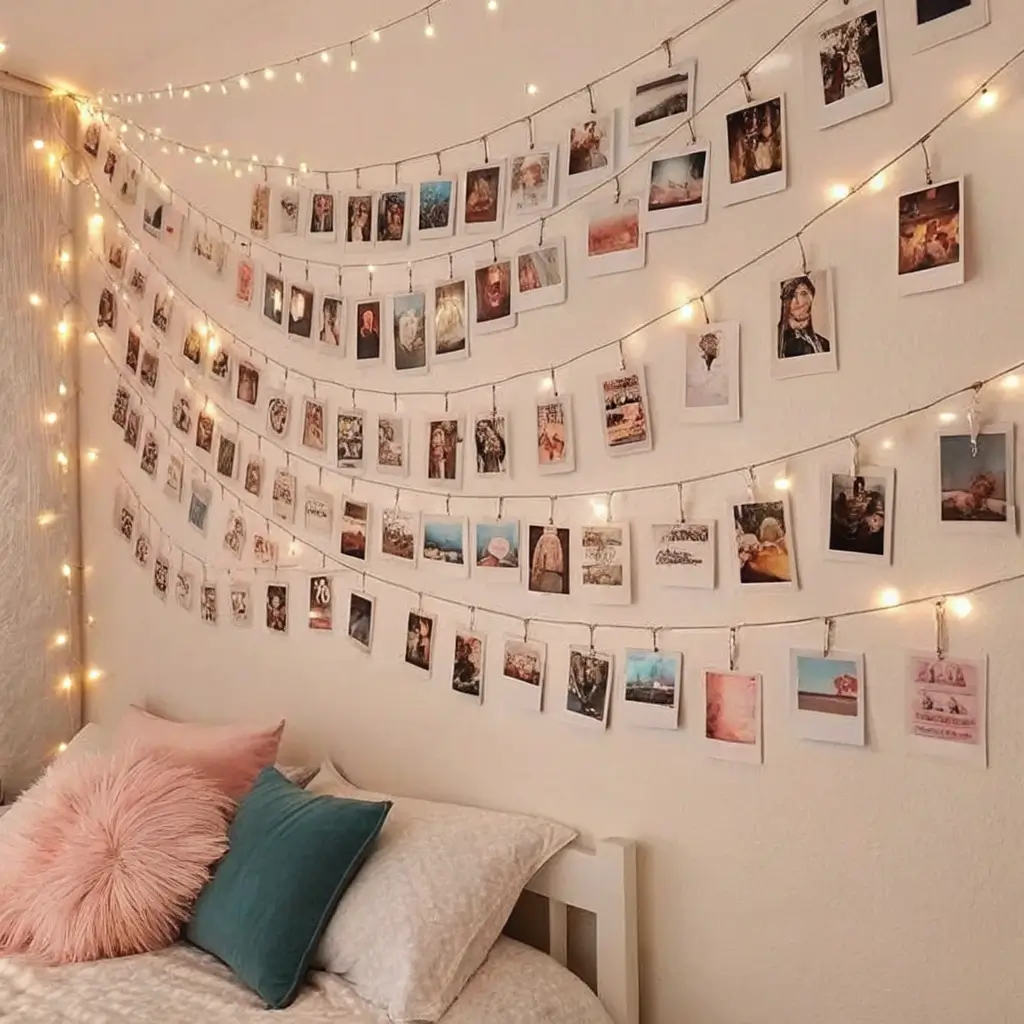
Let’s talk about the easiest way to personalize your space – photos. But we’re not doing the basic grid layout everyone does. Creating a flowing, organic polaroid collage adds personality without looking like you’re trying too hard.
I print my photos using a portable photo printer (best impulse buy ever), but you can also use online services or even fake it with regular prints cut to polaroid size. The key is mixing portrait and landscape orientations, leaving some space between photos, and not being too perfect about it.
String them up with twine and mini clothespins, or go rogue and use washi tape directly on the wall. I change mine seasonally – summer road trips in July, cozy autumn vibes in October. It’s like having a constantly evolving gallery of memories.
Photo Selection Tips:
- Mix color and black-and-white photos
- Include candid shots, not just posed ones
- Add concert tickets or postcards for variety
- Leave room to grow your collection
Resin and Flower Coasters
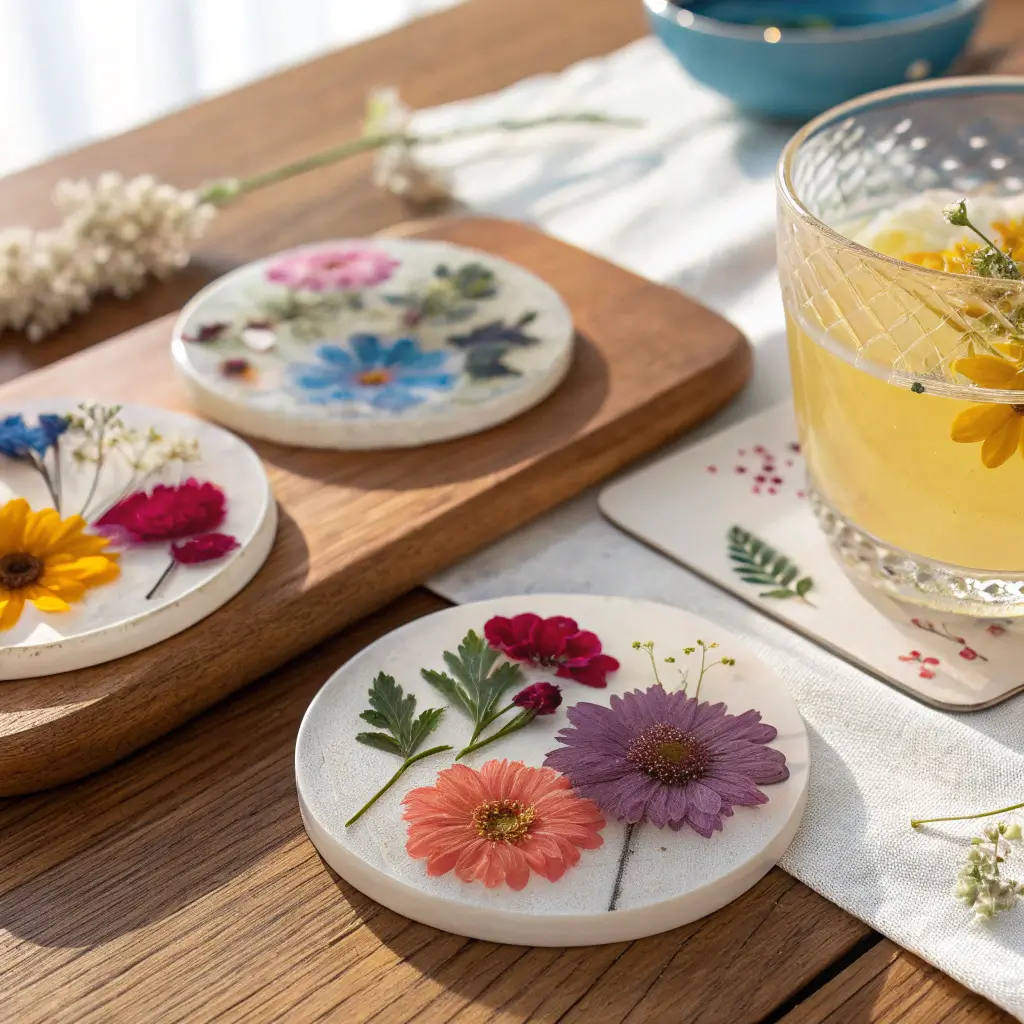
This one’s for my fellow extra people who think regular coasters are boring. Making resin coasters with pressed flowers inside is easier than it looks and impossibly aesthetic. Plus, they make amazing gifts (hello, free Christmas presents).
The process involves arranging dried flowers in silicone molds and pouring clear resin over them. Yes, resin can be intimidating at first, but once you get the hang of it, you’ll want to encase everything in resin. I may have gone through a phase where I tried to preserve everything from movie tickets to autumn leaves.
Work in a well-ventilated area (learned that lesson the hard way), and don’t cheap out on the resin. The good stuff self-levels and has fewer bubbles. Each set of four coasters costs about $10 to make but looks like those $40 ones from anthropology.
Also Read: 15 Whimsical Cute DIY Room Decor Ideas for a Stylish Touch
Hanging Terrarium Glass Ornaments
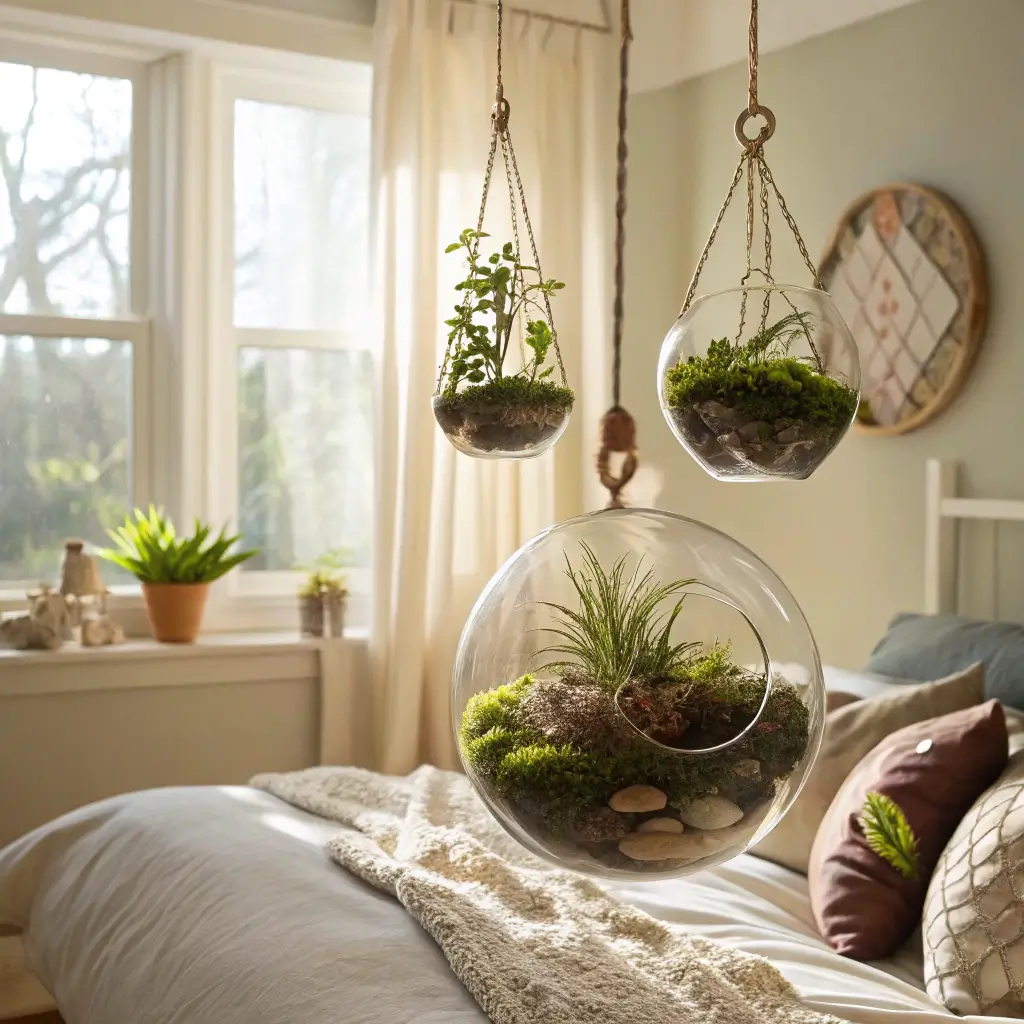
Ever wanted to create your own little ecosystems? Hanging glass terrariums are basically tiny worlds you can suspend from your ceiling or arrange on shelves. These glass orbs filled with air plants, moss, or succulents add a natural element without the commitment of high-maintenance plants.
I killed approximately three succulents before discovering air plants – they’re virtually indestructible and only need misting once a week. The glass ornaments come in tons of shapes, from classic spheres to geometric diamonds. I’ve got seven hanging at different heights near my window, and they catch the light beautifully.
The setup takes maybe 10 minutes per terrarium. Add some decorative sand, tiny pebbles, or even miniature figurines for personality. My dinosaur terrarium is a personal favorite – it’s giving “Land Before Time” vibes.
Washi Tape Wall Patterns
Washi tape might be the most underrated decorating tool ever. This removable decorative tape lets you create patterns, frames, or accent walls without the commitment of paint or wallpaper. Perfect for renters or commitment-phobes like me.
I’ve used washi tape to create a geometric accent wall behind my bed, frame posters, and even make a faux headboard. The patterns can be as simple or complex as you want. Start with basic stripes or a single accent shape, then work your way up to intricate designs.
The best part? If you mess up or get bored, just peel it off and start over. No damage, no drama. I change my washi tape designs about every six months when I get the urge to redecorate but don’t have the budget.
Design Ideas to Try:
- Herringbone pattern behind your desk
- Mountain range silhouette
- Abstract geometric shapes
- Faux window frame around a mirror
Painted Ombre Accent Wall
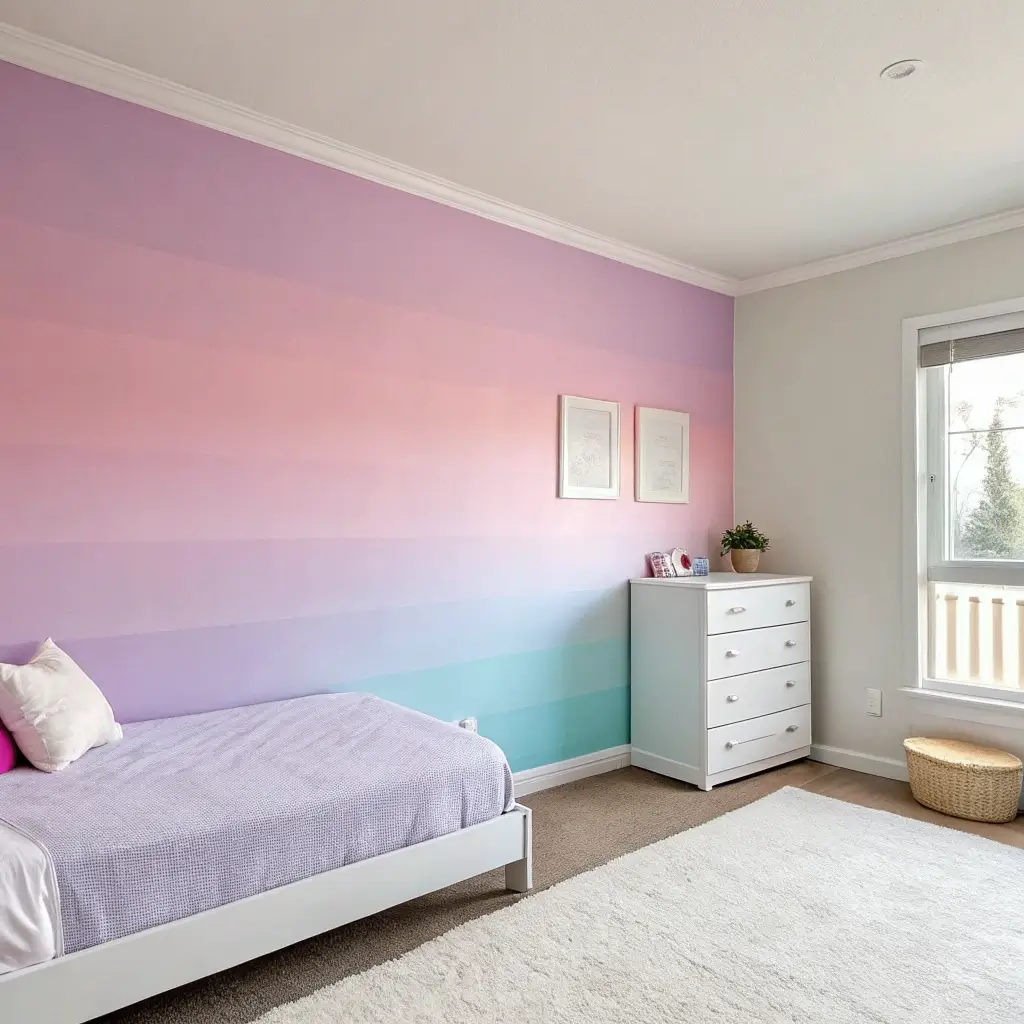
Ready for a weekend project that’ll completely transform your room? An ombre wall is it. This gradient paint technique creates a stunning focal point that looks way more expensive than the cost of a few paint samples.
Pick three to five shades of the same color, going from light to dark. I did mine in dusty pink to deep mauve, and it gives major sunset vibes. The blending is the tricky part, but here’s the secret: work fast and use a damp sponge to blend the edges while the paint’s still wet.
My first attempt was… questionable. But the second try turned out amazing. The key is not overthinking it. Imperfections actually add to the organic, artistic look. Plus, it photographs incredibly well, which, let’s be real, is half the point 🙂
Also Read: 15 Beautiful Aesthetic Room Decor DIY Ideas for Small Spaces
Cork Board Inspiration Wall
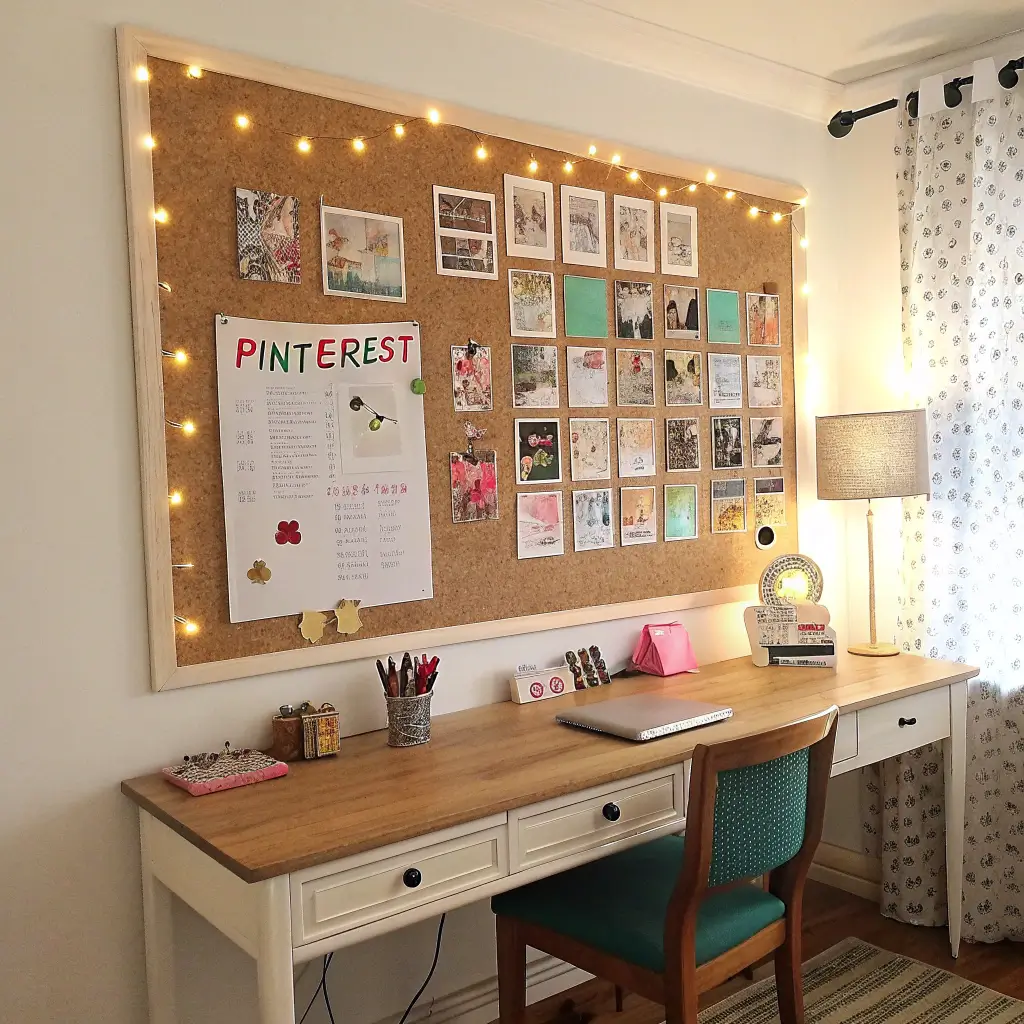
Forget those sad, brown cork boards from office supply stores. We’re making custom-shaped, fabric-covered cork boards that actually enhance your decor. I’ve got three hexagon-shaped ones above my desk, and they’re both functional and aesthetic.
Cover cork tiles with fabric that matches your room’s vibe, create fun shapes, and arrange them in a pattern on your wall. Mine are covered in this dreamy sage green linen that ties into my plant theme. They hold everything from concert tickets to inspiring quotes to Polaroids.
The hexagon trend might be overdone, but IMO, classics become classics for a reason. You could also do circles, triangles, or even cloud shapes. Whatever floats your aesthetic boat.
Handmade Scented Candles

Making your own candles is weirdly addictive. Once you realize how easy it is and how much money you save, you’ll never buy another overpriced candle again. Soy wax, essential oils, and some cute containers are all you need to create custom scents that make your room smell like heaven.
I started with basic vanilla and now I’m out here mixing lavender-eucalyptus-mint combinations like some kind of scent wizard. Old teacups, mason jars, or vintage tins make perfect candle containers. Thrift stores are goldmines for unique vessels.
The process is stupid simple: melt wax, add scent, pour, wait. That’s literally it. Each candle costs about $3 to make versus the $25 you’d pay at fancy stores. Plus, you can match scents to seasons or moods.
Scent Combinations to Try:
- Coffee and vanilla for morning vibes
- Eucalyptus and spearmint for focus
- Lavender and chamomile for relaxation
- Cinnamon and orange for cozy autumn feels
Vintage Mirror Frame Makeover
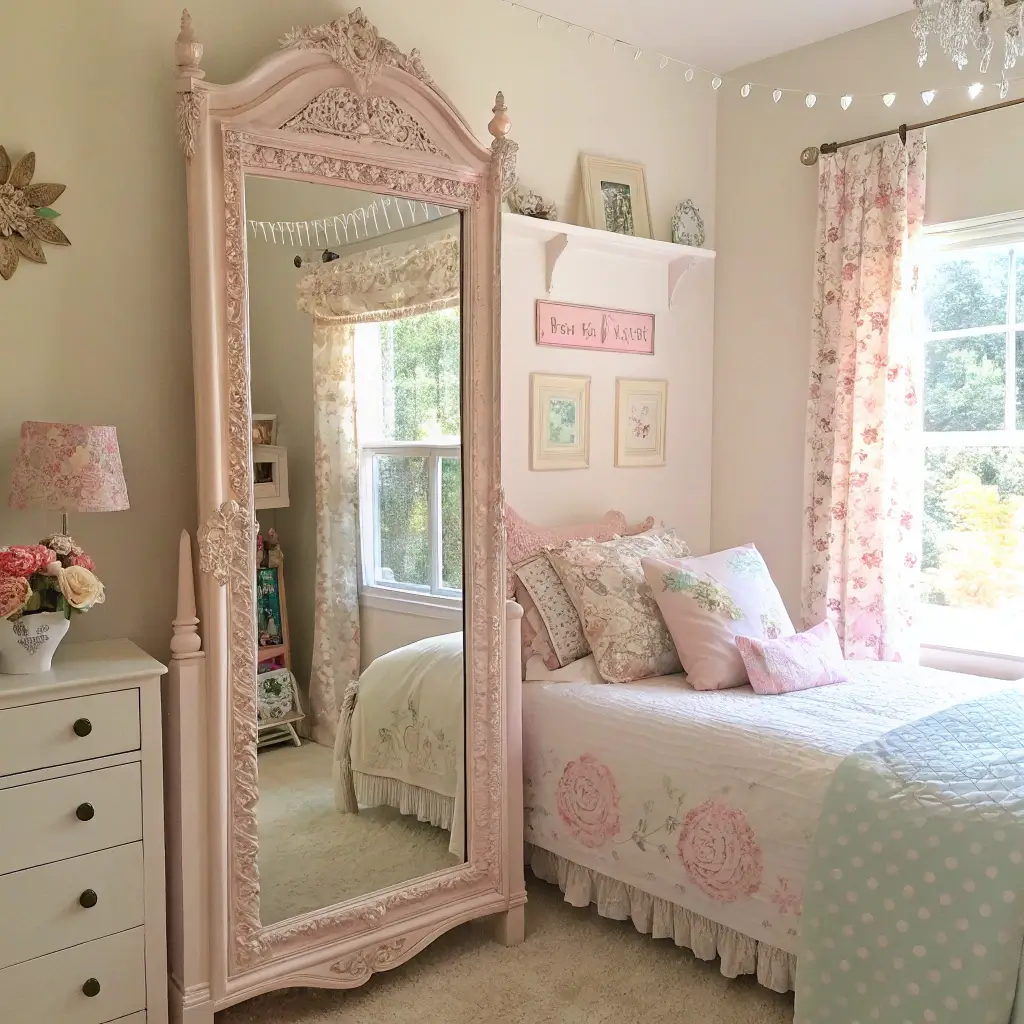
Found an ugly mirror at a thrift store? Perfect. Transforming vintage mirrors with paint, decorative elements, or even dried flowers creates statement pieces that everyone asks about. I’ve rescued five mirrors so far, and each one has its own personality.
My favorite makeover involved hot-gluing dried baby’s breath around a simple circular mirror. It looks ethereal and cost maybe $8 total. Another one got the full paint treatment with metallic gold spray paint and now looks like it belongs in Versailles.
Don’t limit yourself to traditional hanging mirrors. Lean a full-length one against the wall for that effortless cool-girl vibe, or group smaller ones for a gallery wall effect.
Custom String Art Designs
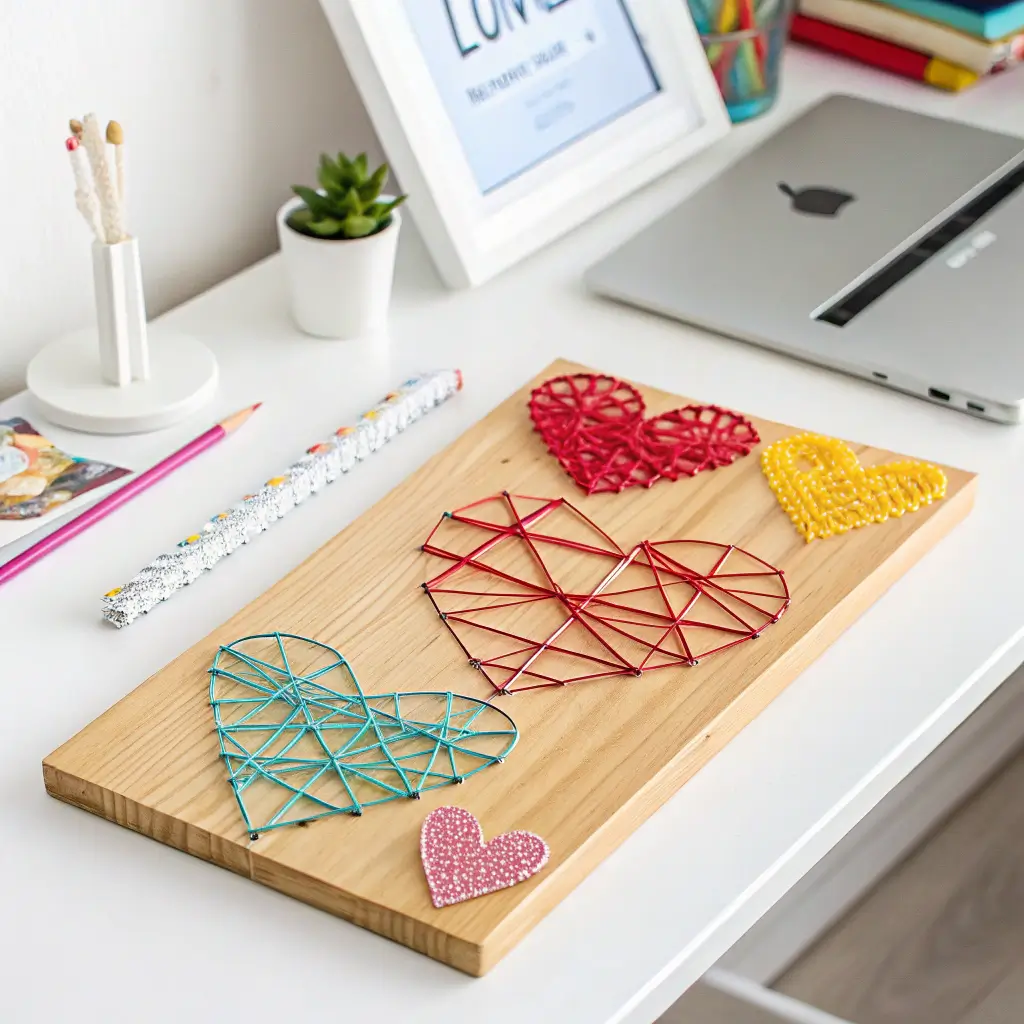
String art is having a moment, and honestly, it deserves it. Using nails and colored string to create designs is meditative and produces genuinely cool wall art. I made a constellation design that gets compliments from literally everyone who sees it.
Start with a simple shape like a heart or star. Once you get comfortable with the technique, graduate to words, landscapes, or abstract designs. The ombré string art trend, where you gradually change colors as you wrap, creates stunning gradient effects.
Fair warning: this project requires patience. My first attempt looked like a spider had a mental breakdown on my board. But once you find your rhythm, it’s actually relaxing. Put on a podcast and zone out while you wrap.
Upcycled Jar Storage Organizers

Those pasta sauce and pickle jars you’re recycling? Stop. Transform them into aesthetic storage solutions that actually look intentional. I’ve turned old jars into everything from makeup brush holders to desk organizers to bathroom storage.
Remove labels with hot water and baking soda (game-changer tip right there). Paint the lids, add labels, wrap them in twine, or leave them clear to show off the contents. I’ve got a whole shelf of matching jars holding everything from cotton balls to hair ties, and it looks like something from The Container Store.
Group jars of similar sizes together for a cohesive look. Mix in some air plants or fairy lights in a few jars for visual interest. It’s functional storage that doesn’t scream “I’m broke but trying.”
DIY Neon Sign with LED Lights
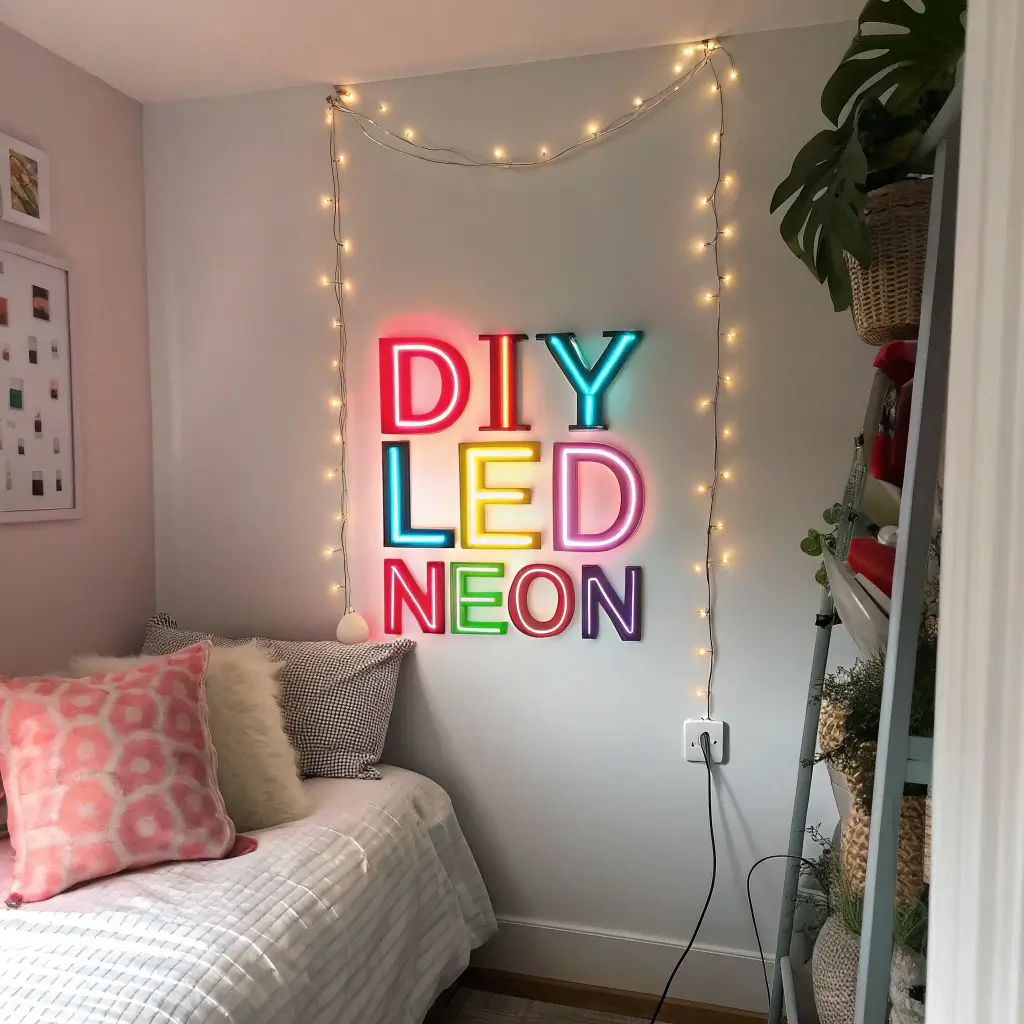
Want that trendy neon sign look without the trendy neon sign price? LED strip lights and acrylic backing can create the same effect for a fraction of the cost. I made a “good vibes” sign that looks legit professional, and people refuse to believe I made it myself.
The trick is using EL wire (electroluminescent wire) or LED neon flex rope. Shape it into your design, secure it to clear acrylic or even directly to your wall, and plug it in. The hardest part is deciding what to write. Keep it short and sweet – one to three words max.
Mine changes color via remote control, which never fails to impress guests. Total cost? About $30. The same thing on Etsy? Easily $150+. You do the math.
Design Ideas:
- Your favorite quote or lyric
- Simple shapes like hearts or stars
- Your initials or name
- Motivational words like “create” or “dream”
Conclusion
There you have it – fifteen DIY projects that’ll transform your space from “meh” to “holy cow, did you hire a designer?” The best part about all these ideas is that they’re completely customizable to your style, whether you’re into boho vibes, minimalist aesthetics, or maximalist chaos.
Start with one or two projects that speak to you. Don’t try to tackle everything at once unless you want to turn your room into a craft supply explosion zone (speaking from experience here). Remember, the whole point is to create a space that makes you happy, not to impress strangers on the internet.
Your room should tell your story, not look like a carbon copy of every Pinterest board out there. So grab some supplies, maybe rope in a friend who actually knows what they’re doing, and start creating. Who knows? You might discover you’re actually good at this whole DIY thing. And if not, well, at least you’ll have some funny failure stories to share. Either way, you win.