15 Inspiring DIY Bathroom Vanity Ideas on a Budget
Look, I get it. You’re staring at that boring, builder-grade bathroom vanity thinking “there’s gotta be something better than this.”
Well, guess what? You’re absolutely right, and I’m about to show you 15 killer DIY vanity ideas that’ll make your bathroom look like something straight out of a magazine – minus the ridiculous price tag.
I’ve personally tackled about half of these projects over the years (some more successfully than others, if I’m being honest), and let me tell you, nothing beats the satisfaction of creating something beautiful with your own hands.
Plus, your wallet will thank you when you realize you just saved thousands by not buying that overpriced designer vanity.
Ready to transform that bathroom? Let’s get our hands dirty!
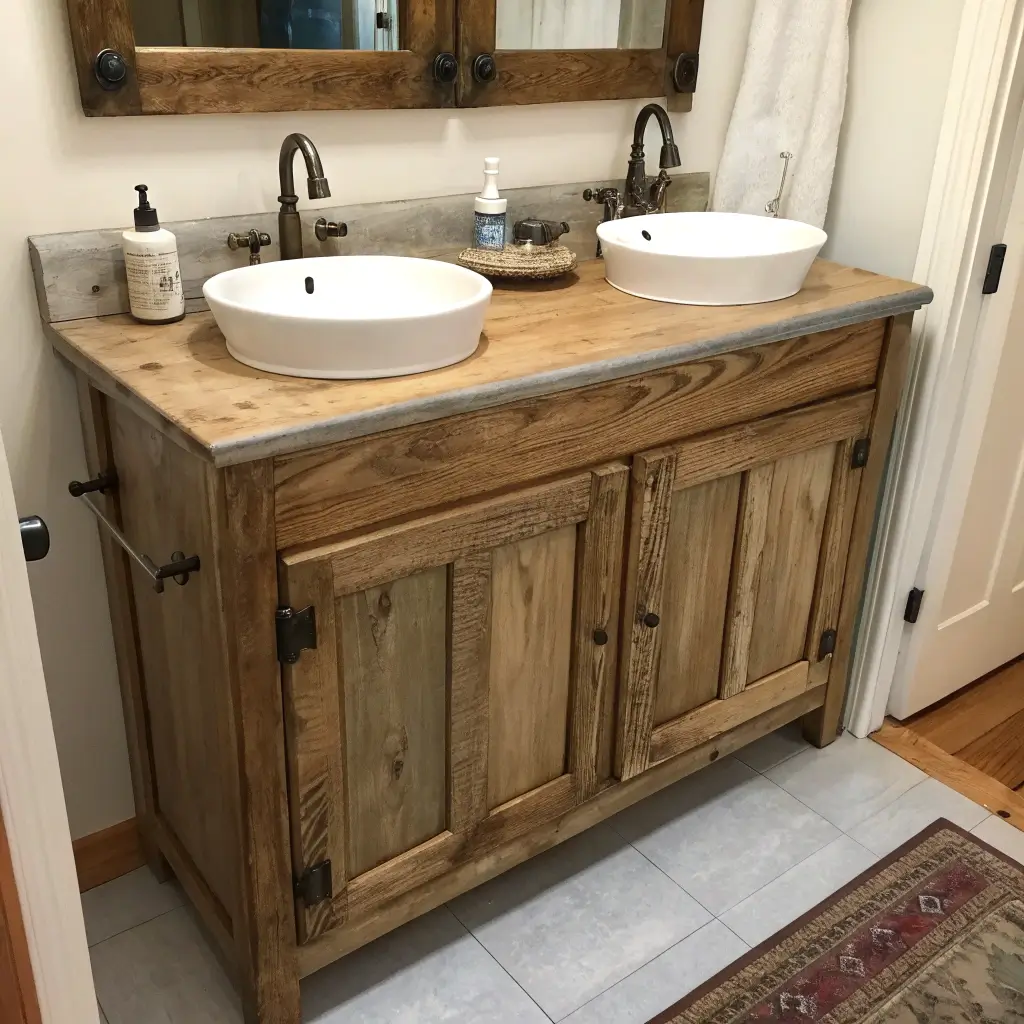
Rustic Reclaimed Wood Vanity
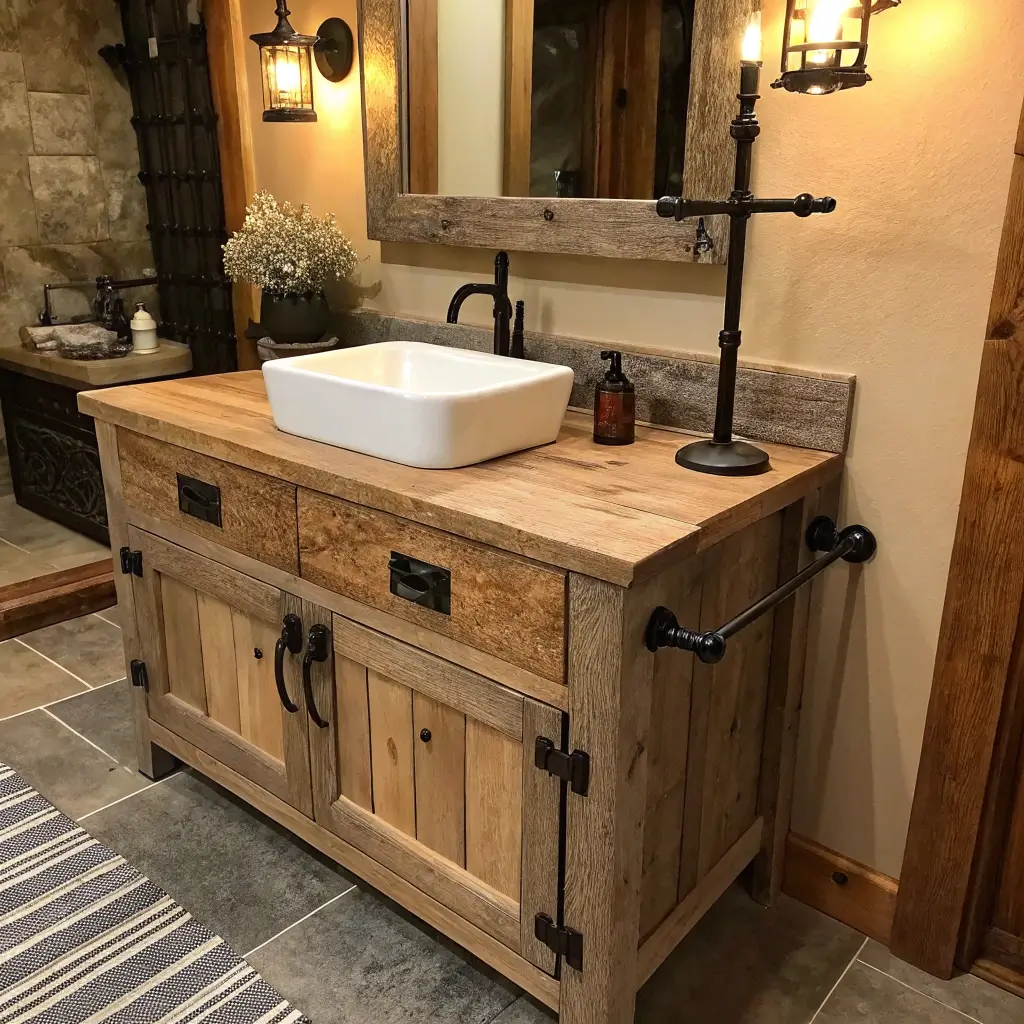
Why Reclaimed Wood Rocks
You know what never goes out of style? Rustic charm. And nothing screams rustic quite like a beautiful reclaimed wood vanity. I built one of these bad boys for my guest bathroom last year, and honestly, it’s become the conversation starter at every dinner party.
The beauty of reclaimed wood lies in its imperfections. Those nail holes, weathered textures, and natural patina? They tell a story that no factory-made vanity ever could. Plus, you’re basically saving the planet one barn board at a time – how’s that for feeling good about your DIY project?
Building Your Rustic Masterpiece
Here’s what makes this project surprisingly doable:
• Source your wood from old barns, pallets, or salvage yards (I scored mine from a demolished farmhouse for $50)
• Sand lightly – you want to keep that weathered character
• Apply a protective sealant that won’t hide the wood’s natural beauty
• Install sturdy brackets because reclaimed wood can be heavier than you’d expect
The trickiest part? Making sure your wood is properly sealed against bathroom moisture. Trust me, I learned this the hard way when my first attempt started warping after three months. Use marine-grade polyurethane – it’s your best friend in this project.
Floating Modern Minimalist Vanity
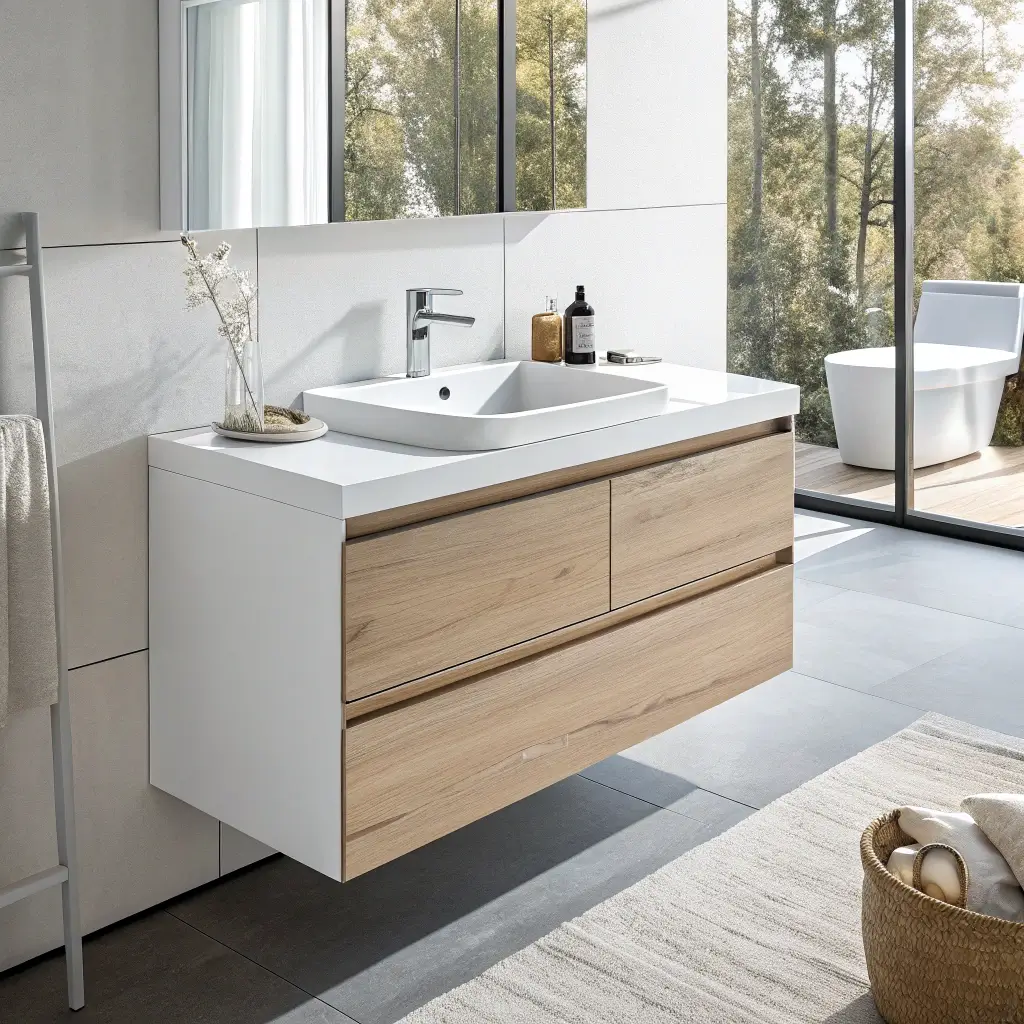
The Magic of Floating Design
Ever walked into a bathroom and thought “wow, this space feels huge”? Nine times out of ten, there’s a floating vanity involved. These sleek beauties create the illusion of more floor space while giving your bathroom that ultra-modern vibe everyone’s after these days.
I installed my first floating vanity two years ago, and honestly? The extra floor visibility makes cleaning a breeze. No more awkwardly reaching around cabinet legs with the mop!
Installation Tips That Actually Work
Creating a floating vanity isn’t rocket science, but you do need to pay attention to a few crucial details:
• Find those studs – seriously, a stud finder is non-negotiable here
• Use heavy-duty wall cleats rated for at least double your vanity’s weight
• Level everything obsessively (nothing ruins the minimalist aesthetic like a crooked vanity)
• Consider adding LED strip lighting underneath for that fancy hotel bathroom effect
The best part about floating vanities? You can customize the height perfectly for your needs. No more hunching over to brush your teeth!
Industrial Pipe Frame Vanity
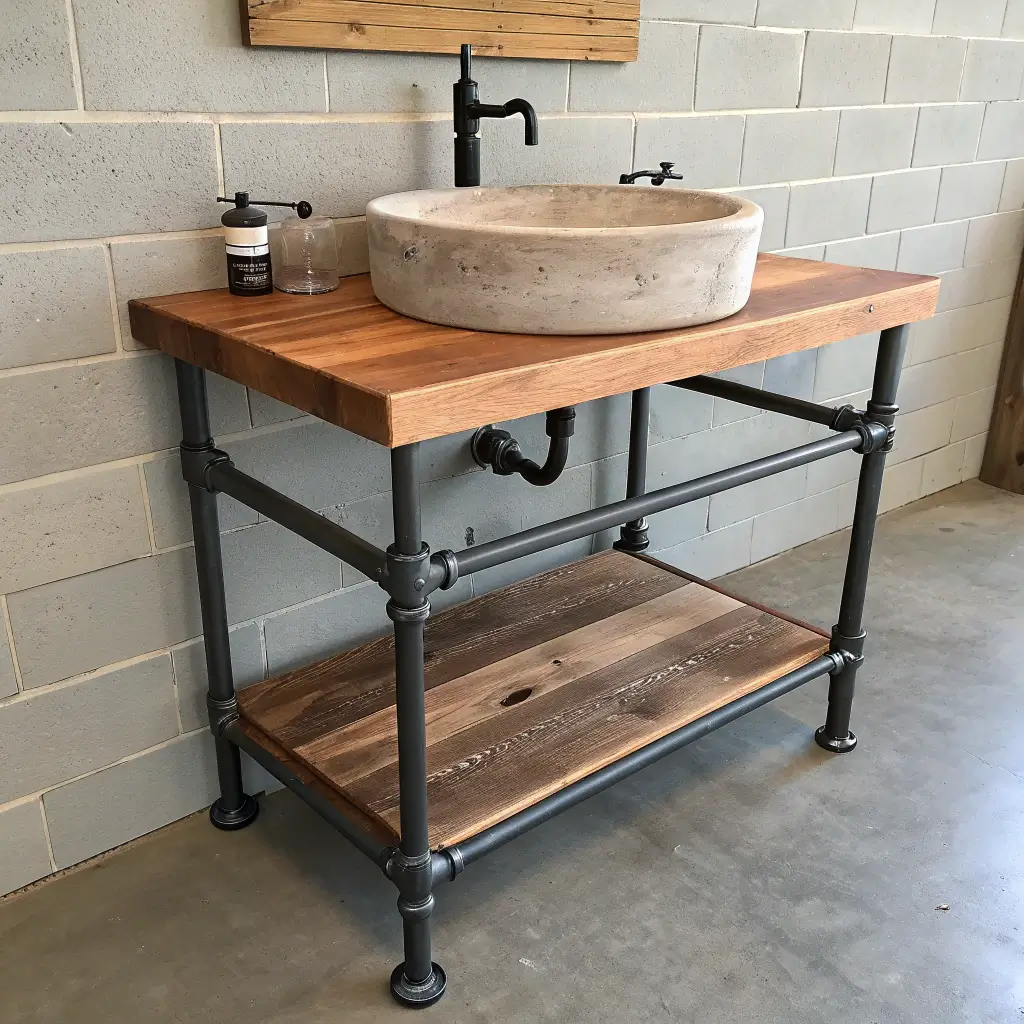
Embracing the Industrial Aesthetic
Who says plumbing pipes need to hide behind walls? The industrial pipe frame vanity takes those utilitarian tubes and turns them into a design statement. It’s like your bathroom went to a CrossFit gym and came back looking tough and trendy.
I’ll admit, when my partner first suggested this style, I was skeptical. But after building one for our master bath, I’m completely sold. The combination of raw metal pipes and warm wood creates this perfect balance between edgy and inviting.
Pipe Dreams to Reality
Building with pipes is surprisingly straightforward:
• Black iron pipes give the most authentic industrial look
• Pre-thread your pipes at the hardware store (saves tons of hassle)
• Clean pipes thoroughly with acetone before assembly
• Add pipe straps for extra stability – wobbling vanities are nobody’s friend
Pro tip: spray your pipes with clear matte sealant to prevent that annoying black residue from getting on everything. Learned that one after ruining a few white towels!
Also Read: 15 Elegant Bathroom Vanity Designs Ideas to Inspire Style
Upcycled Dresser Vanity
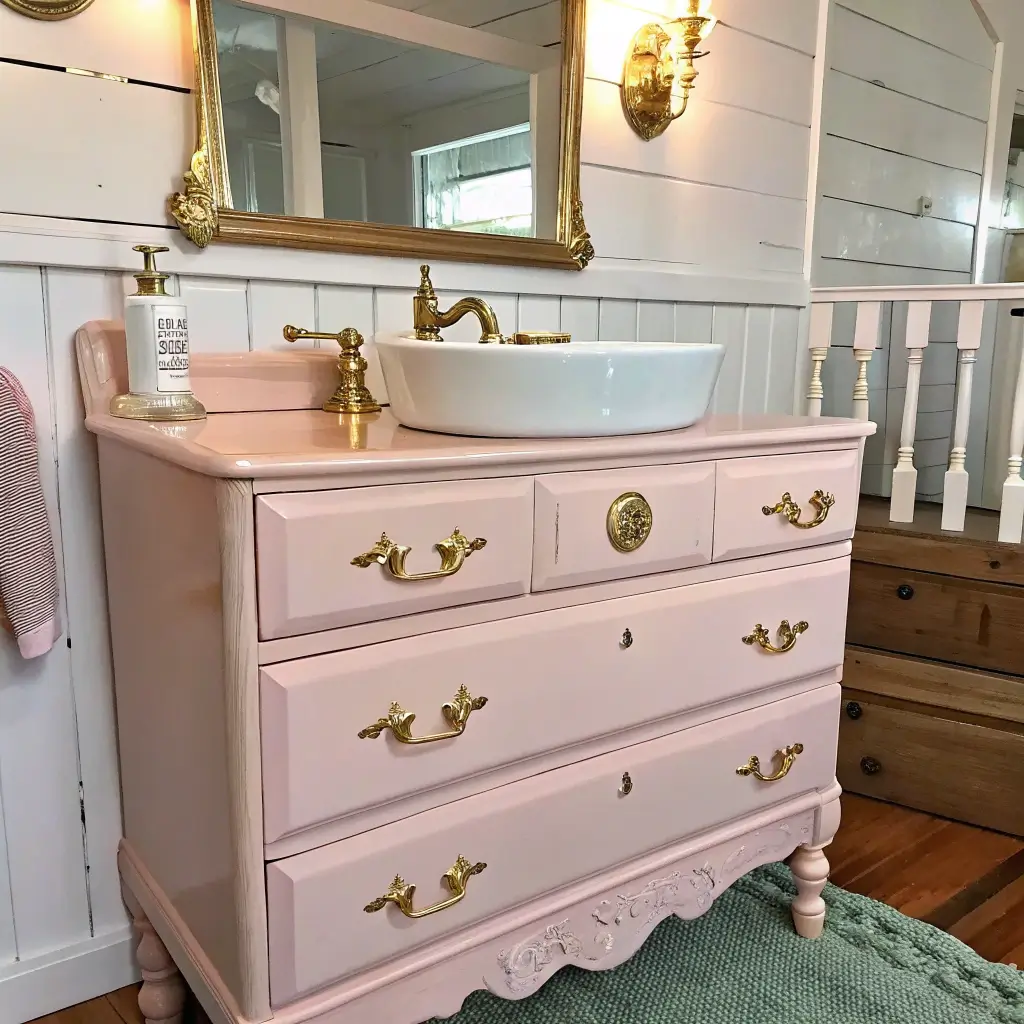
From Bedroom to Bathroom Brilliance
Remember that old dresser gathering dust in your garage? Time to give it a second life as a stunning bathroom vanity. This might be the most budget-friendly option on our list, and IMO, it often yields the most character-rich results.
I’ve converted three dressers into vanities over the years, and each one turned out completely unique. The key is finding a dresser with good bones – solid wood construction beats particle board every single time.
The Conversion Process
Here’s your roadmap to dresser-to-vanity success:
• Measure your plumbing before buying any dresser
• Cut holes carefully for sink and plumbing (measure twice, cut once!)
• Reinforce the top with additional wood support if needed
• Waterproof everything – bathroom moisture is no joke
• Remove or modify drawers to accommodate plumbing
The biggest challenge? Working around existing plumbing. But honestly, with a good jigsaw and some patience, you’ve got this.
Farmhouse Shiplap Vanity
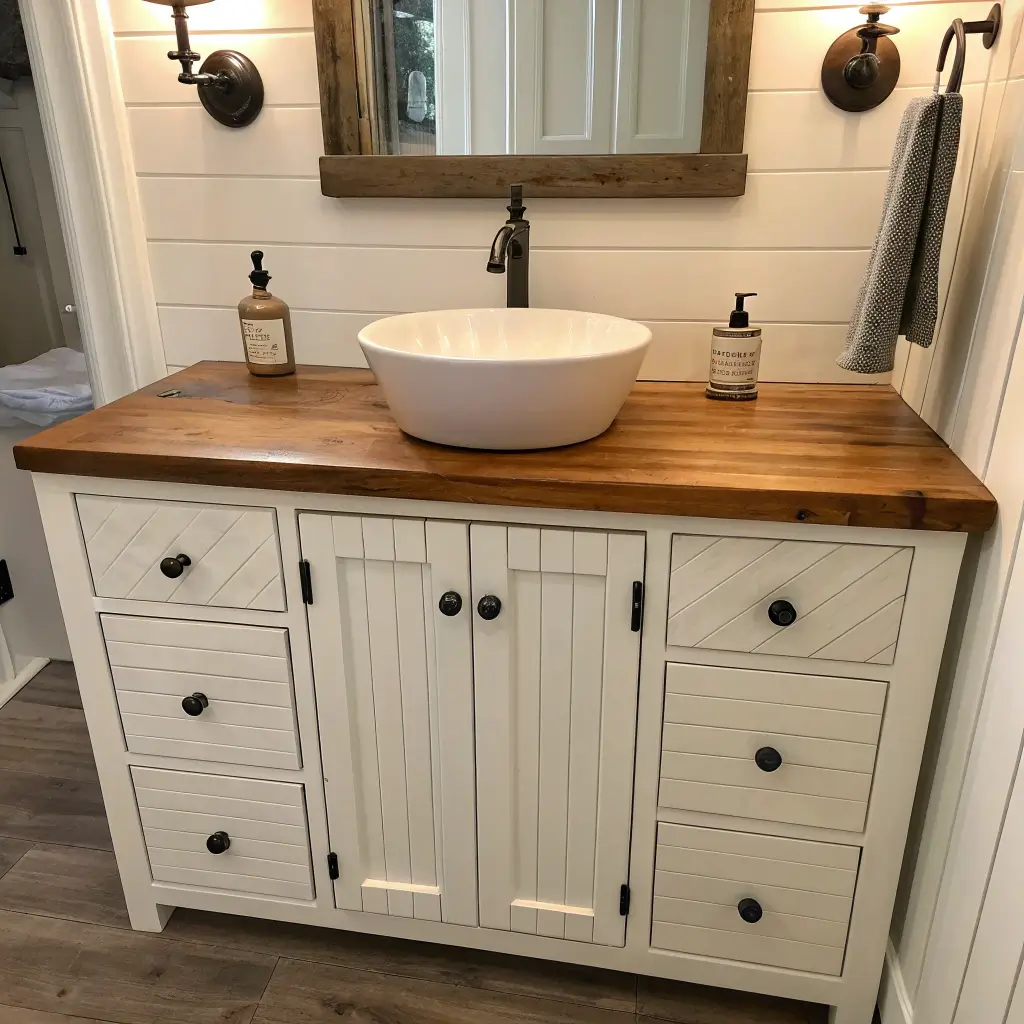
Bringing Farmhouse Charm Home
Shiplap isn’t just for Chip and Joanna anymore. This farmhouse staple makes an absolutely gorgeous vanity facing that’ll have your guests asking “where did you buy this?”
The horizontal lines of shiplap naturally draw the eye, making your bathroom feel wider and more spacious. Plus, painting it white creates that fresh, clean farmhouse aesthetic that somehow never gets old. Though if you’re feeling adventurous, navy blue shiplap is having a serious moment right now.
Shiplap Installation Secrets
Creating your farmhouse dream vanity requires attention to detail:
• Start with a level base line – crooked shiplap is painfully obvious
• Use construction adhesive and nails for maximum hold
• Leave small gaps between boards for that authentic look
• Prime before painting to prevent wood bleed-through
• Caulk the edges for a professional finish
Want to know a secret? You can use pre-primed MDF shiplap for easier installation and lower cost. It looks just as good once painted, and nobody will know the difference 🙂
Concrete Top Vanity
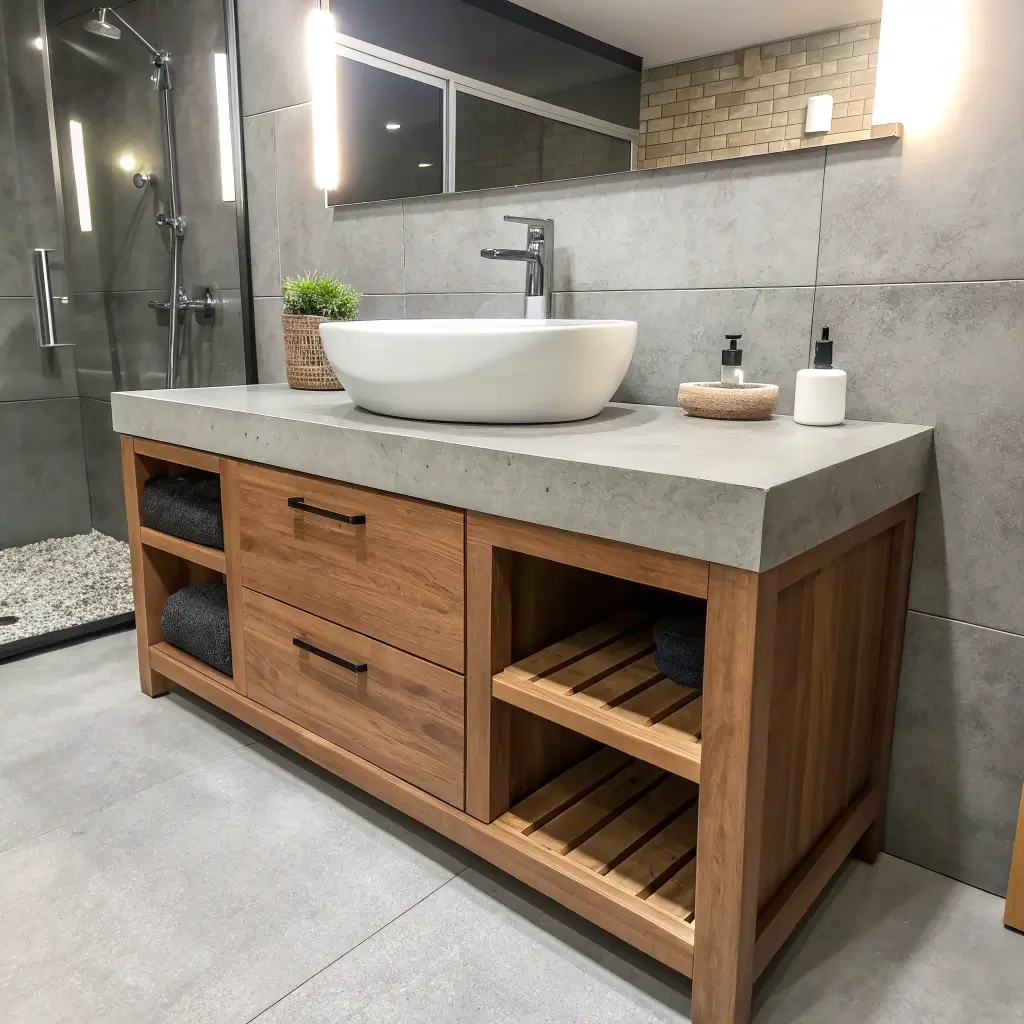
Industrial Meets Elegant
Concrete countertops bring this raw, industrial elegance that makes every bathroom feel like a high-end spa. I was intimidated by concrete work until I actually tried it – turns out, it’s way more forgiving than you’d think.
The weight is something to consider though. My first concrete top nearly gave me a hernia trying to install it solo. Get help for installation day – your back will thank you.
Mastering Concrete Countertops
Here’s what I’ve learned from multiple concrete projects:
• Build a sturdy mold from melamine boards
• Use countertop mix specifically designed for this purpose
• Add fiber mesh for crack prevention
• Vibrate out air bubbles with a palm sander
• Seal properly with multiple coats of concrete sealer
The coolest part? You can customize everything – add glass chips, stones, or even LED lights for a truly unique piece. My current vanity has recycled glass that sparkles in the morning light.
Also Read: 15 Gorgeous Bathroom Vanity Ideas and Chic Design Tips
Compact Corner Vanity
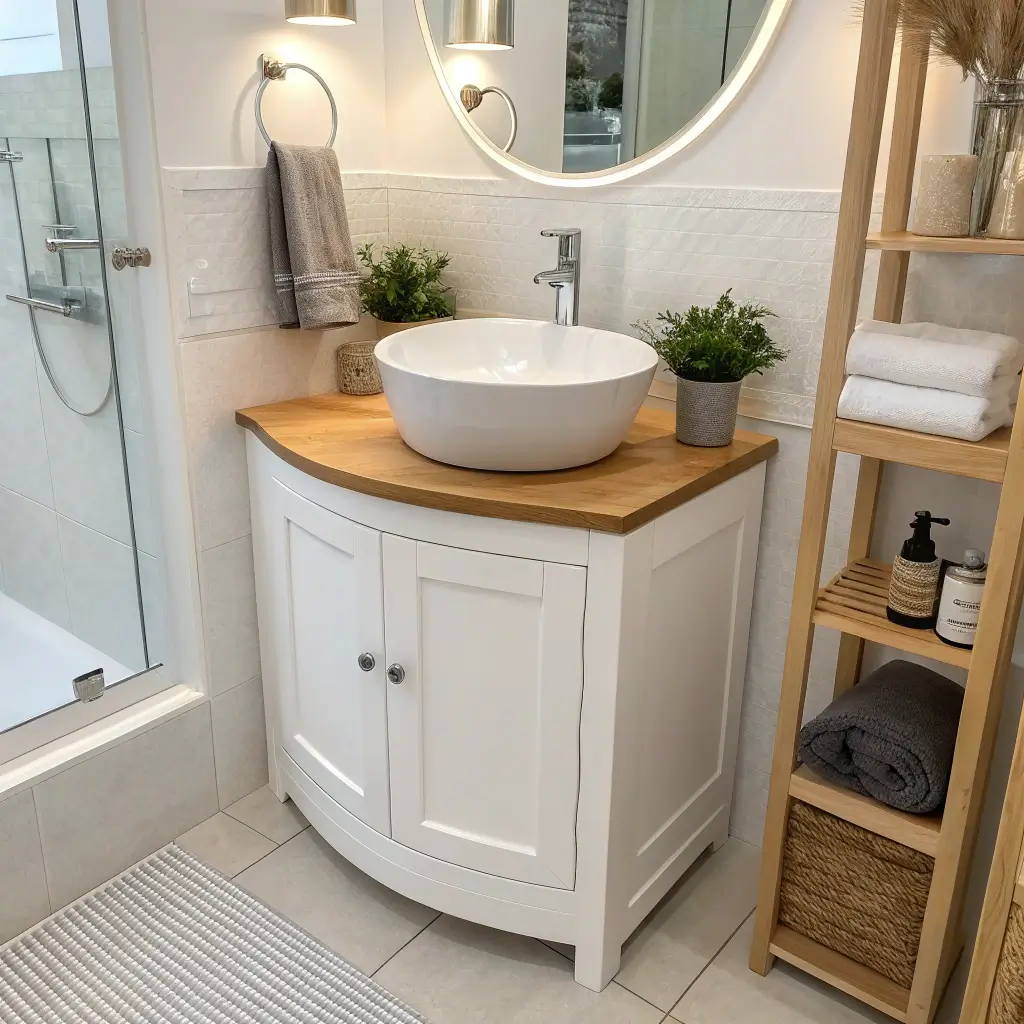
Making Every Inch Count
Got a tiny bathroom? Corner vanities are your space-saving superhero. They tuck perfectly into that awkward corner while still providing storage and style. I installed one in my powder room, and suddenly that cramped space feels functional.
The triangular design means you’re utilizing space that typically goes to waste. And before you ask – yes, you can still fit a decent-sized sink in there!
Corner Installation Tricks
Working with corners requires some special considerations:
• Check for square corners (spoiler: they rarely are)
• Use a corner-specific sink for best fit
• Install blocking between studs for secure mounting
• Consider a vessel sink to maximize counter space
• Add a corner shelf above for extra storage
The biggest mistake people make? Not accounting for the swing of the door. Make sure your vanity doesn’t block the bathroom door from opening fully!
Vintage Cabinet Vanity

Antique Charm Meets Modern Function
There’s something magical about incorporating a genuine vintage piece into your bathroom. I found my vintage cabinet at an estate sale for $40, and with some TLC, it’s now the showpiece of my guest bathroom.
Vintage cabinets bring character that you simply can’t replicate with new pieces. Those worn edges, unique hardware, and solid construction from decades past? Pure gold in the DIY world.
Restoration and Conversion
Converting vintage furniture requires careful planning:
• Check for lead paint before sanding anything pre-1978
• Stabilize wobbly legs with wood glue and screws
• Replace old hardware or restore original pieces with brass cleaner
• Retrofit for plumbing while preserving the original structure
• Apply multiple sealant coats to protect the aged wood
FYI, vintage pieces often need more prep work than you’d expect. But trust me, the end result is worth every minute of stripping old paint.
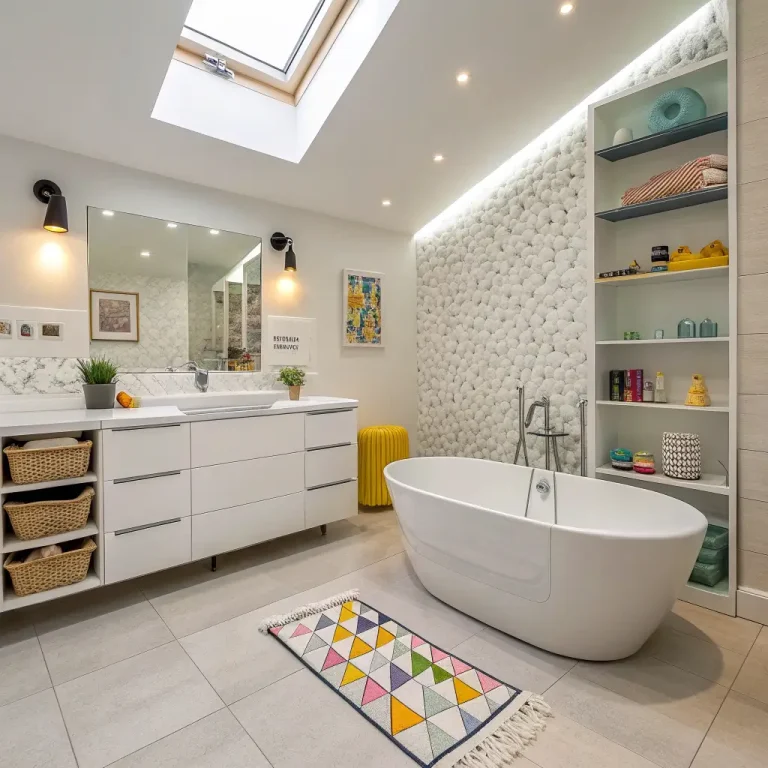
Open Shelf Vanity with Baskets
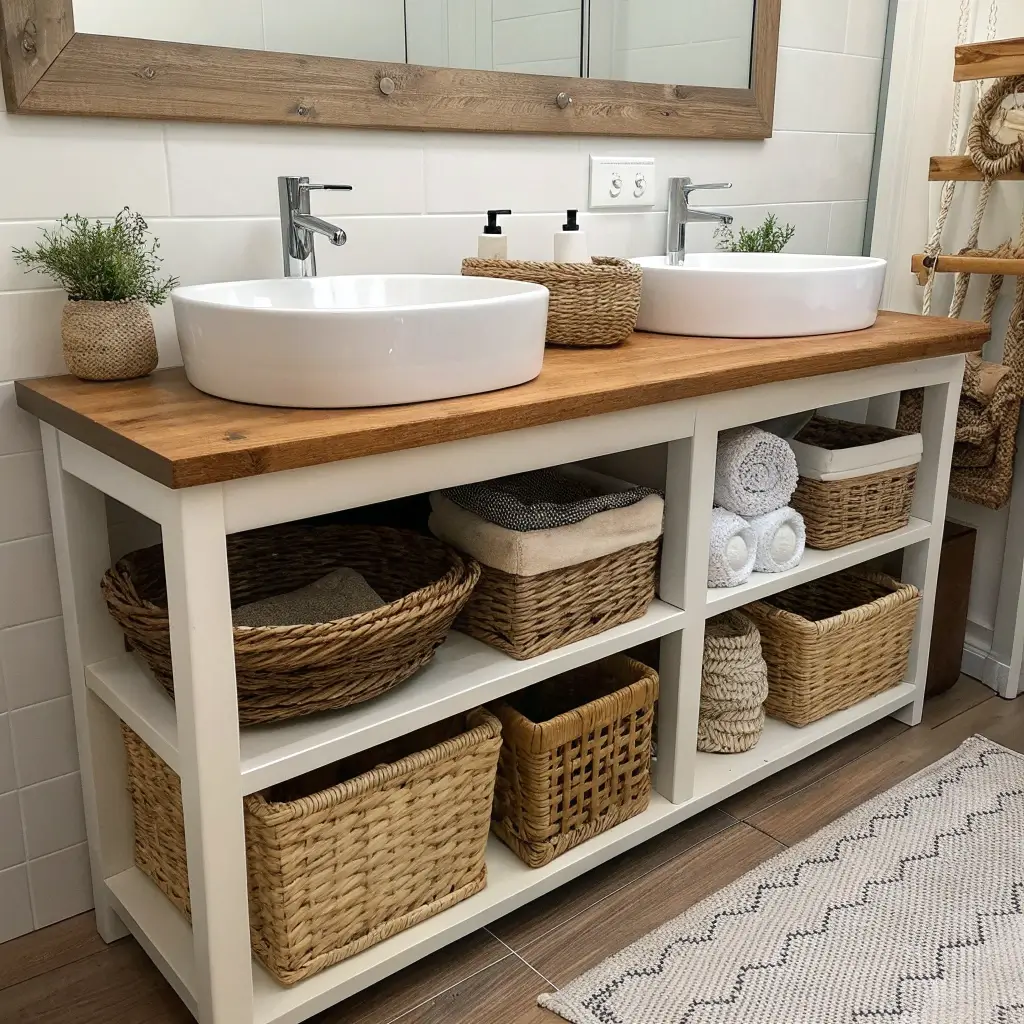
Organization Meets Style
Who needs cabinet doors anyway? Open shelf vanities with woven baskets combine functionality with that breezy, spa-like aesthetic we’re all chasing. Plus, they make small bathrooms feel significantly larger.
I switched to open shelving in my kids’ bathroom, and surprisingly, it’s helped them stay more organized. When everything’s visible, there’s more accountability to keep things tidy (well, mostly tidy).
Building Your Open Storage System
Creating an organized open vanity involves strategic planning:
• Choose uniform baskets for a cohesive look
• Install shelves at varying heights for different items
• Use water-resistant wood or seal thoroughly
• Add dividers within baskets for smaller items
• Label baskets subtly with tags or chalk markers
The key to making open storage work? Pretty containers. Those matching baskets aren’t just functional – they’re part of the design.
Also Read: 15 Genius Clever Bathroom Storage Ideas and Stylish Solutions
Painted Ombre Vanity
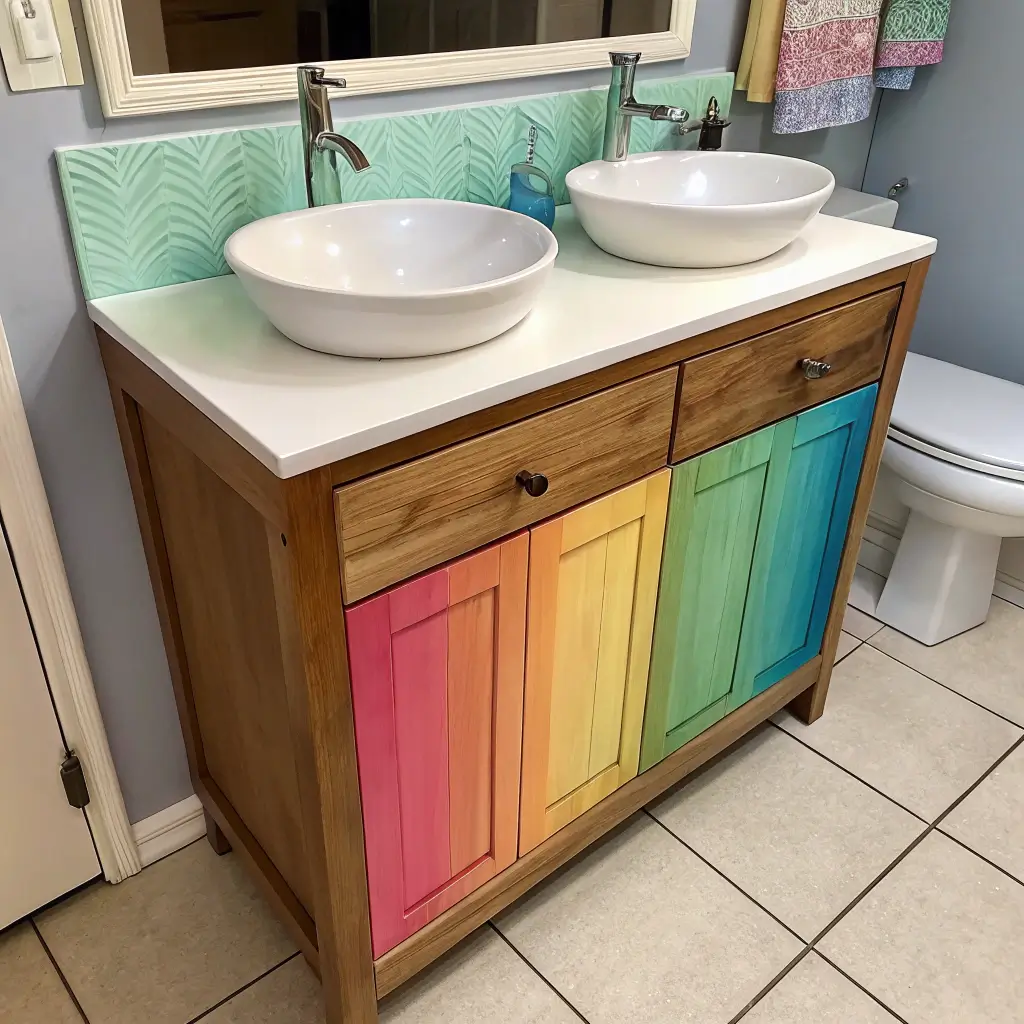
Creating a Gradient Masterpiece
Ready to make a serious statement? An ombre paint job transforms even the most basic vanity into an Instagram-worthy focal point. I attempted this last summer, and while my first try looked more “paint accident” than “artistic gradient,” the second attempt turned out amazing.
The gradual color transition adds depth and visual interest that solid colors just can’t match. Plus, it’s a great way to incorporate multiple shades from your bathroom’s color palette.
Ombre Painting Technique
Mastering the ombre effect takes practice but follows these principles:
• Start with the lightest shade as your base
• Mix transition colors yourself for seamless blending
• Work in horizontal sections while paint is still wet
• Blend with a dry brush for smooth transitions
• Seal with clear coat to protect your artwork
Here’s the thing nobody tells you: practice on cardboard first. Seriously, get your technique down before attacking your actual vanity.
Mirror-Integrated Vanity
Double Duty Design
Why stop at just a vanity when you can integrate storage into your mirror frame? This clever design hack maximizes every inch of wall space while creating a cohesive, built-in look.
I built one of these for my tiny apartment bathroom, and it literally doubled my storage capacity. The mirror frame holds everything from medications to makeup, all hidden behind the mirror door.
Creating Your Mirror Storage Combo
Building an integrated unit requires careful planning:
• Frame your mirror with deep wood boxes
• Add hidden hinges for a seamless look
• Install magnetic catches to keep doors closed
• Include interior shelves adjustable for different items
• Wire for LED lighting inside the frame
The toughest part? Hanging this beast securely. You’ll need heavy-duty wall anchors and probably a friend to help with installation.
DIY Marble Countertop Vanity
Luxury Look Without the Price Tag
Real marble costs a fortune, but contact paper marble? That’s a different story. Before you roll your eyes, hear me out – today’s marble contact papers look incredibly realistic, and when done right, even I can’t tell the difference from across the room.
For those wanting something more substantial, marble-look porcelain tiles offer durability with that coveted marble aesthetic. I’ve used both methods, and honestly? Both look fantastic when installed properly.
Achieving the Marble Effect
Here’s how to nail that marble look:
For contact paper:
• Clean and sand the surface smooth
• Apply slowly to avoid air bubbles
• Use a credit card to smooth as you go
• Seal edges with clear caulk
For porcelain tiles:
• Level your substrate perfectly
• Use white thinset to prevent show-through
• Match veining patterns between tiles
• Seal with quality grout sealer
The contact paper option shocked me with its durability – mine’s survived two years of daily use without peeling.
Scandinavian Style Vanity

Minimalism Meets Warmth
Scandinavian design hits that sweet spot between minimalist and cozy. Think light woods, clean lines, and just enough warmth to prevent your bathroom from feeling cold. It’s basically hygge for your hygiene routine (see what I did there?).
My Scandi-inspired vanity combines white oak wood with matte black fixtures, and every morning feels like I’m getting ready in a Swedish spa. The key is restraint – resist the urge to over-accessorize.
Nordic Design Elements
Creating authentic Scandinavian style involves:
• Choose light wood tones like birch or white oak
• Keep hardware minimal and matte black or brass
• Add legs to lift the vanity off the ground
• Incorporate natural textures through baskets or plants
• Maintain negative space – less really is more here
Remember: Scandinavian design celebrates imperfection. Those little wood knots and grain variations? They’re features, not flaws.
Two-Tone Color Vanity
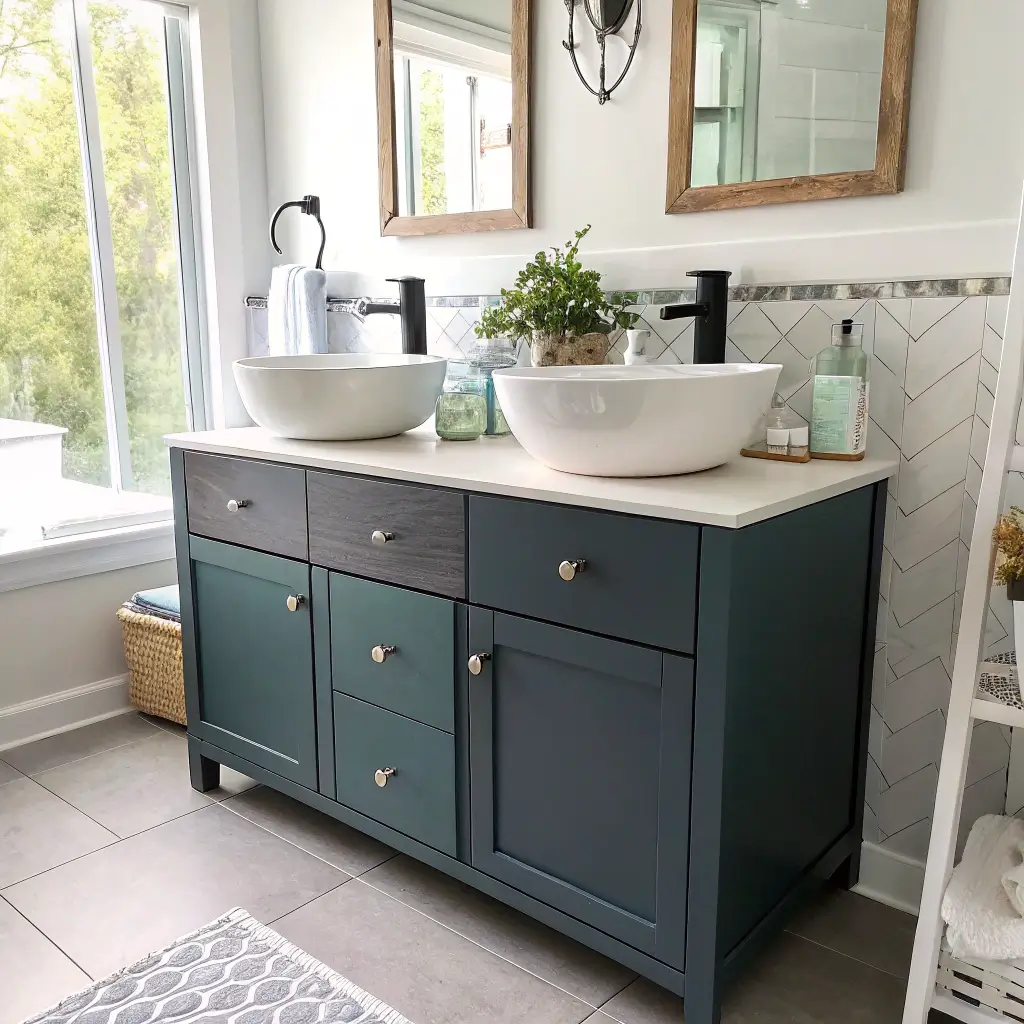
Playing with Contrast
Why settle for one color when two create such dynamic visual interest? Two-tone vanities break up the monotony and add sophisticated depth to any bathroom. I painted my vanity cabinet navy while keeping the drawers white, and visitors always compliment the professional look.
This technique works especially well for larger vanities that might otherwise feel heavy or overwhelming in a single dark color. The contrast keeps things visually light while still making a statement.
Color Combination Strategies
Nailing the two-tone look requires thoughtful planning:
• Keep one color neutral for balance
• Use painter’s tape for crisp lines
• Consider the 60-30-10 rule for color proportions
• Match hardware to one of your chosen colors
• Test combinations with sample paints first
Popular combinations that always work:
- Navy and white
- Gray and natural wood
- Black and brass
- Sage green and cream
The secret to professional-looking results? Quality painter’s tape and removing it while the paint’s slightly tacky.
Repurposed Door Vanity
From Entrance to Elegance
Got an old door lying around? Congratulations, you’ve got vanity potential! This might sound crazy, but solid wood doors make incredible vanity tops, especially those vintage five-panel doors with all that gorgeous detailing.
I discovered this trick when renovating a 1920s house – the original doors were too damaged for regular use but perfect for repurposing. That solid wood construction means they can handle the weight of a sink no problem.
Door Transformation Process
Converting a door requires some creative problem-solving:
• Strip old paint to reveal wood grain (or paint fresh)
• Reinforce hollow areas with wood filler if needed
• Cut sink hole carefully with a jigsaw
• Add legs or mounting cleats depending on your design
• Seal thoroughly with multiple polyurethane coats
The coolest feature? Those recessed panels become perfect spots for decorative tile or even small succulent gardens. How’s that for thinking outside the box?
Making Your Choice
So which DIY vanity speaks to you? Maybe you’re drawn to that rustic reclaimed wood charm, or perhaps the sleek floating vanity matches your modern aesthetic. Whatever you choose, remember that the best vanity is the one that makes you smile every morning.
Building your own vanity isn’t just about saving money (though that’s definitely a sweet bonus). It’s about creating something uniquely yours, something that fits your space perfectly and reflects your personal style. Plus, you’ll have the best answer when guests inevitably ask where you got that amazing vanity: “Oh, this old thing? I made it myself.”
Ready to get started? Pick your favorite design, grab your tools, and remember – every expert DIYer started as a beginner who decided to try anyway. Your dream bathroom is just one weekend project away!