
15 DIY Bedroom Decor Ideas for a Personal Touch
Ugh, is your bedroom giving… hotel vibes? And not even the nice, luxury hotel kind—I’m talking the “beige-on-beige, generic art, did someone actually choose this?” kind of vibe. We’ve all been there.
Your bedroom should be your sanctuary, your escape, the one place in the world that feels 100%, undeniably you.
But when you’re staring at blank walls and mass-produced furniture, it can feel impossible to inject any real personality without spending a fortune or committing to a permanent reno you might regret in six months.
Well, my friend, grab your metaphorical tool belt (or just a really strong cup of coffee), because we’re about to change all that.
I’ve been a DIY maniac for years, turning every rental apartment and first home into a personalized haven, and I’m here to tell you that a little creativity goes a ridiculously long way.
We’re ditching the boring and embracing the bespoke with 15 DIY bedroom decor ideas that are big on style but low on commitment and cost. Let’s get into it.
15 DIY Bedroom Decor Ideas
1. Create a Statement Wall with Removable Wallpaper

Let’s start with the biggest impact for the least amount of effort: the statement wall. Painting an accent wall is so 2010.
The real MVP of the modern renter and commitment-phobe is removable wallpaper. I know what you’re thinking—wallpaper? Isn’t that what my grandma’s kitchen is covered in? Trust me, it’s had a glow-up.
Why This Works: It instantly defines your space, adds depth and texture, and allows you to experiment with bold patterns you’d never dare to paint.
The best part? When you’re over it (or your lease is up), it peels right off without damaging the walls. It’s basically a sticker for your entire wall, and who doesn’t love stickers?
How to Nail It:
- Pick Your Pattern: Go bold! This is your chance to try that gorgeous floral, moody geometric, or even a faux wood panel look.
- Prep is Key: Make sure your wall is clean, dry, and smooth. Any lumps or bumps will show through.
- Measure Twice, Cut Once: Most brands have helpful grids on the back. Measure your wall height and cut your first panel accordingly. Use a level to draw a straight vertical line to guide you—your walls are probably not perfectly straight, FYI.
- The Peel-and-Stick Method: Slowly peel back a few inches of the backing, align it with your guide line, and smooth it onto the wall with a plastic squeegee or a credit card (my personal go-to) to push out any air bubbles.
Pro Tip: Order a sample first! Colors can look wildly different on your screen versus in your room’s lighting. I once ordered a “soft sage green” that showed up looking like neon mint. It was… a choice.
2. Upcycle Old Furniture into Custom Pieces
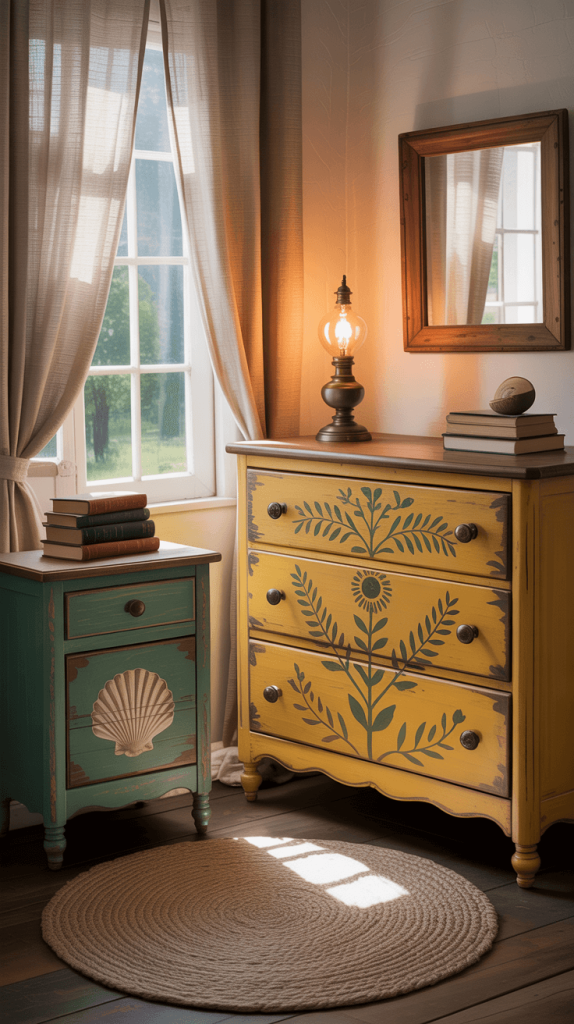
Before you even think about dragging that sad, old dresser to the curb, stop! That piece has potential.
Upcycling is my absolute favorite way to create one-of-a-kind furniture that nobody else on the planet has. It’s sustainable, cheap, and wildly satisfying.
Why This Works: You take something generic and infuse it with your style.
A simple coat of paint, some new hardware, and maybe a little sanding for a distressed look can completely transform a piece.
How to Nail It:
- Find Your Victim: Scour Facebook Marketplace, thrift stores, or even your parents’ garage. Solid wood pieces are gold, but even laminate can be transformed with the right primer.
- The Magic of Prep: Clean it thoroughly with a degreaser. Lightly sand the entire surface to help the paint adhere. If it’s laminate, use a high-adhesion primer.
- Choose Your Finish: Chalk paint is fantastic for beginners because it requires minimal prep and often no priming. For a more durable finish, use a furniture enamel.
- The Jewelry: Swapping out the hardware is the easiest upgrade in the history of upgrades. New knobs or pulls can take a piece from shabby to chic in five minutes flat.
Pro Tip: Don’t be afraid of color! That dresser would look incredible in a deep navy or a terracotta pink. It’s just paint; if you hate it, you can always paint over it.
3. Hang Floating Shelves for Extra Storage and Style
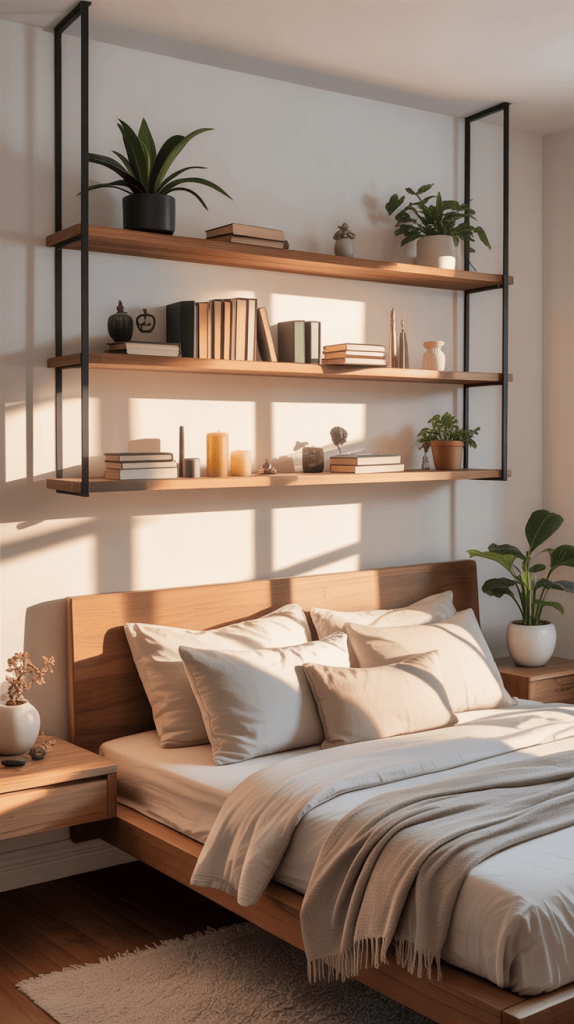
Shelves are the workhorses of the decor world. They hold your stuff and look good doing it.
But floating shelves, specifically, have a clean, modern look that avoids the bulkiness of bracket shelves.
They make your walls feel more designed and intentional.
Why This Works: They utilize vertical space, display your favorite personal items (books, photos, plants, that weird little statue you love), and add architectural interest to a blank wall.
How to Nail It:
- Find the Studs: This is non-negotiable for heavy items. Use a stud finder to locate the wooden beams in your wall. Floating shelves need to be anchored into studs for security. Hitting drywall alone is a one-way ticket to Crushed-Dreamsville.
- Plan Your Layout: Arrange your shelves on the floor first to figure out a spacing and arrangement you like. Asymmetry can look really dynamic!
- Style Thoughtfully: Don’t just line things up. Create little vignettes. Stack a book, lean a small picture frame on it, add a plant, and maybe a cool rock you found on a hike. Group items in odd numbers (3s or 5s) for a more pleasing visual.
Pro Tip: If you’re not ready to commit to heavy-duty drilling, there are amazing pressure-mounted floating shelf options now that are surprisingly sturdy for lighter items.
4. DIY Macramé Wall Hanging for a Boho Touch

Boho chic is forever, and macramé is its iconic ambassador.
Buying a large, handmade macramé piece can cost a pretty penny, but making one yourself is incredibly cheap and oddly meditative.
Why This Works: It adds softness, texture, and a handmade vibe to your space. It’s a perfect piece of art above a bed or on a large, empty wall.
How to Nail It:
- Gather Supplies: All you need is a wooden dowel or a cool found branch and a bunch of cotton cord (3mm or 4mm is a good starter size).
- Learn the Knots: Seriously, it’s like three knots. The square knot, the spiral knot, and the lark’s head knot. YouTube will be your best friend here. I learned in an afternoon while binge-watching my favorite show.
- Start Simple: Don’t try a massively complex pattern for your first go. A simple, minimalist design can be just as striking.
Pro Tip: Add beads or dye sections of the cord for a personalized touch. I threaded some wooden beads into mine, and it made it look so much more expensive and custom.
5. Transform Plain Curtains with DIY Tie-Dye

White or beige curtains are a classic for a reason, but they can also be a little blah.
Instead of buying new ones, why not give your existing plain curtains a groovy, colorful upgrade with tie-dye?
Why This Works: It’s a low-cost, high-reward way to add a massive pop of color and pattern to your room.
The organic, unpredictable patterns of tie-dye ensure your curtains will be completely unique.
How to Nail It:
- Choose Your Dye: Fiber-reactive dyes work best on natural fibers like cotton or linen. For polyester blends, you’ll need a specific dye like iDye Poly.
- The Setup: This is a messy project. Do it outside or in a basement with plenty of plastic covering the floor. Wear gloves unless you want rainbow hands for a week (…which actually sounds kind of fun).
- Get Creative with Folds: The way you fold and bind the fabric creates the pattern. Spirals, bullseyes, crumples—each technique gives a different result. Embrace the unpredictability!
Pro Tip: For a more sophisticated, modern take, try an ombre dye effect by gradually dipping the curtain from top to bottom into the dye bath. It creates a beautiful, subtle gradient of color.
6. Make Your Own Decorative Throw Pillows
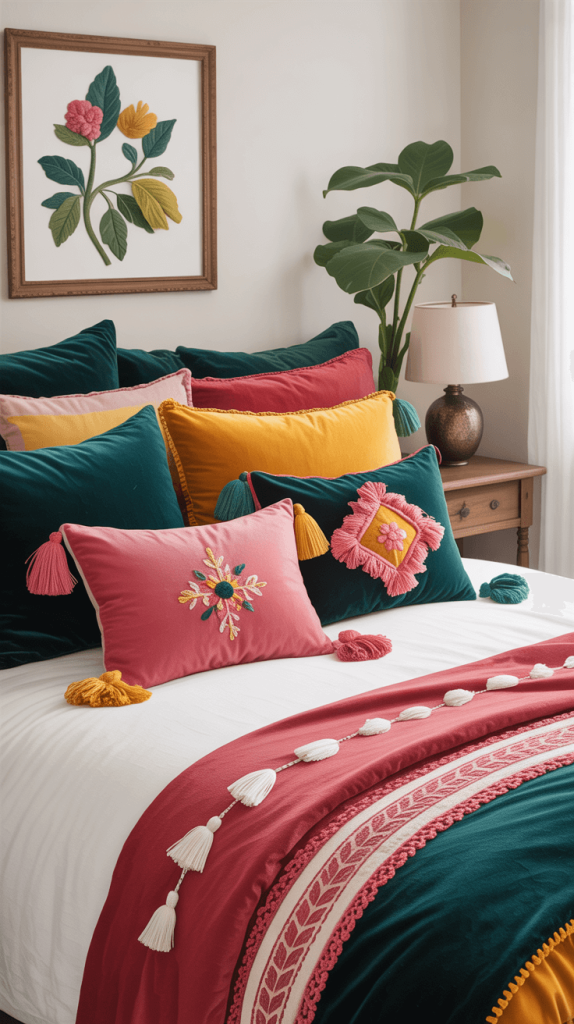
Throw pillows are the accessories of your bedroom. They can tie a color scheme together, add texture, and make your bed look like a cloud of comfort.
Store-bought ones can be stupidly expensive, especially for the good, textured fabrics.
Why This Works: Making your own allows you to control the size, fabric, and fill.
You can use remnants of beautiful fabric, old sweaters, or even vintage scarves to create something truly special.
How to Nail It:
- The Easiest Method: Find a fabric you love. Place a pillow form on top, cut around it leaving a ½-inch seam allowance on all sides. Sew three sides, turn it right-side out, stuff the form in, and hand-stitch the fourth side closed. Seriously, that’s it.
- No Sew? No Problem: Fabric glue and iron-on hem tape are your best friends. You can create a crisp, clean envelope closure without ever touching a needle and thread.
- Play with Texture: Mix and match fabrics! Combine a chunky knit with a smooth velvet or a rustic linen. This adds so much depth to your bedscape.
Pro Tip: Don’t skimp on the insert. A cheap, floppy insert will make even the most beautiful cover look sad. Spend a little more on a high-loft, down-alternative insert that’s overstuffed. It makes all the difference.
Also Read: 15 Stunning Dresser Decor Bedroom Ideas for Extra Style
7. Create a Cozy Reading Nook
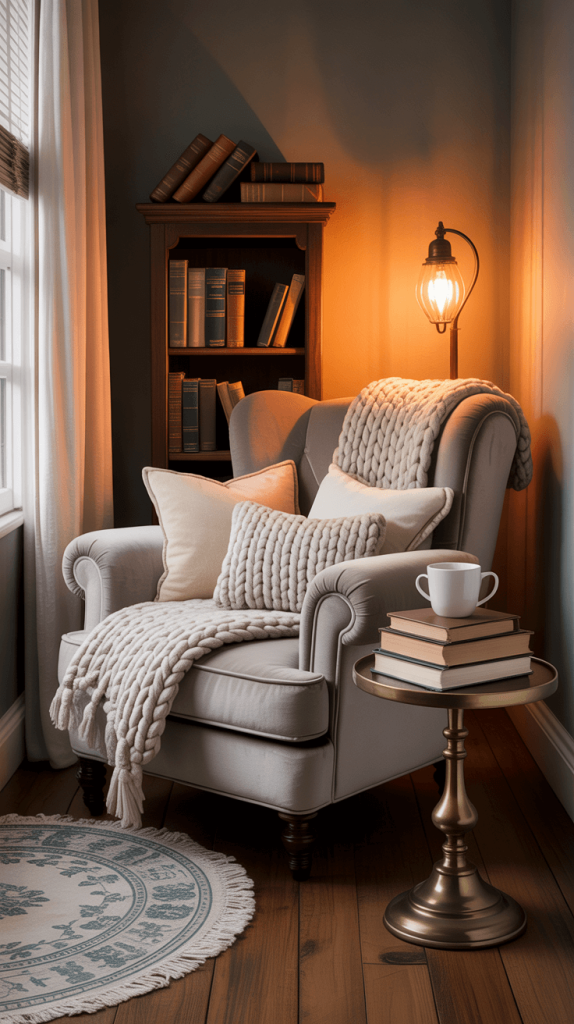
Every bedroom deserves a little corner dedicated to quiet escape. You don’t need a bay window or a ton of space.
You just need to carve out a spot that says, “Sit here and relax.”
Why This Works: It functionally zones your room and creates a dedicated space for relaxation that isn’t your bed, which sleep experts will tell you is better for your overall sleep hygiene.
How to Nail It:
- The Seat: A comfortable armchair, a low-slung lounge chair, or even a large, firm floor pillow (called a pouf) is your foundation.
- The Light: This is crucial. You need a good light source. A sleek floor lamp arching over the chair or a small table lamp on a side table is perfect.
- The Comfort: Drape a super soft throw blanket over the chair and add one of your fancy new DIY pillows.
- The Surface: A small side table or even a stack of books next to the chair gives you a place to rest your coffee or book.
Pro Tip: Define the space with a rug. Even a small 3’x5’ rug under the chair and side table will visually anchor your nook and make it feel like its own intentional area.
8. Design a DIY Headboard with Reclaimed Wood
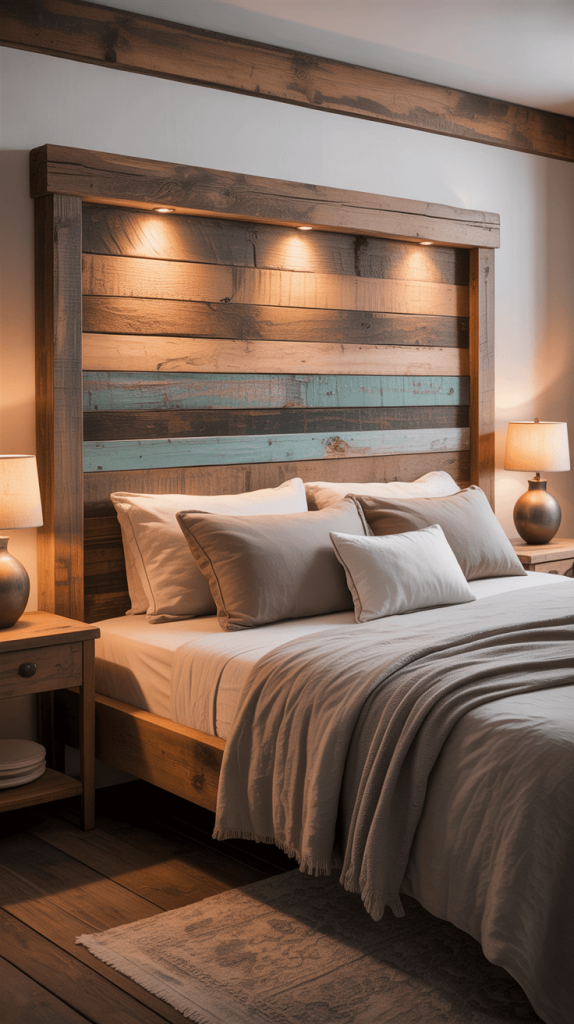
A headboard frames your bed and acts as a huge piece of art. Buying a nice upholstered or wooden headboard can easily run you hundreds of dollars.
Making one from reclaimed wood or even new common boards? A fraction of the cost.
Why This Works: It adds major architectural weight and a rustic, organic feel to your room.
Reclaimed wood has a character and history that new wood just can’t replicate.
How to Nail It:
- Source Your Wood: Pallet wood (make sure it’s heat-treated, not chemical-treated!), old fence posts, or even planks from a deconstructed barn are perfect. Embrace the imperfections—knots, cracks, and old paint splatters tell a story.
- Build the Frame: Construct a simple rectangular frame out of 2x4s that’s the width of your bed. This will be the support structure you attach the planks to.
- Attach the Planks: Nail or screw your reclaimed planks horizontally across the frame. You can leave even gaps for a modern look or place them tight together for a more traditional feel.
- Mount It: The easiest way to hang it is with French cleats. One part attaches to the wall (into studs!), the other to the back of the headboard. It just slides on and is incredibly secure.
Pro Tip: You can stain, whitewash, or leave the wood raw. I lightly sanded mine and used a matte polyurethane to seal it and keep any splinters at bay. It looks amazing against the white walls.
9. Create Personalized Wall Art
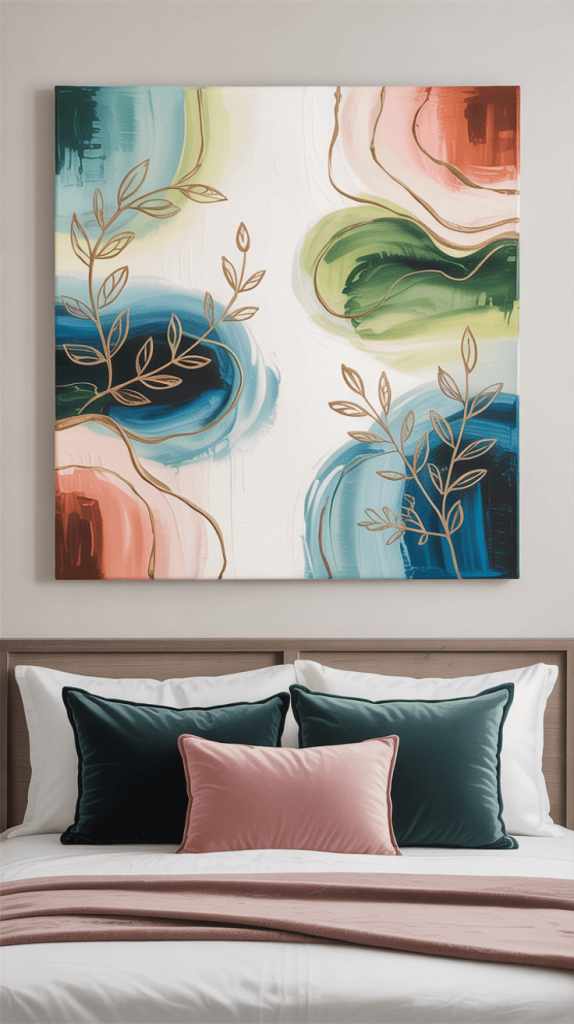
Blank walls are a canvas waiting for your story. You don’t need to be the next Picasso to create art that speaks to you. Personal, meaningful art will always beat a generic mass-produced print.
Why This Works: It’s the ultimate expression of you. It could be a memory, a favorite color, a quote, or just an abstract shape you find calming.
It costs almost nothing but adds immeasurable value to your space.
How to Nail It:
- Abstract Canvas: Grab a cheap canvas and some acrylic paints. Pick 2-3 colors you love. Paint the whole canvas one color as a base. Then, just play. Use a brush, a sponge, your fingers—there are no rules. It’s about the process and the color, not a perfect outcome.
- Photo Wall: Print your favorite Instagram or phone photos in a uniform size (black and white looks especially cohesive). Frame them in identical, simple frames for a gallery wall that’s all about your life and adventures.
- Textured Weaving: Get a small, simple loom kit. Using different yarns—thick, thin, fuzzy, smooth—you can create a small textural wall hanging. It’s easier than macramé and so satisfying.
Pro Tip: Thrift your frames! You can find a ton of ugly-but-sturdy framed art at thrift stores for a few bucks. Pop out the old print, spray paint the frame a unified color (black, white, or gold), and insert your new art. Instant curated gallery.
Also Read: 15 Chic Shelf Decor Bedroom Ideas to Personalize Your Space
10. Upcycle Old Mason Jars into Decorative Light Fixtures

Mason jars aren’t just for pickling anymore. With a little wiring know-how (which is simpler than you think), they can become charming, industrial-chic pendant lights or sconces.
Why This Works: It’s a genius way to add custom, ambient lighting.
The glass diffuses the light beautifully, creating a warm, cozy glow perfect for a bedroom.
How to Nail It:
- The Kit: You can buy pendant light conversion kits at any hardware store for under $20. They include the socket, cord, and a threaded nipple that fits perfectly through the lid of a mason jar.
- The Process: Drill a hole in the center of the mason jar lid. Feed the threaded nipple from the kit through the hole and secure it with a nut. Screw the socket onto the nipple, thread the cord through, and screw the lid onto the jar. That’s the basic gist!
- Safety First: Always ensure your connections are tight and the cord is in good condition. If you’re not comfortable, enlist a handy friend to help. Use LED bulbs as they stay much cooler than incandescent bulbs.
Pro Tip: Cluster 3-5 jar pendants at different heights over a side table or in a corner for a stunning, statement-making light cluster.
11. DIY Dream Catcher for Boho Vibes
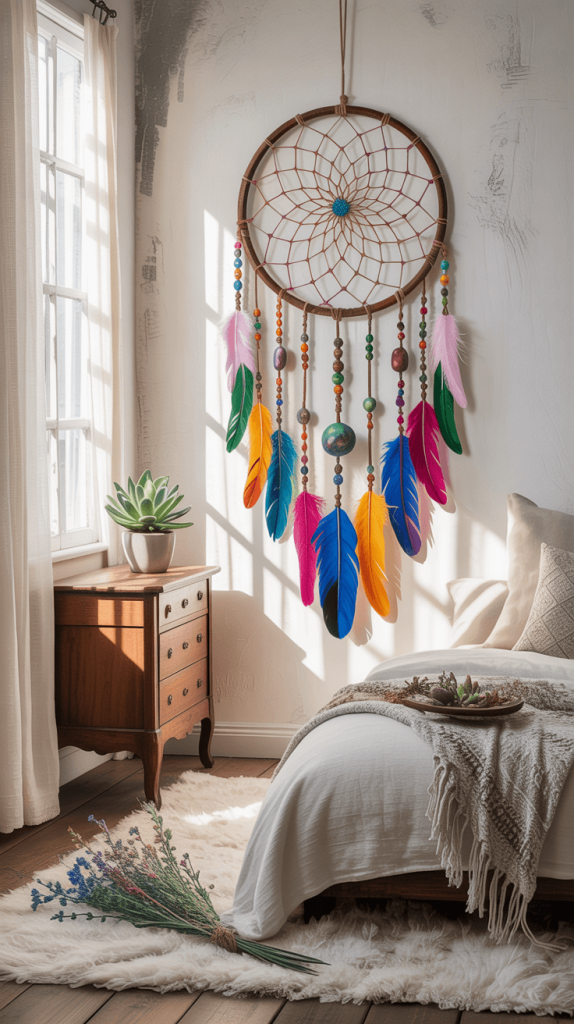
Much like macramé, dream catchers bring that beautiful, flowing, boho texture to a room.
The traditional origins are in Native American culture, and while we’re using them for decor, it’s always good to be mindful and respectful of their cultural significance.
Why This Works: It’s a lightweight, airy piece of wall decor that adds movement with feathers and beads.
It’s a project that feels spiritual and creative.
How to Nail It:
- The Hoop: Use a metal embroidery hoop, a bent willow branch, or even a old bracelet.
- The Web: This is the classic part. You wrap the hoop with suede lace or yarn, then use a needle to weave a web inside with more string. Again, YouTube is your visual guide here.
- The Embellishments: This is where you personalize it. Add hanging suede strands, feathers, beads, crystals, or even little charms that mean something to you.
Pro Tip: Soak your feathers in a mix of water and a little fabric stiffener before attaching them. It keeps them from getting frizzy and looking messy.
12. Build a DIY Loft Bed for Maximizing Space
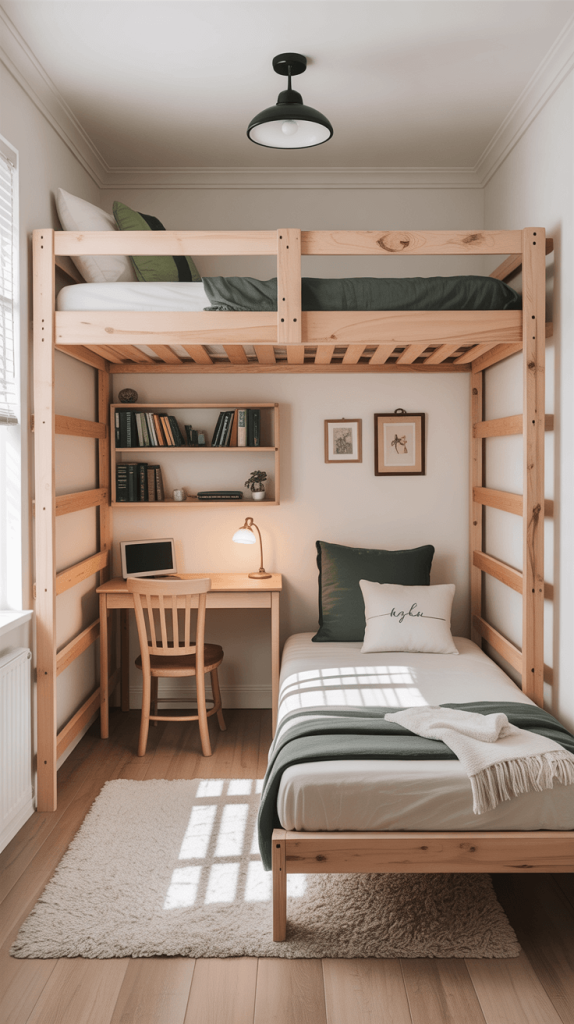
If you’re working with a shoebox-sized bedroom (hello, city living!), going vertical is your only option.
A loft bed is a game-changer, freeing up a massive amount of floor space underneath.
Why This Works: It literally creates new square footage.
Underneath, you can fit a desk for a home office, a cozy seating area, a dressing area, or just crucial storage.
How to Nail It:
- Plan Meticulously: This is a bigger build. You need solid plans. Ana White’s website is a fantastic resource for free, easy-to-follow furniture plans, including loft beds.
- Choose Your Wood: Don’t use flimsy pine for something this important. Invest in sturdy, construction-grade lumber like Douglas Fir. This thing needs to hold you and your mattress safely.
- Reinforce Everything: Use heavy-duty lag bolts and metal brackets at all the major joints. Over-engineer it. The peace of mind is worth the extra few dollars.
Pro Tip: If building from scratch feels too daunting, look for a loft bed kit or a sturdy, high-up metal bunk bed frame that you can modify and customize with curtains and lights.
13. Craft a Terrarium for Natural Decor

Bringing a little bit of nature indoors is proven to boost your mood and purify the air. But if you have a history of killing plants (no judgment), a terrarium is your answer.
It’s a self-contained, low-maintenance ecosystem.
Why This Works: It adds a vibrant, living element to your decor.
A glass terrarium with layers of rock, soil, and moss is like a little piece of art that happens to be alive.
How to Nail It:
- The Container: Any clear glass vessel will work—a large jar, a fish bowl, a cloche, even a cool-shaped bottle.
- The Layers:
- Rocks/Peebles: For drainage at the bottom.
- Activated Charcoal: A thin layer to keep things fresh and filter water.
- Sphagnum Moss: A barrier to keep soil from sinking down.
- Potting Soil: Your plant’s home.
- The Plants: Choose slow-growing, humidity-loving plants like air plants, mosses, fittonia (nerve plant), or small ferns.
Pro Tip: Don’t overwater! This is the #1 killer of terrariums. A closed terrarium might only need water a few times a year. If you see condensation, it’s happy. If it’s swimming, you’ve gone too far.
14. Add a DIY Rug with Fabric Scraps

A good rug ties a room together (The Dude was right). But a large area rug can be a major investment.
If you’re crafty and patient, you can make a stunning, unique rug without a loom.
Why This Works: It’s a zero-waste project that turns old t-shirts, bed sheets, or fabric remnants into a soft, squishy, and completely custom floor covering.
How to Nail It:
- The “Yarn”: Cut old cotton t-shirts or fabric into long, continuous strips. Look up a “t-shirt yarn” tutorial—it’s a clever way to make a long strand from a tee.
- The Base: You’ll need a non-slip rug gripper or a canvas rug base.
- The Technique:
- Latch Hook: Buy a latch hook kit and use your fabric strips to create a shaggy rug.
- Braiding: Braid your fabric strips together and then coil the braid, hand-sewing it in place to create a classic braided rug.
- Rag Rug: Use a locker hooking technique on burlap. It’s easier than it looks and creates a beautiful, flat-weave rug.
Pro Tip: This project is perfect for binge-watching a new series. It’s repetitive, hands-on, and the progress is super satisfying to see.
15. Create a DIY Jewelry Organizer
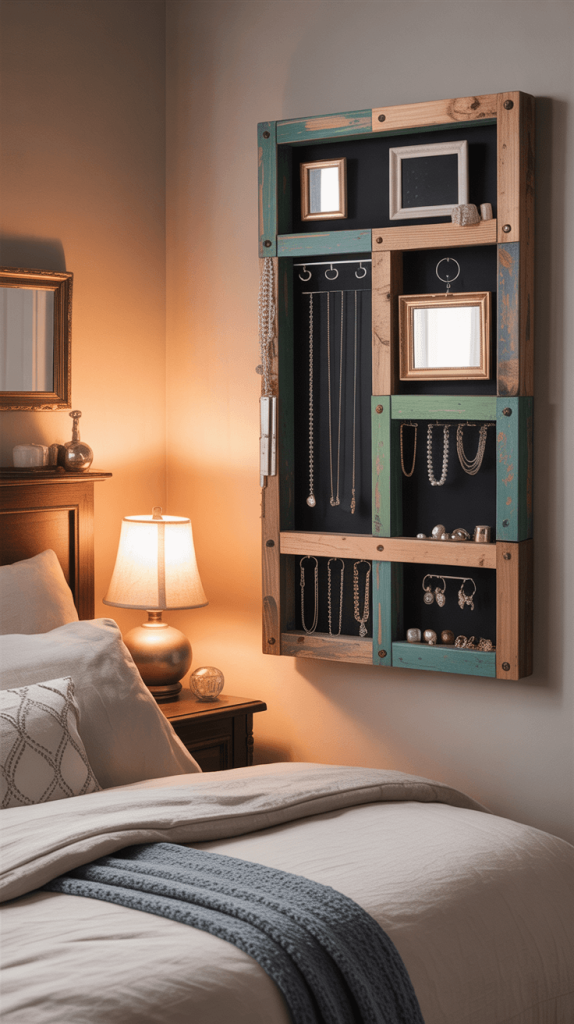
Tired of a tangled necklace graveyard in a box on your dresser? Turn your jewelry into wall art with a functional organizer.
It clears clutter and looks beautiful.
Why This Works: It’s functional decor. You get to see and easily access all your favorite pieces, and they become a display of your personal style.
How to Nail It:
- Picture Frame Organizer: Take a deep, large picture frame and remove the glass. Stretch and staple chicken wire across the opening. Reattach the back. Hang earrings directly on the wire and use s-hooks for necklaces.
- Branch Organizer: Find a cool, sturdy branch. Sand it lightly. Attach picture-hanging wire to both ends and hang it on the wall. Dangle necklaces and bracelets from it.
- Knob Board: Take a piece of wood and stain or paint it. Screw in an assortment of cute knobs from the hardware store. Hang bracelets and necklaces from the knobs.
Pro Tip: Spray paint your organizer a bold color that complements your room. A bright gold or matte black can make a simple piece feel incredibly high-end.
Conclusion
Phew! That was a lot, but I hope it got your creative gears turning. The best part about all of these ideas? There’s no right or wrong way to do them.
Your bedroom is your story, and these projects are just a way to help you tell it. Don’t aim for perfection—aim for personality.
A slightly crooked shelf you built yourself has more charm than a flawless, store-bought one any day.
So, which one are you trying first? IMO, the statement wall or the throw pillows are the perfect gateway drug into the world of DIY.
They offer a huge payoff for a relatively small effort. Just remember to have fun with it.
Put on some music, make a mess, and create a space that makes you genuinely happy to wake up in every single morning.


