15 Sweet DIY Girls Room Decor Ideas to Add Fun and Style
Remember that moment when you walked into your daughter’s room and thought, “This place needs some serious personality”? Yeah, I’ve been there too.
After spending way too much time scrolling through Pinterest (guilty as charged), I discovered that creating an amazing girls’ room doesn’t require breaking the bank or hiring an interior designer.
Let me share 15 DIY decor ideas that’ll make any girl’s room look like it jumped straight out of a magazine. The best part? You can actually make these yourself without needing a degree in arts and crafts.
Hanging Fairy Light Canopy

Who needs a boring ceiling when you can create pure magic overhead? I made one of these last summer, and honestly, it transformed my niece’s room into something straight out of a fairytale.
What You’ll Need
You’ll want to grab some sheer curtain fabric (tulle works amazingly), fairy lights (LED ones save electricity), and a sturdy curtain rod or embroidery hoop. The whole setup costs around $30, which beats those expensive bed canopies any day.
Making the Magic Happen
Start by mounting your curtain rod or hoop to the ceiling – I used ceiling hooks that can hold about 15 pounds. Drape your fabric from the center point, letting it cascade down around the bed. Then comes the fun part: weaving those fairy lights through the fabric.
Pro tip: Battery-operated lights give you way more flexibility since you won’t worry about outlet placement. Plus, some come with remotes, so your kiddo can control their own magical ceiling without getting out of bed. How cool is that?
Personalized Name Wall Art

Nothing says “this is MY space” quite like having your name displayed in giant, gorgeous letters on the wall. I’ve made three of these now, and each time they turn out better than the last.
Materials That Won’t Break Your Budget
- Wooden letters from the craft store
- Acrylic paint in favorite colors
- Glitter (because what girl doesn’t love sparkle?)
- Mod Podge for sealing
- Decorative paper or fabric scraps
The Creative Process
Sand those wooden letters first – trust me on this one. Nobody wants splinters while admiring wall art. Paint them with a base coat, then go wild with patterns, polka dots, or stripes.
I once covered letters with pages from old comic books for my superhero-obsessed cousin. She literally squealed when she saw them :). You can also use washi tape patterns, fabric scraps, or even pressed flowers sealed under Mod Podge.
DIY Pom-Pom Garland

Can we talk about how ridiculously expensive store-bought garlands are? Making your own pom-pom garland saves money and creates exactly the vibe you want.
Gathering Your Supplies
All you need is yarn in various colors, scissors, and some string or fishing line. That’s it. No fancy tools required, though a pom-pom maker speeds things up if you’re making tons.
Creating Fluffy Perfection
Wrap yarn around a fork (yes, a regular kitchen fork) about 50 times for small pom-poms. Tie it tightly in the middle, slide it off, and cut the loops on both sides. Fluff it up, trim any wonky bits, and boom – you’ve got yourself a pom-pom.
String these babies together, alternating colors for a rainbow effect or sticking to a coordinated color scheme. I made one in ombre pink shades that looked professionally done. Nobody believed I made it myself!
Also Read: 15 Colorful DIY Baby Room Decor Ideas and Playful Designs
Upcycled Crate Bookshelf

Old wooden crates make the coolest bookshelves, and you can usually find them for free or super cheap at farmer’s markets or craft stores.
Prep Work That Matters
Sand those crates down well – splinters and kids don’t mix. Paint them in bright colors or leave them natural for that rustic vibe. I’ve done both, and honestly, both look amazing depending on the room’s overall style.
Assembly Options
Stack them pyramid-style, mount them individually on the wall, or create a modular system that can change as storage needs evolve. Secure wall-mounted crates with proper anchors – books get heavy fast!
Add some personality with contact paper on the back panels or paint the insides different colors. My favorite trick? Adding battery-powered LED strips inside each crate for built-in reading lights.
Glow-in-the-Dark Star Ceiling
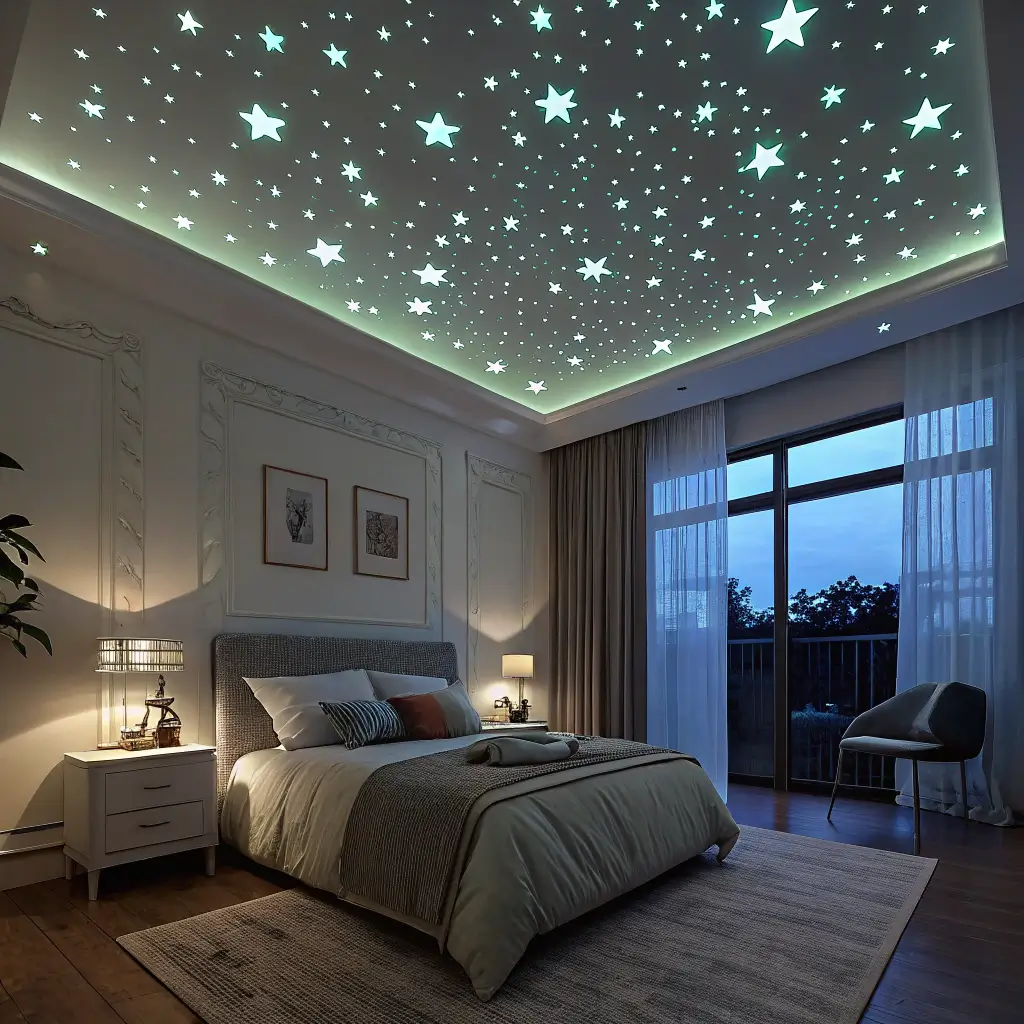
Remember lying in bed as a kid, staring at those plastic glow stars? Well, we’re taking that concept and making it way cooler.
Shopping List for Stargazers
- Glow-in-the-dark paint (get the good stuff that actually glows)
- Star stencils or stamps
- Optional: fiber optic star kit for extra wow factor
Creating Your Indoor Galaxy
Map out constellations first if you want accuracy, or just go random for a more whimsical look. Paint stars in varying sizes – big ones for bright stars, tiny dots for distant ones.
Here’s a secret: charge them with a blacklight flashlight before bedtime for maximum glow. I added the Big Dipper and Orion to my daughter’s ceiling, and now she knows her constellations better than most adults!
Tassel Wall Hanging
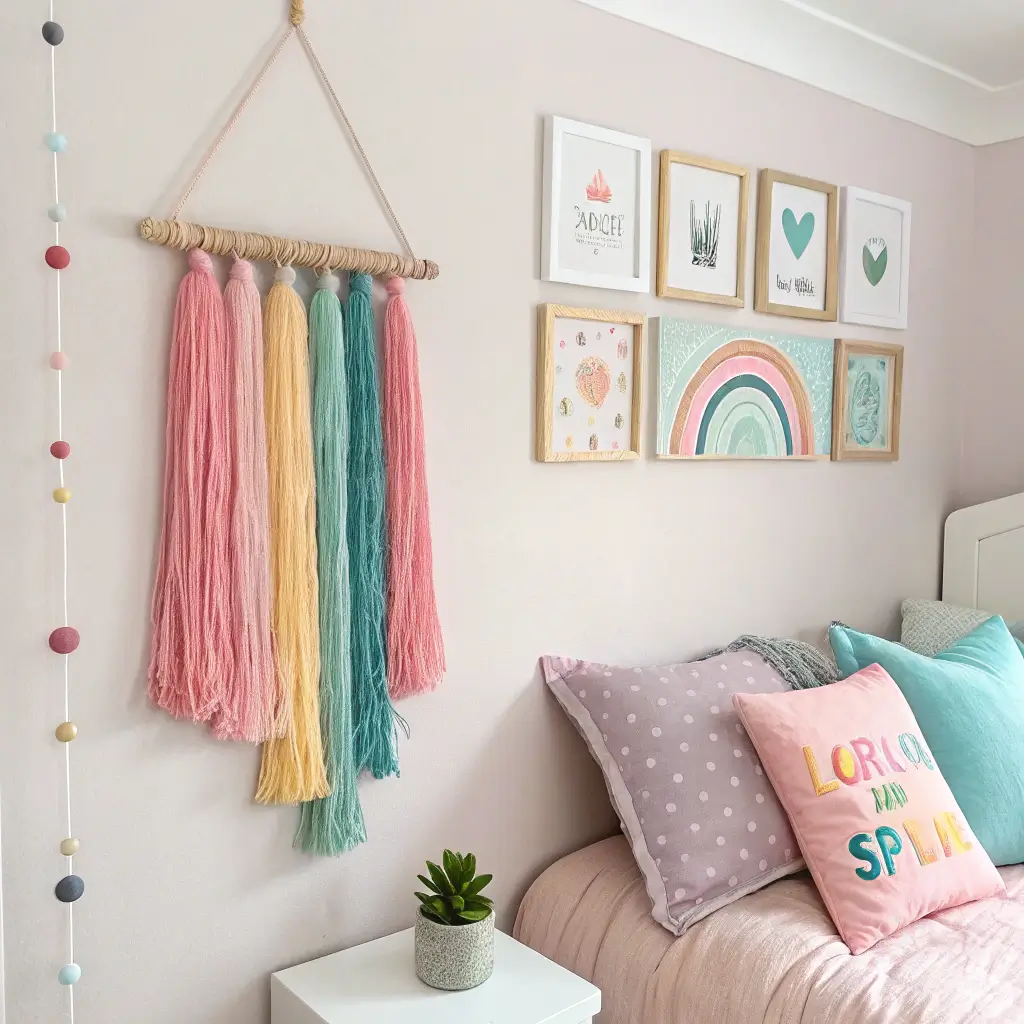
Tassels are having a major moment, and making them yourself means customizing colors to match any room perfectly.
Materials You’ll Love Working With
Embroidery floss creates the prettiest tassels IMO. You’ll also need a wooden dowel or branch for hanging, and maybe some beads for extra decoration.
The Tassel-Making Process
Wrap floss around a piece of cardboard about 50 times, tie at the top, cut the bottom, and create that classic tassel shape. Make them different lengths for visual interest.
Attach them to your dowel with spacing that feels right – there’s no wrong way here. Add wooden beads between tassels or paint patterns on the dowel itself. The whole project takes maybe two hours but looks like boutique decor.
Also Read: 15 Fun DIY Kids Room Decor Ideas to Brighten Rooms
Colorful Washi Tape Wall Designs

Washi tape might be the best invention for renters or anyone afraid of commitment. You can create incredible designs that peel off without damaging walls.
Design Ideas That Pop
Create geometric patterns, frame artwork, or make a faux headboard. I once made an entire city skyline with black washi tape – it looked like an expensive wall decal!
Application Tips
Clean your walls first (boring but necessary). Sketch your design lightly with pencil, then apply tape following your lines. Press edges down firmly to prevent peeling.
Pro tip: Create a rainbow stripe pattern behind a desk for an instant mood booster. Or make triangular mountains for an adventurous vibe. The possibilities are literally endless.
Painted Mason Jar Organizers

Mason jars organize everything from pencils to hair ties, and painted ones look adorable doing it.
Painting Techniques That Work
Chalk paint gives that trendy matte finish without primer. Regular acrylic paint works too – just seal it with Mod Podge. Spray paint creates the smoothest finish if you’re going for that professional look.
Mounting and Styling
Screw jar lids under shelves for hidden storage, or mount them on a painted board for a wall organizer. I made one with five jars in gradient colors from light pink to deep purple – it holds all the art supplies and looks like decor.
Add labels with vinyl letters or hand-paint names on each jar. Glitter inside the jar (sealed with hairspray) creates a magical effect when light hits it.
DIY Felt Animal Wall Decals

Forget those expensive vinyl decals that damage paint when removed. Felt animals stick to walls with removable adhesive and look absolutely adorable.
Cutting and Creating
Download templates online or freehand your designs. Cut felt shapes and layer different colors for dimension. A fox might have an orange body, white belly, and black feet – you get the idea.
Making Them Stick
Use removable mounting squares or poster putty. Arrange them in scenes – maybe birds on branches or butterflies in flight. Changed your mind? Move them around! That’s the beauty of this project.
I created an entire underwater scene with felt fish, seaweed, and bubbles. Total cost? Under $15. Impact? Priceless.
Also Read: 15 Trendy DIY Grunge Room Decor Ideas for Vintage Fans
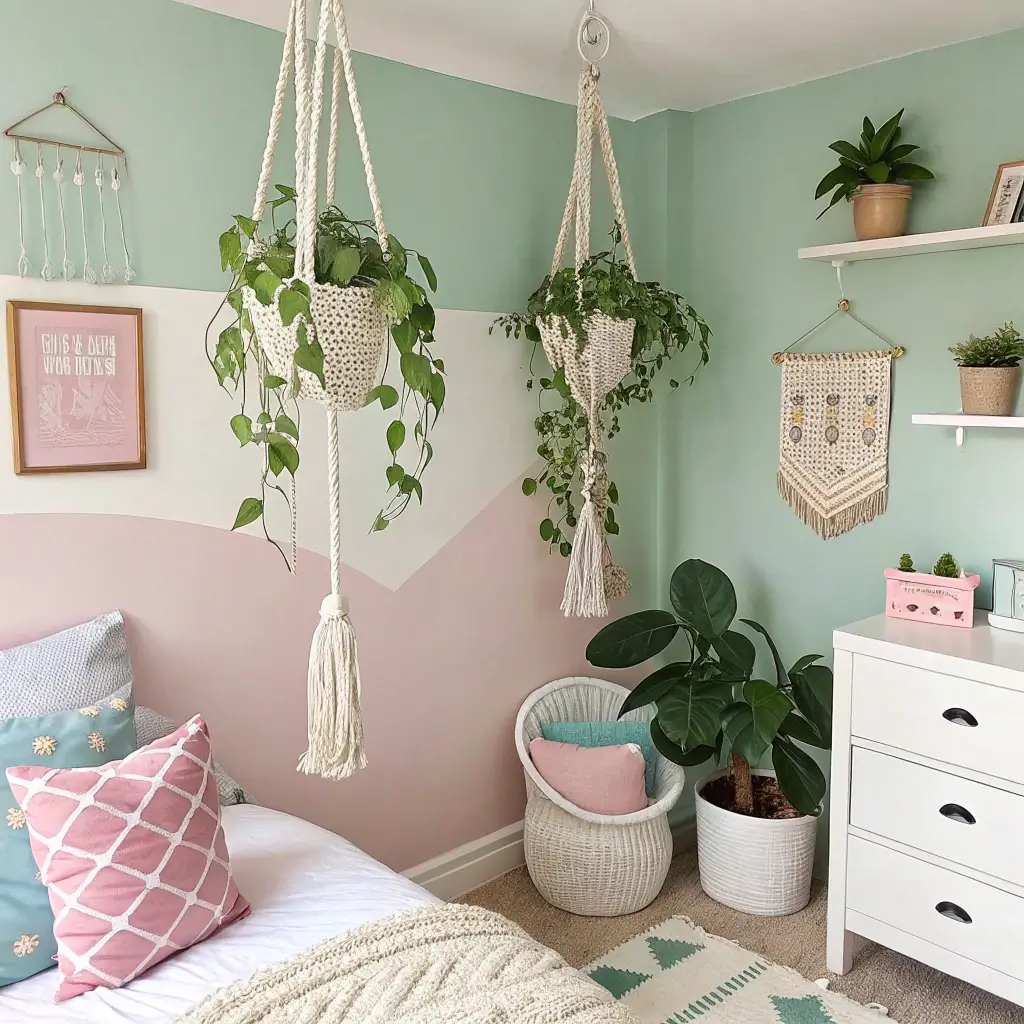
Macrame Plant Hangers

Plants make any room better, and macrame hangers add that boho-chic vibe everyone’s obsessing over.
Knot Your Average Project
You’ll need macrame cord (or even thick yarn works), a metal ring, and basic knot knowledge. YouTube tutorials make learning super easy – I learned in about 20 minutes.
Plant Pairing Perfection
Choose low-maintenance plants like pothos or spider plants that thrive in bedroom lighting. Make hangers at different lengths for a layered look.
The best part? These hangers grow with the room’s style. Spray paint them gold for glam, dye them ombre for artistic flair, or leave them natural for that earthy feel.
String Art Initials
String art looks complicated but trust me – if I can do it, anyone can. It’s basically connect-the-dots with string.
Building Your Base
Cut a wood board to size, sand it smooth, and paint or stain it. Print your letter template and tape it to the board temporarily.
Stringing Along
Hammer nails along the outline of your letter (about 1/2 inch apart). Remove the template and start wrapping string around nails in whatever pattern you like. There’s literally no wrong way to do this.
Use metallic thread for extra sparkle, or gradient colors for an ombre effect. My personal favorite? Neon string on a black board with glow-in-the-dark paint accents. :/
DIY Cork Photo Board

Every girl needs a place to display photos, tickets, and memories. Cork boards do the job, but customized ones do it with style.
Beyond Basic Cork
Cover your cork with fabric using hot glue or staples on the back. Add ribbon in a crisscross pattern for that classic French memo board look, or paint the cork directly for a modern twist.
Display Options
Use decorative pushpins, mini clothespins, or even painted binder clips for hanging photos. Frame the whole board with painted molding for a finished look that screams custom-made.
FYI, this makes an amazing gift too. I’ve made three as birthday presents, and they’re always a hit.
Ribbon Chandelier Mobile

Who says chandeliers need crystals and electricity? Ribbon chandeliers bring color and movement without the price tag.
Constructing Your Creation
Start with an embroidery hoop or wire wreath form. Cut ribbons in varying lengths – I usually go between 2-4 feet. The key is using different textures: satin, grosgrain, lace, and tulle create visual interest.
Hanging It Right
Attach ribbons around the hoop, layering colors and textures. Add beads, small bells, or paper flowers for extra dimension. Hang from the ceiling with fishing line for that floating effect.
Mine moves gently with the air from the ceiling fan, creating this dreamy, ethereal vibe that visitors always comment on.
Polaroid Photo Clip String
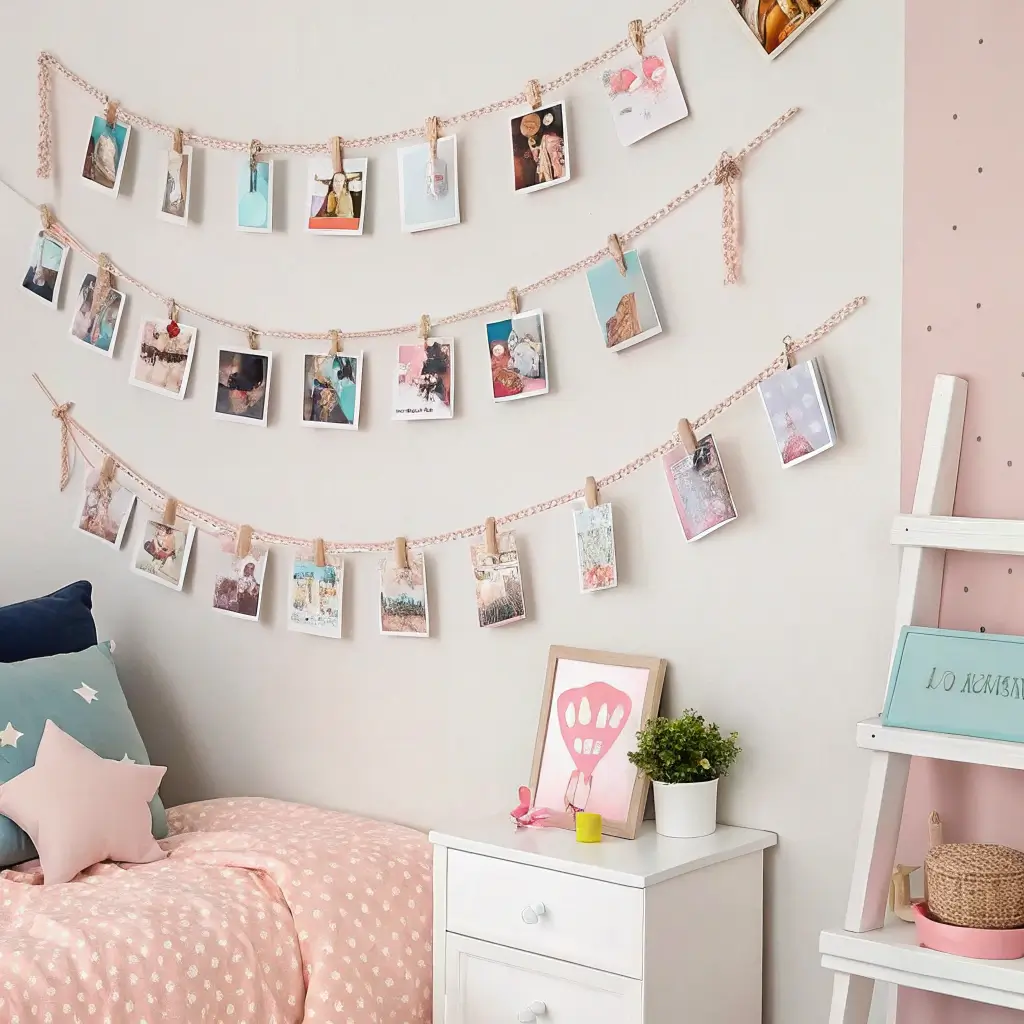
Instant photos deserve an instant display solution. This idea combines function with serious style points.
Setting Up Your Display
String wire or twine across a wall using small nails or removable hooks. Space multiple lines for a gallery effect, or create one long zigzag pattern for something different.
Clip It Good
Mini clothespins come in every color imaginable. Paint them, cover them with washi tape, or add glitter – whatever matches your room’s personality. Wooden clips look rustic, while metallic ones add glamour.
Mix Polaroids with other memories like concert tickets, postcards, or dried flowers. The display evolves constantly, which keeps the room feeling fresh.
Hand-Painted Accent Wall

Sometimes one wall makes all the difference. Hand-painting doesn’t mean you need artistic talent – geometric patterns and abstract designs work perfectly!
Design Planning
Tape off your design with painter’s tape. Mountains, chevron stripes, or color blocks create huge impact with minimal skill required. I painted clouds on my daughter’s wall using just three shades of blue and white.
Paint Like a Pro
Use quality paint – it covers better and lasts longer. Work in sections, removing tape while paint’s slightly wet for crisp lines. Don’t stress about perfection; handmade charm beats factory precision every time.
Consider painting just the lower third of a wall if you’re commitment-phobic. You can always extend it later!
Bringing It All Together
Creating a dream bedroom doesn’t happen overnight, but that’s actually the fun part. Start with one or two projects and build from there. Maybe begin with the fairy light canopy for instant magic, then add the name wall art for personalization.
These DIY projects grow with your girl too. That pom-pom garland that’s perfect at age 8 can evolve into something more sophisticated by simply changing colors. The mason jar organizers that hold crayons today will hold makeup brushes tomorrow.
The real beauty of DIY room decor lies in its flexibility. Didn’t nail that string art on the first try? Unwrap and start over. Tired of those washi tape designs? Peel them off and create something new. You’re not just decorating a room – you’re creating a space that reflects personality and grows with its inhabitant.
Most importantly, many of these projects work better as bonding activities than solo ventures. Sure, you might end up with glitter in your hair and paint on your clothes, but you’ll also create memories that last way longer than any decor trend. And honestly? Those imperfect touches – the slightly crooked tassel, the star that’s more blob than celestial body – add character that no store-bought item can match.
Ready to transform that boring bedroom into something special? Pick your favorite idea and get started this weekend. Your future self (and your daughter) will thank you when you’re both admiring that magazine-worthy room you created together!


