15 Easy DIY Outdoor Christmas Decorations Ideas for Festive Fun
You know what beats spending hundreds of dollars on store-bought Christmas decorations? Making your own magical winter wonderland with stuff you probably already have lying around! I learned this the hard way after blowing my budget on overpriced LED reindeer that stopped working after one season.
Trust me, there’s something ridiculously satisfying about crafting your own outdoor Christmas decorations. Not only do you save money, but you also get that warm fuzzy feeling when neighbors stop to compliment your handiwork. Plus, you can finally put all those Pinterest boards to good use, right?
This year, I’ve tested out 15 absolutely doable DIY outdoor decoration ideas that’ll transform your yard into the neighborhood’s favorite holiday spot. No fancy tools required, no engineering degree needed – just some creativity and maybe a hot cocoa break or two.
Snowflake Mason Jar Lanterns
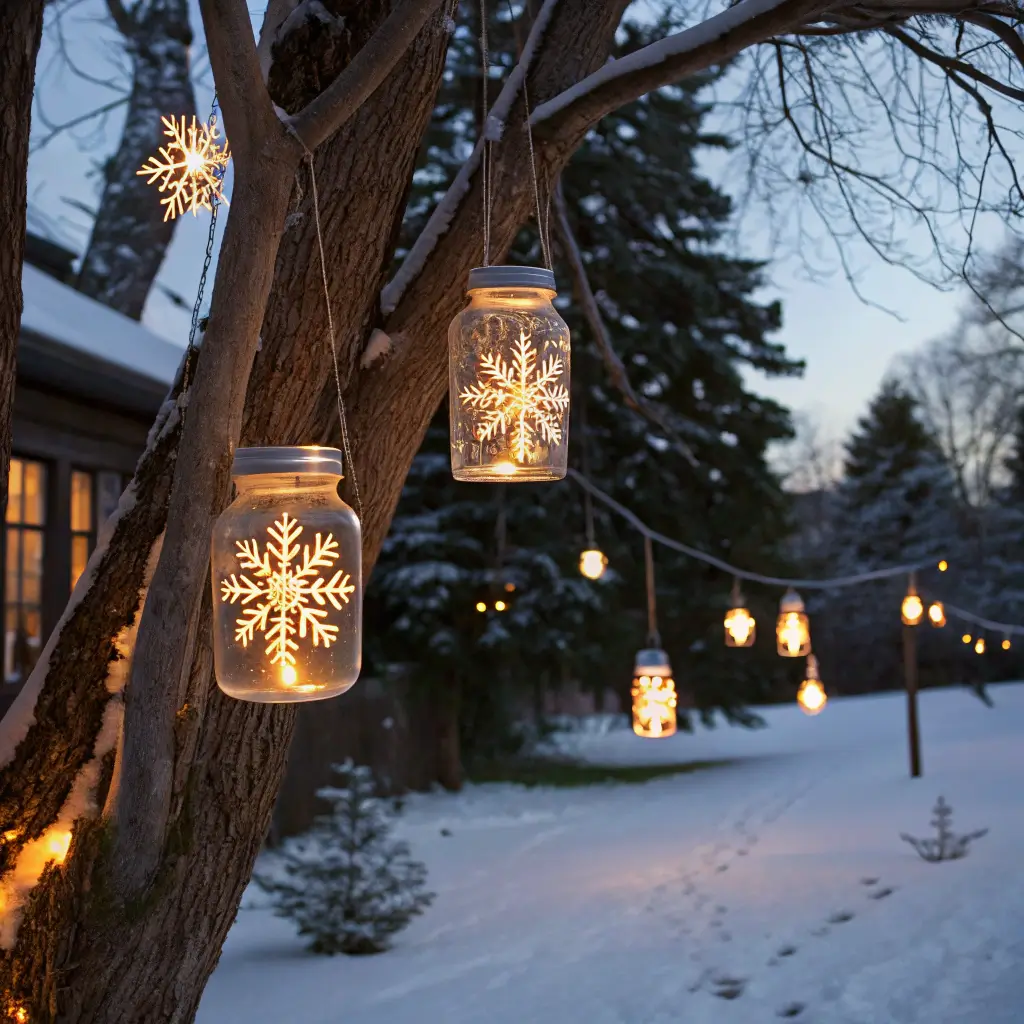
Mason jars strike again! These little beauties have saved my decorating game more times than I can count. Creating snowflake lanterns takes about 30 minutes per jar, and the results look like you bought them from some fancy boutique.
Here’s what makes them special: you paint snowflake designs on the outside using frosted glass paint, pop in some battery-operated fairy lights, and boom – instant winter magic. I made twelve of these last year, and people literally knocked on my door asking where I bought them. The best part? Each jar costs about $3 to make versus the $15-20 store versions.
Materials You’ll Need:
- Mason jars (any size works)
- Frosted glass spray paint or acrylic paint
- Snowflake stencils or painter’s tape
- Battery-operated LED string lights
- Wire for hanging
- Hot glue gun
Line these babies along your walkway or hang them from shepherd’s hooks. The soft glow creates this dreamy atmosphere that screams Christmas without being tacky. Pro tip: use different sized jars for visual interest – it makes the whole display look more professional.
Recycled Wooden Pallet Christmas Tree
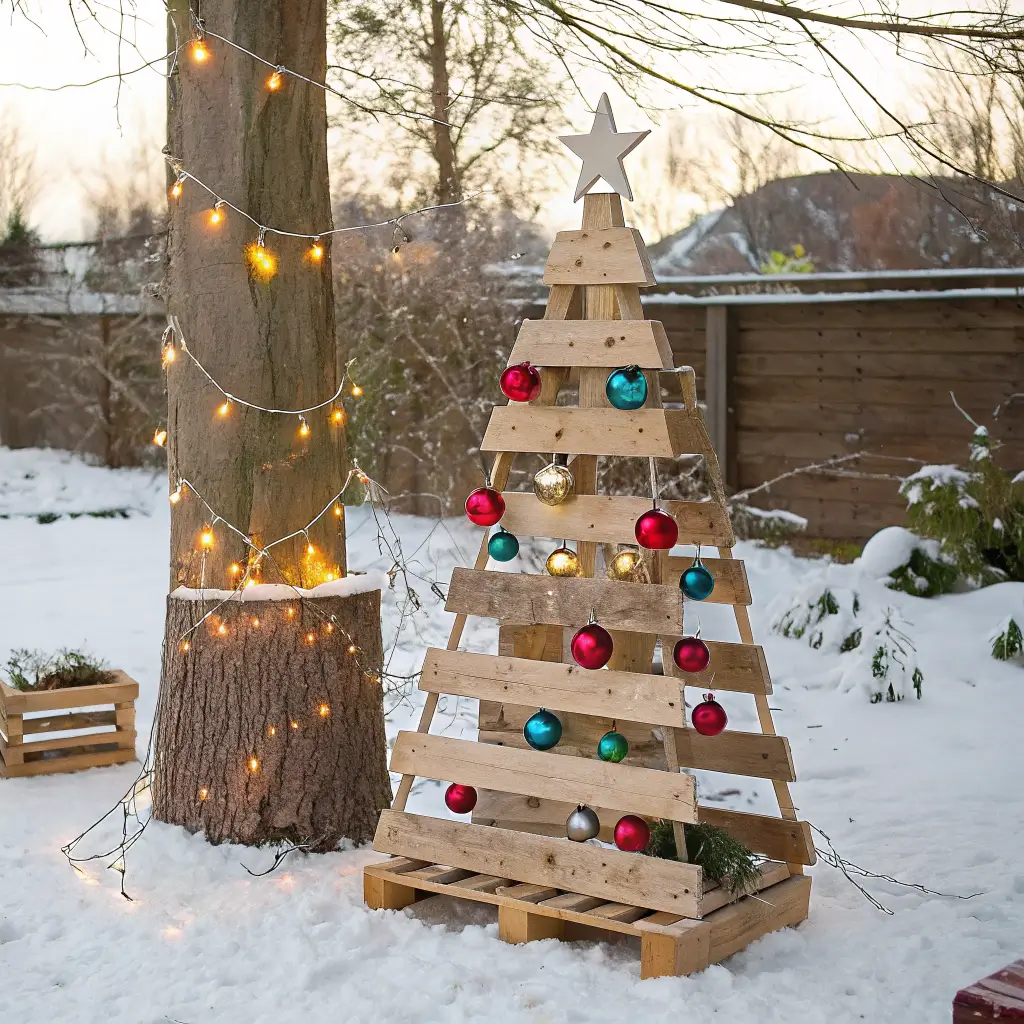
Who says Christmas trees need to be green and bushy? My pallet tree has become the talk of the neighborhood, and it cost me exactly zero dollars (found the pallet behind a grocery store – with permission, of course!).
This project requires minimal woodworking skills – if you can use a saw and a drill, you’re golden. Cut the pallet into triangle sections of decreasing size, stack them up, and secure with a wooden post through the center. The whole thing takes about 2 hours from start to finish.
What really makes this pop is the decoration flexibility. String lights weave beautifully through the slats, and you can hang ornaments directly on the wood. I painted mine white for that shabby chic vibe, but natural wood looks equally stunning. FYI, this works amazingly well for small spaces where a traditional outdoor tree won’t fit.
Decoration Ideas for Your Pallet Tree:
- Wrap with outdoor string lights (go for warm white)
- Hang weatherproof ornaments
- Add a star or angel topper
- Spray paint for a custom color
- Attach pinecones and ribbons
Candy Cane Pathway Markers

Remember those cheap pool noodles gathering dust in your garage? Time to give them a festive makeover! This might be the easiest project on this list, and kids absolutely love helping with it.
Cut white pool noodles in half lengthwise, wrap them with red duct tape in a spiral pattern, and curve the top – instant candy canes! Stake them into the ground using wooden dowels or PVC pipes. I made twenty of these bad boys in under an hour while watching Christmas movies.
The genius part? They’re basically indestructible. Rain, snow, wind – these things survive everything. Plus, they’re lightweight enough that you won’t throw out your back setting them up every year. Each candy cane costs about $2, compared to $8-10 for store-bought versions.
Rustic Pinecone Garland for Fence
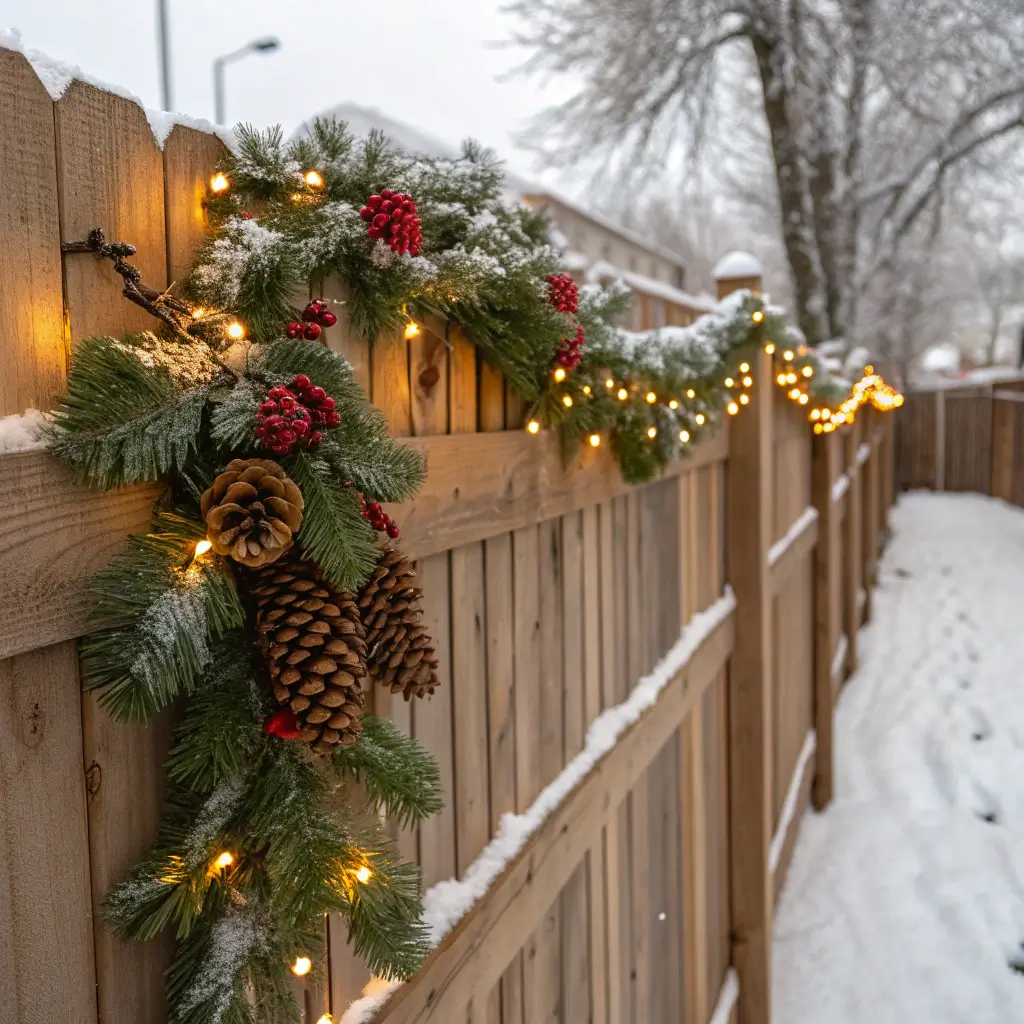
Nature provides the best decorating materials – and they’re free! I collected pinecones during my morning walks all autumn, and now they’re the star of my fence decoration. This project brings that cozy cabin-in-the-woods vibe to suburban yards.
Creating pinecone garland requires patience but zero skill. Thread fishing line through the pinecones (a hot glue gun helps secure them), add some artificial berries and greenery between them, and you’ve got yourself magazine-worthy fence décor. Budget: practically nothing if you forage for materials.
Tips for the Perfect Pinecone Garland:
- Bake pinecones at 200°F for 30 minutes to kill bugs
- Spray paint tips with gold or silver for elegance
- Mix in battery-operated micro lights
- Use varying pinecone sizes for texture
- Add cinnamon sticks for natural fragrance
The weathered look actually improves over time, making this decoration even better in its second or third year. How’s that for sustainability?
Outdoor String Light Reindeer
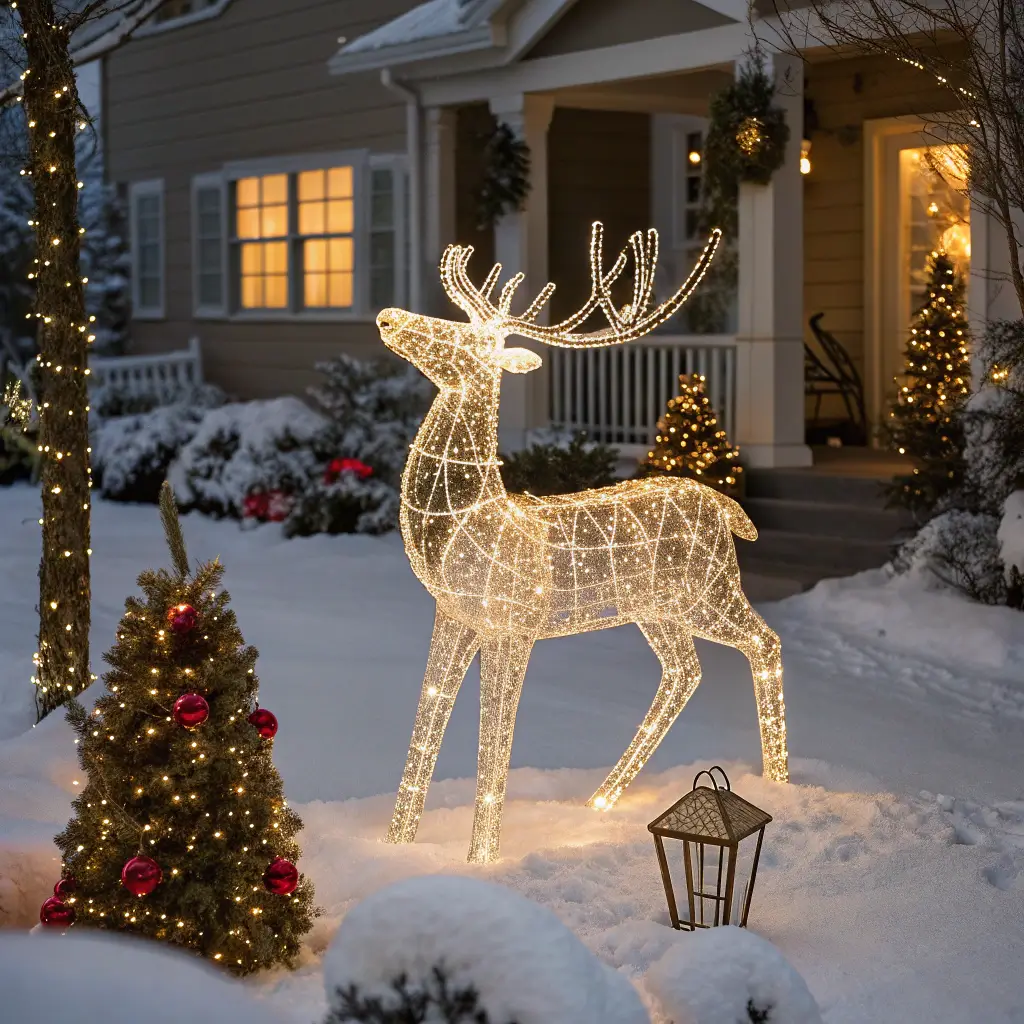
Ever looked at those wire reindeer at the store and thought, “I could make that”? Well, you absolutely can, and it’s easier than assembling IKEA furniture. Using tomato cages and string lights, you can create reindeer that rival any commercial display.
Here’s the trick: flip one tomato cage upside down for the body, use a smaller one for the head, and connect them with zip ties or wire. Wrap the entire structure with outdoor string lights (I prefer warm white LED strands), and add branches for antlers. Total time investment: about 90 minutes per reindeer.
My three reindeer “family” cost me $45 total versus the $200+ for similar store-bought versions. The neighbors think I’m some kind of craft genius, but honestly, YouTube tutorials taught me everything 🙂
DIY Santa Boot Planters

Rain boots nobody wears anymore? Perfect Santa boot planters! This idea came to me when I found my kids’ outgrown boots during spring cleaning. Now they’re the quirkiest decoration in my yard.
Paint old boots black, add a white fur trim (fake fur fabric and hot glue work perfectly), and throw in a red ribbon belt. Fill them with evergreen branches, holly, or even battery-operated light branches. Each boot takes about 20 minutes to transform, and they look absolutely adorable flanking your front door.
What to Plant in Your Santa Boots:
- Winter berries and evergreen sprigs
- Battery-operated twig lights
- Candy canes and wrapped “presents”
- Small poinsettias (if weather permits)
- Glittery branches and ornaments
The best part? These work year after year. Just switch out the greenery, and you’re good to go. My mother-in-law loved them so much she “borrowed” the idea for her yard – imitation is the sincerest form of flattery, right?
Also Read: 10 Unique Christmas Door Decorating Contest Ideas Everyone Loves
Festive Hanging Snowball Wreaths
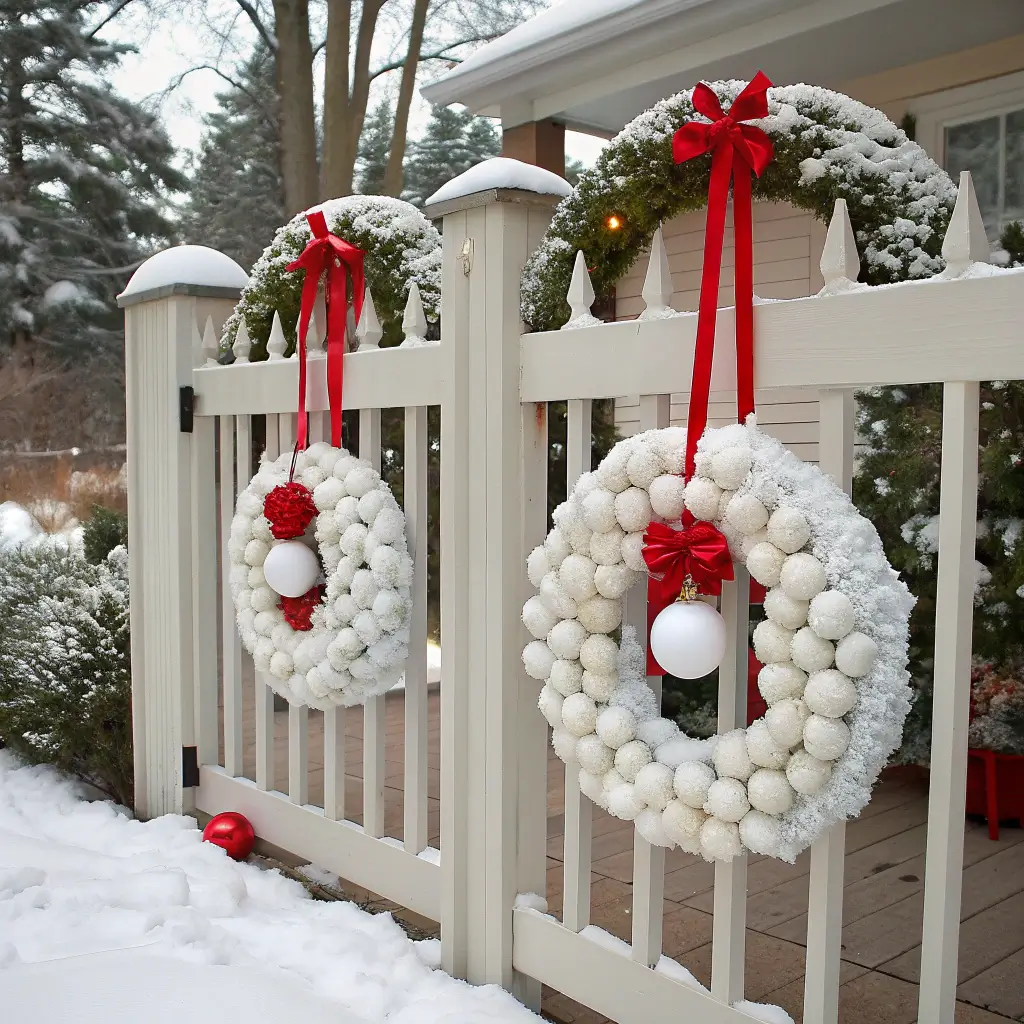
Styrofoam balls and fishing line – that’s literally all you need for these stunning snowball wreaths. I discovered this trick when traditional wreaths kept getting destroyed by wind on my covered porch.
Group different-sized white Styrofoam balls together using hot glue, creating a circular wreath shape. Dust with iridescent glitter while the glue’s still tacky, and hang with clear fishing line. The result? Floating snowball wreaths that look like frozen bubbles suspended in air.
These cost about $8 per wreath and take maybe 30 minutes to create. Compare that to the $40+ versions at craft stores, and you’ll understand why I made six of them. They catch light beautifully during the day and look magical when lit by porch lights at night.
Illuminated Christmas Star Stakes
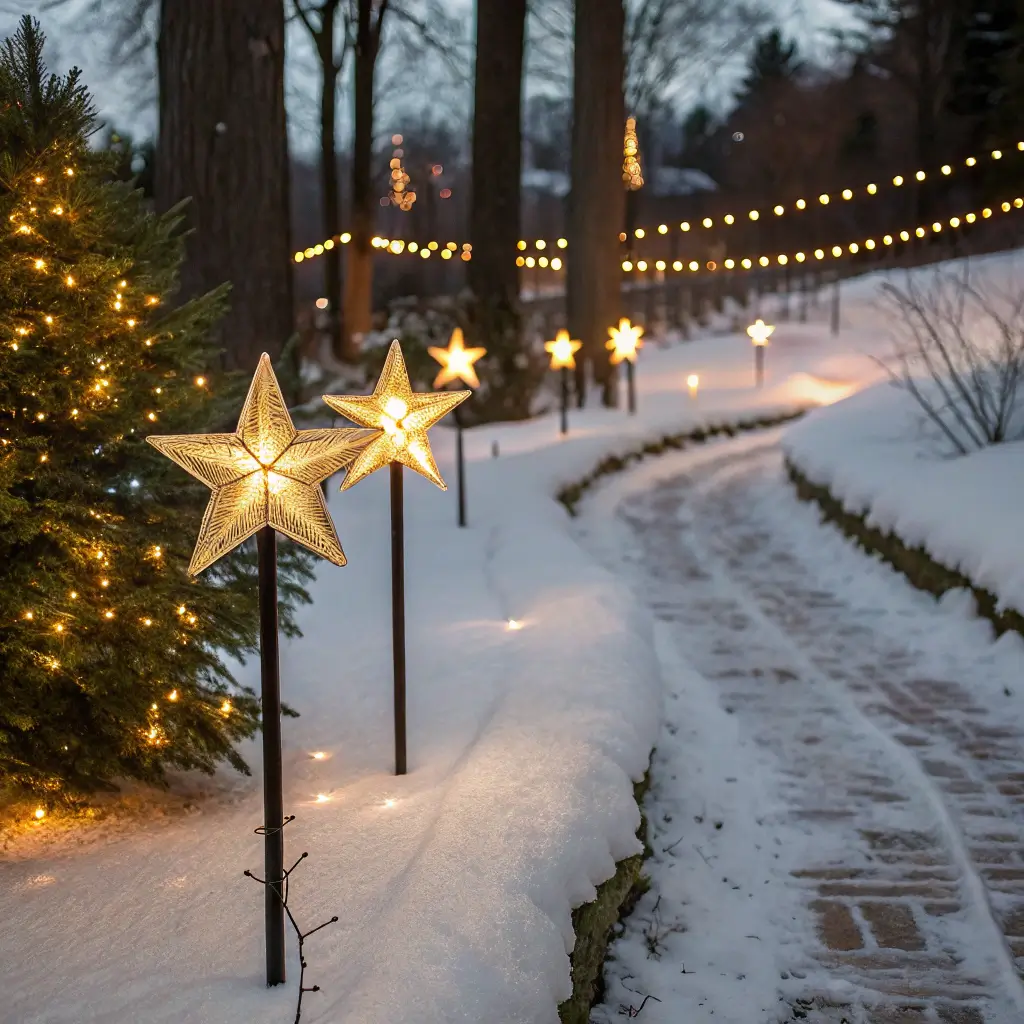
Want to make your yard look like a professional light display? These star stakes deliver that wow factor without the electrician’s bill. Using wooden dowels and string lights, you create geometric stars that stake directly into your lawn.
Form star shapes by connecting five wooden dowels with zip ties or wire at the points. Wrap with battery-operated lights (solar ones work great too), and push the bottom dowel into the ground. Each star takes about 45 minutes and costs roughly $6.
I arranged mine in a curved pattern leading to my front door – looks like the stars fell from heaven and landed in my yard. Cheesy? Maybe. Effective? Absolutely! The key is varying the heights for a more dynamic display.
Painted Christmas Gnome Garden
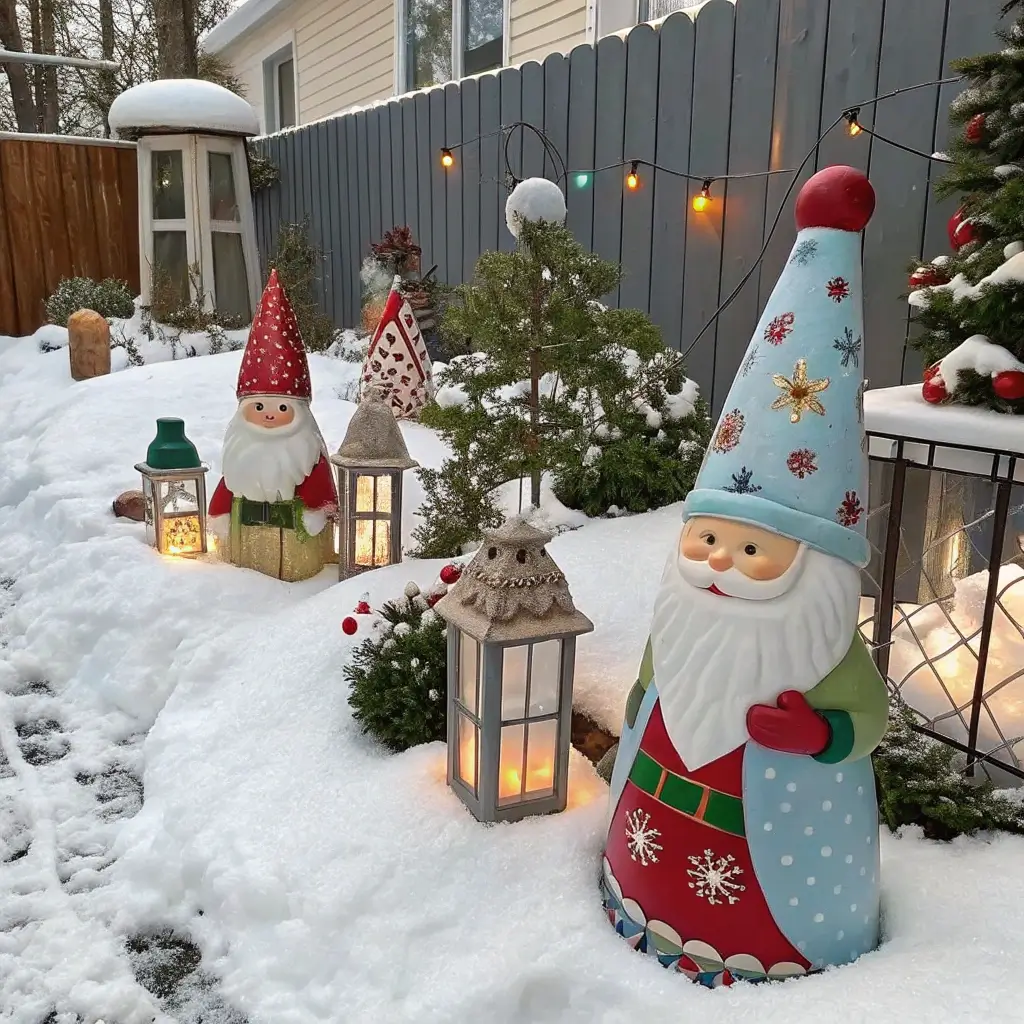
Garden gnomes meet Christmas spirit in this whimsical decoration idea. Those plain concrete garden statues hiding in your shed? Time for their holiday makeover! A little acrylic paint transforms boring lawn ornaments into festive focal points.
Paint them in traditional Christmas colors – red hats, green outfits, white beards with glitter accents. Weather-resistant acrylic paint ensures they survive the season. I turned my three frog statues into Christmas gnomes (don’t judge), and honestly, they’re hilarious and adorable.
Gnome Painting Tips:
- Use primer first for better paint adhesion
- Seal with weatherproof coating
- Add LED tea lights nearby for nighttime glow
- Group in odd numbers for visual appeal
- Create themed scenarios (gnomes decorating, caroling, etc.)
Also Read:15 Delightful Farmhouse Christmas Decor Ideas for Cozy Vibes
Frosted Bottle Cap Ornaments
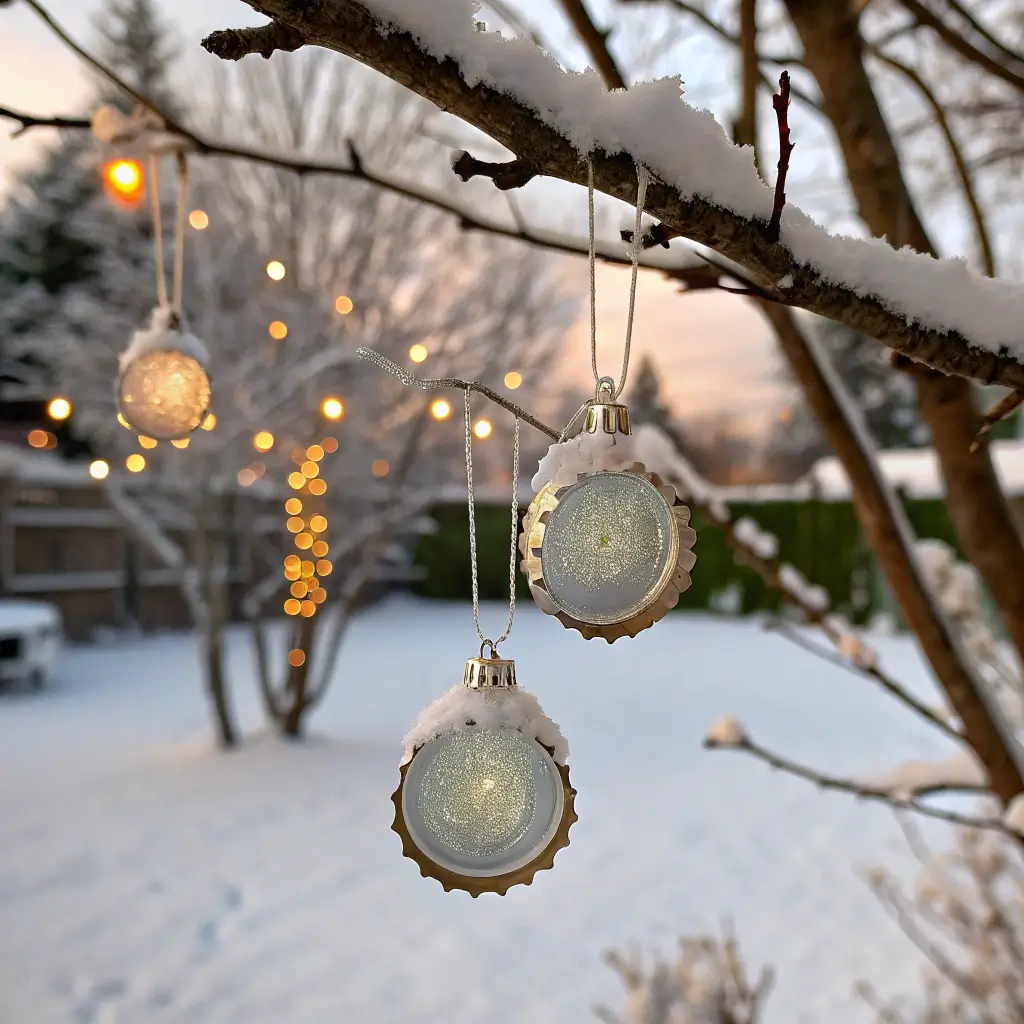
This one’s for my fellow recyclers! Been collecting bottle caps? Transform them into unique outdoor ornaments that withstand weather like champions. Paint the inside of metal bottle caps with festive designs, fill with resin or hot glue, and add hanging wire.
Create snowflakes, mini Santa faces, or simple color patterns. String them together for garland or hang individually on outdoor trees. Each ornament takes 5 minutes once you get the hang of it. IMO, these look way cooler than generic plastic ornaments.
The metallic edges catch sunlight beautifully, creating natural sparkle without electricity. Plus, you’re literally turning trash into treasure – how satisfying is that?
Evergreen Branch Stair Runners
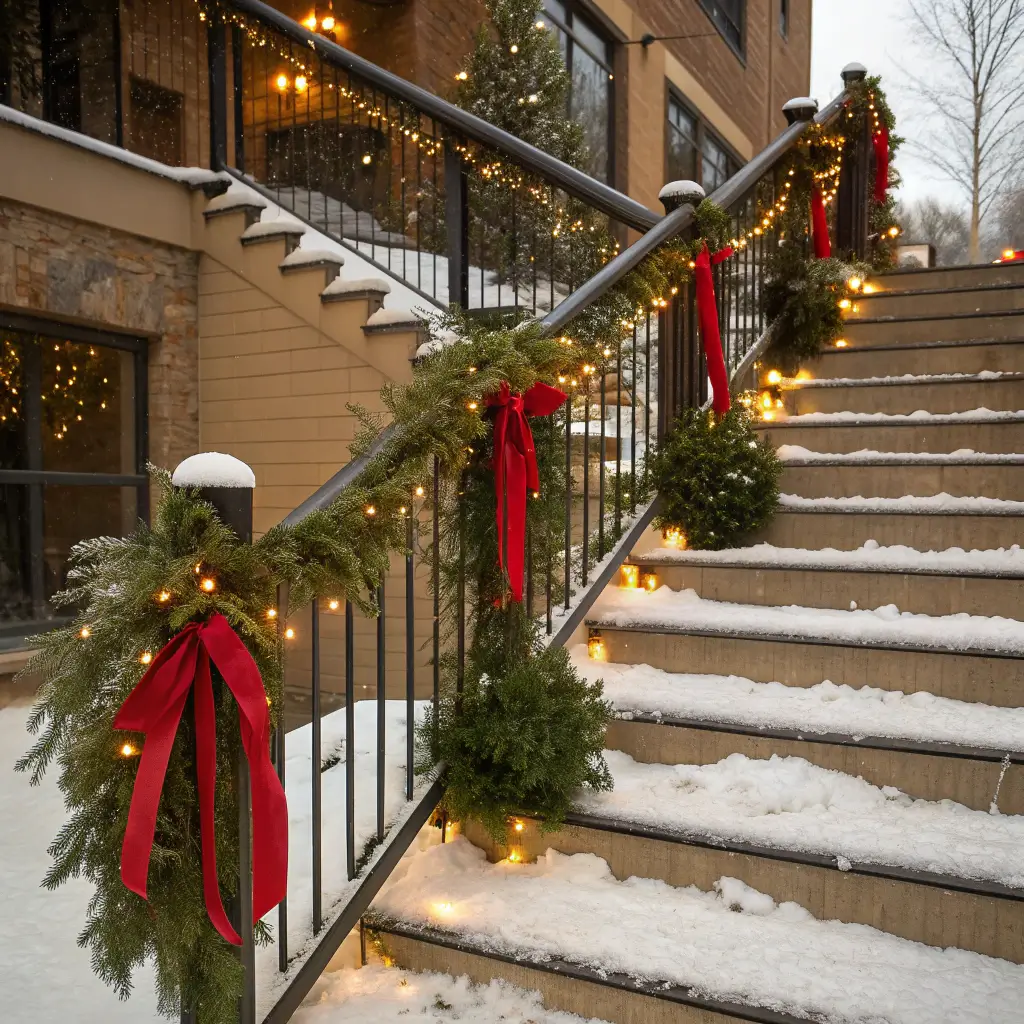
Transform your outdoor stairs into a winter wonderland pathway using fresh evergreen branches. This classic decoration method never goes out of style, and the smell? Chef’s kiss – nothing beats real pine scent.
Secure branches along stair railings with zip ties or floral wire, weaving in battery-operated lights and red ribbons. Add pinecones and berries for texture. The whole process takes about an hour for a standard staircase.
Here’s what I learned: mix different evergreen types for depth. Cedar, pine, and fir create beautiful color variation. Water-resistant ribbons survive weather better, and LED lights won’t heat up and dry out your greenery.
DIY Holiday Lantern Post
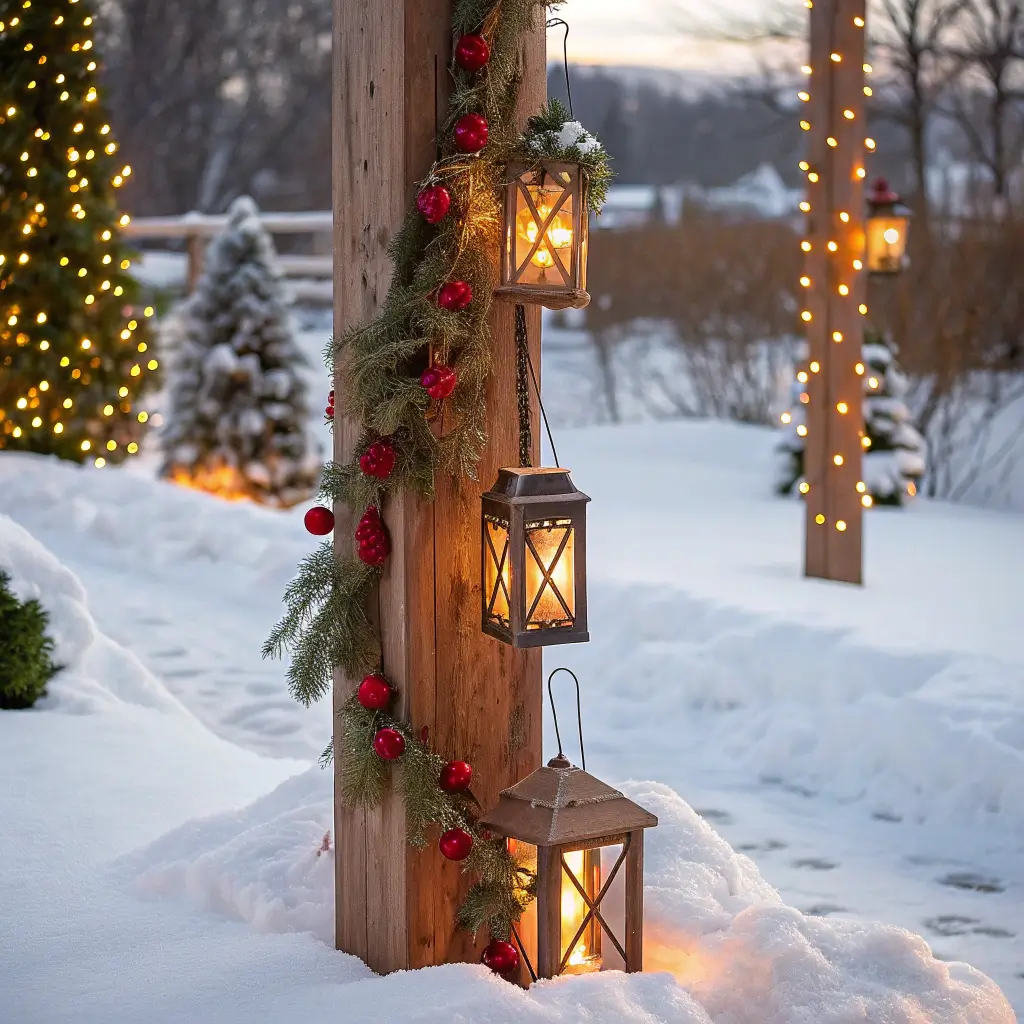
Your boring lantern post needs some Christmas love! Wrapping it properly makes a huge difference in your overall curb appeal. Think of it as gift-wrapping for your yard’s vertical elements.
Start with a base of evergreen garland, spiral it up the post, and secure with floral wire every 12 inches. Weave in lights, add a big weatherproof bow at the top, and maybe hang a few ornaments. Total transformation time: 30 minutes.
Lantern Post Decorating Essentials:
- 9-foot garland minimum for standard post
- 100-light strand (battery or plug-in)
- Weather-resistant velvet ribbon
- Zip ties or floral wire
- Optional: timer for lights
The trick is making it look full without blocking the actual light. I learned this after my first attempt looked like a green tube sock on a pole – not cute!
Also Read: 15 Cute Christmas Haul Ideas and Cozy Holiday Treats
Upcycled Tin Can Candle Holders
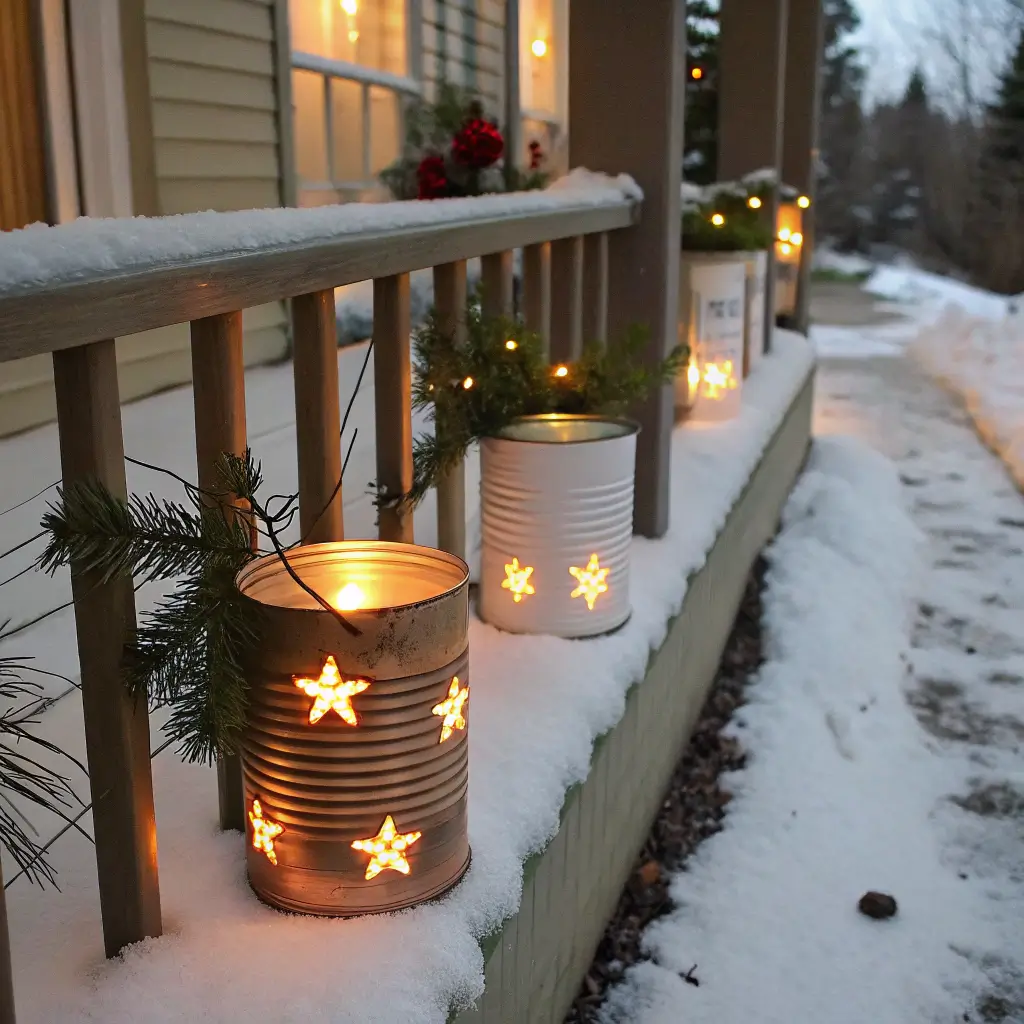
Empty soup cans become magical luminaries with just a hammer and nail! This project combines recycling with stunning results. Fill cans with water, freeze overnight, then punch decorative patterns using nails and a hammer.
The ice prevents cans from denting while you work – genius, right? Create stars, trees, or abstract patterns. Spray paint them in metallics or Christmas colors, add sand and battery tea lights inside. Each luminary takes 15 minutes of actual work time.
Line your driveway or cluster them on porch steps. The punched patterns throw beautiful shadows, creating ambiance that expensive solar lights can’t match. Plus, they’re practically free to make!
Outdoor Christmas Light Curtain
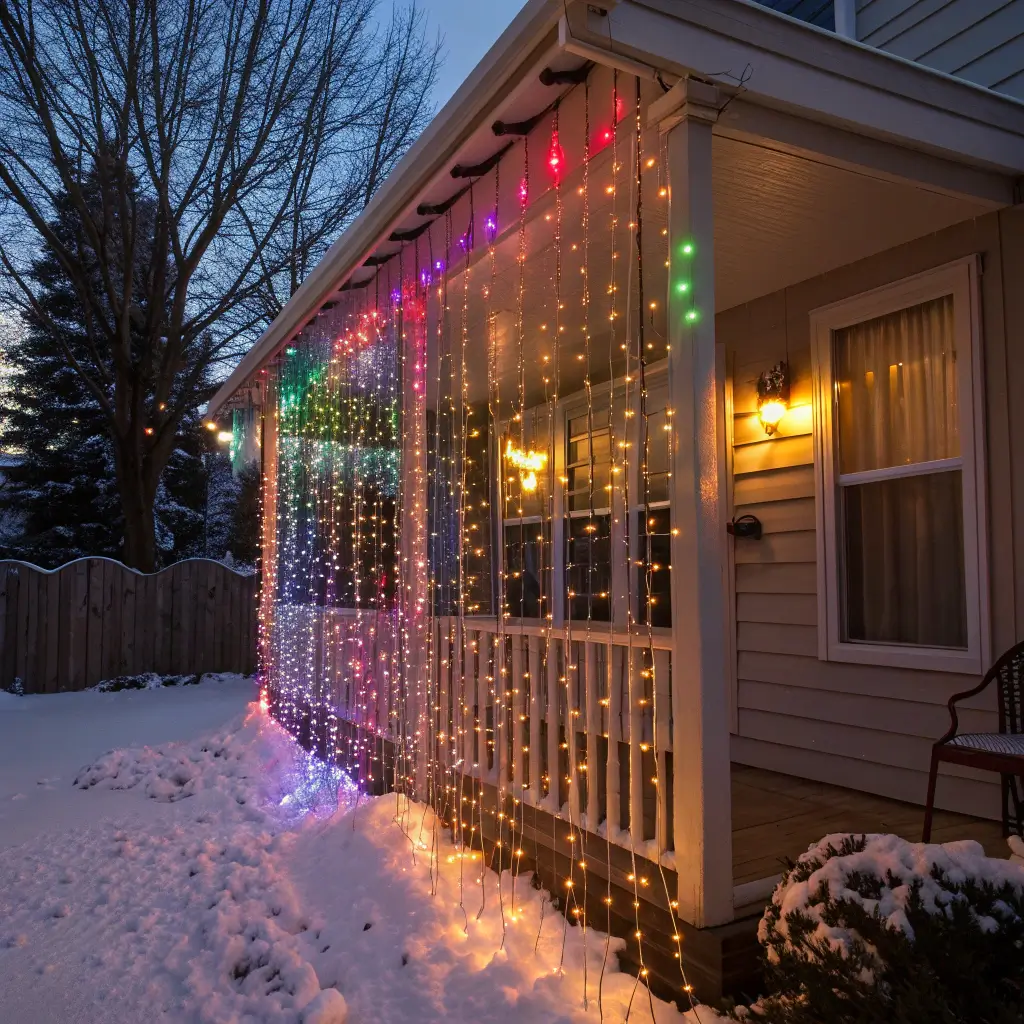
Window shopping made me realize light curtains cost a fortune. Making your own? Way cheaper and customizable! String lights vertically from a horizontal support (I used a tension rod between porch posts) create a stunning backdrop.
Use fishing line to keep strands evenly spaced, mixing white and colored lights for depth. Total cost: about $30 versus $100+ for pre-made versions. The vertical lines make your space look taller and more dramatic.
Light Curtain Installation Tips:
- Measure twice, hang once
- Use outdoor-rated extension cords
- Create multiple layers for depth
- Add a timer for convenience
- Secure bottom weights in windy areas
This works amazingly behind outdoor seating areas or as a photo backdrop for holiday parties. Your Instagram feed will thank you!
Giant DIY Outdoor Snow Globe
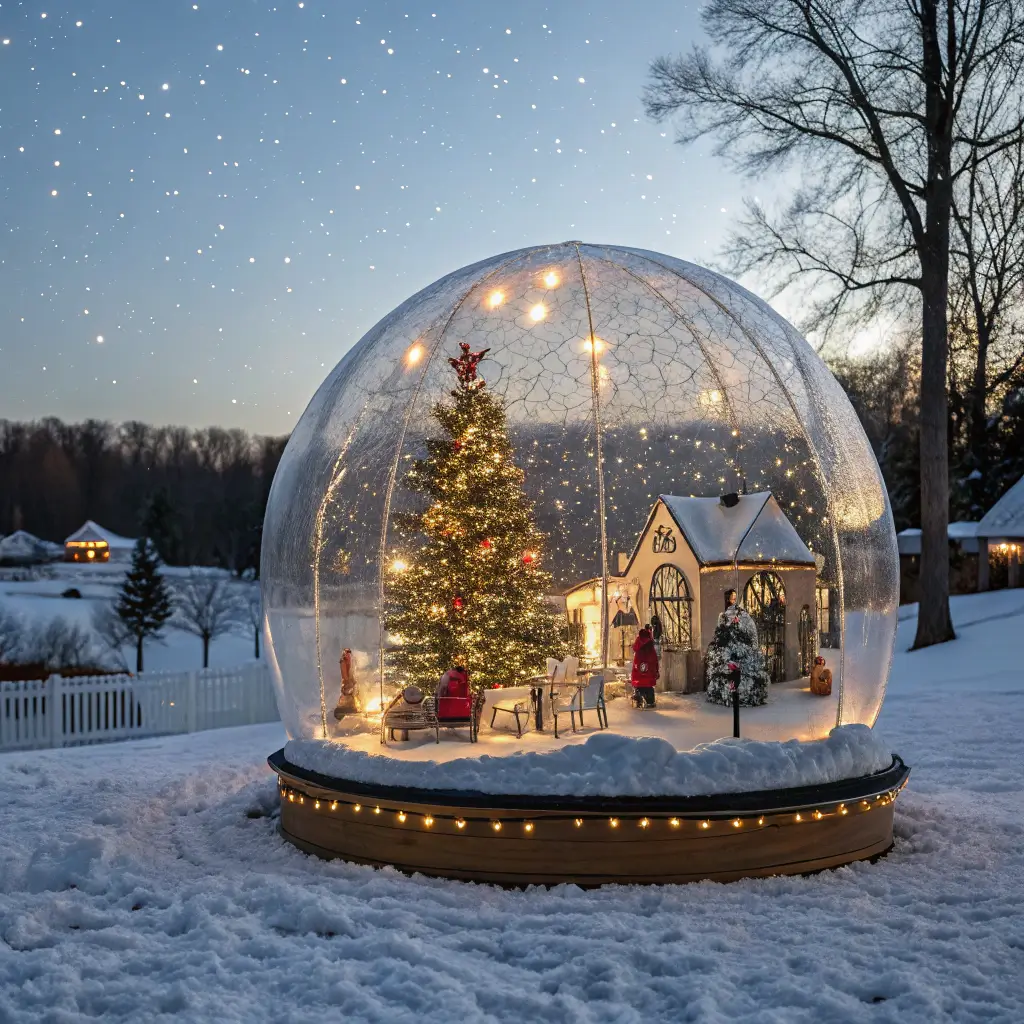
Saving the best for last! This showstopper uses a large clear beach ball or inflatable globe, fake snow, and miniature decorations to create a magical scene. Cut the ball in half, create a winter scene on a platform, and cover with the clear dome.
Add battery-operated lights inside, maybe a small fan to blow the “snow” around, and secure everything to a decorated base. Build time: 2-3 hours, but the impact is incredible. Kids lose their minds over this one!
The trick is weatherproofing – seal all edges with clear caulk and use weather-resistant materials inside. Mine survived a whole season, including one memorable windstorm that relocated it to my neighbor’s yard (oops).
Wrapping Up Your DIY Christmas Wonderland
There you have it – fifteen ways to make your outdoor space festive without maxing out credit cards or hiring professionals. The total cost for ALL these projects? Less than what you’d spend on one animated reindeer from the big box store.
What I love most about DIY decorations is their uniqueness. Nobody else on your street will have exactly what you’ve created. Plus, making these with family becomes part of your holiday tradition – way better than fighting crowds at the mall.
Start with one or two projects that excite you most. Once you see how easy and rewarding they are, you’ll be hooked. Before you know it, you’ll be the house everyone drives by to see the decorations. And when people ask where you got everything? You get to say those magical words: “I made it myself!”
Remember, perfection isn’t the goal here – creativity and fun are what matter. Some of my favorite decorations started as happy accidents or midnight crafting sessions fueled by too much eggnog. The wonky candy cane that leans a bit? It has character. The gnome with the crooked hat? He’s special.
So grab your hot glue gun, raid your recycling bin, and create some outdoor Christmas magic. Your wallet will thank you, your neighbors will admire you, and you’ll have decorations with actual stories behind them. Now that’s what I call festive fun!