15 Inspiring Easy DIY Room Decor Ideas for Small Rooms
You know that feeling when you scroll through Pinterest and think, “My room could never look like that”? Well, I’m here to tell you that’s complete nonsense.
I’ve been tinkering with DIY room decor for years, and honestly, some of the most jaw-dropping transformations come from the simplest projects.
After countless weekends spent crafting (and yes, occasionally failing spectacularly), I’ve discovered that the secret isn’t about having an interior designer’s eye or a massive budget.
It’s about knowing which projects actually work and which ones just photograph well for Instagram. Today, I’m sharing 15 ridiculously easy DIY room decor ideas that even your craft-challenged friend could pull off.
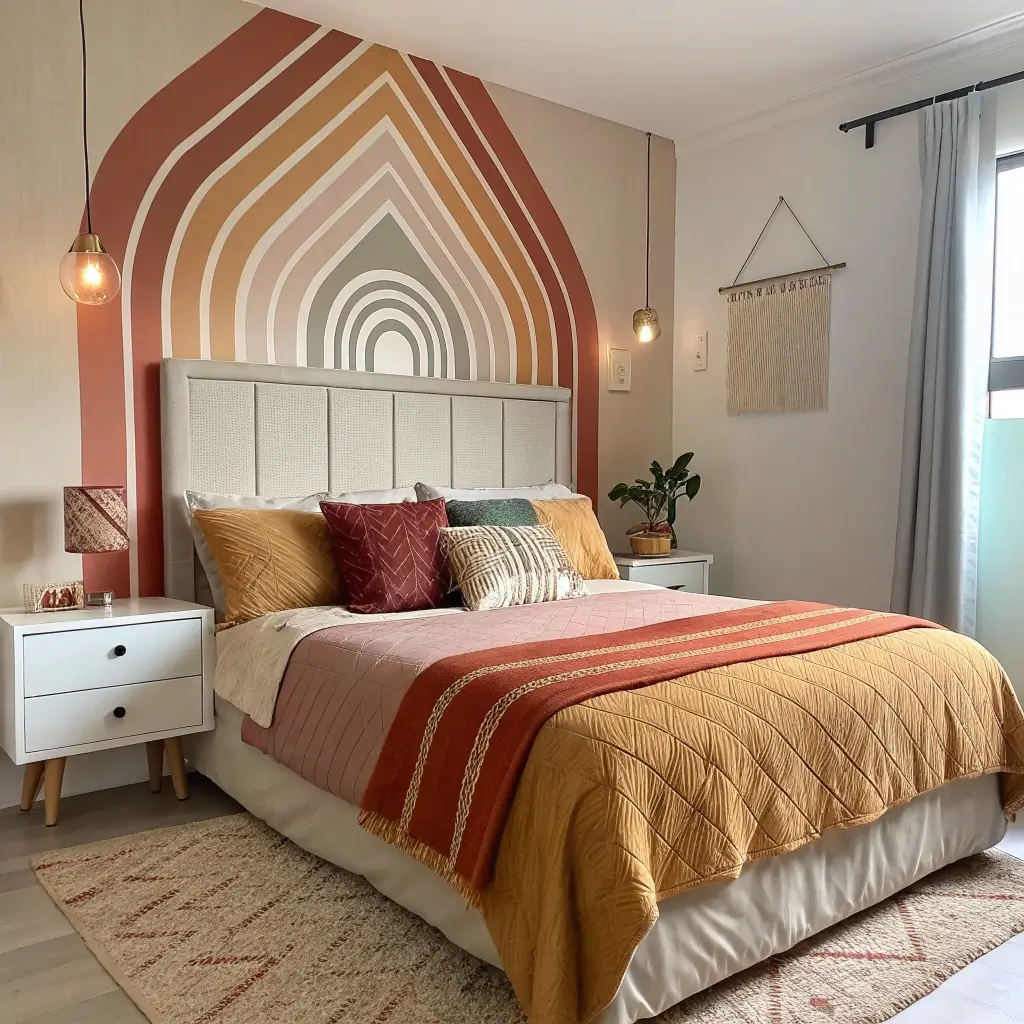
Peel-and-Stick Accent Wall
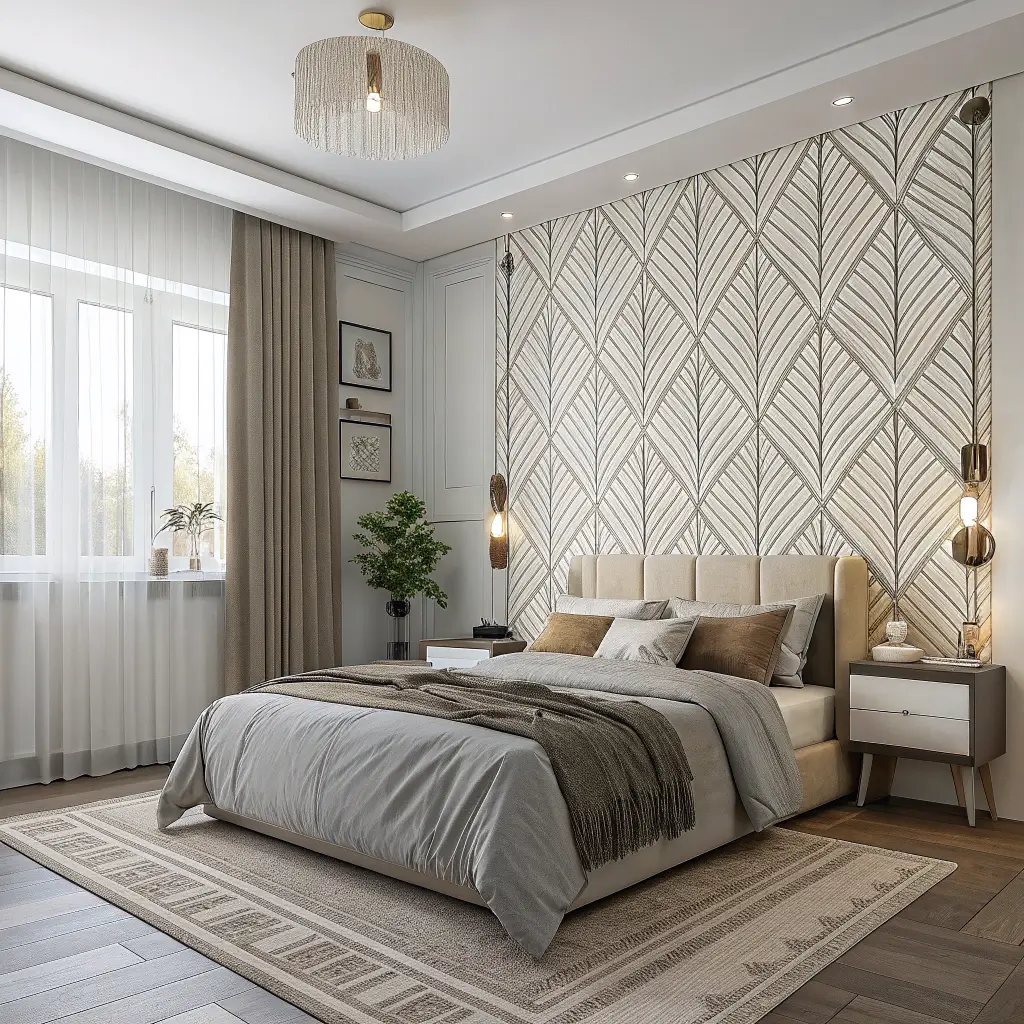
Why This Changes Everything
Remember when creating an accent wall meant committing to paint or expensive wallpaper? Those days are gone, my friend. Peel-and-stick wallpaper has completely revolutionized the game, and I’m not being dramatic here.
I transformed my boring beige bedroom wall last month using geometric peel-and-stick paper that cost me less than $50. The whole project took about three hours, and that includes the time I spent repositioning panels because I couldn’t get them straight the first time (or the second, but who’s counting?).
How to Nail This Project
Here’s what makes this project foolproof:
- No commitment required – rent-friendly and removable
- Mistake-proof application – you can reposition until it’s perfect
- Instant transformation – seriously, the before and after will shock you
- Budget-friendly – covers more area for less money than traditional wallpaper
Start with just one wall behind your bed or desk. Measure twice, cut once, and work from the center outward. Pro tip: get a friend to help you keep those lines straight. Trust me, attempting this solo is how you end up with a wonky pattern that’ll bug you every single day.
DIY Fabric Wall Panels
The Acoustic Solution You Didn’t Know You Needed
Want to know what nobody tells you about fabric wall panels? They don’t just look amazing – they actually improve your room’s acoustics. If you’re tired of hearing every footstep from upstairs or your roommate’s questionable music choices, this project is calling your name.
I made six panels for my home office using foam boards, batting, and some gorgeous indigo fabric I found on clearance. The total cost? Under $40. The impact? Priceless. My Zoom calls sound better, and the room feels cozier somehow.
Making It Happen
Creating these panels is embarrassingly simple:
- Cut foam boards to your desired size (I went with 24×24 inches)
- Wrap with batting for that plush, professional look
- Stretch fabric over the front and staple to the back
- Hang using Command strips or picture ledges
The best part? You can switch out the fabric whenever you want a new look. FYI, this works amazing with bold patterns or even vintage scarves if you’re feeling fancy.
Fairy Light Photo Grid
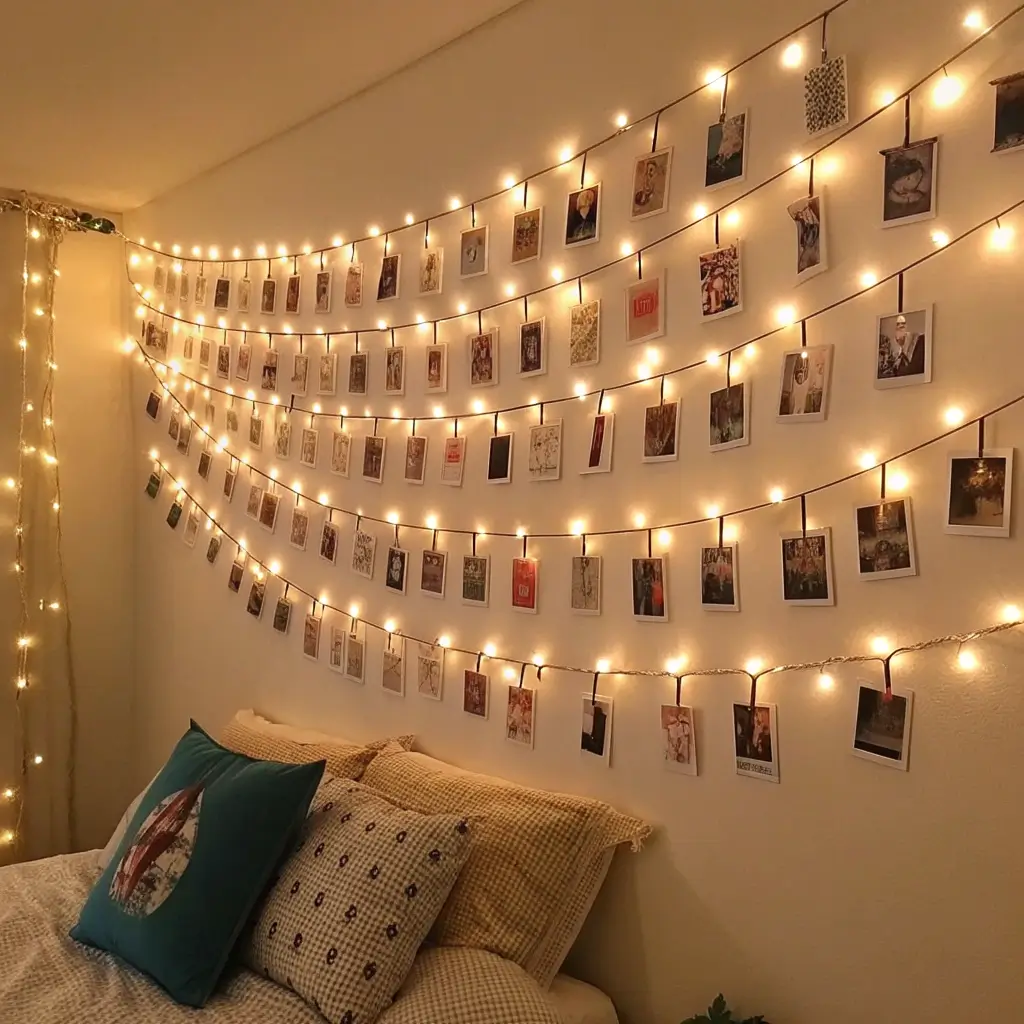
Instagram-Worthy Without the Effort
Let’s be real – we all have hundreds of photos trapped on our phones that deserve to see the light of day. A fairy light photo grid solves this problem while adding that cozy ambiance everyone’s after.
I created mine using battery-operated LED string lights (the warm white ones, not those harsh cool-toned disasters) and mini clothespins. The whole setup cost about $15 and took maybe 20 minutes to install.
The Setup That Actually Works
Here’s my tried-and-tested approach:
- Create a grid pattern with your lights using small hooks or tape
- Space lights evenly – about 6-8 inches apart works perfectly
- Clip photos randomly for an organic, effortless look
- Mix in postcards or ticket stubs for personality
What makes this special is how it evolves. You can constantly swap photos, add new memories, or theme it for seasons. Mine currently features a mix of travel photos and embarrassing childhood pictures that make me smile every morning.
Also Read: 15 Budget-Friendly Room Decor DIY Ideas You’ll Love
Washi Tape Wall Patterns

The Renter’s Best Friend
If you’re living in a rental or just commitment-phobic when it comes to decor, washi tape is about to become your new obsession. This Japanese masking tape comes in every pattern imaginable and peels off without damaging walls.
I went a little wild and created a geometric mountain range behind my desk. Did it take patience? Absolutely. Do I regret spending three hours on it? Not even a little bit.
Design Ideas That Actually Look Good
Skip the Pinterest fails and try these proven patterns:
- Geometric shapes – triangles, hexagons, or diamonds
- Faux frames around artwork or mirrors
- Grid patterns for a modern, minimalist vibe
- Organic lines that create abstract art
The key is choosing a color scheme and sticking to it. I learned the hard way that rainbow washi tape chaos looks fun in theory but messy in reality. Pick 2-3 complementary colors max, and your wall will thank you.
Floating Book Display Shelves
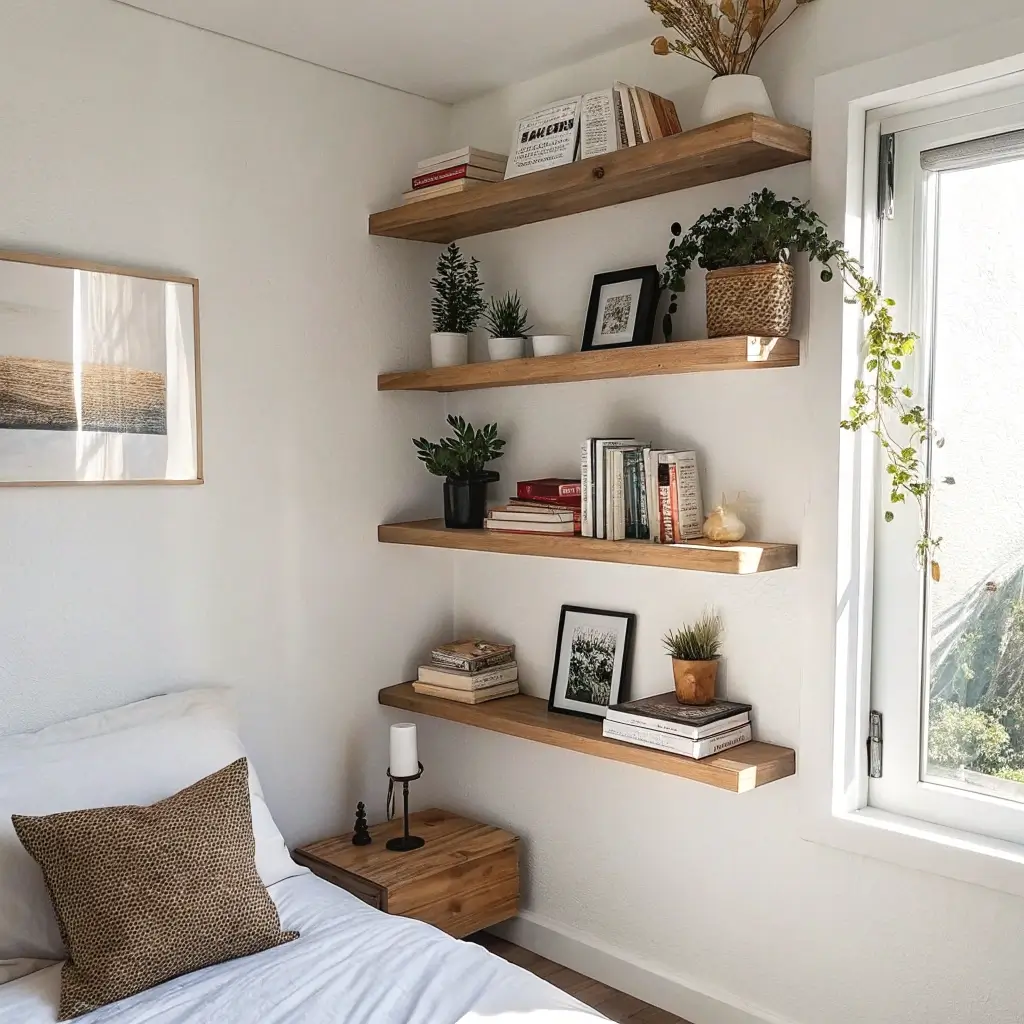
Show Off Your Literary Side
Regular bookshelves are fine, but floating book displays that show off your covers? That’s how you make a statement. Plus, they force you to curate your collection instead of hoarding every paperback you’ve touched since middle school.
I installed picture ledges from IKEA (the $5 ones) and suddenly my favorite books became art pieces. The visual impact completely transformed my reading nook, and visitors always comment on them.
Installation Without the Headache
Making this work requires:
- Sturdy picture ledges – don’t cheap out here
- Proper wall anchors – books are heavier than you think
- Strategic placement – eye level or slightly above works best
- Thoughtful curation – mix sizes and colors for visual interest
Rotate your display monthly to keep things fresh. Currently, I’m showcasing my collection of vintage orange Penguin classics, and honestly? It looks like I actually have my life together.
Handmade Mirror Collage Wall
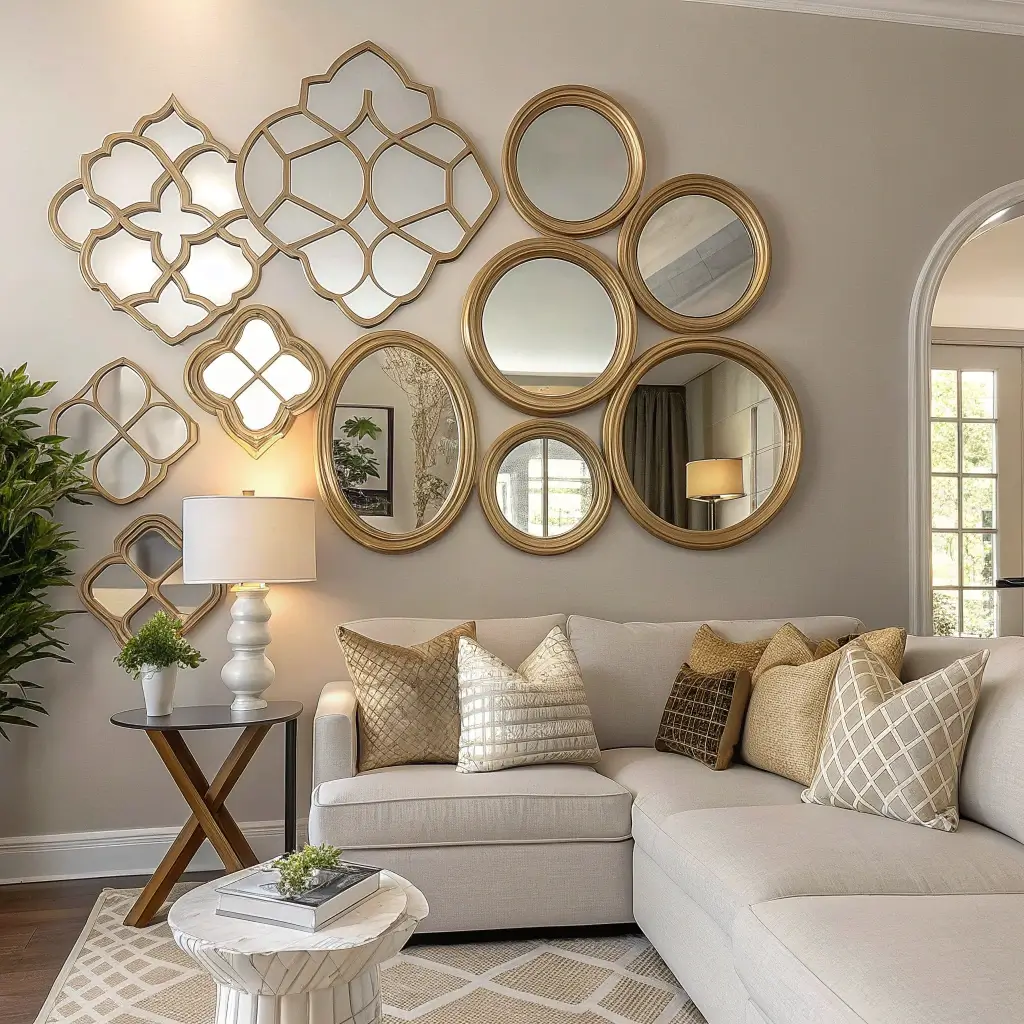
Multiply Your Space (and Style)
Small room? Dark corners? A mirror collage wall fixes both problems while looking ridiculously expensive. I collected mirrors from thrift stores over two months and created a stunning focal wall for less than $30 total.
The trick is embracing mismatched frames. Gold, silver, wood, painted – they all work together when you commit to the chaos. My wall has 12 mirrors ranging from tiny compacts to a massive ornate piece I spray-painted black.
Creating Your Reflection Masterpiece
Follow these guidelines for success:
- Mix shapes enthusiastically – circles, ovals, squares, sunbursts
- Vary sizes dramatically – from 4 inches to 2 feet
- Plan your layout on the floor first
- Use paper templates to test placement before hanging
Pro tip: add one unexpected element like a small shelf or artwork piece among the mirrors. It breaks up the pattern and adds personality.
Also Read: 15 Fun DIY Room Decor Ideas and Cozy Bedroom Tips
Painted Mason Jar Lamp Decor
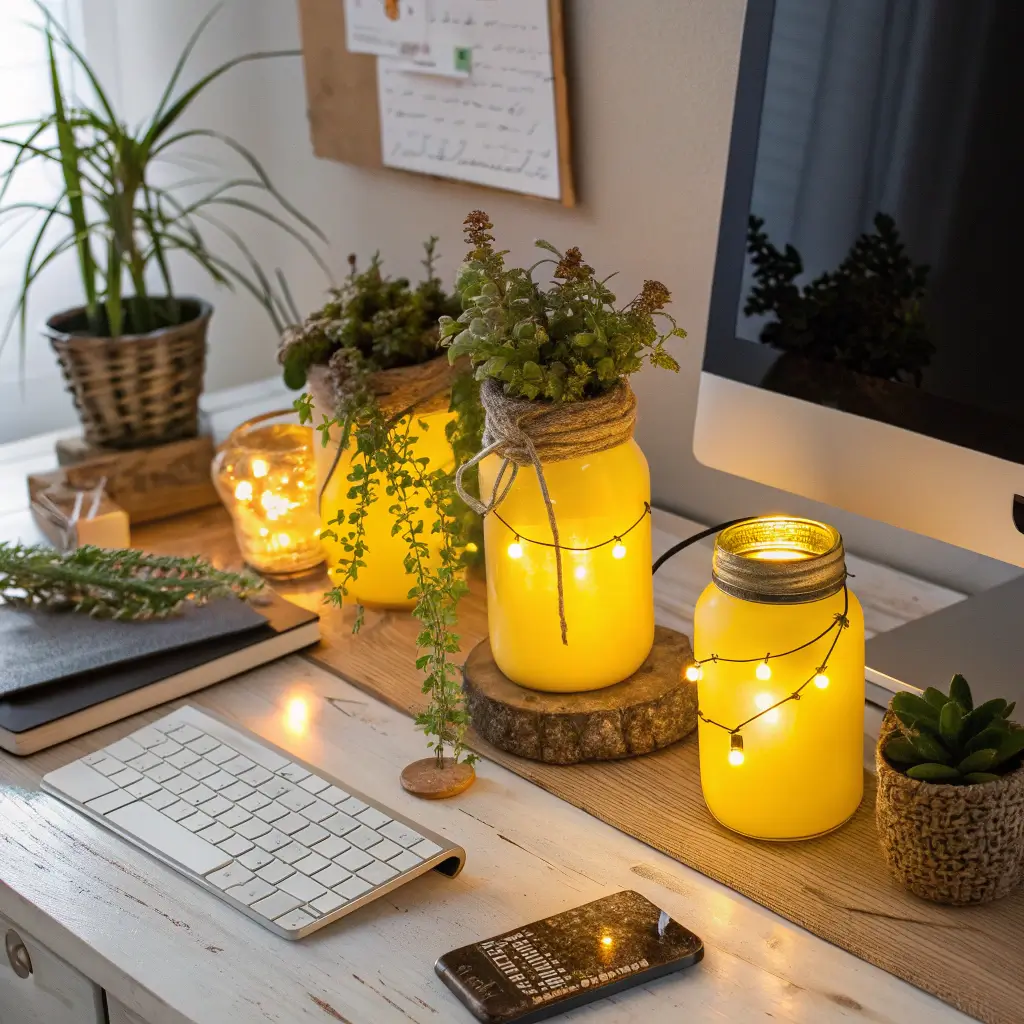
Lighting That Doesn’t Look DIY
Mason jar crafts get a bad rap IMO, but done right, they’re actually sophisticated. I made three painted mason jar pendant lights for my kitchen, and guests always ask where I bought them.
The secret? Quality spray paint and proper lighting kits. Skip the battery-operated fairy lights and invest in actual pendant light cords. The difference between crafty and classy lies in these details.
The Method That Works
Here’s your roadmap to mason jar lighting success:
- Clean jars thoroughly – any residue will show through paint
- Apply thin, even coats of spray paint (I prefer metallic copper)
- Install proper lighting fixtures through drilled lid holes
- Hang at varying heights for visual interest
Want to level up? Try etching designs on the glass before painting or wrapping the jars with macrame for a boho vibe.
Paper Flower Feature Wall
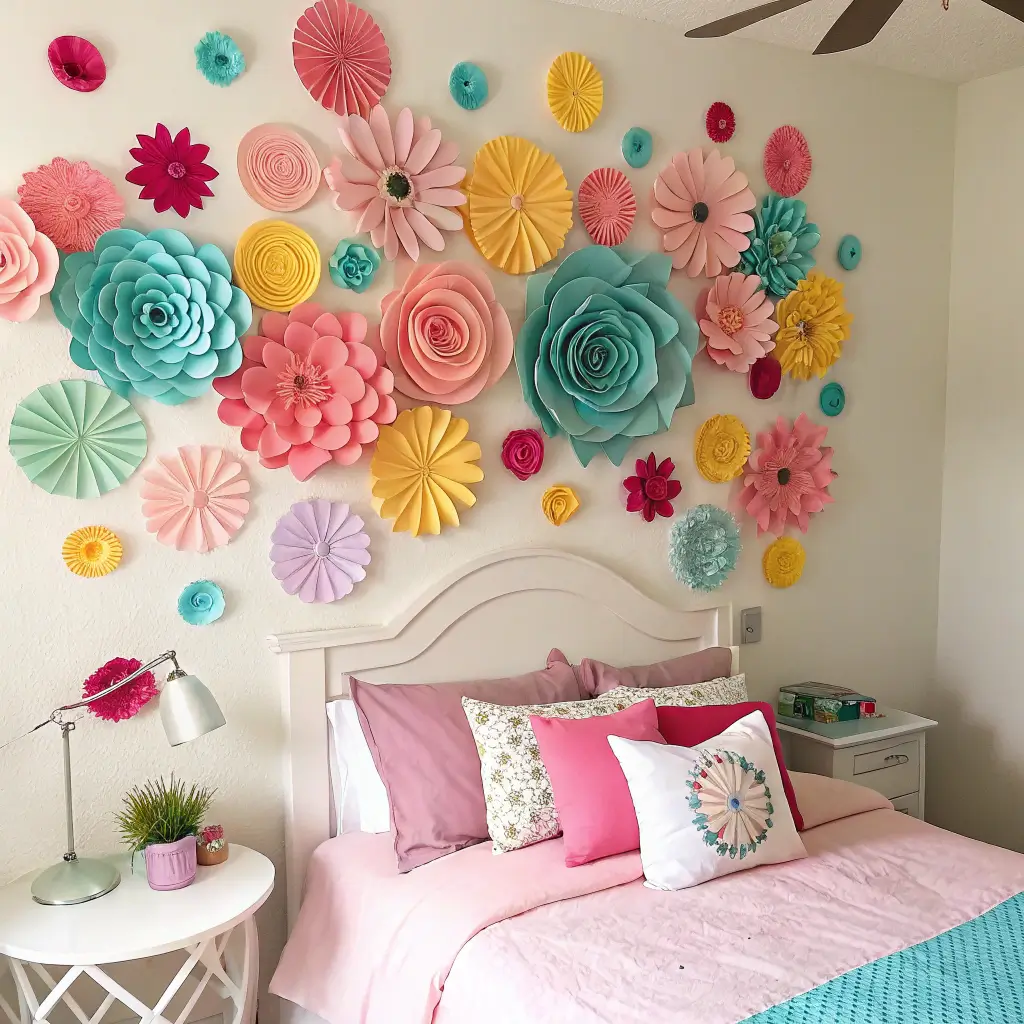
3D Art Without the Price Tag
Creating a paper flower wall sounds complicated, but I promise it’s therapeutic once you get going. I made 30 flowers one weekend while binge-watching Netflix, and now I have a stunning feature wall that cost less than a single piece of “real” art.
The best part? Paper flowers never die, never need water, and can be any color combination your heart desires. Mine are various shades of blush and cream, creating an ombre effect that photographs beautifully.
Crafting Your Blooming Wall
Master these techniques:
- Start with quality cardstock – regular paper looks cheap
- Use templates – freehand flowers rarely look professional
- Vary flower sizes from 6 to 18 inches diameter
- Create depth by layering petals and using foam dots
Attach flowers directly to the wall using removable adhesive strips. Group them tightly in one corner and let them cascade outward for maximum impact.
Rope-Wrapped Hanging Shelves
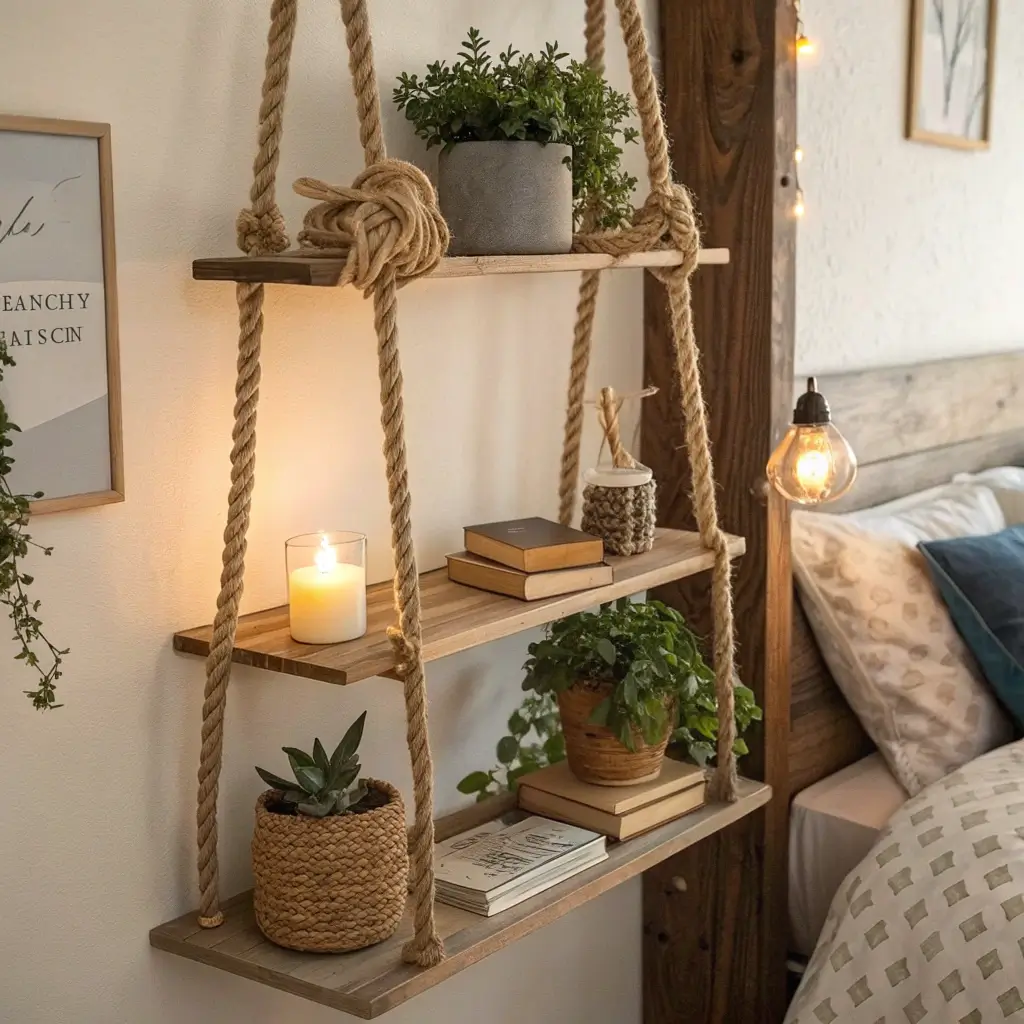
Nautical Meets Functional
I stumbled upon rope-wrapped shelves while trying to hide the ugly brackets on my existing shelving. Twenty dollars worth of sisal rope later, I had custom floating shelves that looked straight out of a beach house.
The texture adds warmth to any room, and the process is so simple it’s almost embarrassing. You literally just wrap rope around wood and hang it up. That’s it. That’s the whole thing.
Your Step-by-Step Guide
Nail this look with:
- Choose your wood – reclaimed pieces add character
- Sand and stain if desired (I prefer natural wood)
- Wrap with rope using hot glue every few inches
- Drill holes for rope hanging system
- Thread thick rope through holes and knot securely
These shelves hold lightweight items perfectly. I use mine for plants, candles, and small decorative objects. Heavy books? Not so much 🙂
Also Read: 15 Unique Security Door Design Ideas You’ll Love Today
Aesthetic Quote Canvas Art

Words That Actually Inspire
Let’s address the elephant in the room – quote art can be incredibly cheesy. But when you create your own with meaningful words in your handwriting or a font you love, it becomes personal art that actually motivates you.
I made three canvases with quotes that genuinely resonate with me (no “Live, Laugh, Love” in sight). Using acrylic paint and stencils I cut myself, each piece cost about $8 to create.
Making Quote Art That Doesn’t Suck
Follow these rules religiously:
- Choose quotes that matter to you personally
- Keep designs minimal – the words should be the focus
- Use quality materials – cheap canvas looks cheap
- Consider typography carefully – fonts convey mood
My favorite technique? Writing quotes in pencil first, then painting over with a thin brush for that hand-lettered look without the pressure of perfection.
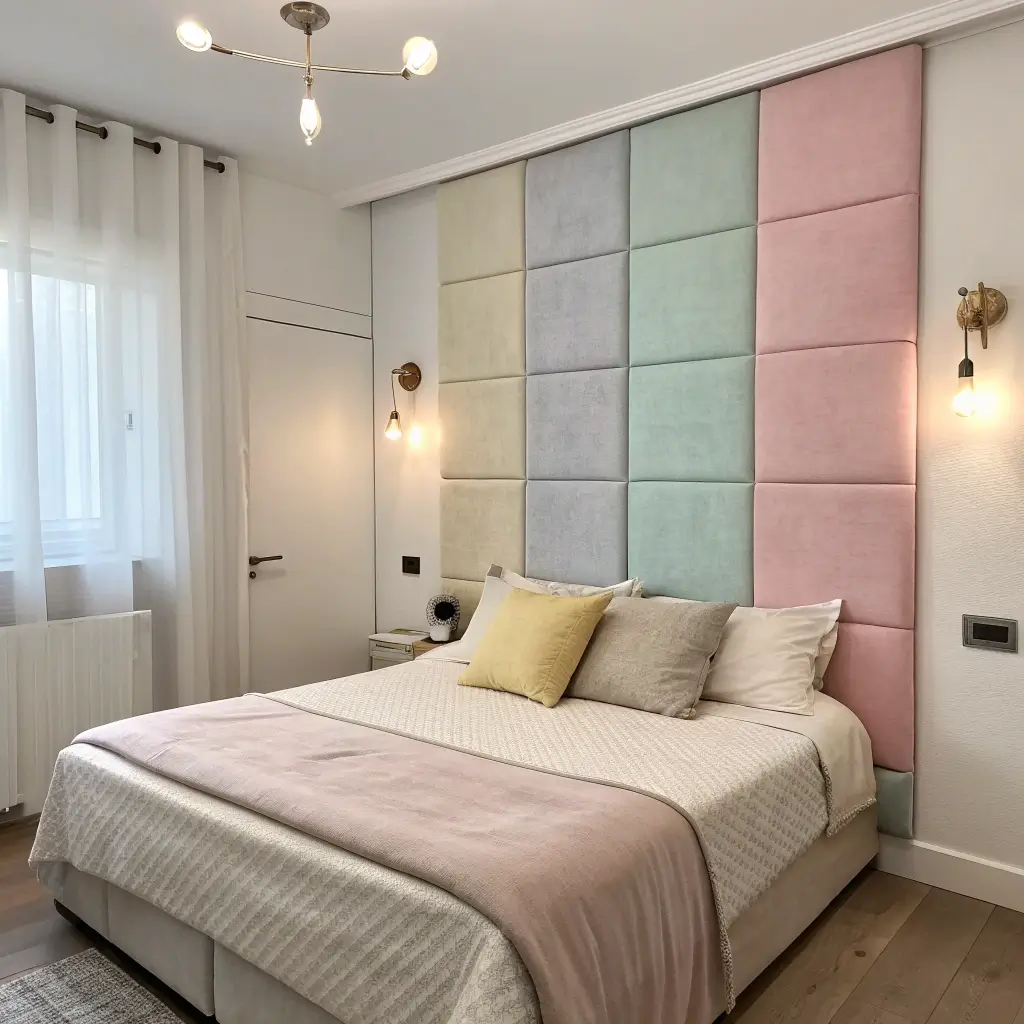
DIY Headboard Wall Illusion
Big Impact, Zero Commitment
Who needs an actual headboard when you can create the illusion of one with paint, wallpaper, or even washi tape? I painted a curved headboard shape on my wall, and it completely transformed the bedroom’s focal point.
The beauty of this approach? You can go as bold or subtle as you want. Change your mind? Paint over it. Moving? No furniture to haul.
Creating Your Faux Headboard
Options that actually work:
- Paint a solid shape in a contrasting color
- Create patterns with painter’s tape and multiple colors
- Apply peel-and-stick wood planks for texture
- Use fabric or tapestry stretched across the wall
Measure your bed width and add 6-12 inches on each side. Height should be 3-4 feet above the mattress for proper proportion. Trust me, getting these measurements right makes all the difference.
Recycled Frame Gallery Wall

Trash to Treasure Gallery
That box of random frames in your closet? Time to put them to work. A recycled frame gallery wall celebrates imperfection while looking intentionally curated.
I spray-painted all my mismatched frames matte black, creating instant cohesion. Fill them with everything from pressed flowers to fabric scraps to children’s artwork. The result looks like something from an expensive boutique hotel.
Gallery Wall Without the Guesswork
Master the gallery wall with:
- Unify with color – paint frames the same shade
- Mix content types – photos, art, pressed botanicals, fabric
- Plan layout on floor before hammering anything
- Start with largest piece and build outward
- Keep spacing consistent – 2-3 inches between frames
The secret sauce? Include unexpected elements like a small mirror, vintage postcard, or even an empty frame for negative space.
Cozy Corner Floor Cushion Setup
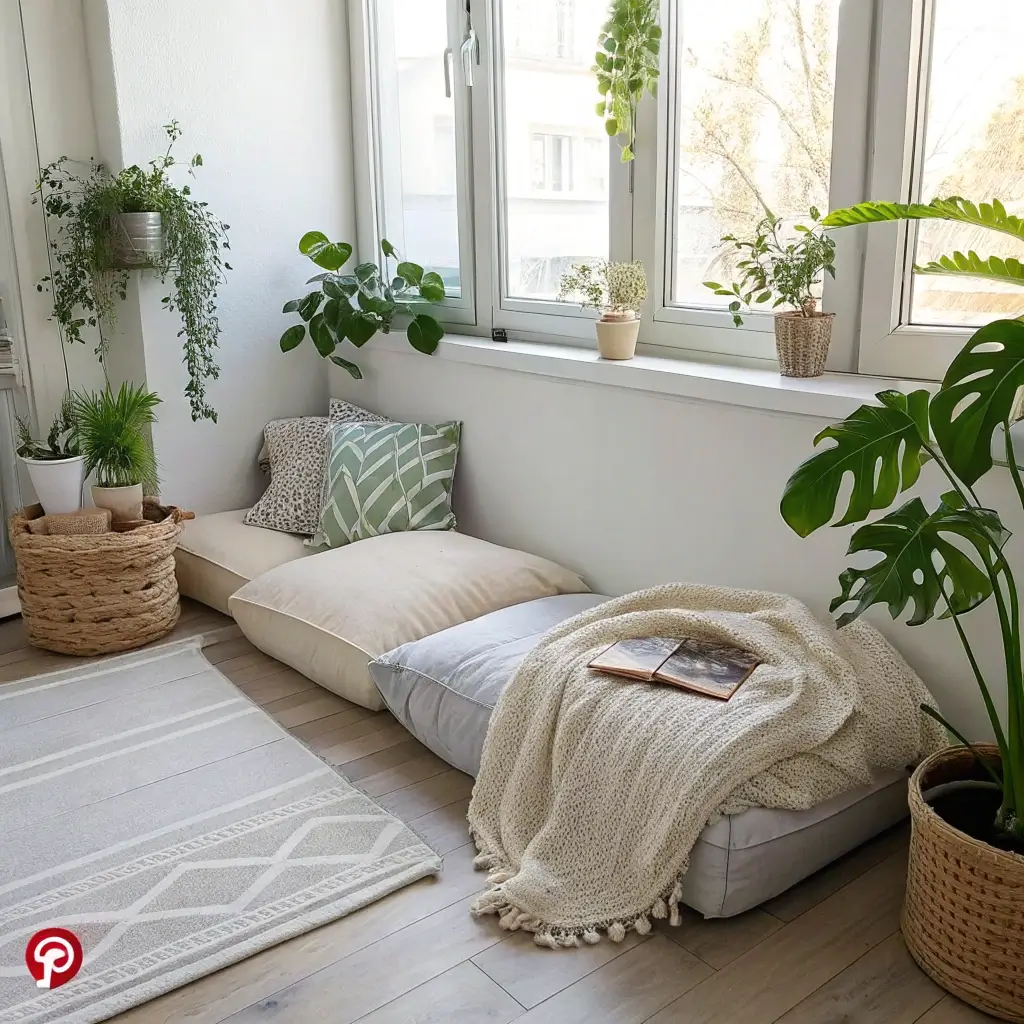
Your Personal Retreat Space
Creating a floor cushion corner transformed an awkward empty corner in my bedroom into my favorite reading spot. Four large floor pillows, a soft rug, and some string lights created a cozy oasis for under $75.
This setup works especially well in small spaces where traditional furniture feels overwhelming. Plus, everything can be easily moved when you need the floor space back.
Building Your Comfort Zone
Essential elements include:
- Large floor cushions in varying sizes
- Soft base rug to define the space
- Throw blankets for extra comfort
- Low lighting – floor lamp or string lights
- Small side table or tray for drinks and books
Layer textures obsessively here. Mix velvet, cotton, faux fur, and knits. The more textures, the cozier the vibe.
Faux Ivy Window Frame Decor
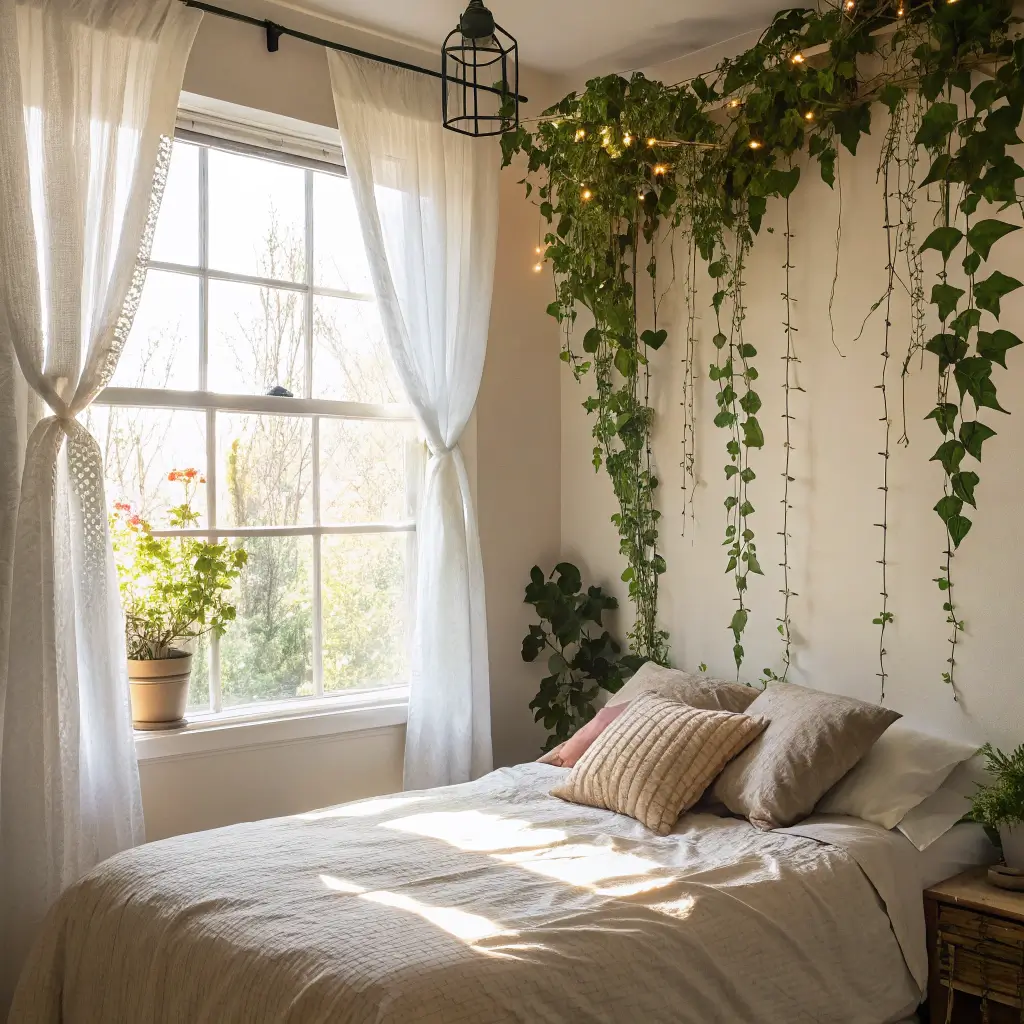
Bringing Outside In
Fake plants get hate, but quality faux ivy around window frames creates an enchanted garden vibe that real plants could never maintain. I framed my home office window with artificial ivy garland, and the effect is surprisingly elegant.
The key is buying realistic-looking faux greenery (skip the dollar store stuff) and securing it properly so it doesn’t look tacked on as an afterthought.
Installation That Looks Natural
Achieve that organic look:
- Choose quality faux ivy with varied leaf sizes
- Secure with clear Command hooks placed strategically
- Layer multiple garlands for fullness
- Add fairy lights for evening ambiance
- Mix in other faux plants like eucalyptus or ferns
Let some pieces drape naturally while training others to climb. The controlled chaos makes it look alive and growing.
Minimalist Desk Shelf Riser
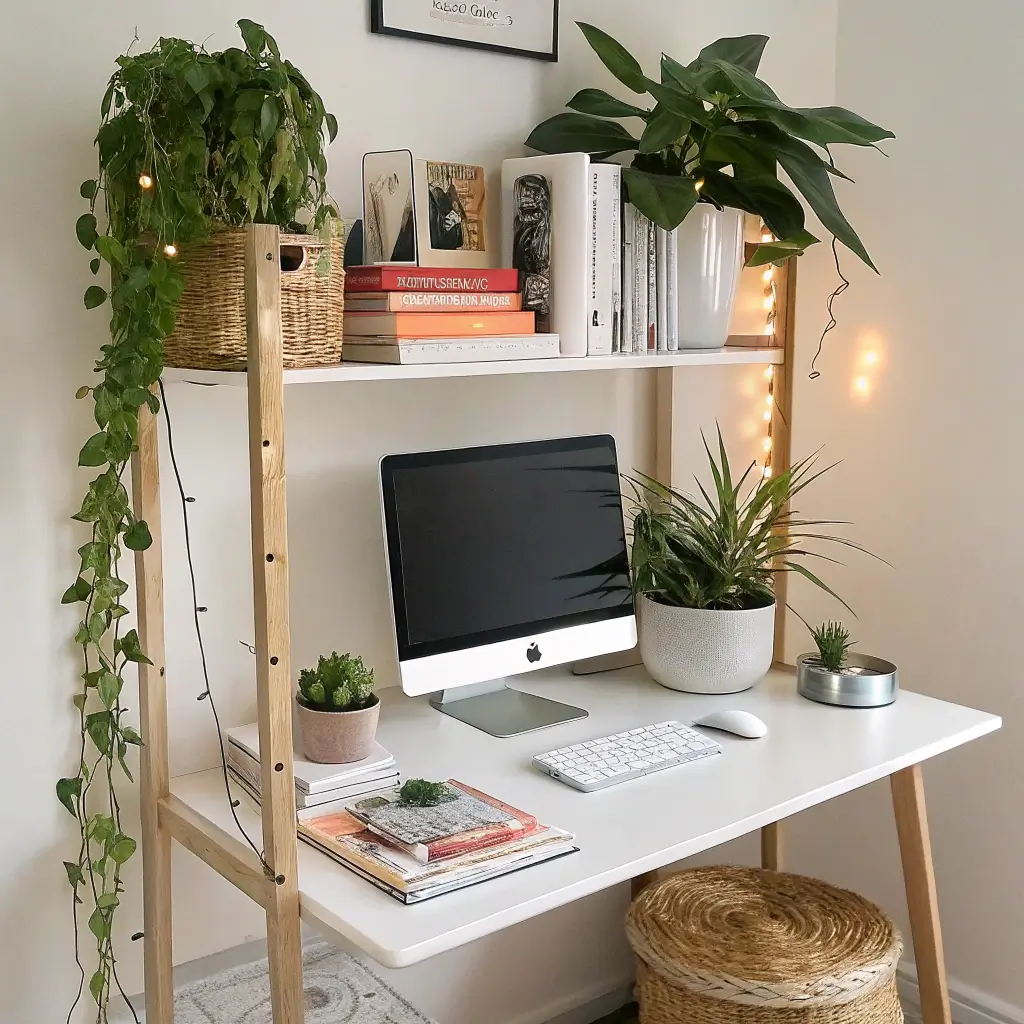
Declutter and Display
A desk shelf riser changed my work-from-home life completely. Using two wooden cutting boards and four furniture legs from the hardware store, I created a custom riser that holds my monitor at eye level while creating storage underneath.
The minimalist design keeps my desk looking clean while maximizing vertical space. Total cost? $25. Chiropractor visits avoided? Priceless.
Building Your Perfect Riser
Customize with these considerations:
- Measure monitor height needs – eye level is crucial
- Choose appropriate leg height – usually 4-6 inches
- Select wood that matches your existing furniture
- Add cork or felt pads to protect desk surface
- Consider cable management – drill holes for cords
Paint or stain to match your aesthetic. Mine is natural wood with hairpin legs for that modern industrial vibe everyone seems to love.
Wrapping Up Your DIY Journey
Look, transforming your space doesn’t require a design degree or trust fund. These 15 DIY room decor projects prove that creativity and a little effort go further than any shopping spree could.
Start with one project that speaks to you. Maybe it’s the instant gratification of peel-and-stick wallpaper or the meditative process of crafting paper flowers. Once you see how easy it is to create something beautiful with your own hands, you’ll be hooked.
The best room decor tells your story, reflects your personality, and makes you smile every time you walk through the door. None of these projects are perfect – mine certainly aren’t – but that’s what makes them yours. So grab some supplies, put on your favorite playlist, and start creating. Your dream room is just a weekend project away


