
15 Easy Peel and Stick Floor Tile Bathroom Ideas for a Quick Update
Ugh. Is there anything more depressing than a sad, outdated bathroom floor? You know the one. The linoleum from 1987 that’s seen better days, the cracked ceramic that’s a nightmare to clean, or that weird beige vinyl that just screams “landlord special.”
You stare at it every morning and it just… drains your soul a little. But the thought of a full-blown renovation? The demolition dust, the plumber’s bill, the sheer, unadulterated chaos of it all? No, thank you. I’d rather live with the beige.
But what if I told you there’s a hero in a very sticky, very clever disguise? A solution that requires zero mortars, no messy grout, and absolutely no previous DIY experience? Enter the glorious world of peel and stick floor tiles.
I’m not talking about the flimsy, plasticky stickers your grandma had in her kitchen. Modern peel and stick tiles are legit.
They’re durable, they’re stylish, and they are the ultimate weekend warrior project for giving your bathroom a jaw-dropping makeover without the jaw-dropping price tag.
I’ve been there. I’ve tackled my own “before” bathroom disaster with these magical tiles, and I’m here to be your guide, your hype-man, and your source of 15 seriously inspiring ideas. Let’s banish the beige together, shall we?
Why Peel and Stick Tiles are Your Bathroom’s New Best Friend
Before we dive into the eye candy, let’s talk brass tacks for a second. Why should you even consider this? IMO, it boils down to a few unbeatable perks.
- The Obvious: It’s Stupid-Easy. The name says it all. You peel off the backing and you stick it down. You need basic tools: a measuring tape, a utility knife, a straight edge, and maybe a roller to really secure them. That’s it. You’re not mixing anything; you’re not calling your brother-in-law for backup.
- It’s a Wallet’s Dream. Compared to the cost of traditional tile, plus the materials and potential labor for installation, peel and stick is a fraction of the price. You can completely transform a small bathroom floor for well under $200.
- Commitment Issues? No Problem. Renting? Not sure if you’ll love that bold pattern in a year? The beauty of many quality peel and stick tiles is that they can be removed. Always check the specific product details, but this is a low-commitment way to inject some serious personality into a space.
- Speed Demon. You can literally do this in a weekend. Prep the floor on Saturday morning, install all afternoon, and be admiring your handiwork by Sunday brunch. Try doing that with ceramic tile.
Now, a quick but crucial FYI: prep is everything. These tiles are only as good as the surface they’re stuck to.
You must, must, MUST ensure your floor is impeccably clean, dry, and smooth. Any grit, old adhesive, or major bumps will show through and compromise the hold. A little sweat equity in prep pays off a thousandfold in the final look. Trust me on this one.
Alright, lecture over. Let’s get to the fun part.
15 Easy Peel and Stick Floor Tile Bathroom Ideas
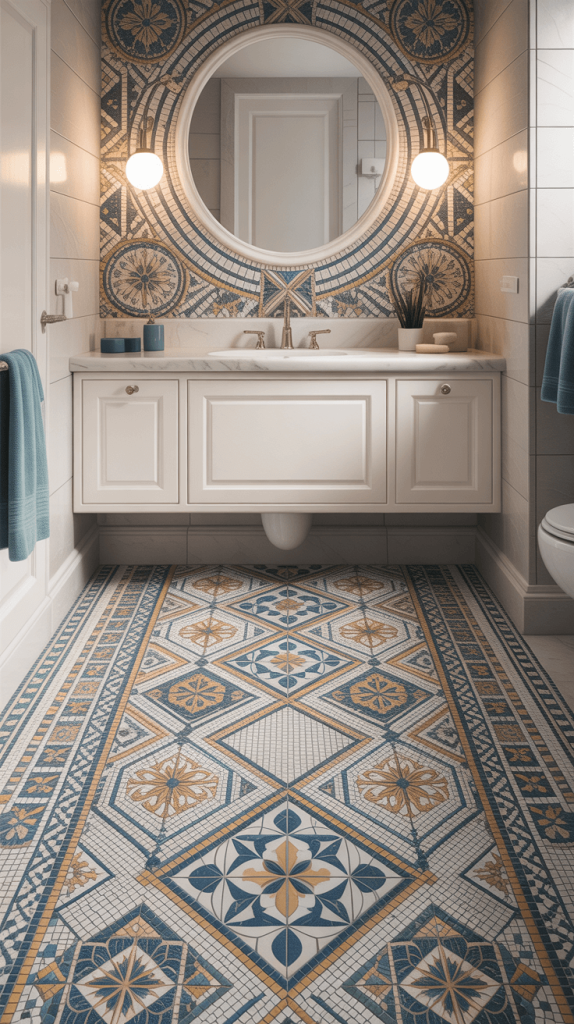
1. Modern Geometric Patterns
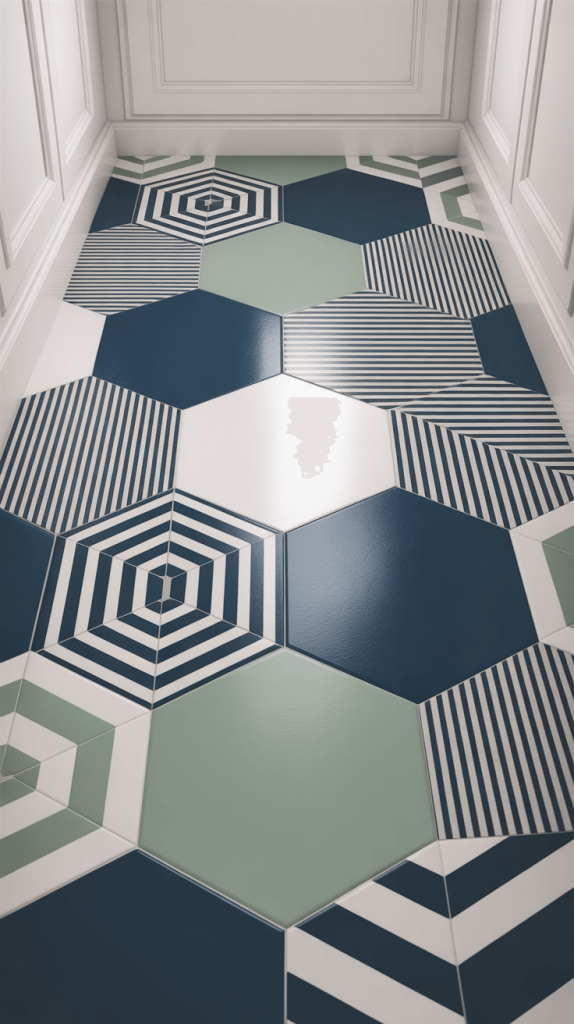
Let’s kick things off with a bang. If you want to instantly drag your bathroom into the 21st century, geometric patterns are your go-to.
We’re talking hexagons, triangles, Moroccan-inspired trellis designs, and abstract shapes. This isn’t your grandma’s floral print; this is cool, contemporary, and packed with personality.
Why it works: Geometric tiles create instant visual interest and can make a small bathroom feel dynamic and designed. They’re a conversation starter for sure.
My take: I used a black and white hexagon pattern in my own powder room, and the effect was staggering. It looks like a million bucks, and everyone assumes I hired a pro. Little do they know I did it while binge-watching a true crime series.
Pro Tip: Start tiling from the absolute center of your room and work your way out. This is non-negotiable with patterns, as it ensures your design is balanced and you don’t end up with weird, sliver-thin cuts on one side.
2. White Subway Tiles for a Classic Look
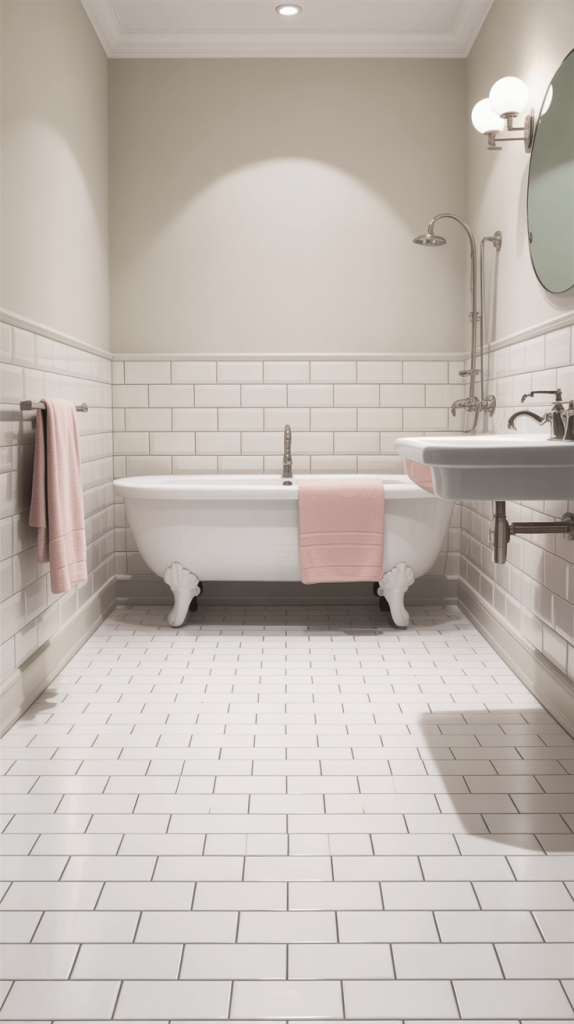
You can never, ever go wrong with classic white subway tile. It’s the little black dress of the tile world—timeless, chic, and always appropriate. While traditionally a wall tile, the peel and stick world has brilliantly adapted this icon for floors, often in a larger format perfect for underfoot.
Why it works: It’s bright, clean, and makes any space feel larger and airier. It provides a crisp, neutral backdrop that lets your other decor—a colorful rug, cool artwork, fancy towels—really pop.
The Ironic Bit: It gives you that authentic “renovated New York loft” vibe without the authentic New York loft price tag or the 100-year-old plumbing issues. 🙂
3. Marble Effect for Luxury at Home

Want the opulent feel of Carrara or Calacatta marble without the exorbitant cost, the tedious installation, and the high maintenance? Marble-effect vinyl tiles are a godsend. The printing technology on these is insane these days; the veining looks incredibly realistic.
Why it works: It instantly elevates the space, injecting a dose of sophistication and luxury. It pairs beautifully with both modern chrome fixtures and vintage-inspired brass.
A Word of Caution: When selecting a marble look, avoid patterns that are too repetitive or symmetrical. The beauty of real marble is in its random, organic veining. The best peel and stick options mimic this chaos perfectly.
4. Bold Black and White Checkerboard

Talk about a comeback story! The checkerboard floor is no longer just for 1950s diners and your Nana’s kitchen. It’s back, and it’s dripping with retro-modern attitude. It’s bold, it’s graphic, and it makes a statement that says, “I’m fun, and I have great taste.”
Why it works: It’s high-contrast, high-impact, and pure nostalgia. It works wonders in both tiny powder rooms and larger bathrooms, adding a dynamic energy that plain tiles just can’t match.
Pro Tip: If the classic black and white feels too intense, try a softened version like grey and white or tan and cream. You get all the graphic punch without the stark contrast.
5. Wood-Look Tiles for a Warm, Cozy Vibe
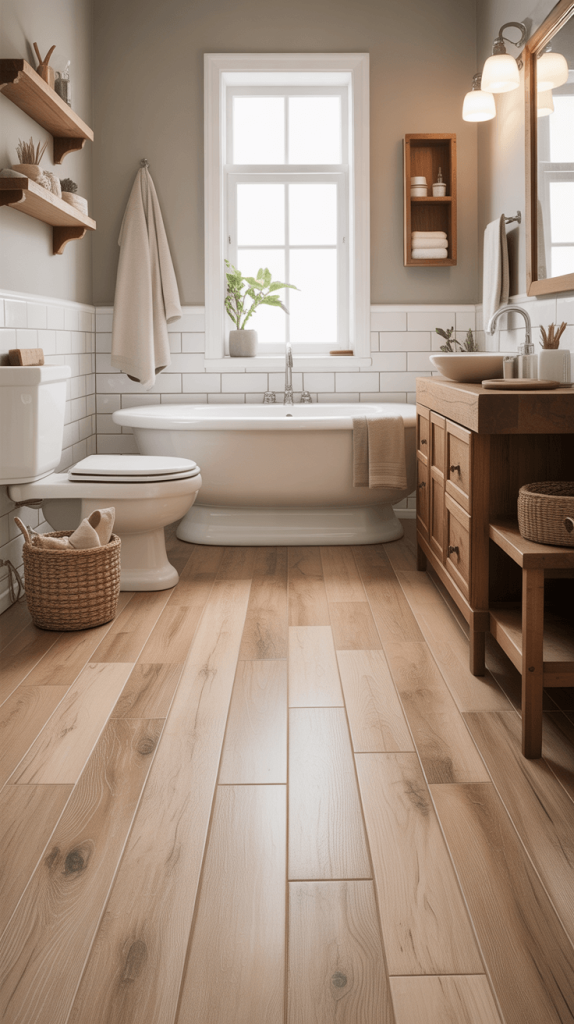
Wait, wood in a bathroom? Isn’t that a moisture nightmare? With real wood, absolutely. But with wood-look luxury vinyl or laminate peel and stick planks? You get all the warmth, texture, and cozy cabin feeling with 100% waterproof peace of mind.
Why it works: It brings an organic, natural element into a space that’s often filled with cold, hard surfaces. It makes the bathroom feel warmer, more inviting, and less… well, bathroom-y.
My Experience: I installed a grey-wash wood look in a basement bathroom, and it completely eliminated that cold, damp feeling. It’s now the coziest room in the house.
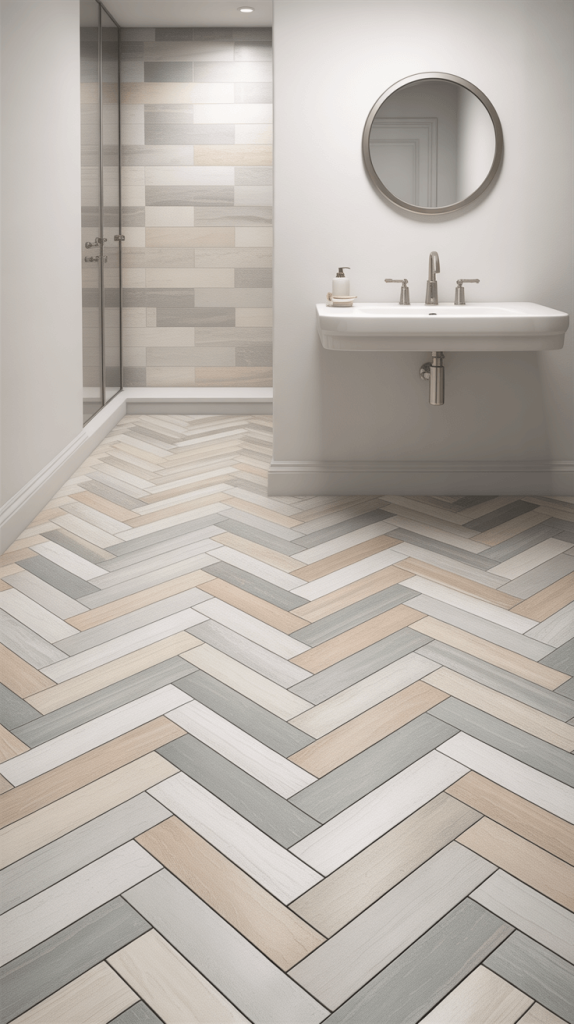
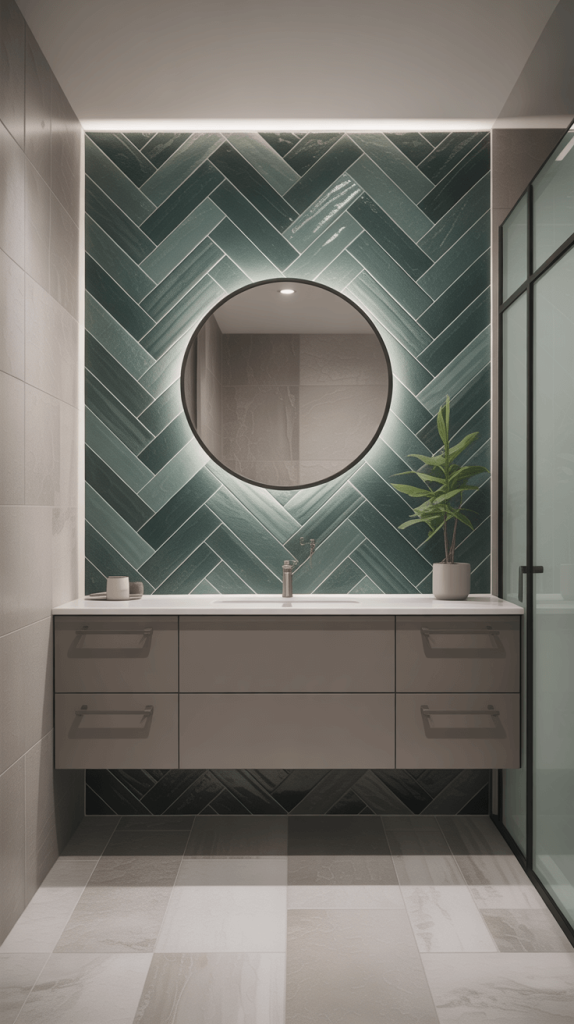
6. Herringbone Tile Layout for a Timeless Touch

Okay, this one is for the overachievers (like me). Herringbone is that beautiful, zig-zag pattern that just oozes classic European elegance. While traditionally achieved with wood or rectangular tiles, you can now find peel and stick tiles designed to be installed in this exact pattern, making it infinitely easier.
Why it works: It adds a layer of complex, artisanal detail that feels incredibly custom and high-end. The pattern draws the eye and gives the floor a sense of movement and depth.
Heads Up: This pattern requires a bit more precision and cutting than a standard grid, but the payoff is enormous. It’s still miles easier than trying to create a herringbone pattern with individual traditional tiles.
7. Bright and Bold Color Pops

Feeling brave? Ditch the neutrals altogether! Emerald green, cobalt blue, sunshine yellow, or even a fiery terracotta orange can transform your bathroom into a joyful, energetic sanctuary. Life’s too short for boring bathrooms.
Why it works: Color directly influences mood. A vibrant floor can be the single piece of art your room needs. It’s confident, playful, and unforgettable.
How to Nail It: If you go bold on the floor, keep the walls and fixtures relatively simple. Let the floor be the star. A white wall and a plain vanity will balance the look perfectly.
8. Rustic Chic with Wood-Look Tiles

Let’s revisit the wood look, but grittier. For a true rustic, farmhouse, or cabin feel, look for wood-look tiles that have a textured surface. We’re talking tiles that mimic hand-scraped wood, reclaimed barnwood with visible grain and knot holes, or even a distressed paint effect.
Why it works: The texture adds another layer of realism and rustic charm. It feels authentic, lived-in, and wonderfully cozy. It pairs perfectly with shiplap walls, a trough sink, and wrought iron fixtures.
9. Tropical Vibes with Leaf and Floral Designs
Turn your bathroom into your own personal staycation spot. Tropical prints featuring monstera leaves, palm fronds, or lush florals are a huge trend, and for good reason. They’re happy, they’re fresh, and they make you feel like you’re showering in a Bali resort.
Why it works: It’s a total escape. This pattern is pure fun and personality. It works best in a well-lit space where the design can really sing.
A Little Warning: This is a powerful look. To avoid overwhelming the space, use it in a smaller bathroom or a half-bath where it can be the undeniable focal point without competing with too much other stuff.
10. Minimalist Style with Neutral Tones

Not everyone wants their floor to scream. For some, a gentle whisper is more than enough. If you’re a fan of the minimalist, Scandinavian, or Japandi styles, then large-format peel and stick tiles in soft, neutral tones are your holy grail. Think light greys, warm beiges, soft taupes, and creamy whites.
Why it works: It creates a serene, calm, and uncluttered foundation for your space. The goal is to create a feeling of tranquility and spaciousness, and a quiet, neutral floor does exactly that.
11. Mosaic Tile Accents for a Pop of Detail
You don’t have to cover the entire floor in a busy pattern. Why not use peel and stick mosaics as a stunning accent? Imagine a border around the perimeter of the room, a “rug” effect in the center of the floor, or an accent strip in front of the vanity.
Why it works: It lets you incorporate intricate, beautiful details—like mother-of-pearl, glass, or stone looks—without the cost or complexity of a full installation. It’s a brilliant way to add a custom, designer touch.
12. Vintage Inspired with Retro Patterns
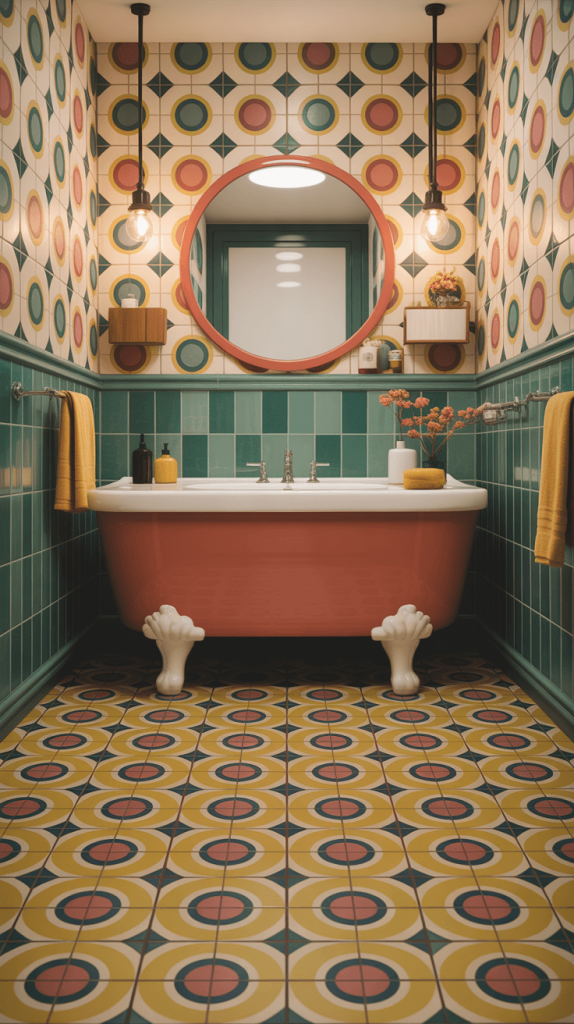
Channel your inner Don Draper or Mid-Century Modern maven. Retro patterns are having a major moment. Think of pastel colors, atomic starbursts, funky 70s florals, or Art Deco geometrics. These patterns are packed with nostalgia and character.
Why it works: It’s a unique and personal style choice that very few people have. It shows you’re not afraid to have fun with design and honor the classics.
Pro Tip: Hunt for these on sites like Etsy or specialty retailers. The big box stores have some options, but the real gems are often found in smaller shops.
13. Rustic Barn Style with Distressed Tiles

This takes rustic to the next level. We’re not just talking wood grain; we’re talking tiles that look like they were pulled right off the side of a 100-year-old barn. Think deep, textured grooves, varied color tones, and a seriously authentic weathered look.
Why it works: It adds an incredible amount of character and history to a new space. It’s rugged, handsome, and utterly timeless.
14. Textured Tiles for Extra Depth

This is a genius two-for-one. Textured peel and stick tiles, often designed to mimic natural stone like slate or travertine, don’t just look amazing—they provide actual grip underfoot. This is a major win for bathroom safety, especially in a family home.
Why it works: You get visual interest from the color variation and physical texture. It makes the floor look and feel more expensive and real, all while adding a non-slip feature that’s pretty much essential.
15. Accent Wall with Peel-and-Stick Tiles
I know, I know. This is a floor tile article. But hear me out! Some of these patterns are too good to keep underfoot. Using a dramatic, floor-worthy peel and stick tile on a single accent wall (behind the vanity or the bathtub) creates a breathtaking focal point.
Why it works: It draws the eye upward, adds incredible drama, and ties the whole room’s design together. A bold geometric or marble look on the wall with a complementary solid tile on the floor? Chef’s kiss.
Alright, You’re Convinced. Now What?
So, you’ve found your dream design. Amazing! Before you click “add to cart,” let’s run through a quick checklist. Ever wondered why some DIY projects fail spectacularly? It’s almost always the prep.
- Measure Twice, Buy Once: Measure your floor’s square footage (length x width). Buy 10-15% more tile than you need to account for cuts, mistakes, and future repairs. There’s nothing worse than running out and finding the lot number is sold out.
- Prep Like a Pro: This is the most boring and most important step.
- Clean: Sweep, vacuum, and then mop the floor with a degreasing cleaner. Every speck of dust is the enemy.
- Repair: Fill any cracks or holes in a concrete subfloor. For wooden subfloors, ensure there are no loose boards.
- Level: The floor must be smooth. Sand down any high spots. If your old floor has a significant texture (like a deeply embossed vinyl), you might need to lay down a thin underlayment or even a blank layer of vinyl sheeting to create a perfectly smooth canvas.
- Plan Your Layout: Don’t just start sticking in a corner. Dry lay a few tiles (without peeling the backing) to see how they’ll fit. Find your center point and plan your pattern outward from there. This will save you from a wonky, off-center disaster.
Conclusion
Look, renovating a bathroom can feel like a monumental task. But giving it a fresh, new look doesn’t have to be.
Peel and stick tiles are the ultimate hack for the time-poor, budget-conscious, or DIY-nervous homeowner.
They offer an unbelievable amount of style and satisfaction for a relatively tiny investment of time and money.
I’ve done it, my friends have done it, and you can absolutely do it too. Whether you go for serene minimalist, bold tropical, or timeless herringbone, you’re not just putting down a new floor.
You’re reclaiming a space in your home. You’re creating a room that makes you smile instead of sigh. And that, IMO, is priceless.
Now go forth, peel, stick, and transform! And maybe send me a picture when you’re done. I’m a sucker for a good before-and-after. 🙂


