
How to Paint Kitchen Cabinets Easily for a Fresh New Look
So you’re staring at those tired, dated kitchen cabinets and thinking, “There’s gotta be a better way than dropping $20,000 on a full renovation,” right?
Well, you’ve come to the right place, my friend. I’ve painted more kitchen cabinets than I care to remember some for myself, some for friends who promised pizza in return (spoiler: the pizza never makes up for the sanding).
Here’s the thing: painting kitchen cabinets isn’t rocket science, but it’s also not a casual Sunday afternoon project.
I learned this the hard way when I thought I could knock out my entire kitchen in a weekend.
Three weeks later, I was still finding paint in my hair and eating takeout off paper plates. But hey, the cabinets looked fantastic, and I saved about $15,000, so who’s complaining?
Why Paint Your Kitchen Cabinets Instead of Replacing Them?

Let me paint you a picture (pun absolutely intended). New kitchen cabinets cost anywhere from $8,000 to $25,000 for an average-sized kitchen.
Meanwhile, painting them yourself? You’re looking at maybe $200-500 in supplies, depending on how fancy you want to get with your paint choices.
But it’s not just about the money, though that’s a pretty compelling argument. Sometimes your cabinets are solid wood beauties that just need a fresh face.
Why send perfectly good oak cabinets to a landfill when all they need is some TLC and a coat of paint?
Plus, there’s something deeply satisfying about transforming your kitchen with your own two hands.
Every time someone compliments your kitchen, you get to casually drop, “Oh thanks, I painted those myself.” Trust me, the ego boost alone is worth the effort.
What You’ll Actually Need (Not What Pinterest Tells You)

The Non-Negotiable Supplies
Here’s where I’m gonna save you some headaches. Everyone online acts like you need a NASA-level setup to paint cabinets. You don’t. But you do need the right stuff, or you’ll end up with cabinets that look like they were painted by a toddler having a bad day.
Essential supplies:
- Quality primer (don’t cheap out here—I recommend Zinsser BIN or KILZ)
- High-quality paint (Benjamin Moore Advance is my go-to)
- Sandpaper (150 and 220 grit)
- Tack cloths
- Good brushes (Purdy or Wooster)
- Small foam rollers
- Screwdriver (obviously)
- Painter’s tape
- Drop cloths
- Degreaser (TSP works great)
The Nice-to-Have Items
These aren’t essential, but they’ll make your life easier:
- Electric sander (your arms will thank you)
- Paint sprayer (if you’re feeling fancy)
- Cabinet door painting rack
- Work lights
- A good podcast playlist (seriously, you’ll be at this for a while)
Choosing Your Paint: The Decision That Haunts Every DIYer

Can we talk about paint for a second? Because this is where most people mess up royally. You can’t just grab any old paint off the shelf and expect professional results. Kitchen cabinets take more abuse than a punching bag at a boxing gym.
Paint Types That Actually Work
Alkyd paint used to be the gold standard, but honestly? It’s a pain to work with. It smells like you’re huffing chemicals (because you basically are), takes forever to dry, and yellows over time. Hard pass from me.
Water-based acrylic paint has come a long way, baby. Benjamin Moore Advance is my personal favorite—it self-levels like a dream and dries hard as nails. Sherwin Williams ProClassic is another solid choice. Both give you that smooth, professional finish without making your house smell like a chemical factory.
Milk paint or chalk paint might seem tempting if you’re going for that farmhouse vibe. But unless you want to spend your weekends touching up chips and dings, I’d skip these for kitchen cabinets. Save them for your furniture flips.
Color Selection: The Fun Part That Becomes Stressful
White cabinets are classic for a reason—they make your kitchen look bigger and brighter. But please, for the love of all that is holy, don’t just grab “white” paint. There are literally hundreds of whites, and picking the wrong one will haunt you every morning with your coffee.
My personal favorites? Benjamin Moore White Dove for a warm white, or Chantilly Lace if you want that crisp, clean look. Avoid pure white unless you want your kitchen looking like a hospital ward.
Going bold with color? I respect that. Navy blue cabinets are having a moment, and honestly, they look incredible with brass hardware. Just remember: dark colors show every speck of dust and fingerprint. Ask me how I know 🙂
The Prep Work: Where Dreams Go to Die (But Success Is Born)
Step 1: Empty Everything Out
This seems obvious, but you’d be surprised how many people think they can work around their dishes. Remove everything. Every. Single. Thing. Your kitchen is about to become a construction zone, and finding sawdust in your cereal bowl isn’t fun.
Step 2: Remove Cabinet Doors and Hardware
Here’s a pro tip that’ll save your sanity: number your doors and their corresponding cabinets. I use painter’s tape and write “1” on door one and “1” inside the cabinet frame. Why? Because even though all your doors look the same now, I guarantee they won’t all fit perfectly in each other’s spots.
Remove all hardware and put it in labeled bags. Even if you’re replacing it, you might need those screws. Don’t be the person making a hardware store run at 9 PM because you threw away a crucial screw.
Step 3: Clean Like Your Mother-in-Law Is Coming
Kitchen cabinets are gross. I don’t care how clean you think you are—there’s grease on those cabinets. Years of cooking splatters, steam, and mysterious sticky spots that seem to appear from nowhere.
Mix up some TSP (trisodium phosphate) solution and scrub every surface. Then wipe down with clean water and let everything dry completely. This step is boring, but skip it and your paint will peel faster than a bad sunburn.
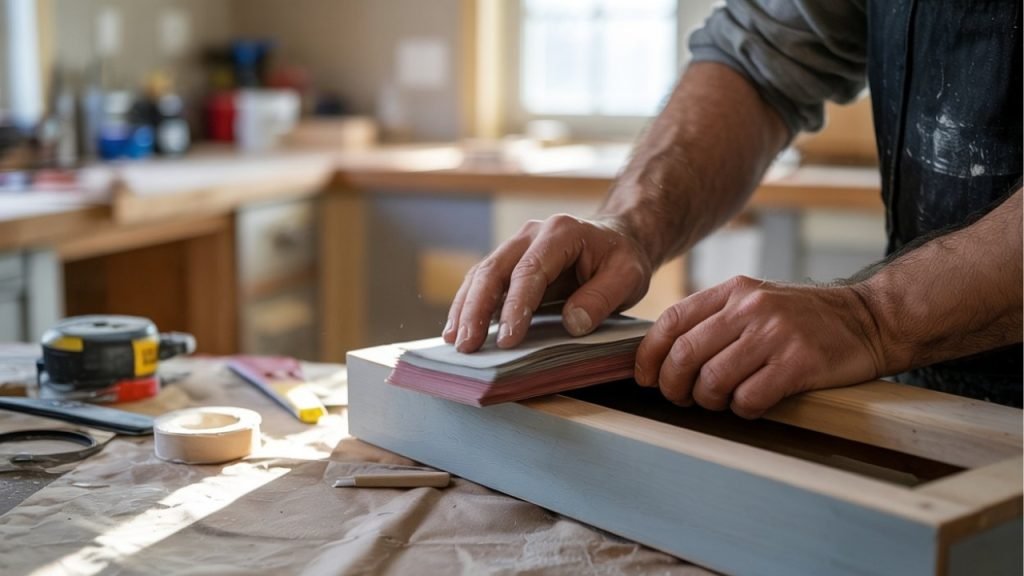
Step 4: The Sanding Marathon
Remember when I mentioned that electric sander in the nice-to-have list? Yeah, this is when you’ll wish you had one. You don’t need to sand down to bare wood (unless your cabinets have a glossy finish), but you do need to rough up the surface enough for primer to grip.
Start with 150-grit sandpaper and give everything a good once-over. Focus on any areas with dings or imperfections—now’s your chance to smooth those out. Don’t forget the edges and details where old paint might have built up over the years.
After sanding, wipe everything down with a tack cloth. Then do it again. Seriously, dust is the enemy of smooth paint jobs.
Also Read: 15 Stunning Black and White Kitchen Cabinets Ideas for Modern Homes
Prime Time: The Step Everyone Wants to Skip (Don’t You Dare)

I get it. You’ve already spent hours prepping, and now I’m telling you to add another step before you can even start painting? But here’s the truth: primer is the difference between a paint job that lasts and one that chips the first time someone slams a door.
Choosing Your Primer
Oil-based primers like Zinsser BIN are fantastic for covering stains and ensuring adhesion. They smell terrible and require mineral spirits for cleanup, but they work. If you’re painting over dark wood or have any staining issues, this is your best bet.
Water-based primers like KILZ 2 are easier to work with and don’t smell like death. They’re perfect for most situations, especially if you’re painting over previously painted cabinets.
Application Technique
Apply primer with a combination of brush and roller. Use the brush for details and edges, then immediately follow with a foam roller on flat surfaces. This technique gives you the coverage of a brush with the smooth finish of a roller.
Work in thin coats. I know you want to slap it on thick and be done with it, but restraint is key here. Two thin coats beat one thick coat every single time. Let the first coat dry completely (usually 2-4 hours) before applying the second.
The Main Event: Actually Painting Your Cabinets

The First Coat: Setting the Stage
Alright, this is what you’ve been waiting for! Time to crack open that beautiful can of paint and transform those cabinets. But hold your horses—there’s a method to this madness.
Start with the cabinet frames while your doors are drying somewhere else (ideally laid flat). Paint the inside edges first, then work your way out. Why? Because if you start with the visible surfaces, you’ll inevitably drag your brush through wet paint trying to reach the corners. Don’t ask me how many times I learned this lesson.
For the doors, I like to paint the backs first. Let them dry completely, flip them, then paint the fronts. This way, if there are any imperfections on the back (and there usually are when you’re learning), nobody’s gonna see them anyway.
The Brush and Roll Technique
Here’s my secret weapon: the brush and roll technique. First, brush the paint on in the direction of the wood grain (even if you can’t see it). Then, while the paint is still wet, lightly roll over it with a foam roller. This eliminates brush strokes and gives you that factory-smooth finish everyone’s after.
FYI, this technique takes some practice. Your first door might look a bit wonky, but by door number three, you’ll be rolling like a pro. Just remember: light pressure with the roller. You’re not trying to squeeze the paint out; you’re just smoothing what’s already there.
Between Coats: The Patience Game
Most paints need at least 4-6 hours between coats, but honestly? I wait overnight whenever possible. Sure, it extends the project timeline, but rushing leads to tacky paint, fingerprints, and tears of frustration.
Between coats, lightly sand with 220-grit sandpaper. And when I say lightly, I mean barely kissing the surface. You’re just knocking down any dust nibs or raised grain, not removing paint. Wipe clean with a tack cloth before applying the next coat.
The Second Coat: Where the Magic Happens
The second coat is where your cabinets really start looking professional. The primer and first coat have done the heavy lifting—now you’re just perfecting the finish.
Apply the second coat the same way as the first, but you might notice it goes on smoother and more evenly. That’s because you’ve already sealed the surface. This coat determines your final look, so take your time and maintain consistent pressure.
Ever notice how some painted cabinets look thick and goopy around the edges? That’s from paint buildup. Keep an eye on edges and details, using your brush to pull away excess paint before it dries.
To Three-Coat or Not to Three-Coat?
In a perfect world, two coats of quality paint over primer are enough. But let’s be real—we don’t live in a perfect world. If you’re going from dark to light, covering a bold primer mistake (we’ve all been there), or just not happy with the coverage, go for that third coat.
White and light colors especially might need three coats for full, even coverage. Dark colors usually get away with two. It’s not a failure if you need three coats; it’s just being thorough.
Also Read: 15 Stunning Antique White Kitchen Cabinets Ideas for Dream Kitchens
Hardware: The Jewelry of Your Kitchen
Keeping the Old or Going Bold?
Your old hardware might be perfectly fine—just needs some love. Soak it in warm soapy water, scrub with a toothbrush, and see what you’re working with. Bar Keepers Friend works miracles on tarnished metal. Sometimes that “dated” brass hardware just needs a good cleaning to look vintage-chic instead of just old.
But maybe you want a complete change? New hardware can transform the entire look of your cabinets. Going from traditional to modern? Swap those ornate pulls for sleek bar handles. Want farmhouse vibes? Black cup pulls are your friend.
The Great Hole Drilling Debate
If your new hardware doesn’t match the old holes (and it probably won’t), you’ve got decisions to make. You can fill the old holes and drill new ones, or find hardware that works with your existing setup.
Filling holes isn’t as scary as it sounds. Use wood filler, sand smooth, prime, and paint. Nobody will ever know those holes existed. Just make sure you measure seventeen times before drilling new ones. There’s no undo button on power tools.
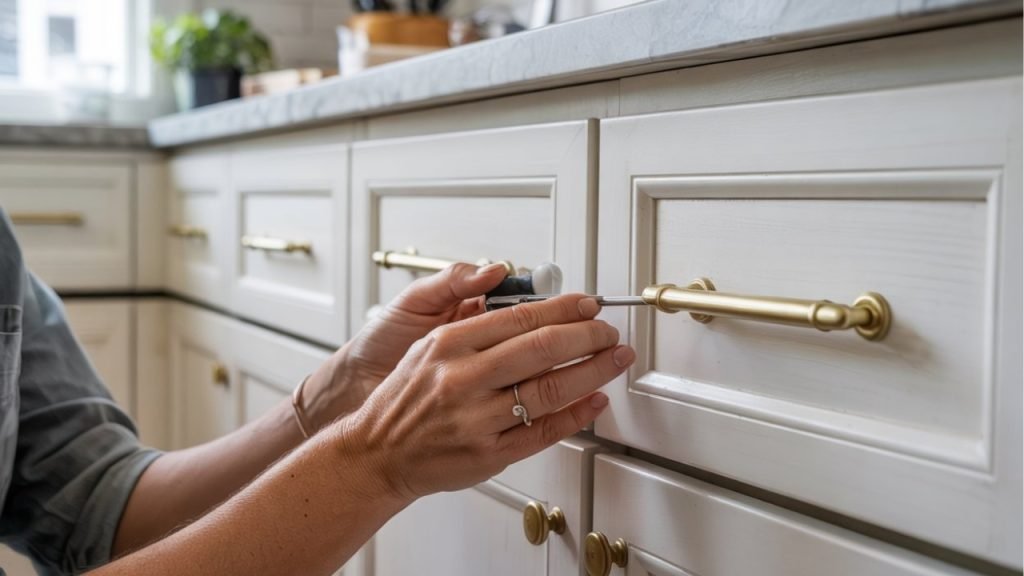
Installation Tips That’ll Save Your Sanity
Get yourself a cabinet hardware jig. Seriously, this $20 tool will ensure all your handles are perfectly aligned. Nothing screams “DIY disaster” like crooked cabinet pulls.
When installing, work systematically. Do all the left doors, then all the right doors, then drawers. This assembly-line approach means you’re less likely to miss something or install hardware upside down (yes, there’s a right way up for most pulls).
Reassembly: The Home Stretch
Letting Everything Cure
I know you’re dying to get your kitchen back together, but paint needs time to cure, not just dry. There’s a difference. Dry means it’s not tacky to the touch. Cured means it’s reached its full hardness and durability.
Most water-based paints need about 30 days to fully cure, but you can carefully reassemble after about a week. Just be gentle with your newly painted surfaces. No aggressive scrubbing or hanging cast iron pans on them just yet.
The Door Hanging Dance
Remember those numbers you wrote on tape? Time for them to shine. Start with the upper cabinets—they’re easier to align when you’re not bending over.
Here’s a trick: partially insert the top screw of the top hinge first. Let the door hang while you align it properly, then add the bottom screw of the top hinge. Now the door is supported while you work on the bottom hinge. This method prevents the “hold the door while fumbling with screws” dance that usually ends with dropped doors and creative profanity.
Adjusting for Perfection
Even with all your careful numbering, doors might need adjustment. Most modern hinges have built-in adjustment screws. A quarter turn here, a half turn there, and suddenly your doors line up like soldiers.
Don’t skip this step. Properly aligned doors make the difference between “nice DIY job” and “wait, you did this yourself?” Take the time to get everything sitting just right.
Troubleshooting: When Things Go Wrong (Because They Will)
Brush Strokes Showing
If you’re seeing brush strokes in your dried paint, you’re probably using too much pressure or your paint is too thick. Thin the paint slightly with water (10% max for water-based paints) or Floetrol. Also, upgrade your brush—cheap brushes leave marks no matter how skilled you are.
Paint Not Adhering
This usually means inadequate prep work. I hate to be the bearer of bad news, but you might need to sand more aggressively and re-prime. Skipping prep steps always comes back to haunt you. Consider it a learning experience (she says, trying to stay positive).
Yellowing White Paint
If your beautiful white cabinets start looking cream-colored after a few months, you probably used oil-based paint. Some oil-based paints yellow over time, especially in low-light conditions. Unfortunately, the only fix is repainting with a non-yellowing formula.
Also Read: 15 Stunning Green Kitchen Cabinets Ideas for a Stylish Home Makeover
Maintenance: Keeping Your Masterpiece Looking Fresh
The First 30 Days
Treat your cabinets like newborns for the first month. Gentle cleaning only—just a damp microfiber cloth. No harsh chemicals, no aggressive scrubbing, no hanging heavy items on the doors. The paint is still curing and building its full strength.
Long-Term Care
Once fully cured, your painted cabinets are pretty low maintenance. Clean with mild soap and water. Avoid abrasive cleaners or scrub pads—they’ll dull the finish over time.
Touch-ups are inevitable, especially in high-traffic areas. Keep some paint in a small jar for quick fixes. A small artist’s brush works great for touching up chips without having to repaint entire doors.
When to Call It Quits
Look, painted cabinets aren’t immortal. With good prep and quality materials, you should get 8-10 years before needing to repaint. If you’re touching up constantly or the finish is wearing through to wood, it’s time for round two.
The Reality Check: Is This Really Worth It?
Let me level with you. Painting kitchen cabinets is a labor of love. It’s messy, time-consuming, and will test your patience. You’ll question your life choices somewhere around hour 10 of sanding. Your kitchen will be chaos for at least a week, probably two.
But when you step back and see those gleaming cabinets that you transformed with your own hands? When you calculate that you saved enough money to take that vacation you’ve been dreaming about? When guests compliment your “new” kitchen? Totally worth it.
I’ve painted my kitchen cabinets twice now (different houses), and I’d do it again. The transformation is dramatic, the savings are real, and the satisfaction is unmatched. Plus, you’ll gain skills and confidence that’ll serve you in future projects.
Your Action Plan: Let’s Make This Happen
Ready to take the plunge? Here’s your weekend-by-weekend breakdown to keep you sane:
Weekend 1: Shop for supplies, remove doors, clean and start sanding
Weekend 2: Finish sanding, prime everything
Weekend 3: First coat of paint on everything
Weekend 4: Second coat (and third if needed)
Weekend 5: Reinstall hardware and doors
IMO, spreading it out like this makes the project manageable without burning out. Sure, you could marathon it in one long weekend, but why put yourself through that torture?
Final Thoughts: You’ve Got This
Painting kitchen cabinets isn’t just about saving money or updating your space. It’s about proving to yourself that you can tackle big projects. It’s about not settling for what you have when you can create what you want.
Will it be perfect? Probably not. Will you notice every tiny imperfection that nobody else can see? Absolutely. Will you bore your friends with detailed accounts of your painting process? Without a doubt.
But you’ll also have beautiful cabinets that you created, a kitchen that feels fresh and new, and the knowledge that you can handle whatever DIY project comes next. And honestly? That feeling is priceless.
So grab that sandpaper, queue up your favorite podcast, and get ready to transform your kitchen. Your future self will thank you every morning when you’re making coffee in your gorgeous “new” kitchen. Just remember—when friends ask who did the work, try to act humble when you tell them it was all you 😉
Now stop reading and start sanding. Those cabinets aren’t going to paint themselves, and the sooner you start, the sooner you’ll be showing off your handiwork. You’ve got this, and I can’t wait to see what you create!

