10 Beautiful Night Wedding Decor Ideas That Shine Bright
Picture this: the sun sets, stars begin twinkling overhead, and your wedding transforms into a magical wonderland of lights and shadows.
Night weddings hit different, you know? They bring this romantic, almost mystical vibe that daytime ceremonies just can’t match.
And honestly, after helping plan my sister’s evening celebration last year (and attending way too many weddings to count), I’ve become somewhat obsessed with nighttime wedding decor.
Let me share the 10 most stunning night wedding decor ideas that’ll transform your special day into something straight out of a fairy tale. Trust me, your Pinterest board is about to get a serious upgrade!
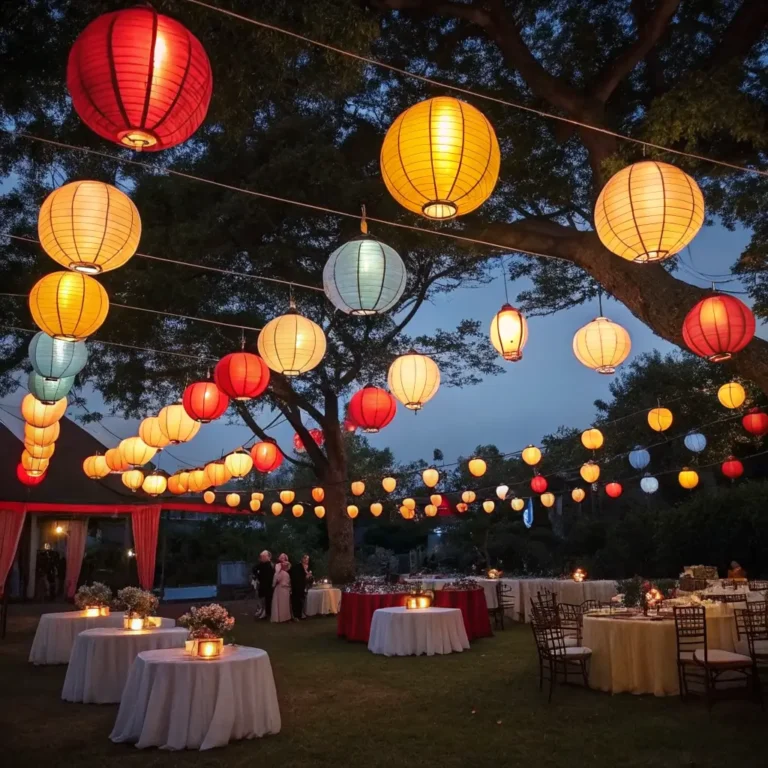
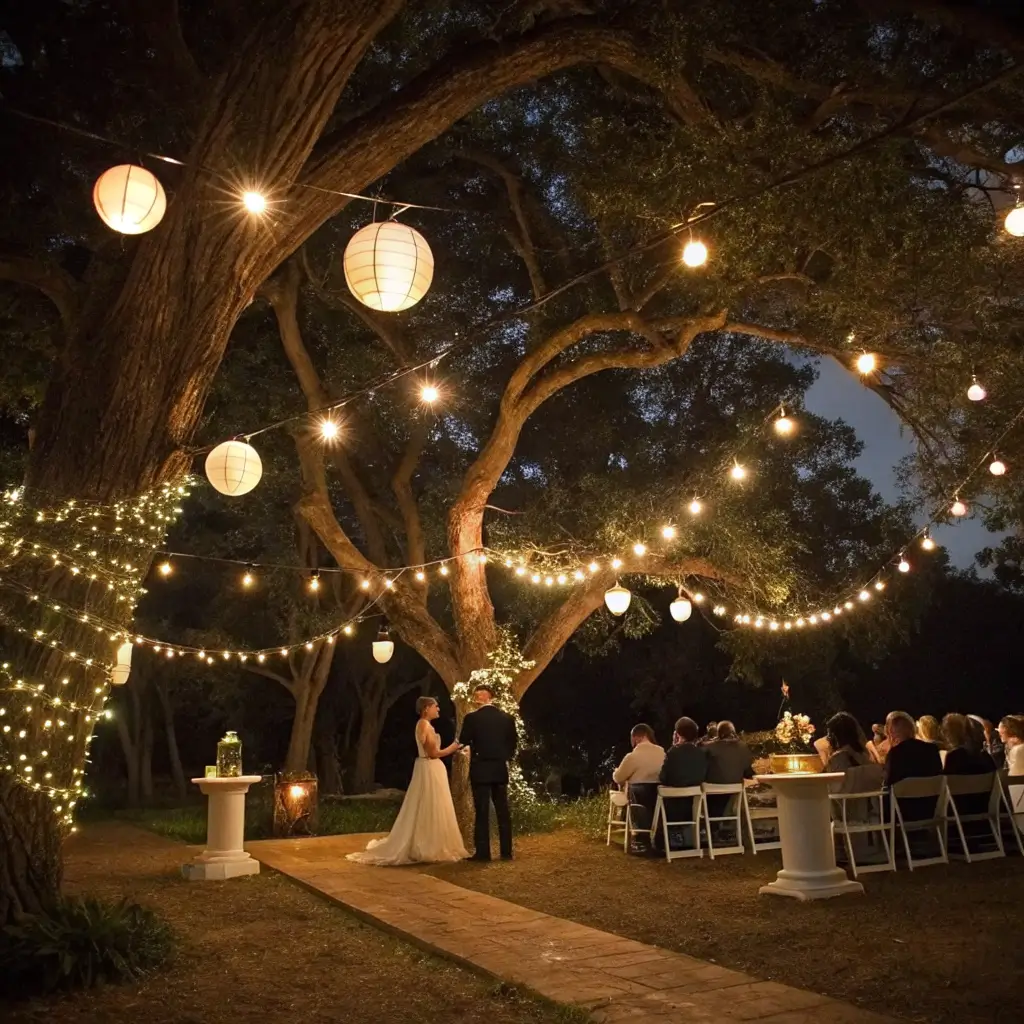
Fairy Light Canopy Over Dining Area

Have you ever walked into a reception and felt like you’ve entered another world? That’s exactly what a fairy light canopy does for your dining area. I remember walking into my cousin’s reception last summer – they’d strung thousands of warm white fairy lights across the entire ceiling, creating this intimate cocoon of sparkle above the tables.
The magic happens when you layer different lengths of string lights at varying heights. Start with a central focal point above the dance floor and let the lights cascade outward like a glowing web. You want that dreamy, starry-night effect without making it feel like Christmas threw up on your wedding (we’ve all seen those disasters, right?).
Creating the Perfect Fairy Light Layout
The key is using warm white LED lights rather than cool white ones. Warm lights create that romantic amber glow that photographs beautifully and doesn’t wash out your guests’ faces. I learned this the hard way when I helped with a friend’s wedding – cool white lights made everyone look like ghosts in the photos!
Consider mixing in some larger Edison bulbs every few feet to add visual interest. These bigger bulbs become anchor points that draw the eye upward and create depth in your canopy design. Plus, they give off this vintage vibe that works perfectly with both rustic and elegant themes.
Installation Tips That Actually Work
Here’s where things get practical. Secure your lights to sturdy anchor points – tent poles, beams, or specially installed hooks work best. Never, and I mean never, rely on just tape or lightweight adhesive. One strong breeze or enthusiastic dancer bumping a pole, and your magical canopy becomes a hazard.
Use clear fishing line or thin wire to create invisible support structures. This trick lets the lights appear to float magically above your guests. FYI, measure twice, hang once – nothing ruins the mood faster than having to rehang drooping lights during cocktail hour.
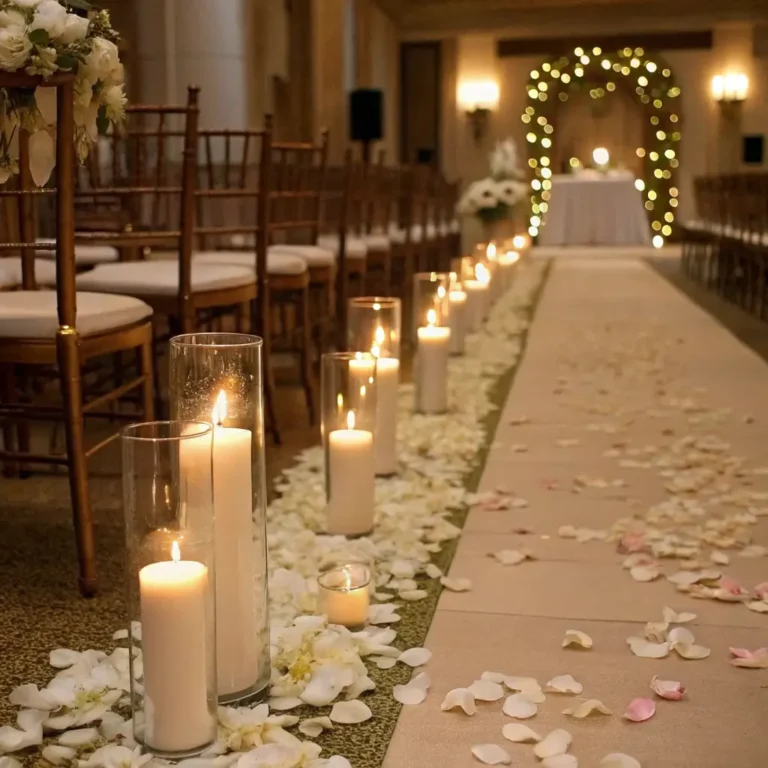
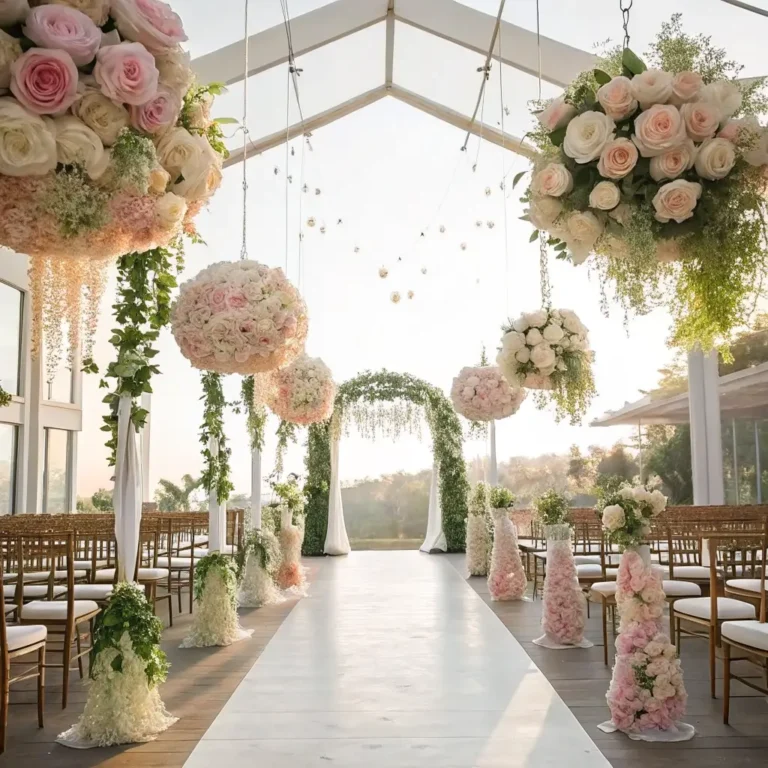
Candlelit Aisle with Lanterns

Walking down a candlelit aisle flanked by glowing lanterns feels like stepping into a romance novel. And before you worry about fire hazards (because someone always does), let me tell you about the amazing LED options available now that look incredibly realistic.
I’ve seen this done brilliantly at beach weddings where real candles would’ve been impossible. The couple used hurricane lanterns with battery-operated candles placed every three feet along the aisle. The flickering LED flames looked so real that guests kept trying to blow them out!
Choosing Your Lantern Style
Moroccan-inspired lanterns work phenomenally for bohemian or exotic themes. Their intricate cutout patterns cast the most beautiful shadows on the ground as guests walk by. Meanwhile, simple glass hurricane lanterns suit classic or beachy vibes perfectly.
Mix heights for visual interest – alternate between tall shepherd’s hooks with hanging lanterns and ground-level arrangements. This creates rhythm and movement that guides the eye (and the bride) down the aisle naturally.
Safety First, Romance Second
Let’s talk real talk for a second. If you’re determined to use real candles (and I get it, nothing beats that authentic flicker), invest in quality glass enclosures. Wind guards aren’t just suggestions; they’re necessities. Also, designate someone responsible to light them just before the ceremony and extinguish them immediately after.
Pro tip: LED candles with timers eliminate all the stress. Set them to turn on 30 minutes before the ceremony and off two hours later. No one has to remember anything, and you still get that romantic glow without Aunt Martha’s dress catching fire.
Glow-in-the-Dark Floral Arrangements
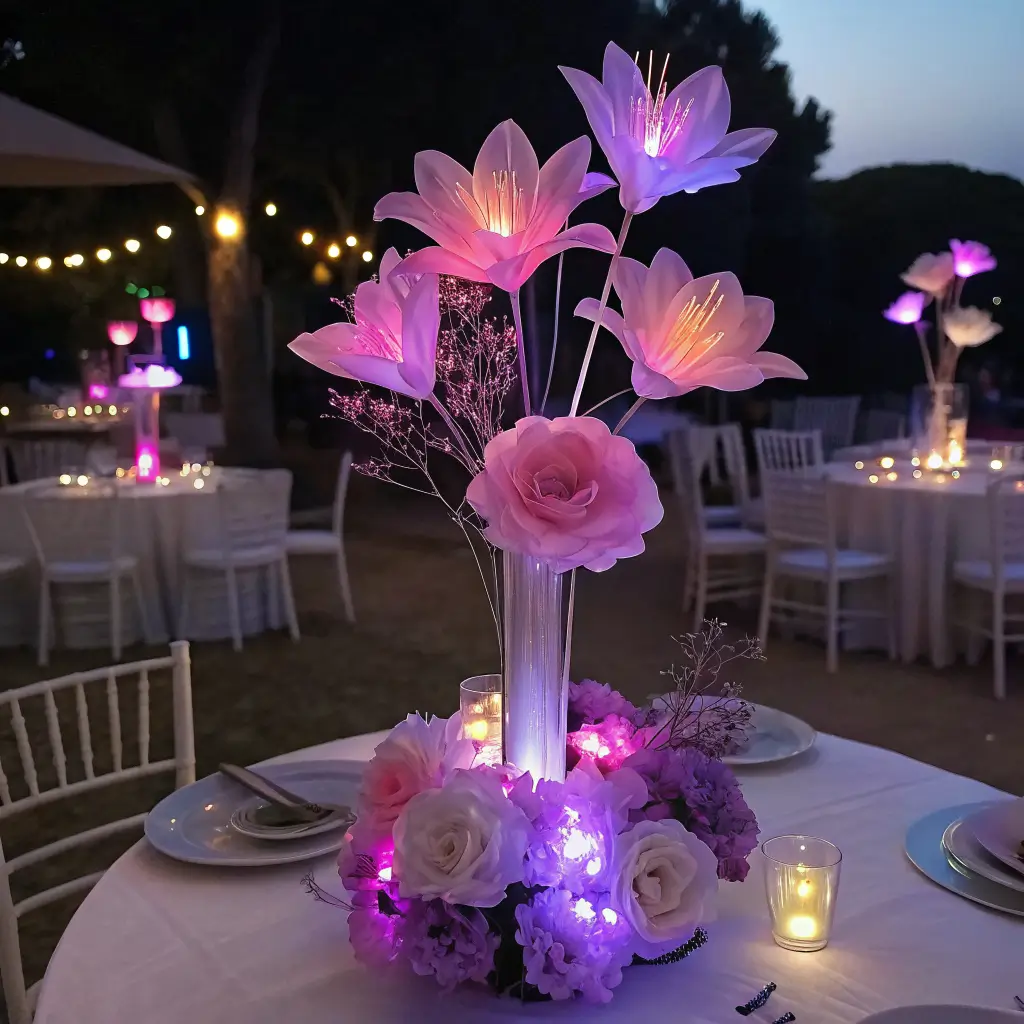
Okay, this one might sound crazy at first, but hear me out. Glow-in-the-dark flowers are having a serious moment, and they’re absolutely mesmerizing at night weddings. I’m not talking about those tacky neon paint jobs either – modern techniques create subtle, ethereal glows that look straight-up magical.
The trick involves using specialized UV-reactive spray on white flowers or incorporating fiber optic elements into arrangements. When the lights dim for dancing, these arrangements transform from beautiful to breathtaking. Imagine centerpieces that literally light up as the evening progresses!
Creating Natural-Looking Illuminated Blooms
Start with white or pale-colored flowers like roses, peonies, or orchids. These take the treatment best and maintain their elegant appearance during daylight hours. Apply a thin layer of UV-reactive coating (available at craft stores) and let it dry completely.
For a more subtle approach, tuck small LED wire lights within the arrangement. Wrap them around stems or weave them through greenery. The light filters through petals creating this soft, organic glow that photographs beautifully.
Placement Strategy for Maximum Impact
Position these special arrangements strategically throughout your venue. Place them at the entrance, on the sweetheart table, and as accent pieces on the bar. You don’t need every arrangement to glow – sometimes less really is more.
Consider creating a gradient effect where arrangements near the dance floor glow brightest, gradually fading to traditional florals in dining areas. This creates natural zones and helps transition between party spaces.
Also Read: 10 Elegant Simple Wedding Table Decor Ideas for Inspiration
Hanging Edison Bulb Installations
Edison bulbs scream industrial chic meets romantic elegance, and I’m completely here for it. These vintage-style bulbs create the perfect amount of ambient lighting while adding serious style points to any venue. Plus, they work equally well in barns, gardens, or modern loft spaces.
The best installations I’ve seen use varying bulb sizes and filament styles hung at different heights. Think of it as creating a 3D sculpture with light. One wedding I attended had them clustered above the bar area, and people literally couldn’t stop taking selfies there 🙂
Design Patterns That Pop
Create geometric patterns by running straight lines of bulbs across your space in a grid formation. Or go organic with random clustering that mimics constellation patterns. Both approaches work, but they give completely different vibes.
Dimmer switches are your best friend here. Start bright during dinner service, then gradually lower them as dancing begins. This transition helps shift the energy from formal dining to party mode without anyone really noticing.
Mixing Bulb Styles for Interest
Don’t stick to just one bulb type. Combine round globes, traditional Edison shapes, and tube lights for a collected-over-time feel. This eclectic mix prevents the installation from looking too manufactured or catalog-perfect.
Space them irregularly – some closer together, others with breathing room. This organic spacing creates visual rhythm and prevents that “hardware store display” look that nobody wants at their wedding.
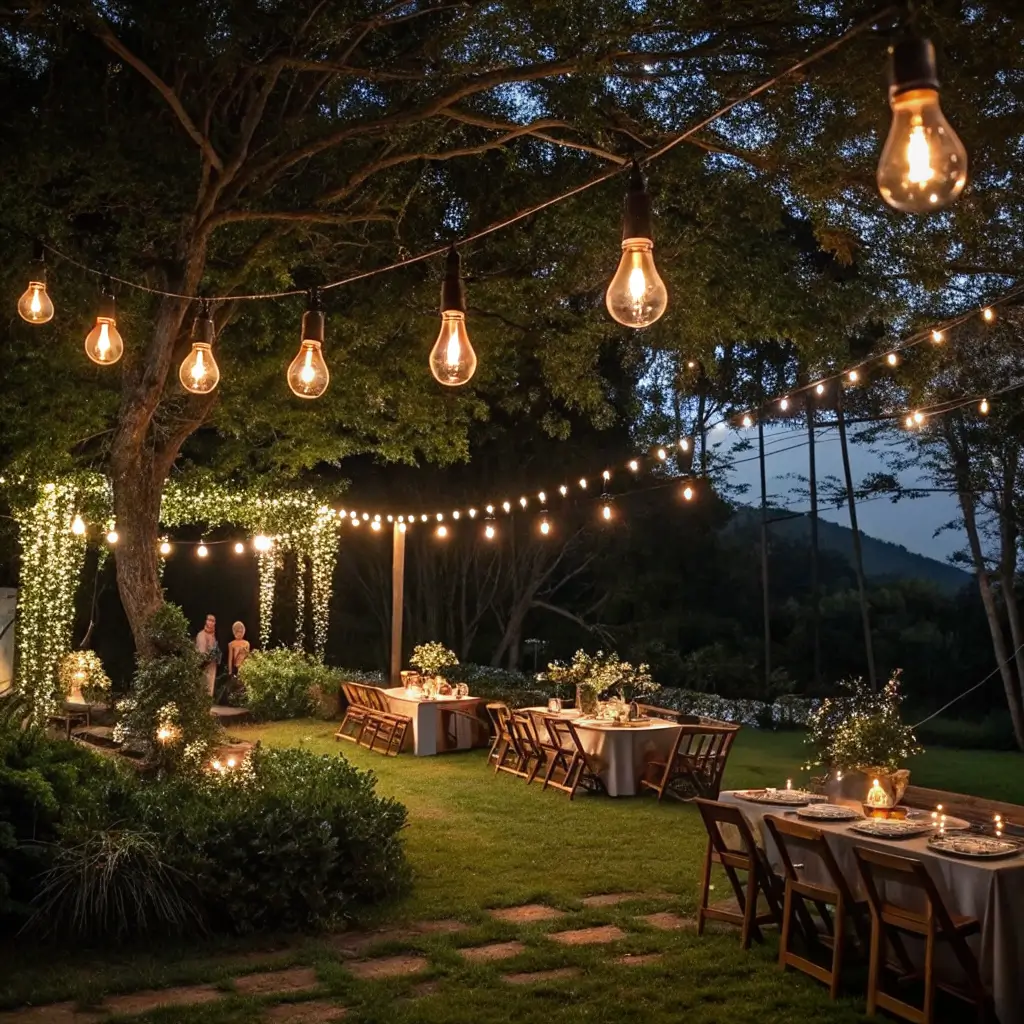
Twinkling String Lights on Trees
If you’re lucky enough to have trees at your venue, you’ve hit the outdoor lighting jackpot. Wrapping trees in string lights transforms any outdoor space into an enchanted forest that’ll have your guests feeling like they’ve stumbled into a fairy tale.
I helped wrap lights on 15 trees for my best friend’s backyard wedding, and let me tell you, the result was absolutely worth the ladder-climbing workout. We started from the ground up, wrapping trunks first, then moving to major branches. The key is maintaining consistent spacing – about 6 inches between wraps works perfectly.
Professional Wrapping Techniques
Start at the base with your plug end (seems obvious, but you’d be surprised how many people mess this up). Work your way up the trunk in a spiral pattern, keeping tension consistent but not too tight. Trees grow and move, so leave a little slack for wind movement.
For branches, follow the natural lines rather than forcing geometric patterns. Begin at the trunk and work outward, returning to wrap back if needed. This creates depth and dimension that flat, straight lines just can’t achieve.
Power Management Solutions
Real talk – power distribution is the biggest challenge with tree lighting. Extension cords become trip hazards faster than you can say “lawsuit.” Invest in outdoor-rated cords and cover them with cable protectors or bury them slightly under mulch.
Consider solar-powered options for trees farther from power sources. Modern solar strings stay bright for 6-8 hours, which covers most reception timelines. Just make sure they get full sun during the day for maximum brightness at night.
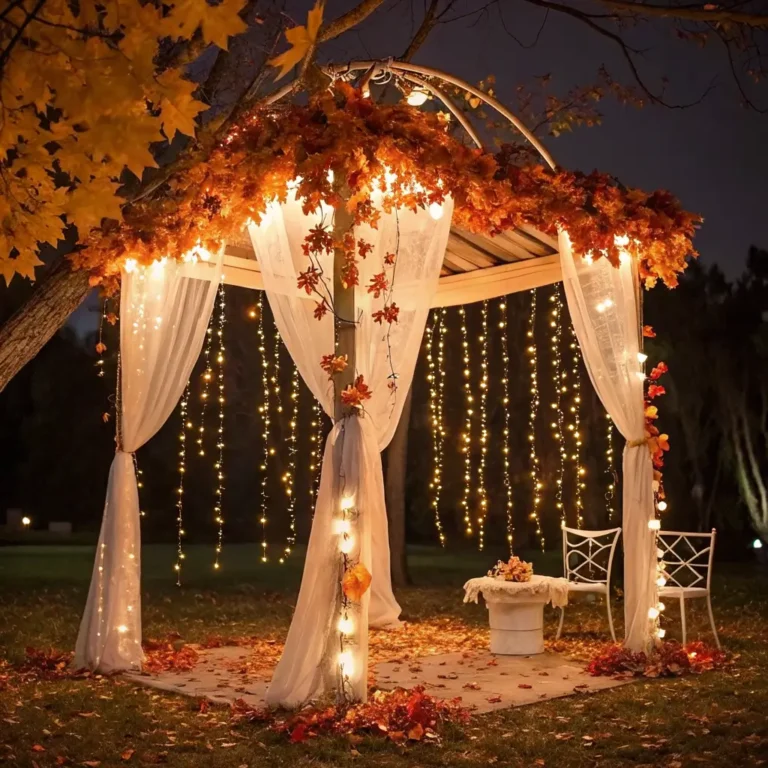
Illuminated Wedding Arch with Drapes
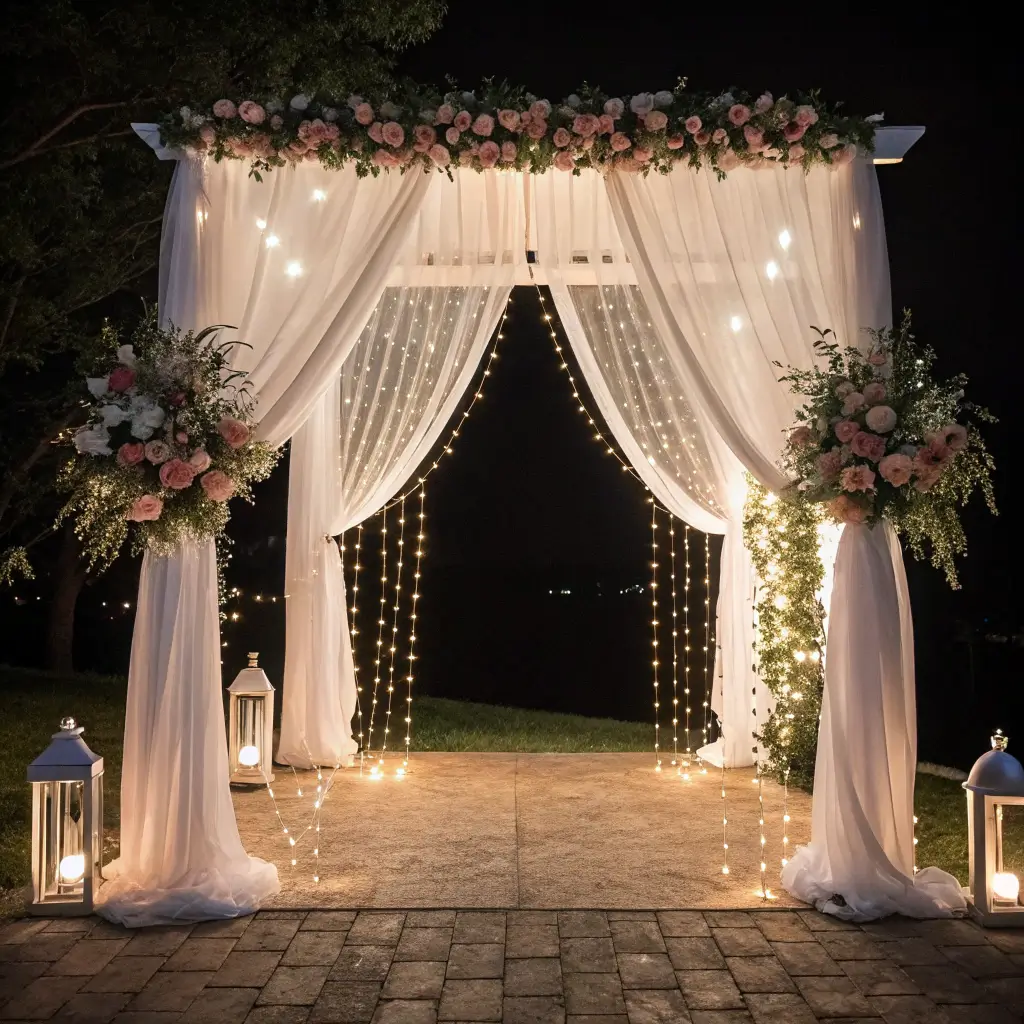
Your ceremony arch becomes the ultimate focal point when the sun goes down, so why not make it absolutely spectacular? An illuminated arch with flowing drapes creates this dreamy backdrop that makes every photo look like it belongs in a bridal magazine.
The combination of soft fabric and strategic lighting creates depth and movement that static decorations just can’t match. I’ve seen couples literally gasp when they see their illuminated arch for the first time – it’s that impactful.
Fabric Selection for Light Play
Choose lightweight, semi-sheer fabrics that allow light to filter through. Chiffon, organza, or tulle work beautifully. These materials create this ethereal glow when backlit and move gracefully in the evening breeze.
Layer different fabric opacities for depth. Start with sheer panels closest to the lights, then add progressively heavier layers moving outward. This creates a gradient effect that photographs incredibly well from every angle.
Lighting Placement Strategies
Uplight from the base using LED spotlights to wash the fabric in color. You can match your wedding colors or stick with warm white for a classic look. Hidden lights behind the arch create a halo effect that makes the whole structure seem to glow from within.
Weave micro LED strings through the draping for extra sparkle. These tiny lights look like captured fireflies when the fabric moves. IMO, this detail alone can elevate a simple arch into something truly magical.
Also Read: 10 Gorgeous Thrifted Wedding Decor Ideas for a Chic Celebration
Neon Wedding Signs with Personalized Messages
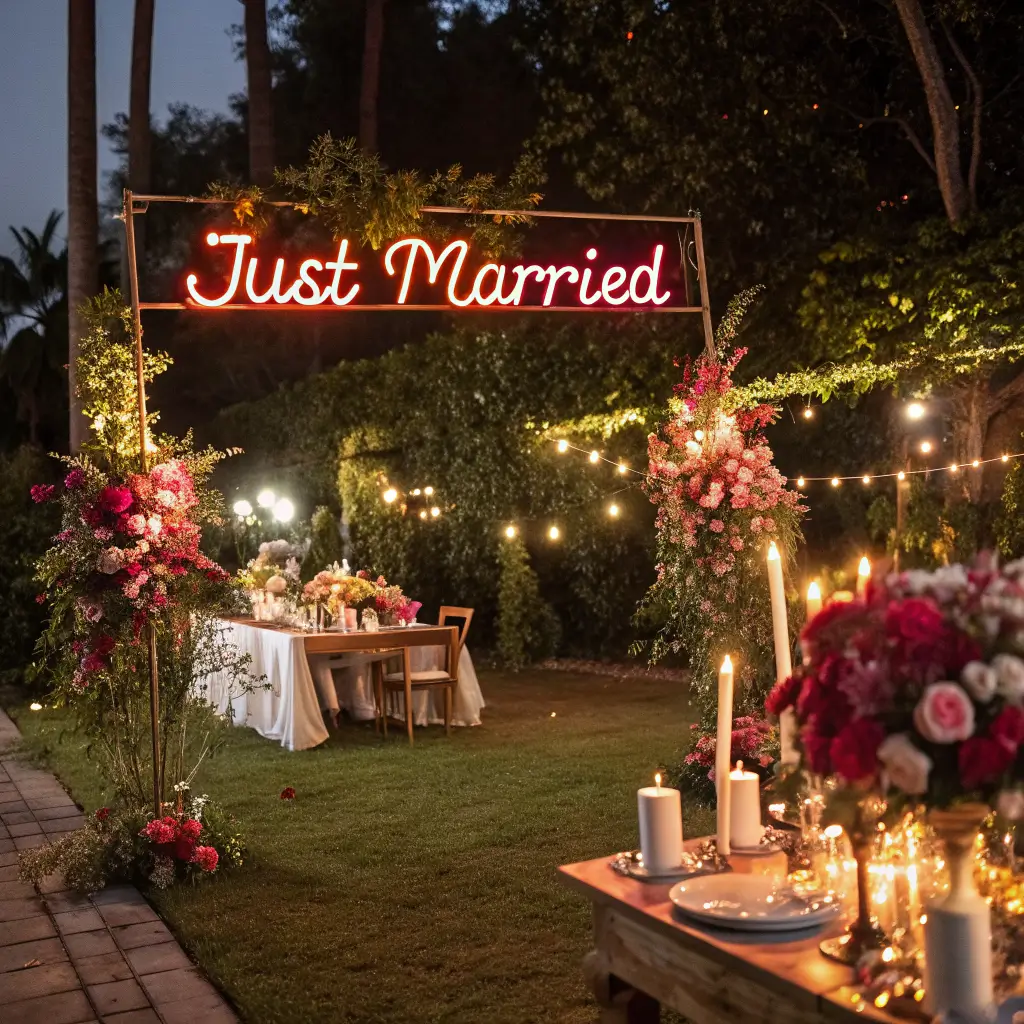
Neon signs have exploded in popularity, and honestly, I totally get why. They add this cool, modern edge while still being completely romantic. Plus, you can literally say whatever you want – from your names to inside jokes that’ll make your friends laugh.
Custom neon signs serve double duty as both decor and photo ops. Every wedding I’ve attended with a neon sign has it featured in approximately 500 Instagram posts. That’s not even an exaggeration – these things are social media gold!
Choosing Your Message
Keep it personal but timeless. “Better Together” or your wedding date work great, but “Till Death Do Us Party” might feel cringey in your anniversary photos years later. Although, if that’s your vibe, own it completely!
Consider multiple smaller signs instead of one giant one. Place them strategically – behind the bar (“Drunk in Love”), near the dance floor (“Let’s Dance”), or at the entrance (“Welcome to Our Beginning”). This creates multiple photo opportunities and spreads the visual interest around.
Color Selection and Placement
Warm white or soft pink neon creates the most flattering light for photos. Avoid harsh blues or greens unless they’re specifically part of your color scheme. These cooler tones can make skin look washed out in pictures.
Mount signs at eye level or slightly above for the best visual impact. Behind the sweetheart table or above the bar are perfect spots. Just ensure they’re securely mounted – a falling neon sign definitely kills the vibe.
Floating Candle Centerpieces on Water
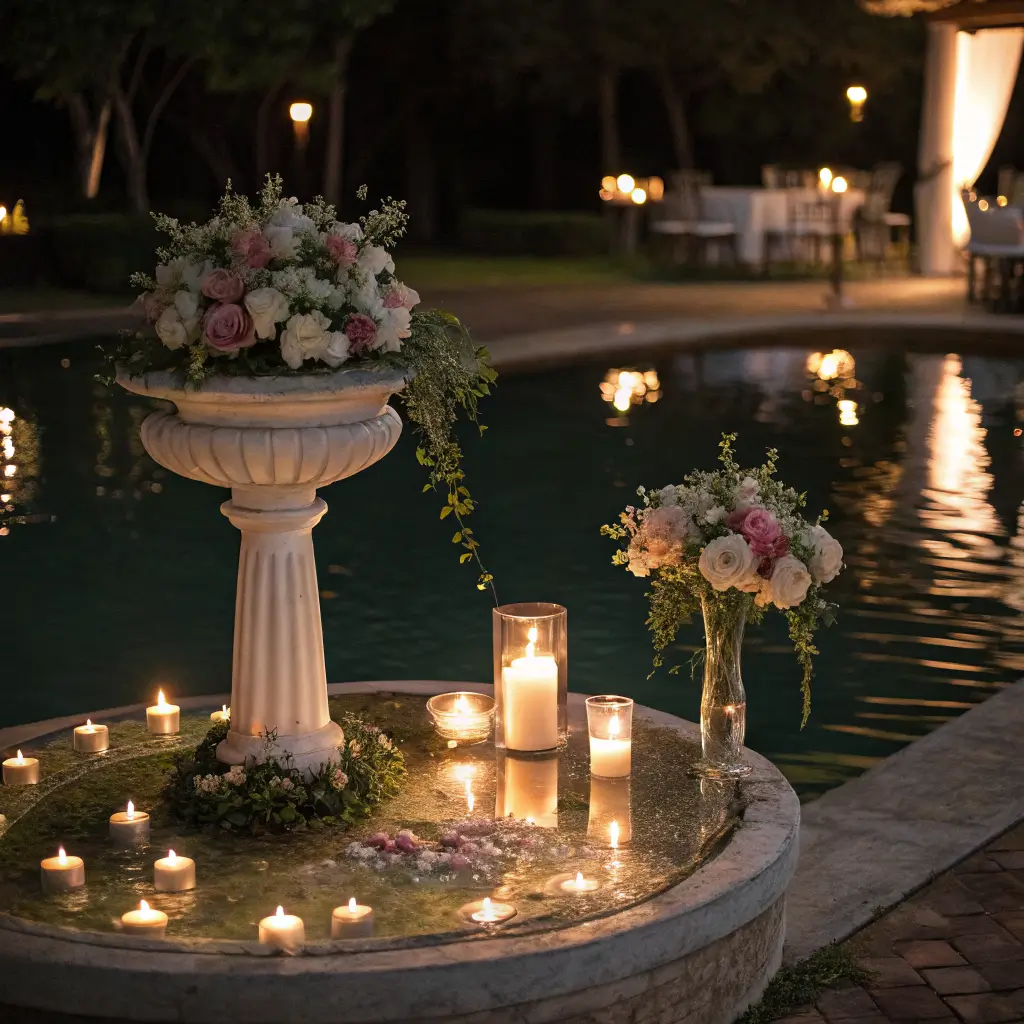
There’s something absolutely hypnotic about candles floating on water. The gentle movement, the reflected light, the way flames seem to dance on the surface – it creates this zen-like atmosphere that grounds the whole reception.
I discovered this at a lakeside wedding where they had oversized glass bowls with floating candles and flower petals. The reflection doubled the light output without adding more actual candles. Genius, right? Plus, the water acts as a safety barrier, which venue coordinators love.
Container Selection Matters
Choose wide, shallow bowls over tall vases. This maximizes the water surface area and creates better stability. Clear glass shows off the water beautifully, but colored glass can add an extra design element if that fits your theme.
Mix container sizes on each table. A large central bowl surrounded by smaller ones creates visual hierarchy and prevents that “everything’s the same size” monotony that can make tables look flat.
Adding Extra Elements
Float flower heads alongside candles for color and texture. Orchids, roses, and gardenias work particularly well because they’re sturdy enough to last all evening. Add a few drops of food coloring to tint the water subtly if you want to match your color scheme.
Consider submersible LED lights at the bottom of bowls for extra glow. These create an under-lighting effect that makes the whole arrangement seem to glow from within. Just make sure they’re fully waterproof – learned that lesson the hard way :/
Lantern Pathway Leading to Ceremony
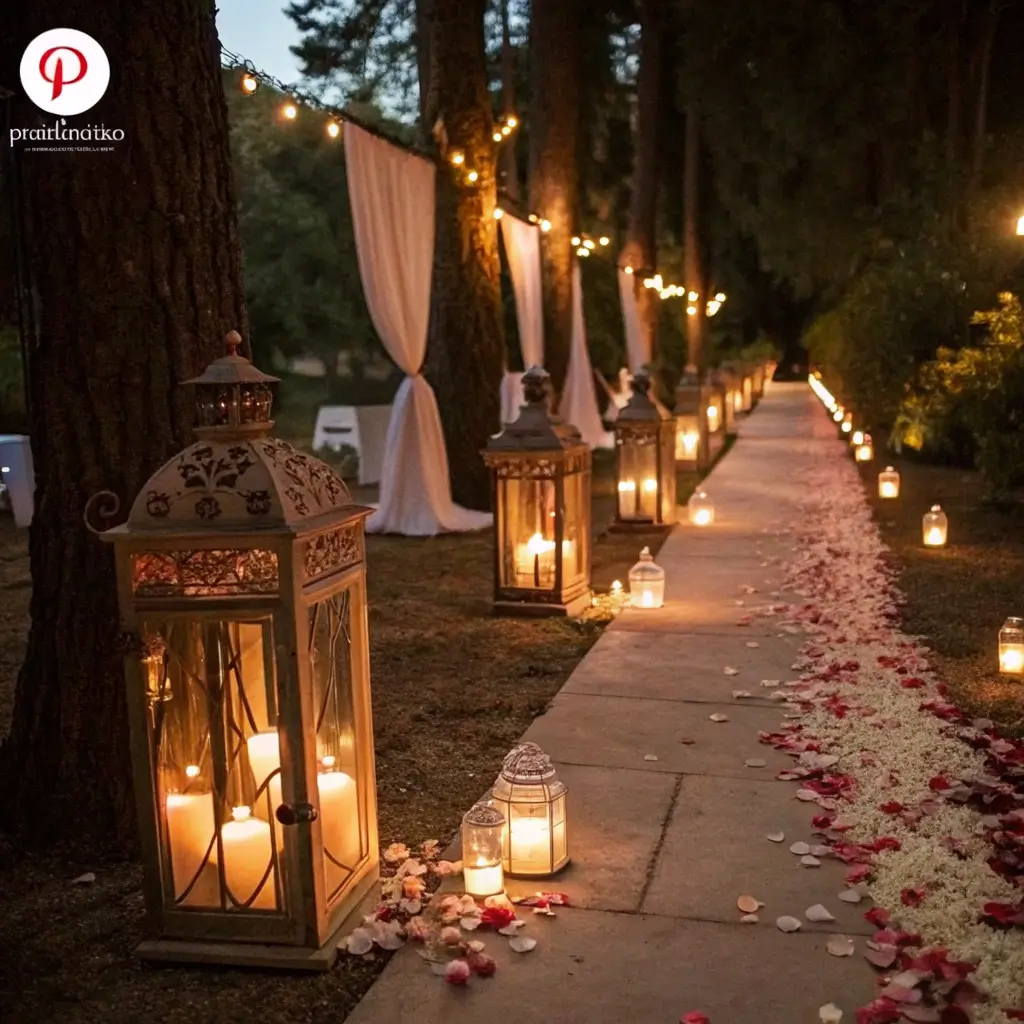
Creating a illuminated pathway with lanterns doesn’t just look amazing – it actually serves a practical purpose. Guests know exactly where to go, and nobody’s stumbling around in the dark looking for their seats. Win-win!
The most stunning pathway I ever saw used graduated sizes of lanterns, starting small at the parking area and growing larger as you approached the ceremony site. This created this sense of building anticipation that had everyone excited before the ceremony even started.
Spacing and Arrangement
Place lanterns every 4-6 feet along the path for consistent lighting. Closer spacing creates more drama but also requires more lanterns (and budget). Alternate sides of the path to create a gentle zigzag pattern that guides the eye forward.
Use shepherd’s hooks at varying heights to add vertical interest. Ground-level lanterns mixed with hanging ones create layers that make the pathway feel more substantial and designed rather than just functional.
Weather-Proofing Your Design
Weighted bases are non-negotiable for standing lanterns. Sand, decorative stones, or water in the base prevents tipping. Nothing ruins the ambiance faster than lanterns bowling over like dominoes in a breeze.
Choose lanterns with secure closures and sturdy construction. Those pretty but flimsy decorative lanterns from the craft store won’t survive an outdoor evening. Invest in quality pieces that can handle some weather – your nerves will thank you.
Also Read: 10 Stunning Luxury Wedding Decor Ideas for a Dream Celebration
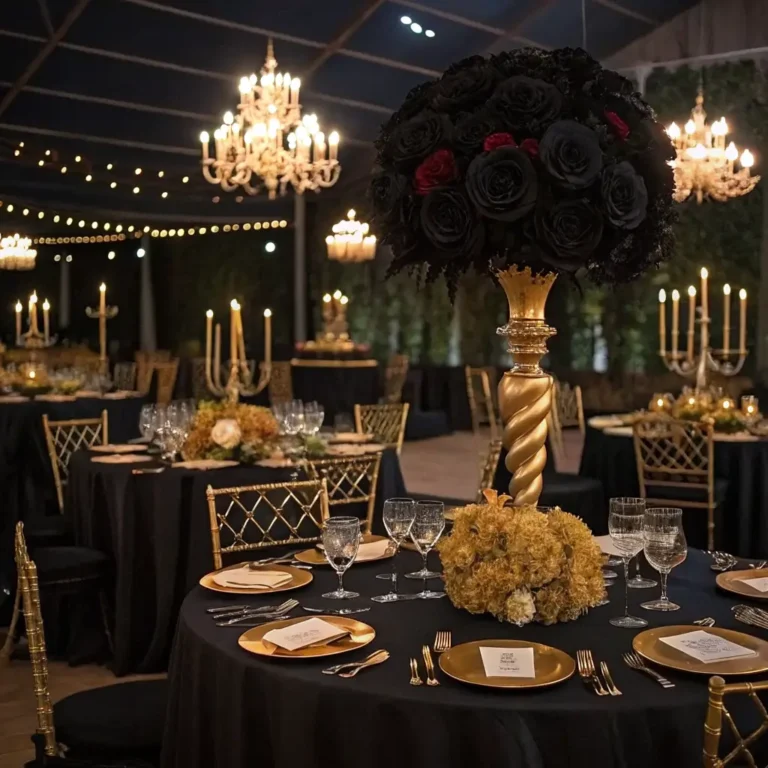
Crystal Chandeliers in Outdoor Tents
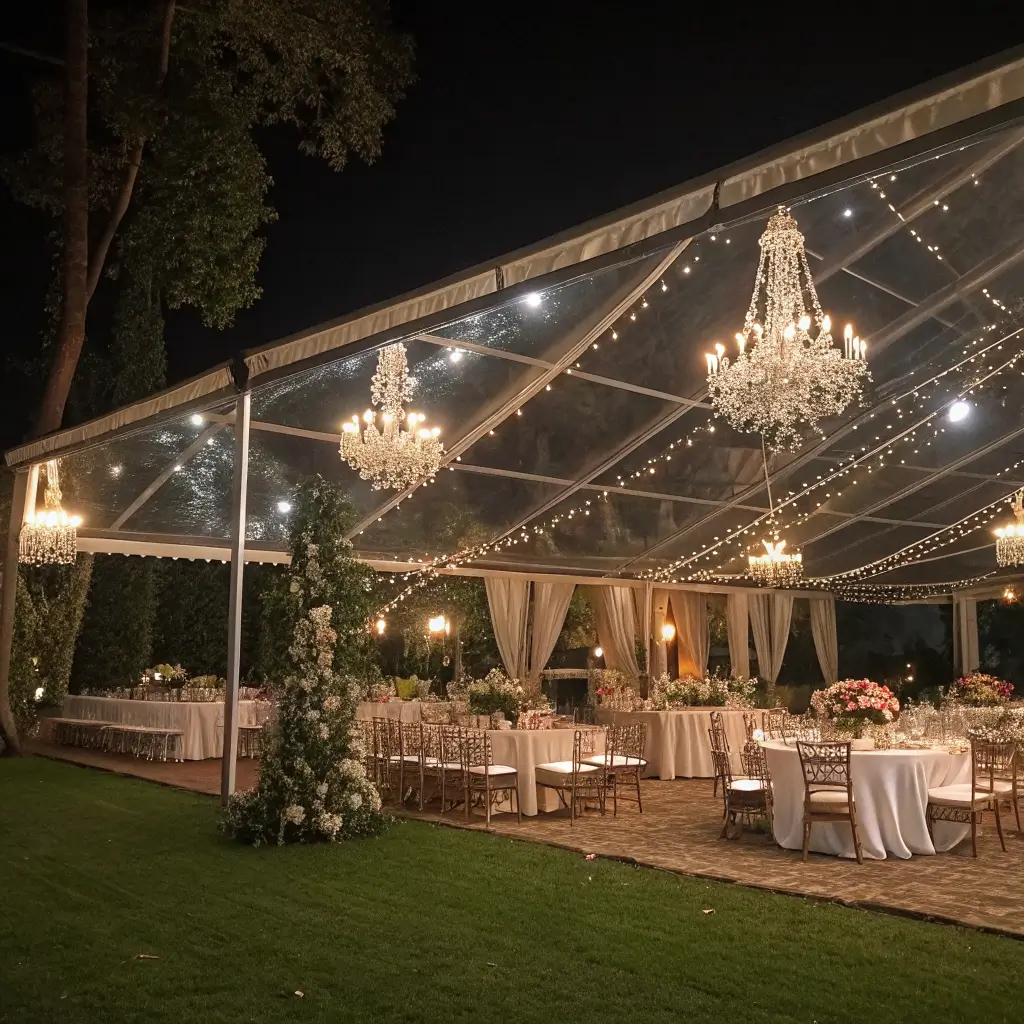
Who says chandeliers are just for ballrooms? Hanging crystal chandeliers in outdoor tents creates this incredible juxtaposition of rustic and elegant that makes everyone stop and stare. It’s unexpected, it’s gorgeous, and it photographs like a dream.
The first time I saw this done properly, my jaw literally dropped. They had three massive chandeliers running down the center of a clear-top tent, and when the sun set, those crystals caught every bit of light and scattered it like diamonds. Absolutely breathtaking!
Structural Considerations
Check your tent’s weight capacity before committing to chandeliers. Real crystal is heavy, and you need proper support structures. Many tent companies offer reinforced beams specifically for hanging installations – use them!
Consider acrylic crystal alternatives if weight is a concern. Modern acrylic crystals look incredibly realistic and weigh a fraction of real crystal. Your guests won’t know the difference, but your tent poles definitely will.
Mixing Chandelier Styles
Don’t feel locked into matching chandeliers. Mixing styles and sizes creates a collected, eclectic feel that’s very on-trend. Combine traditional crystal with more modern geometric designs for an updated look.
Add LED candle bulbs rather than standard bulbs for that authentic candlelit chandelier glow. The flickering effect adds movement and life to the crystals. Plus, they use less power, which matters when you’re running everything off generators.
Height and Placement Strategy
Hang chandeliers high enough that your tallest guest won’t hit their head when standing (obviously), but low enough to create intimate atmosphere zones. Generally, 8-9 feet from floor to bottom of chandelier works perfectly.
Create a dramatic focal point by clustering smaller chandeliers over specific areas like the dance floor or sweetheart table. This draws attention to important spaces and helps define different zones within your tent.
Bringing It All Together
Night wedding lighting isn’t just about visibility – it’s about creating an atmosphere that transforms your venue into something extraordinary. Every single one of these ideas can stand alone, but the real magic happens when you layer different lighting elements together.
Think about how your lighting tells your story throughout the evening. Start subtle during cocktails, build drama for your entrance, create intimacy during dinner, then pump up the energy for dancing. Your lighting should evolve as your reception progresses.
Remember, you don’t need to implement every idea to create something spectacular. Pick the elements that resonate with your style and venue. Sometimes two or three well-executed lighting concepts trump trying to do everything at once.
Most importantly, test everything before the big day if possible. Visit your venue at night, try different placements, and take photos with your phone to see how things photograph. What looks amazing in person might wash out on camera, and vice versa.
Your night wedding has the potential to be absolutely magical. With the right lighting design, you’ll create an atmosphere that your guests will talk about for years. And trust me, when you see your space transformed by beautiful lighting as the stars come out above, you’ll understand why night weddings are so incredibly special.
Now go forth and light up your love story – literally! Your Pinterest board is calling, and those string lights won’t hang themselves. Here’s to creating a night that shines as bright as your future together!