15 Brilliant Outdoor Kitchen DIY on a Budget Ideas for Small Yards
So you want an outdoor kitchen but your wallet’s giving you the side-eye? Trust me, I get it. Building an outdoor cooking space doesn’t have to mean taking out a second mortgage or selling your firstborn.
After spending way too many weekends tinkering with backyard projects (and making plenty of mistakes along the way), I’ve discovered that the best outdoor kitchens often come from creativity, not cash.
Here’s the thing – you can absolutely create an amazing outdoor cooking space without breaking the bank. Whether you’re working with pallets, cinder blocks, or that pile of random materials in your garage, there’s a budget-friendly solution waiting to happen. Ready to transform your backyard into a culinary paradise? Let’s get cooking!
15 Brilliant Outdoor Kitchen DIY on a Budget Ideas
Pallet Outdoor Kitchen Design
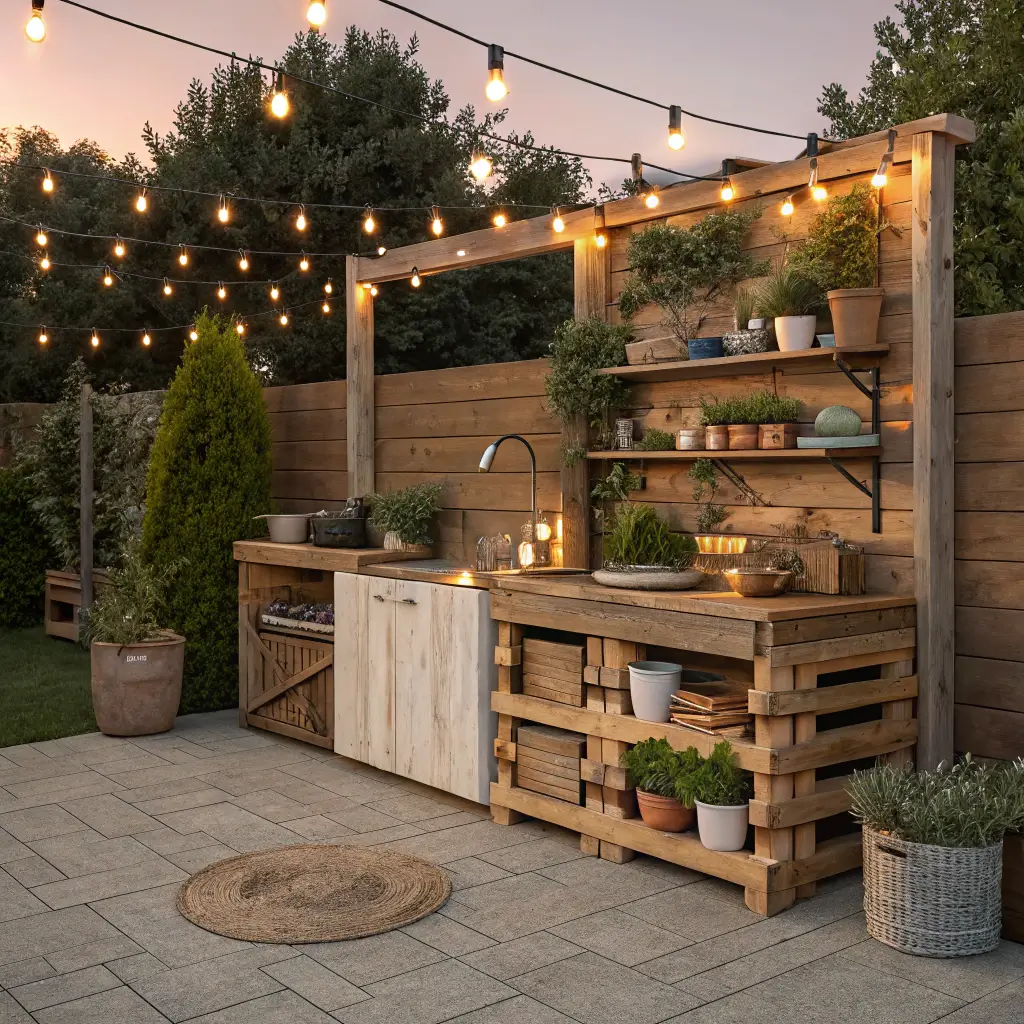
Who knew those wooden shipping pallets could become the backbone of your outdoor kitchen? I stumbled onto this idea when a neighbor was literally throwing away perfectly good pallets. Now, three years later, my pallet kitchen is still going strong (and gets compliments at every BBQ).
The beauty of pallets lies in their versatility. You can stack them for instant counter height, break them down for custom shelving, or keep them intact for a rustic industrial vibe. Start by sourcing heat-treated pallets – look for the “HT” stamp, not the chemical-treated ones. Local businesses often give these away for free. Score!
Here’s what makes pallet kitchens work so well:
- Free or dirt-cheap materials (seriously, check Craigslist)
- Natural wood aesthetic that ages beautifully
- Modular design – rearrange whenever you want
- Perfect height for prep stations when stacked
The trick is treating the wood properly. Sand those rough edges, apply a weather-resistant sealant, and boom – you’ve got countertops that’ll last for years. I added some heavy-duty casters to mine, making the whole setup mobile. Game changer for party hosting, FYI.
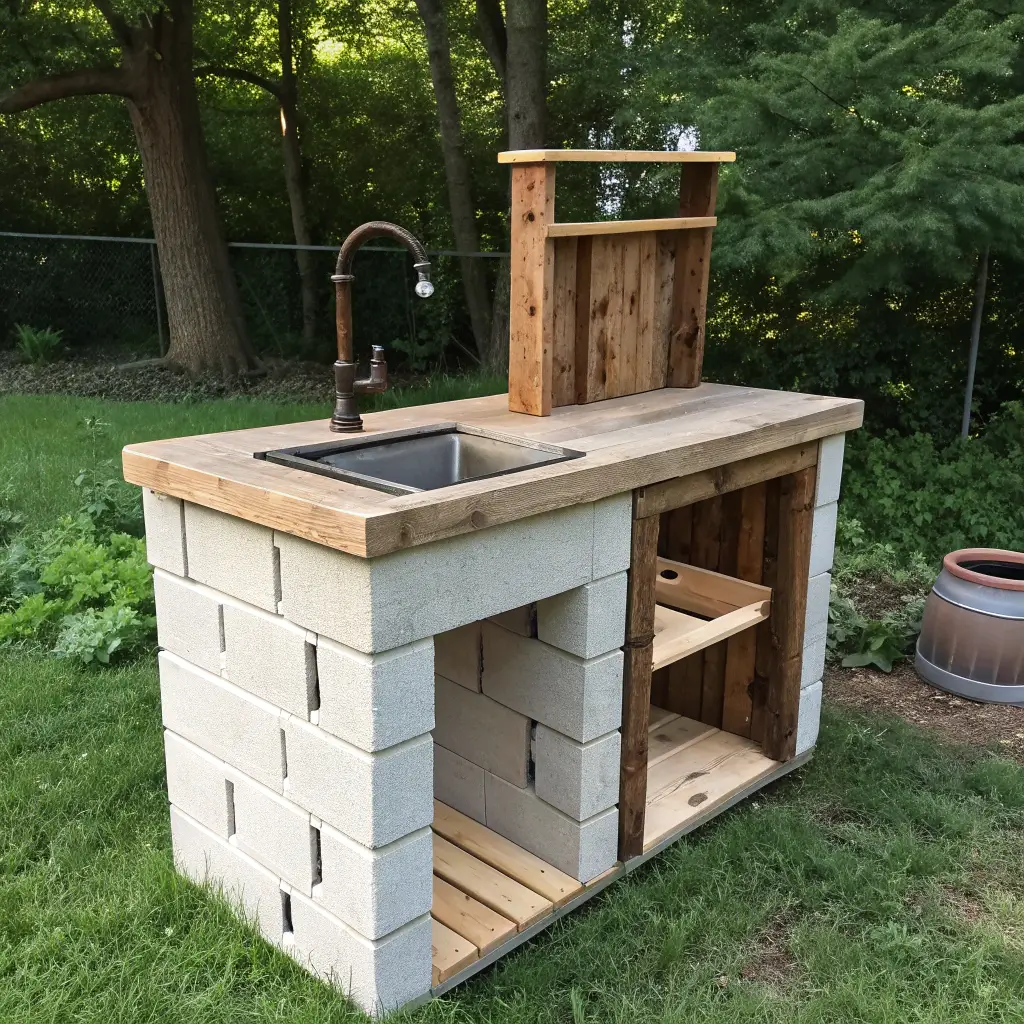
Cinder Block BBQ Station
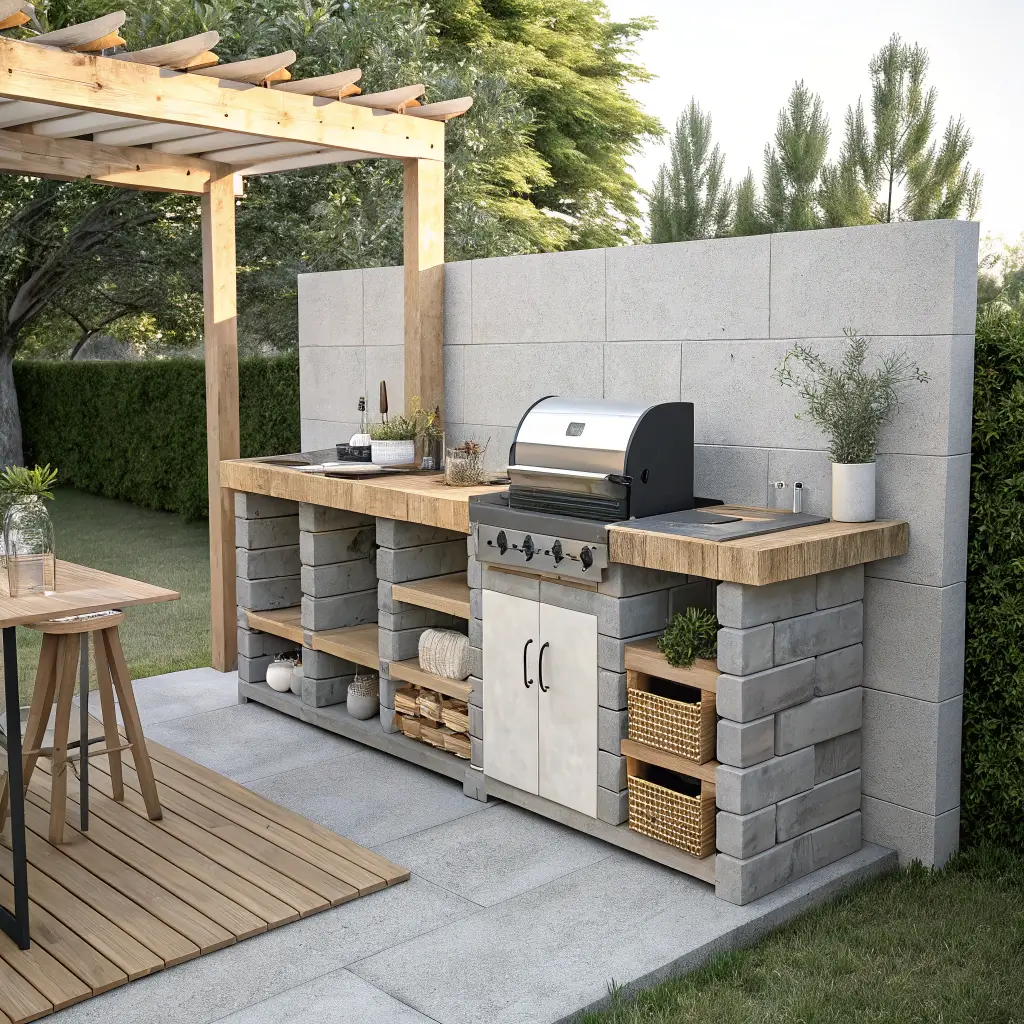
Remember playing with blocks as a kid? Well, this is basically the grown-up version, except now you’re building something that cooks meat. Cinder blocks are the unsung heroes of DIY outdoor kitchens – they’re cheap, sturdy, and surprisingly good-looking when done right.
My first cinder block station took exactly one afternoon to build. No mortar, no special tools, just strategic stacking. The blocks cost me about $1.50 each at the hardware store, and I needed maybe 30 for a decent-sized station. Do the math – that’s less than what you’d spend on a fancy dinner out.
The setup process couldn’t be simpler:
- Level your ground (this step matters more than you think)
- Stack blocks in a U-shape or straight line
- Add a wooden or concrete top for your work surface
- Insert your grill and you’re golden
Want to get fancy? Paint those blocks! I’ve seen people create stunning designs with outdoor paint. One friend went full Mediterranean with terracotta paint and mosaic tiles on top. The transformation from basic blocks to boutique kitchen was mind-blowing.
Small Space Outdoor Kitchen Setup
Living in a shoebox apartment or dealing with a postage-stamp yard? Join the club. My first “outdoor kitchen” was literally a 4×4 foot corner of a tiny patio. But here’s what I learned – constraints breed creativity.
Think vertical, my friend. Wall-mounted shelves, hanging utensil racks, and fold-down prep tables become your best allies. I installed a simple pegboard system that holds everything from spatulas to spice containers. Total cost? Under $50, and it freed up precious counter space.
Multi-functional furniture is key in small spaces:
- Storage benches that double as seating
- Nesting tables for expandable prep space
- Collapsible side tables for the grill
- Over-the-rail planters for fresh herbs
The secret sauce? Keep it simple. You don’t need every gadget – just the essentials arranged smartly. My tiny setup handles everything from morning coffee to full dinner parties. Sometimes less really is more 🙂
Also Read: 15 Stunning Outdoor Kitchen DIY Ideas for Your Backyard Makeover
Portable Outdoor Kitchen on Wheels
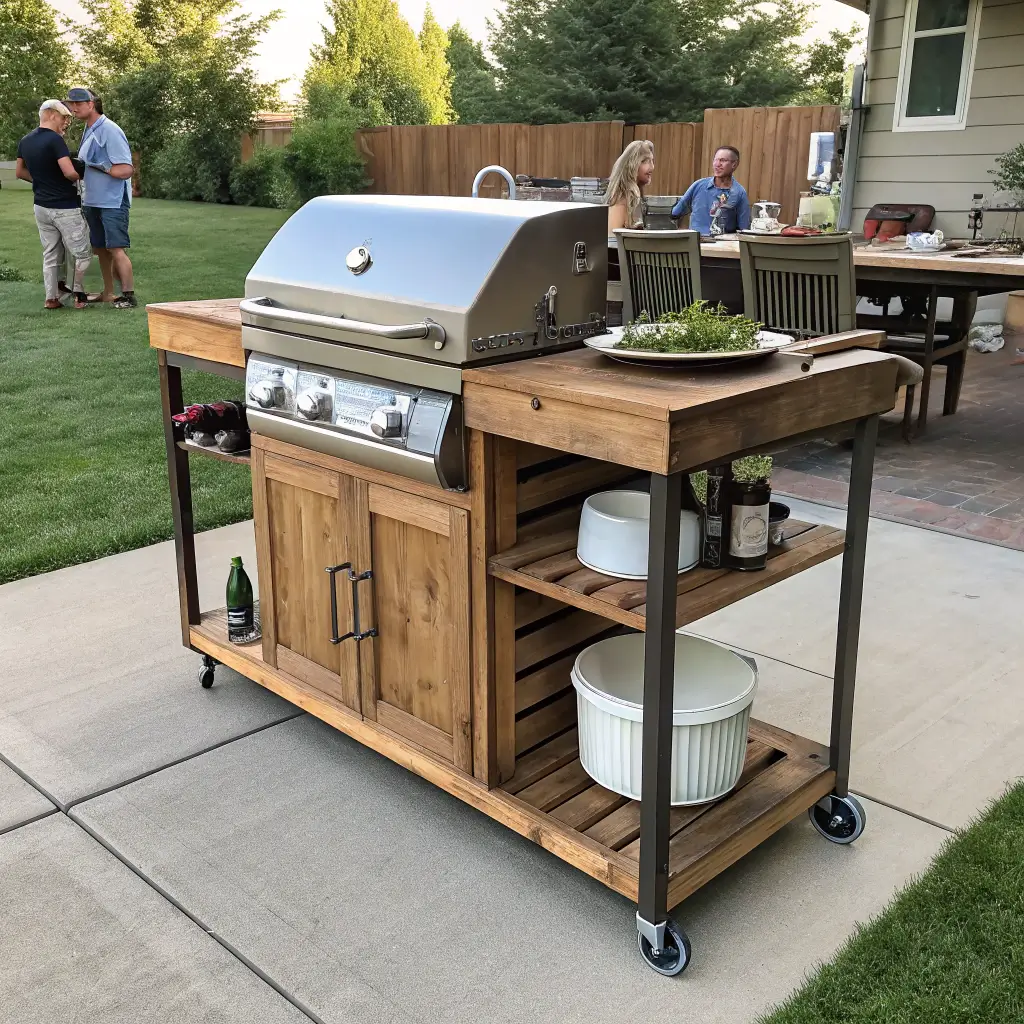
Ever wished you could just wheel your kitchen wherever the party’s happening? That’s exactly why I built my rolling outdoor kitchen. Mobility changes everything – suddenly you’re not stuck cooking in one spot while everyone else has fun across the yard.
Start with a sturdy cart base. Old metal carts from restaurant supply stores work brilliantly (check auction sites). Add some beefy casters rated for outdoor use – don’t cheap out here, trust me. I learned that lesson when my first set literally fell apart mid-BBQ.
Here’s my portable setup breakdown:
- Heavy-duty utility cart as the foundation
- Butcher block top for prep space
- Side hooks for tools and towels
- Lower shelf for propane tank storage
- Magnetic strips for knife storage
The whole thing rolls smoothly from storage to patio to poolside. During winter, it lives in the garage, protecting my investment from the elements. Smart, right?
Budget-Friendly Brick Oven DIY

Pizza ovens seem fancy, but building one doesn’t require an engineering degree or trust fund. My brick oven cost less than $300 and makes pizza that rivals any restaurant. The secret? Firebricks from a demolition site and YouTube University.
Start small – you don’t need a massive dome oven to make great pizza. A simple rectangular design works perfectly for beginners. Source your firebricks from salvage yards or renovation sites. Many contractors will let you haul away old bricks for free.
The basic construction involves:
- Creating a solid foundation (concrete pavers work great)
- Building a floor with firebricks
- Constructing walls leaving space for the opening
- Adding a simple chimney for smoke escape
Temperature control takes practice, but that’s half the fun. My first pizzas were… let’s say “artistically charred.” Now I can crank out perfect Neapolitans in 90 seconds. The learning curve is worth it, IMO.
Outdoor Kitchen with Recycled Materials
One person’s trash becomes your outdoor kitchen treasure. I’ve built entire cooking stations from materials destined for the dump. Recycling isn’t just eco-friendly – it’s budget-friendly too.
My current setup features countertops made from an old door, shelving from discarded warehouse racking, and a sink salvaged from a kitchen remodel. The whole thing has this industrial-chic vibe that store-bought kitchens can’t match.
Great recycled materials to hunt for:
- Old doors for instant countertops
- Granite remnants from countertop shops
- Restaurant equipment from closing businesses
- Barn wood for rustic touches
- Metal roofing for backsplashes
The hunt becomes addictive. Every garage sale, demolition site, and curbside pile holds potential. Just last week, I scored a stainless steel prep table someone was tossing. One person’s renovation debris = my new kitchen upgrade.
Also Read: 15 Stunning Outdoor Kitchen Ideas and Stylish Backyard Designs
Low-Cost Countertop Alternatives
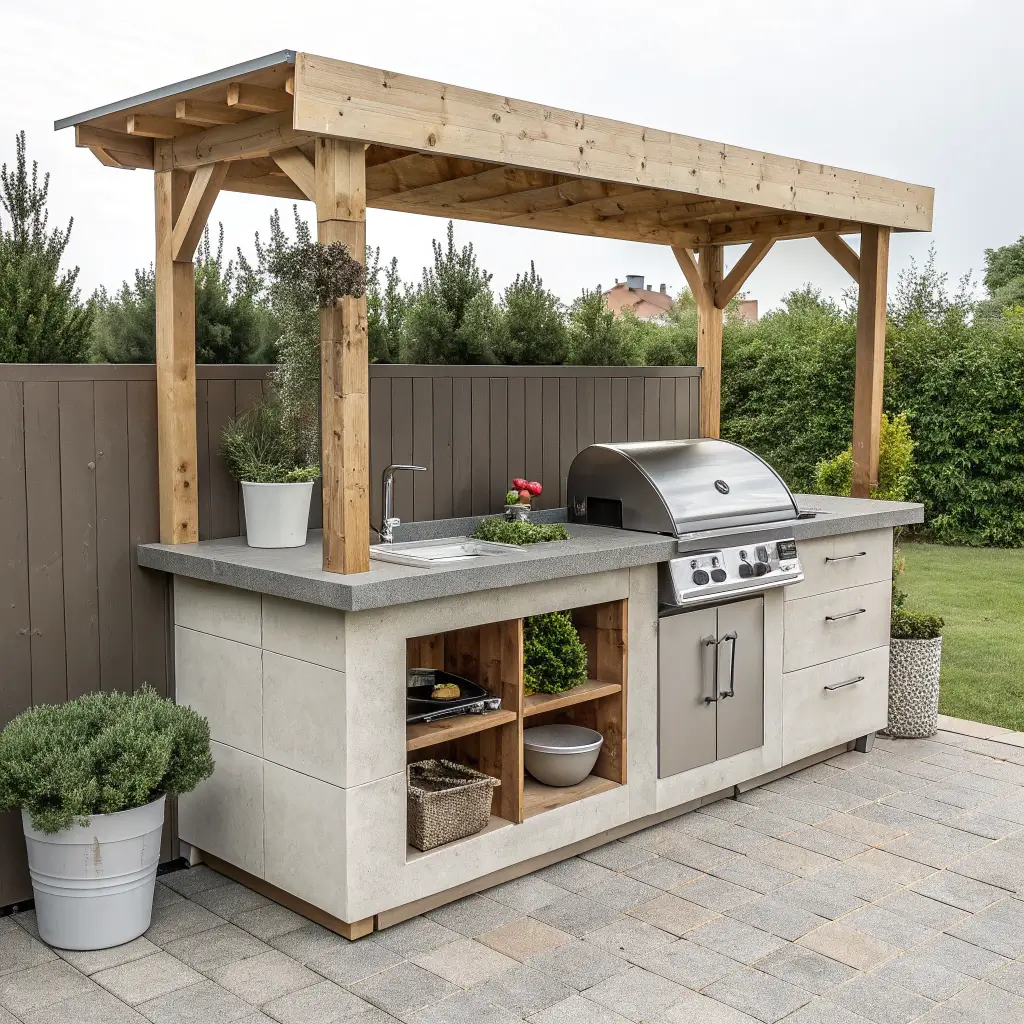
Granite countertops? In this economy? Please. There are dozens of budget alternatives that look amazing and won’t require a payment plan. My favorite discovery? Concrete countertops you can pour yourself.
For about $100 in materials, you can create custom concrete counters that look like they cost thousands. Mix, pour, sand, seal – it’s surprisingly straightforward. Add some color pigment or embedded stones for that custom touch. Mine have held up to three years of weather and abuse.
Other wallet-friendly options include:
- Butcher block from restaurant supply stores
- Tile over plywood (mosaic designs rock)
- Sealed wood slabs from lumber yards
- Stainless steel sheets over wood base
- Composite decking boards
Each option brings its own aesthetic. Butcher block adds warmth, tile offers endless design possibilities, and stainless steel screams professional kitchen. Pick what matches your vibe and budget.
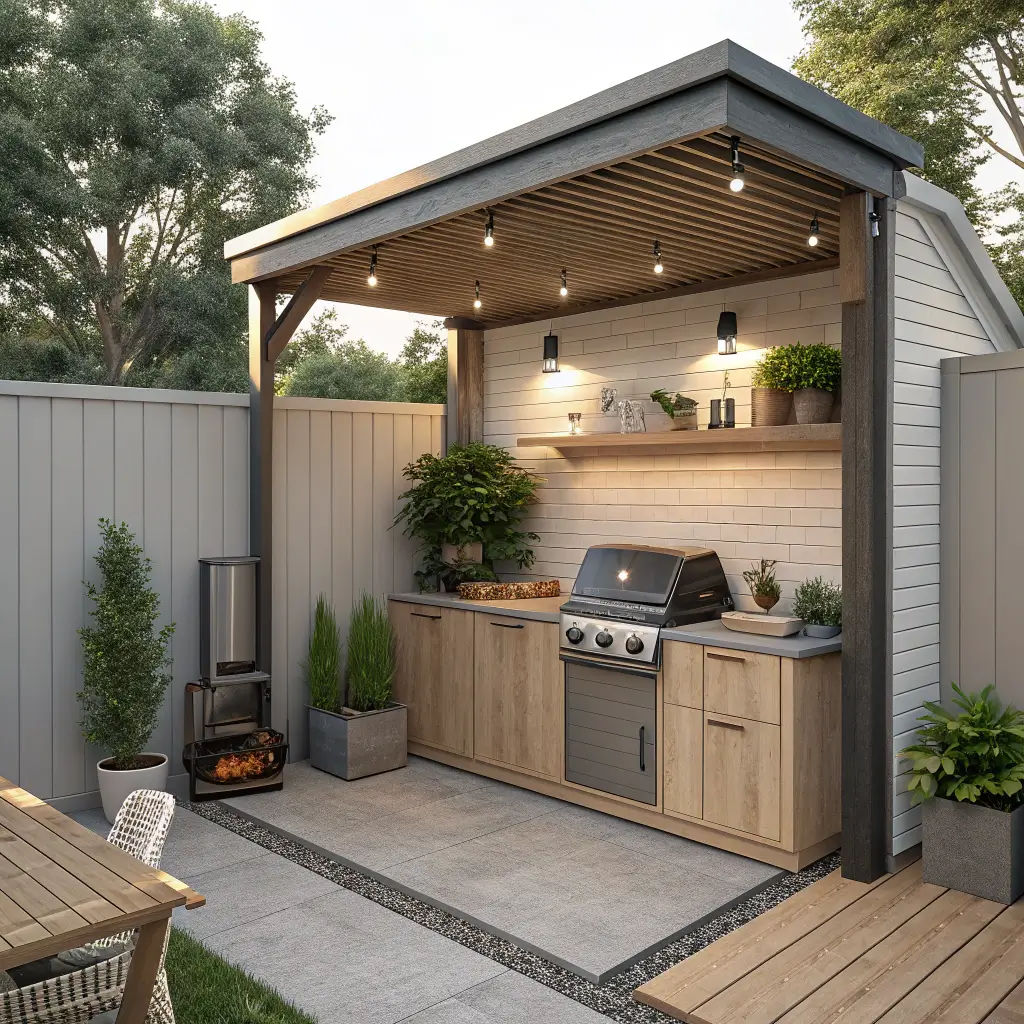
Backyard Grill Station Under $500
Think you need thousands for a decent grill station? Think again. My entire setup cost $487, including the grill itself (found on end-of-season clearance). The key is knowing where to spend and where to save.
Start with the grill – watch for sales in late summer when stores clear inventory. I snagged a $400 grill for $200. Then build around it using budget materials. Simple wooden frames, concrete blocks, or even sturdy shelving units create the structure.
Here’s my under-$500 breakdown:
- Clearance grill: $200
- Lumber for frame: $100
- Concrete blocks: $50
- Plywood and sealant: $75
- Hardware and accessories: $62
The result? A station that looks custom-built but cost less than a smartphone. Add some hooks for tools, a towel bar, and maybe a bottle opener (priorities!), and you’re set for years of grilling glory.
DIY Rustic Outdoor Kitchen
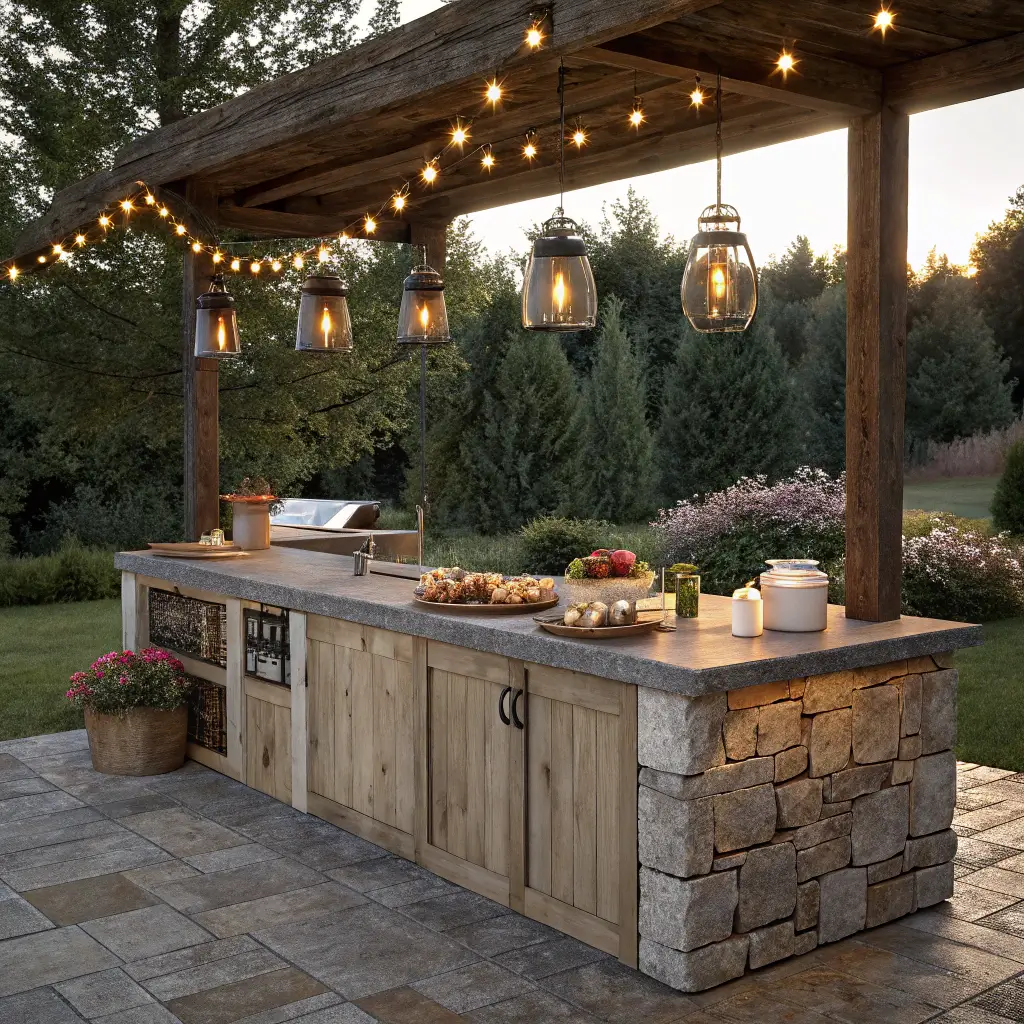
Rustic doesn’t mean rough – it means character. My rustic kitchen gets more compliments than any fancy setup I’ve seen. There’s something about weathered wood and raw metal that just works outdoors.
The foundation of rustic design is imperfection. That salvaged barn wood with nail holes? Perfect. The slightly wonky handmade shelves? They add charm. This style celebrates the handmade, the weathered, the authentic.
Essential rustic elements:
- Reclaimed wood for every surface possible
- Cast iron fixtures and hardware
- Natural stone accents
- Vintage signs or decor
- Edison bulb string lights
I built my counters from old fence boards and topped them with sealed pine. The whole setup looks like it’s been there forever, even though I finished it last spring. Pro tip: artificially age new wood with vinegar and steel wool solution. Instant patina!
Also Read: 15 Stunning Green Kitchen Island Ideas for Modern Home Style
Simple Outdoor Sink Setup
Running water outdoors = game changer. But plumbing costs can spiral fast. My solution? A self-contained sink system that requires zero permanent plumbing. It’s brilliant in its simplicity.
Start with a basic utility sink (garage sales are goldmines for these). Mount it to your outdoor kitchen structure or a standalone frame. For water supply, use a garden hose with a splitter – one side for the sink, one for general use.
The drainage solution:
- Gray water bucket underneath (empty into garden)
- French drain to gravel pit
- Connection to rain barrel system
- Simple dry well for permanent setups
My setup uses a foot pump from an old RV, making it completely off-grid. Fill the reservoir, pump with your foot, wash your hands. It’s surprisingly satisfying and costs practically nothing to set up.
Compact Corner Outdoor Kitchen
Corners are the forgotten heroes of outdoor spaces. That awkward corner of your patio? It’s actually prime kitchen real estate. Corner designs maximize space while creating natural work triangles.
I transformed a dead corner into a fully functional cooking station using simple L-shaped counters. The angle naturally separates prep space from cooking area, and the corner itself becomes valuable storage for rarely-used items.
Smart corner design tips:
- Angle your grill at 45 degrees for easy access
- Use corner shelving units for vertical storage
- Install lazy Susans for corner cabinet access
- Add triangular cutting boards that fit the space
The beauty of corner kitchens? They feel cozy and defined without eating up your entire outdoor space. Mine leaves plenty of room for dining and lounging while keeping everything within arm’s reach.
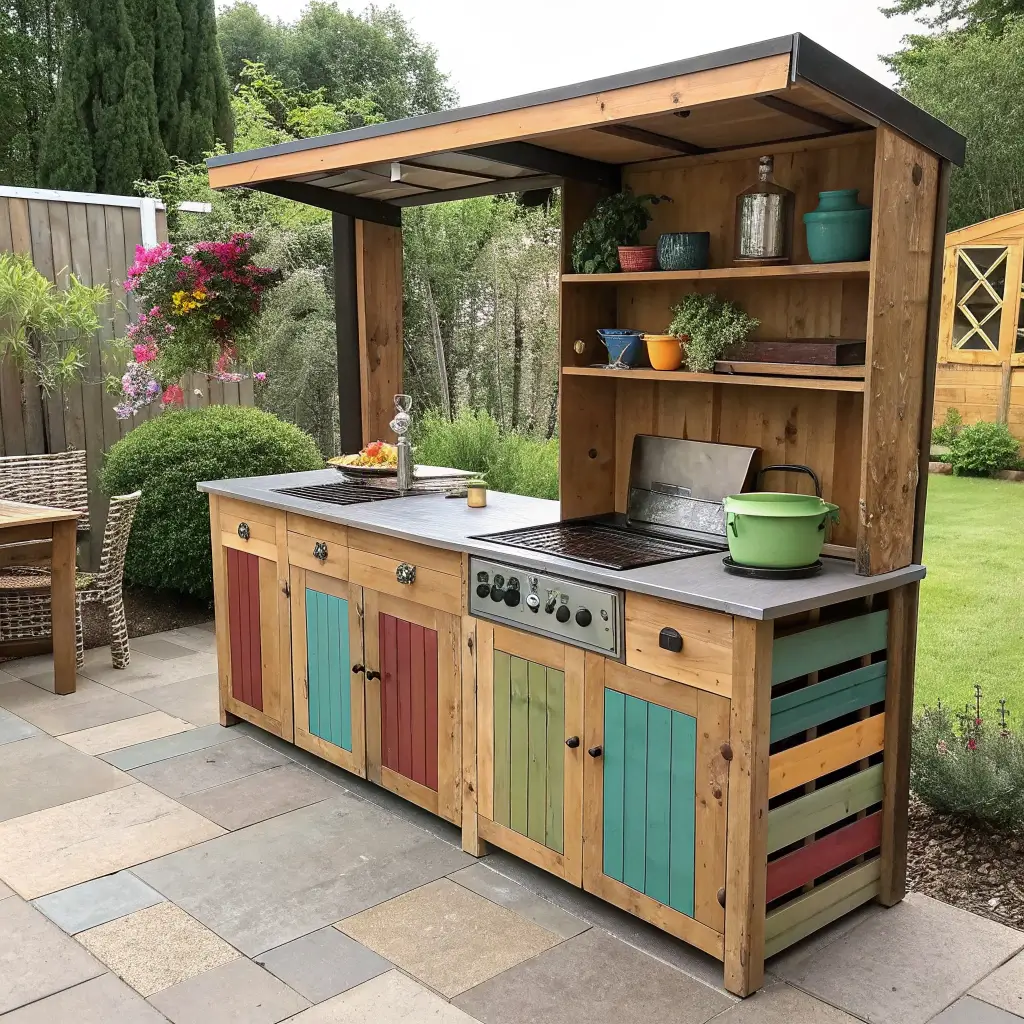
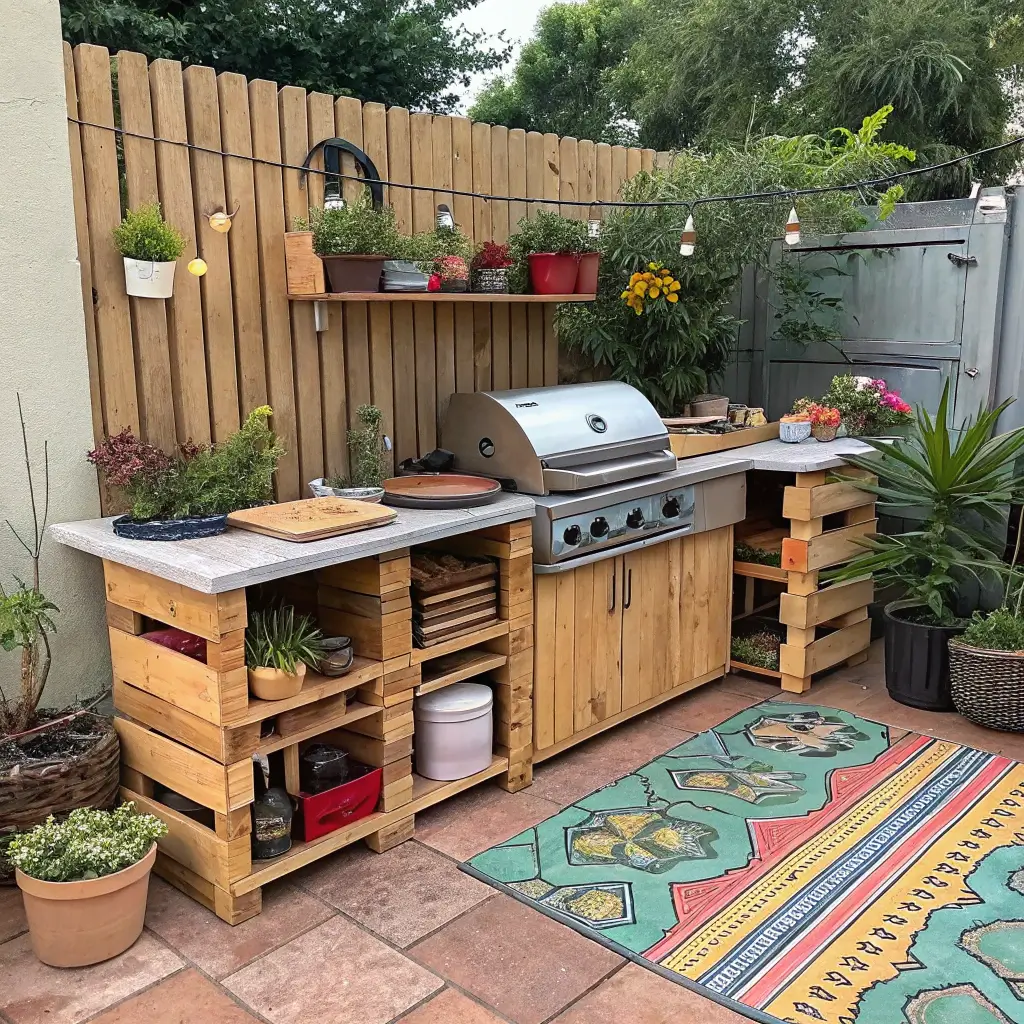
Patio Kitchen Using Wood Crates

Wood crates are having a moment, and for good reason. These versatile boxes transform into instant outdoor kitchen components with minimal effort. I’ve built entire kitchen islands from nothing but crates and some strategic hardware.
Hit up craft stores, wine shops, or farmer’s markets for crates. Many places give away or sell cheaply the crates they’d otherwise toss. Sand them smooth, apply outdoor sealant, and start stacking. The modular nature means you can reconfigure as needed.
Creative crate configurations:
- Stack horizontally for open shelving
- Turn sideways for wine rack storage
- Mount on walls for spice organization
- Create rolling islands with casters
- Build temporary bars for parties
My crate kitchen started as four boxes and has grown to twelve. Each addition costs maybe $10 and adds functionality. The rustic look fits perfectly with outdoor settings, and guests always ask where I bought such a “unique” kitchen island. Little do they know…
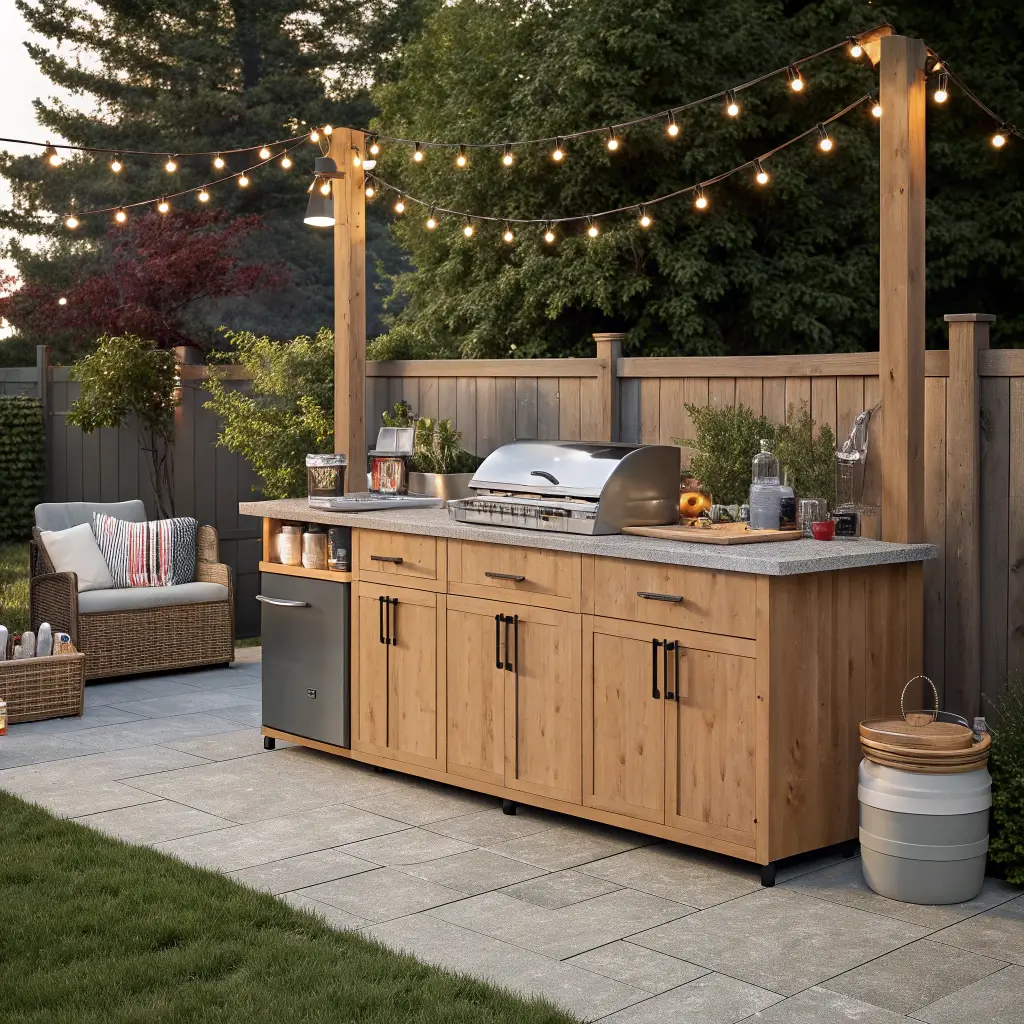
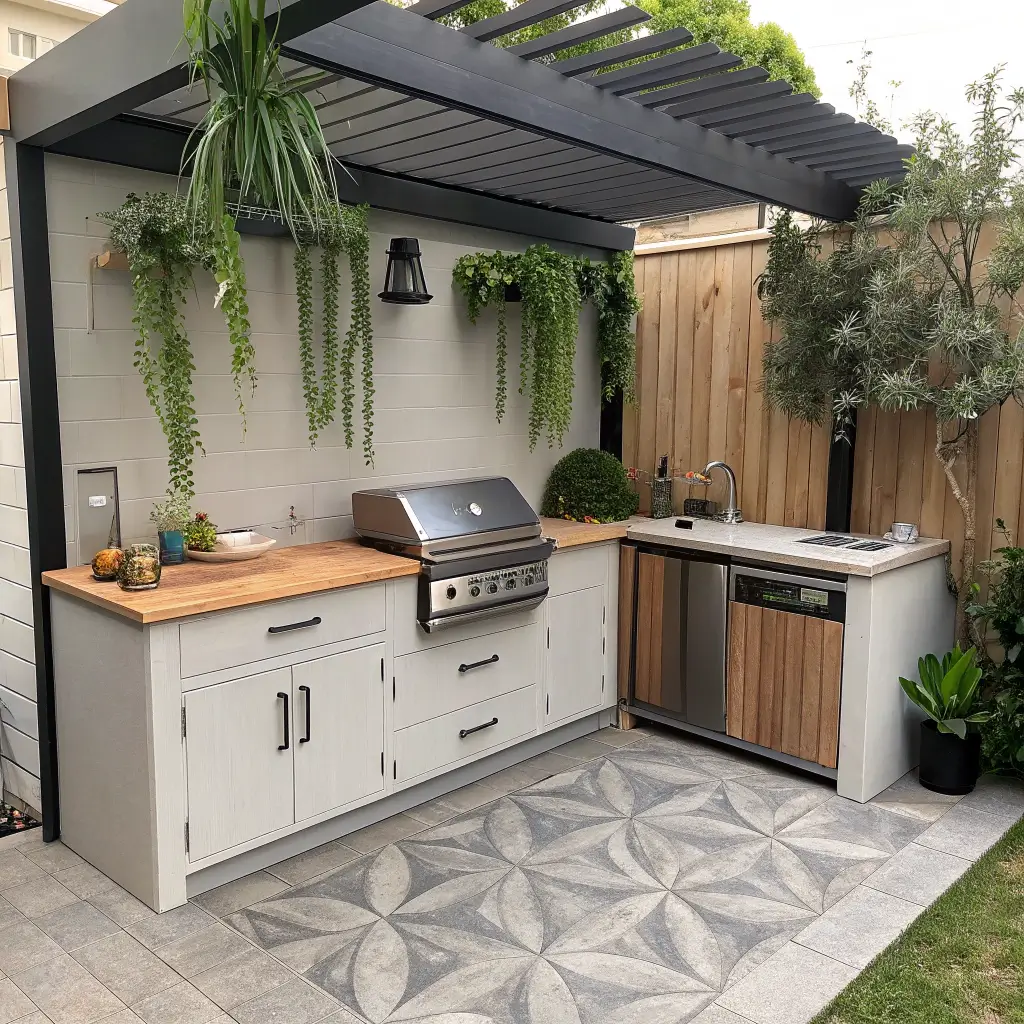
Affordable Modern Outdoor Kitchen
Modern design doesn’t automatically mean expensive. Clean lines, simple materials, and smart planning create modern aesthetics on any budget. My modern outdoor kitchen proves that contemporary style and frugality can coexist beautifully.
The key is embracing minimalism. Fewer materials mean lower costs. I used concrete blocks, sealed plywood, and black spray paint to create a sleek cooking station that looks like it belongs in a design magazine. Total investment? Under $400.
Modern design on a budget:
- Monochromatic color schemes (black, white, gray)
- Smooth surfaces (sealed plywood works great)
- Hidden storage to reduce visual clutter
- Simple geometric shapes
- Strategic lighting for ambiance
Skip the fancy hardware – simple handles or push-to-open mechanisms maintain clean lines. My favorite trick? Using adhesive LED strips under counters for that high-end glow. Looks like a million bucks, costs about twenty.
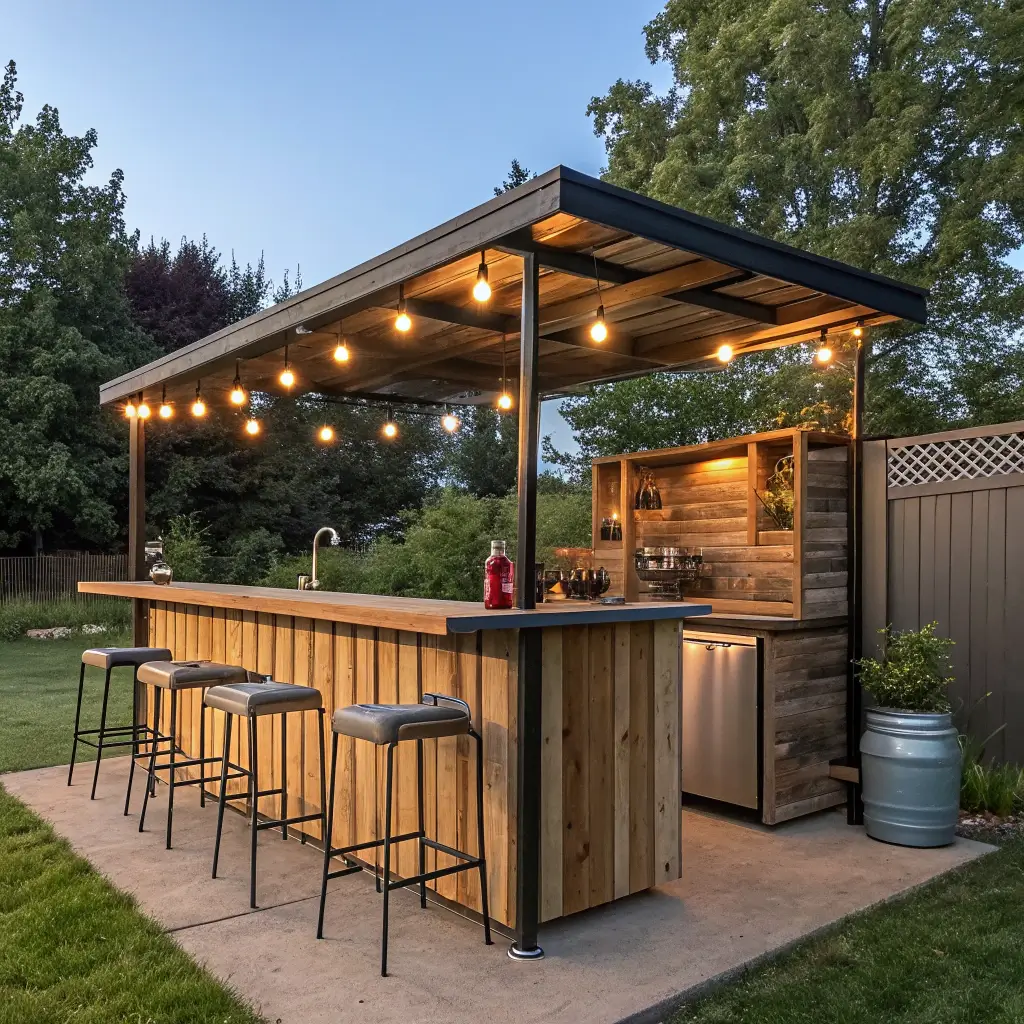
DIY Outdoor Bar and Serving Area

Every outdoor kitchen needs a social hub. Building a bar area transforms cooking from chore to party. My DIY bar has become the neighborhood gathering spot, and it cost less than one night out at an actual bar.
Start with a basic frame – I used 2x4s and plywood. Add a footrest (crucial for comfort), some bar-height seating, and you’re basically done. The magic happens in the details: bottle openers, towel hooks, maybe a small ice bucket holder.
Bar essentials to include:
- Overhang for knee room (learned this the hard way)
- Multiple levels for serving and seating
- Built-in cooler space or ice bucket holder
- Hooks underneath for bag/purse storage
- Good lighting for evening entertaining
Paint it bold or stain it natural – either way works. I added a corrugated metal front for that industrial vibe and strung Edison bulbs overhead. The whole setup screams “grab a drink and stay awhile” without screaming “expensive!”
Multi-Purpose Outdoor Cooking Station
Why limit yourself to just grilling? The best outdoor kitchens handle everything from morning coffee to midnight s’mores. My multi-purpose station evolved from basic grill stand to full outdoor culinary command center.
Think beyond the BBQ. Add a side burner for pots and pans. Include a flat-top griddle for breakfast foods. Maybe incorporate a smoker box or pizza stone setup. The goal is maximum cooking flexibility without maximum cost.
Multi-purpose must-haves:
- Adjustable grill grates for different cooking methods
- Side burner for sauces and sides
- Prep space that doubles as serving area
- Storage for various cooking implements
- Power outlets for small appliances
I retrofitted my basic grill station with a camp stove burner ($30) and added a removable griddle top ($50). Now I can sear steaks, simmer sauces, and make pancakes all in the same space. Weekend brunch game = forever changed.
Wrapping It Up
Building an outdoor kitchen on a budget isn’t about settling for less – it’s about getting creative with what you have. Every single one of these ideas can transform your outdoor space without transforming your bank account into a wasteland.
The best outdoor kitchen is the one you actually use. Whether you go full rustic with pallets and crates or sleek modern with concrete and steel, the important thing is creating a space that makes you want to cook outside. Start small, build as you go, and don’t be afraid to experiment.
Remember, some of my best outdoor kitchen features came from happy accidents and creative problem-solving. That weird corner that became a prep station? Total accident that worked out perfectly. The cinder blocks I painted bright blue on a whim? Now they’re the feature everyone notices first.
So grab some pallets, scout some sales, and start building. Your budget-friendly outdoor kitchen adventure awaits, and trust me – your future self (and your wallet) will thank you. Who knows? Maybe next summer you’ll be the one giving tours of your DIY masterpiece while the neighbors wonder how you pulled it off for so little.
Now get out there and start creating. Your backyard is calling, and it’s hungry for transformation! 🙂


