15 Easy Room Decor Bedroom DIY Ideas That Save Money
Remember that time you scrolled through Pinterest for hours, saving bedroom ideas you’d never actually try? Yeah, me too.
But here’s the thing – I actually went ahead and attempted most of these DIY projects, and guess what? They’re surprisingly doable, even if you think you can’t craft your way out of a paper bag.
Let me walk you through 15 bedroom DIY ideas that transformed my boring bedroom into something that actually makes me smile when I wake up.
And trust me, if I can pull these off with my questionable crafting skills, you definitely can too.
Floating Shelves with Hidden Storage

Who doesn’t love a good secret compartment? I discovered this genius hack when I desperately needed more storage but didn’t want my room looking like a warehouse. Floating shelves with hidden storage combine style with sneaky practicality.
Here’s what makes these shelves absolutely brilliant. You build a basic floating shelf, but you create a hollow section behind it that slides or opens up. I made mine using pine boards from the hardware store, and the whole thing cost me about $30.
How to Make Your Own Secret Storage Shelves
Start by cutting two identical boards – one for the visible shelf and one for the backing. Create a frame between them using smaller wood pieces, leaving space for your hidden items. I keep my passport, emergency cash, and those embarrassing diary entries from 2015 in mine 🙂
The mounting process requires sturdy wall anchors because you’re essentially hanging a box, not just a shelf. Use a level (seriously, don’t eyeball it like I did the first time), and make sure you hit at least one stud. Paint or stain everything before mounting – learned that one the hard way.
DIY Macrame Wall Hangings

Remember when macrame was something only your grandma did? Well, it’s back, and it’s actually pretty therapeutic to make. I started my macrame journey thinking I’d create one small piece. Three months later, my bedroom wall looks like a boho textile museum.
The beauty of macrame lies in its simplicity. You need cord, a dowel or branch, and YouTube tutorials. That’s literally it. Start with basic knots – the square knot and half hitch will get you through 90% of patterns.
Materials You’ll Actually Need
Pick cotton cord over synthetic options. Cotton feels better, looks more authentic, and doesn’t give you rope burn while working. I recommend starting with 4mm cord for beginners. Thicker cord means fewer knots and faster results.
Want to know my secret weapon? I use a clothing rack as my working station. It keeps the macrame at eye level and saves my back from hunching over a table. Plus, you can walk around it to check your progress from different angles.
Personalized Photo Collage Wall
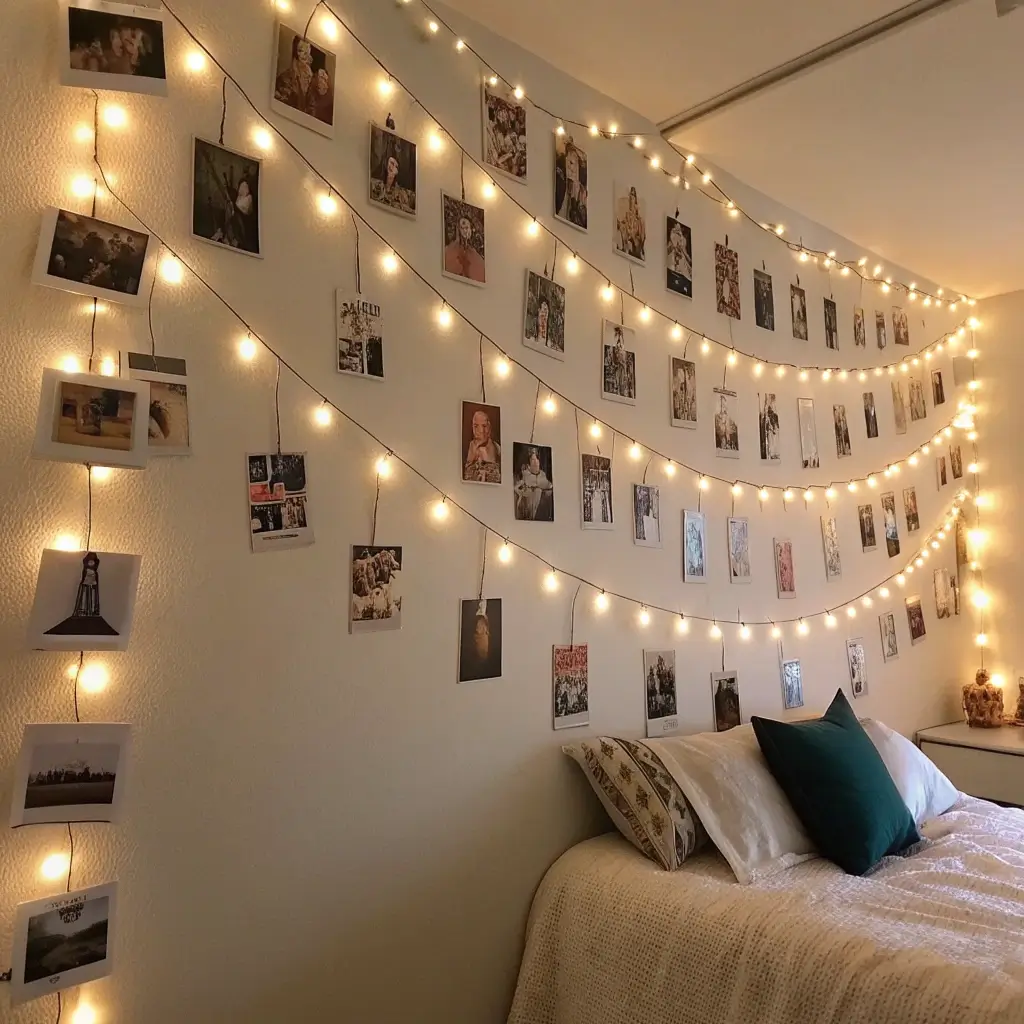
Let’s talk about the elephant in every bedroom – that blank wall staring at you judgmentally. A personalized photo collage turns that boring space into your own personal gallery, and you don’t need to be an interior designer to pull it off.
I started mine with a mix of printed photos, concert tickets, and random memorabilia. The trick? Don’t overthink the arrangement. Seriously, perfectionism kills creativity here.
Creating Your Layout Without Going Crazy
Lay everything on the floor first. Move pieces around until something clicks. Take a photo of your floor arrangement before transferring it to the wall – trust me on this one. I learned this after dismantling my first attempt three times.
Mix different frame styles and sizes for visual interest. Thrift stores are goldmines for unique frames. Spray paint them all the same color if you want cohesion, or keep them mismatched for that collected-over-time vibe.
Also Read: 15 Easy DIY Aesthetic Room Decor Ideas to Try This Weekend
Boho Chic Canopy Bed Makeover
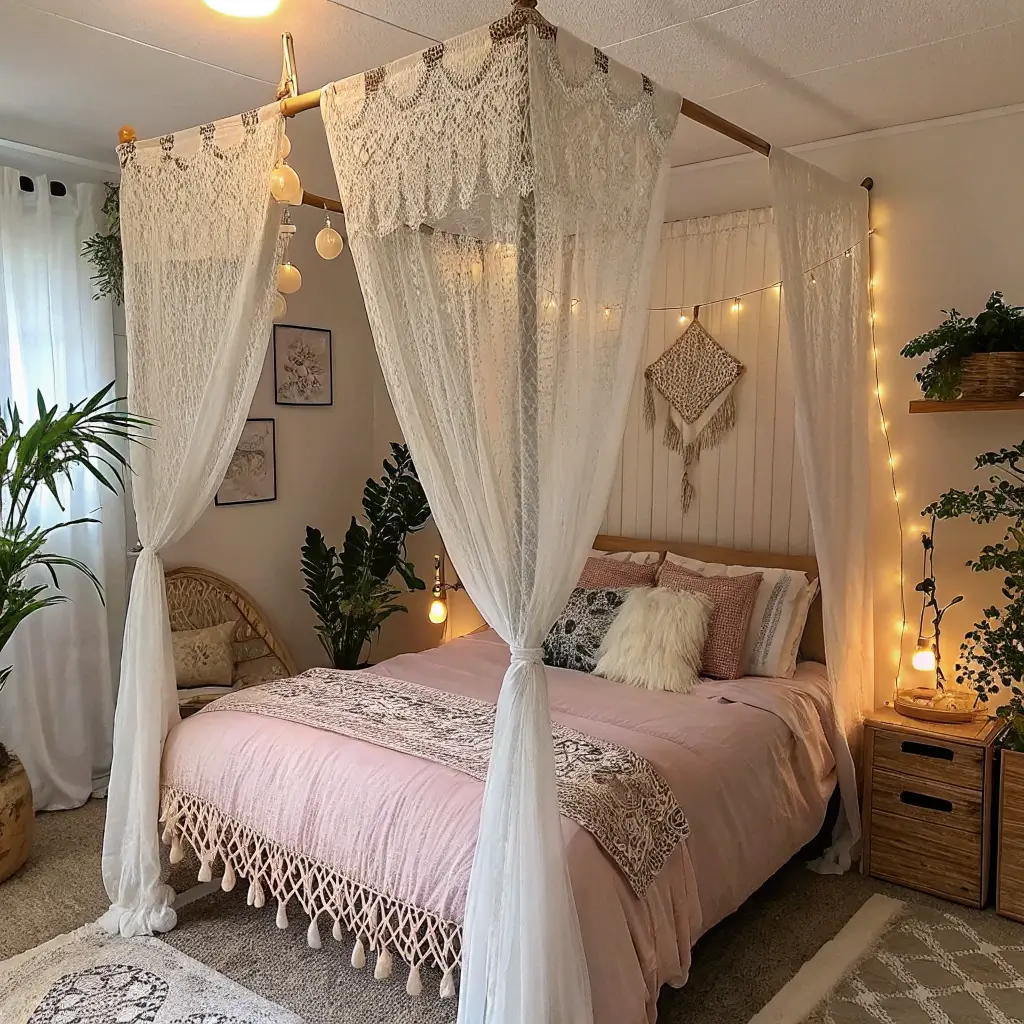
Ever wanted that dreamy canopy bed but couldn’t justify buying a new bed frame? I transformed my basic bed into a boho paradise using curtain rods and fabric. Total cost? Under $50.
Mount curtain rods or wooden dowels on the ceiling above your bed’s corners. I used ceiling hooks and fishing line for a floating effect. Choose lightweight, flowy fabrics – sheer curtains work perfectly and won’t make you feel claustrophobic.
The Installation Process That Actually Works
Measure twice, drill once. Mark your ceiling points carefully, ensuring they align with your bed corners. Use proper drywall anchors because fabric might seem light, but it adds up. Nobody wants fabric falling on their face at 3 AM.
Layer different textures for depth. I combined white sheer curtains with a macrame piece (see how these projects connect?). Add battery-operated fairy lights between layers for that magical glow without fire hazards.
Handmade String Light Decor
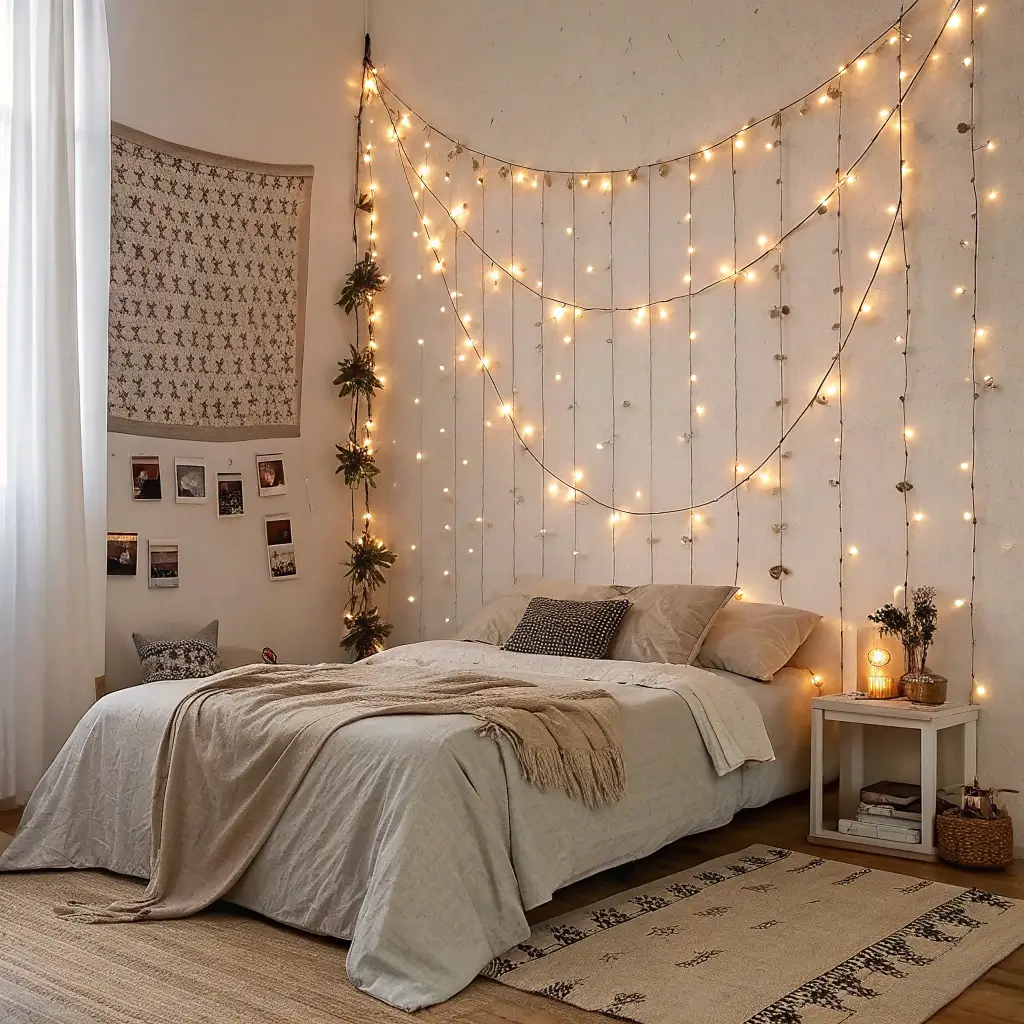
Speaking of lights, can we agree that overhead lighting is the enemy of cozy bedrooms? String lights change everything, but generic Christmas lights won’t cut it. You need something with personality.
I created custom light shades using ping pong balls, paper lanterns, and even origami. The ping pong ball hack? Cut an X in each ball and push it onto each bulb. Instant modern lighting for under $10.
Creative Ways to Hang Your Lights
Forget the basic border-around-the-ceiling approach. Create patterns, spell words, or make shapes. I arranged mine in a constellation pattern above my bed. Nerdy? Maybe. Cool at night? Absolutely.
Use removable adhesive hooks for rental-friendly installation. Command strips save your security deposit and your sanity. Pro tip: warm white LEDs create better ambiance than cool white – unless you want your bedroom feeling like a hospital ward.
Upcycled Furniture Painting Ideas
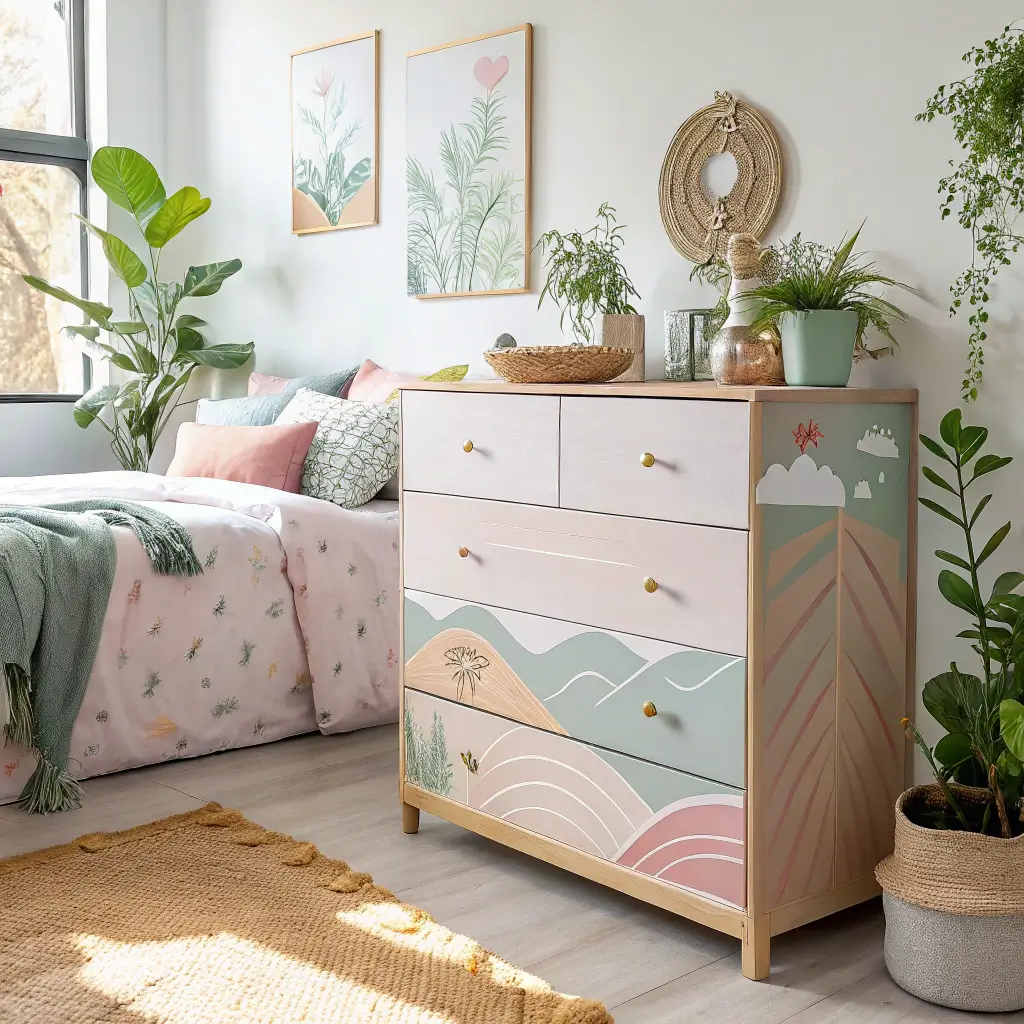
That hand-me-down dresser doesn’t have to scream “college dorm” forever. Furniture painting transforms tired pieces into statement furniture, and you don’t need artistic skills to nail it.
I turned my grandmother’s brown nightstand into a sage green beauty with gold hardware. The transformation took one weekend and about $25 in supplies. The compliments? Priceless.
Prep Work That Makes or Breaks Your Project
Sand lightly – you’re roughing up the surface, not removing it entirely. Clean with TSP substitute to remove years of grime. Prime everything, even if the paint claims it doesn’t need it. I skipped primer once and spent twice as long doing touch-ups.
Choose chalk paint for beginners. It’s forgiving, covers well, and gives that trendy matte finish. Want durability? Seal with polycrylic, not wax. Wax looks pretty but requires maintenance, and honestly, who has time for that?
Also Read: 15 Creative DIY Room Decor for Teens Ideas That Wow
Minimalist Desk and Study Corner DIY
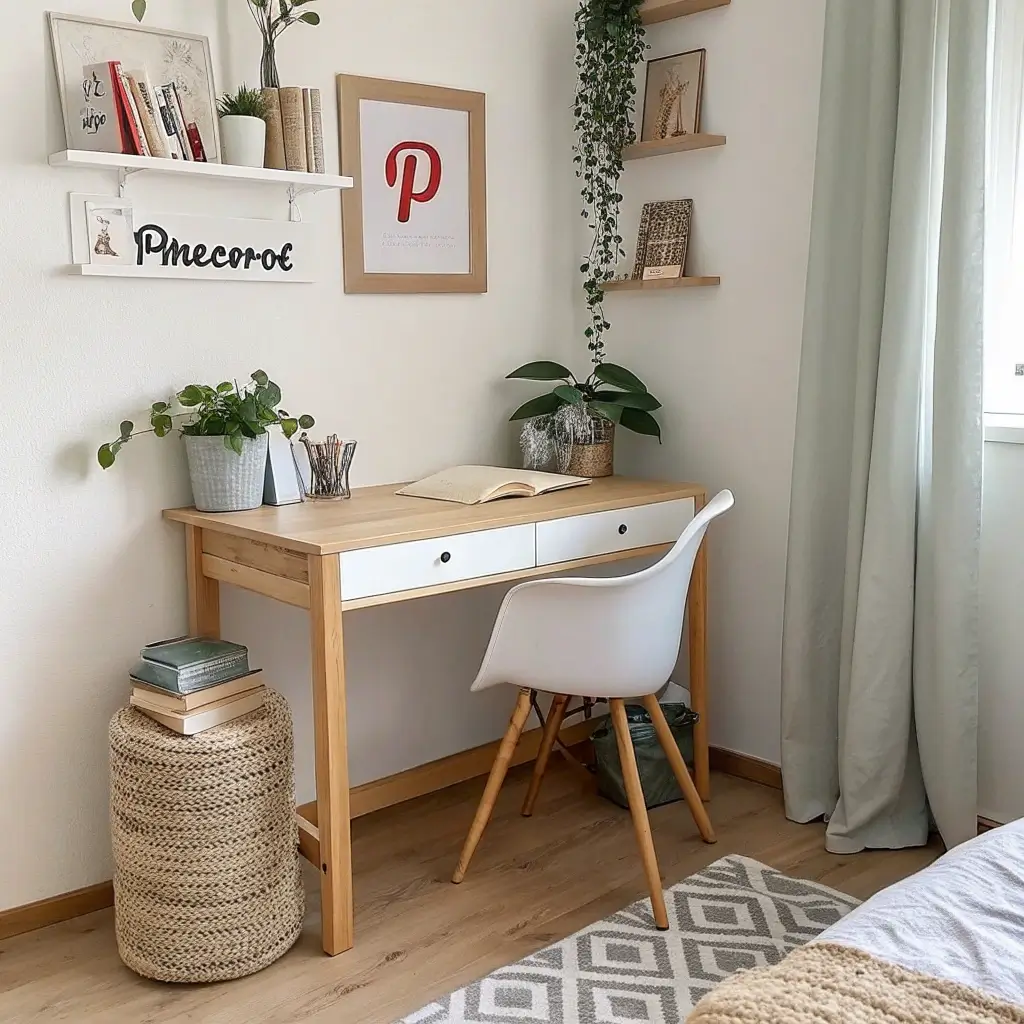
Not everyone has space for a full home office, but everyone needs a spot to adult occasionally. I carved out a minimalist desk area in my bedroom corner using a floating desk and smart storage.
Build a floating desk using a butcher block or solid wood board and heavy-duty brackets. Mine spans just 4 feet but holds my laptop, plants, and coffee mug collection. Mount it at the perfect height – measure while sitting in your actual chair.
Organization Hacks That Keep You Sane
Install a pegboard above the desk. It’s infinitely customizable and keeps supplies visible but organized. Paint it to match your room or go bold with a contrasting color. I chose black, and it looks surprisingly sophisticated.
Use drawer organizers in unconventional ways. Mount small bins under the desk for hidden storage. Magnetic strips hold scissors, paper clips, and other metal items. Everything has a place, so nothing clutters your minimal aesthetic.
DIY Wall Stencils and Patterns
Wallpaper’s expensive and permanent. Wall stencils? Cheap, customizable, and totally removable if you mess up or get bored. I created an accent wall that looks like designer wallpaper for less than $40.
Buy or make your stencil – I’ve done both. Cutting your own from cardstock works for simple patterns. Complex designs? Just buy one. Your sanity’s worth the $15, trust me.
Stenciling Techniques That Actually Work
Use a foam roller, not a brush. Brushes leave streaks and take forever. Load your roller lightly – too much paint causes bleeding under the stencil. Several light coats beat one heavy one every time.
Start from the center of your wall and work outward. This keeps your pattern aligned and prevents that awkward moment when you realize your pattern doesn’t fit evenly. Mark registration points with painter’s tape for consistent spacing.
Creative Headboard Ideas on a Budget

Beds without headboards look unfinished, but headboards cost ridiculous money for what’s essentially decorative wood. Why not make your own for a fraction of the price?
I created a fabric panel headboard using foam insulation boards, batting, fabric, and a staple gun. Total investment? $45. Time spent? One afternoon. Impact on my bedroom’s vibe? Huge.
Alternative Headboard Ideas That Rock
Not into fabric? Try these options:
- Reclaimed wood planks for rustic charm
- Painted geometric shapes directly on the wall
- Hanging tapestry or large fabric piece
- Grid of framed prints or mirrors
Mount everything securely. French cleats work great for heavy headboards. Lightweight options can use Command strips or picture ledges. Just ensure whatever method you choose can handle the weight – and potential bumping during, uh, activities.
Also Read: 15 Whimsical Cute DIY Room Decor Ideas for a Stylish Touch
Indoor Plant Display Hacks
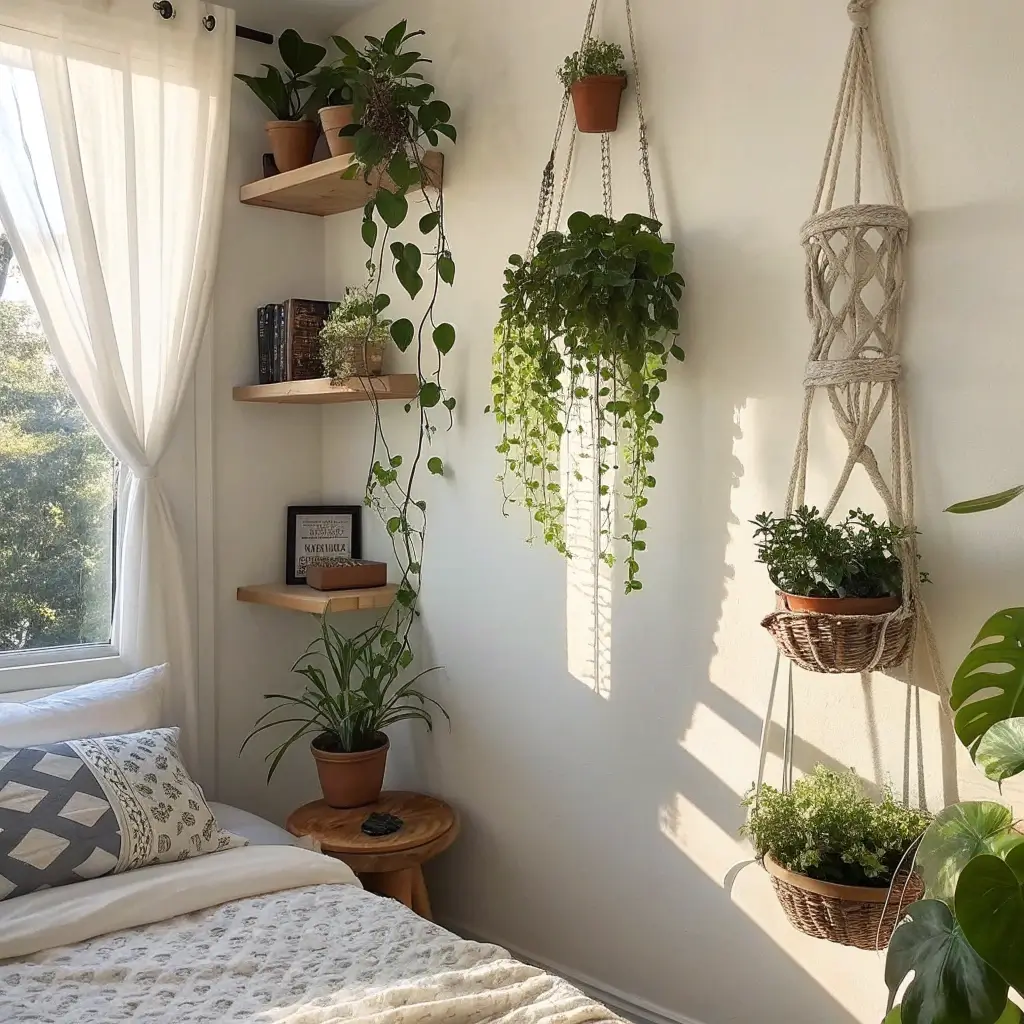
Plants make bedrooms feel alive, but not everyone has windowsill space for a jungle. Creative plant displays solve this problem while adding vertical interest to your room.
I installed a tension rod in my window frame and hung plants at different heights using macrame hangers. The layered effect creates depth without sacrificing floor space. Plus, watering’s easier when plants hang at eye level.
Smart Solutions for Plant Parents
Build a ladder shelf from old wood or buy a blanket ladder from a thrift store. Lean it against the wall and use rungs for plant placement. Vary pot sizes and plant types for visual interest.
Create a living wall using a grid panel and S-hooks. Attach small pots or mount air plants directly. This works especially well in corners where traditional furniture won’t fit. FYI, pothos and spider plants thrive in bedrooms with moderate light.
Colorful Washi Tape Wall Art
Who says art needs to be expensive? Washi tape creates removable, customizable wall art that changes with your mood. I’ve created everything from geometric mountains to abstract patterns.
The best part about washi tape? Zero commitment. Hate your design? Peel it off and start over. Moving? Remove it without losing your deposit. It’s basically the perfect medium for renters and commitment-phobes.
Design Ideas That Don’t Suck
Create a geometric headboard outline when you can’t have an actual headboard. Frame doorways or windows for architectural interest. Make a gallery wall grid without hanging actual frames.
Plan your design with painter’s tape first. Once you’re happy, replace it with colorful washi tape. Work in sections to maintain straight lines. Use a level for horizontal lines – eyeballing it never works out like you think it will.
Cozy Reading Nook DIY
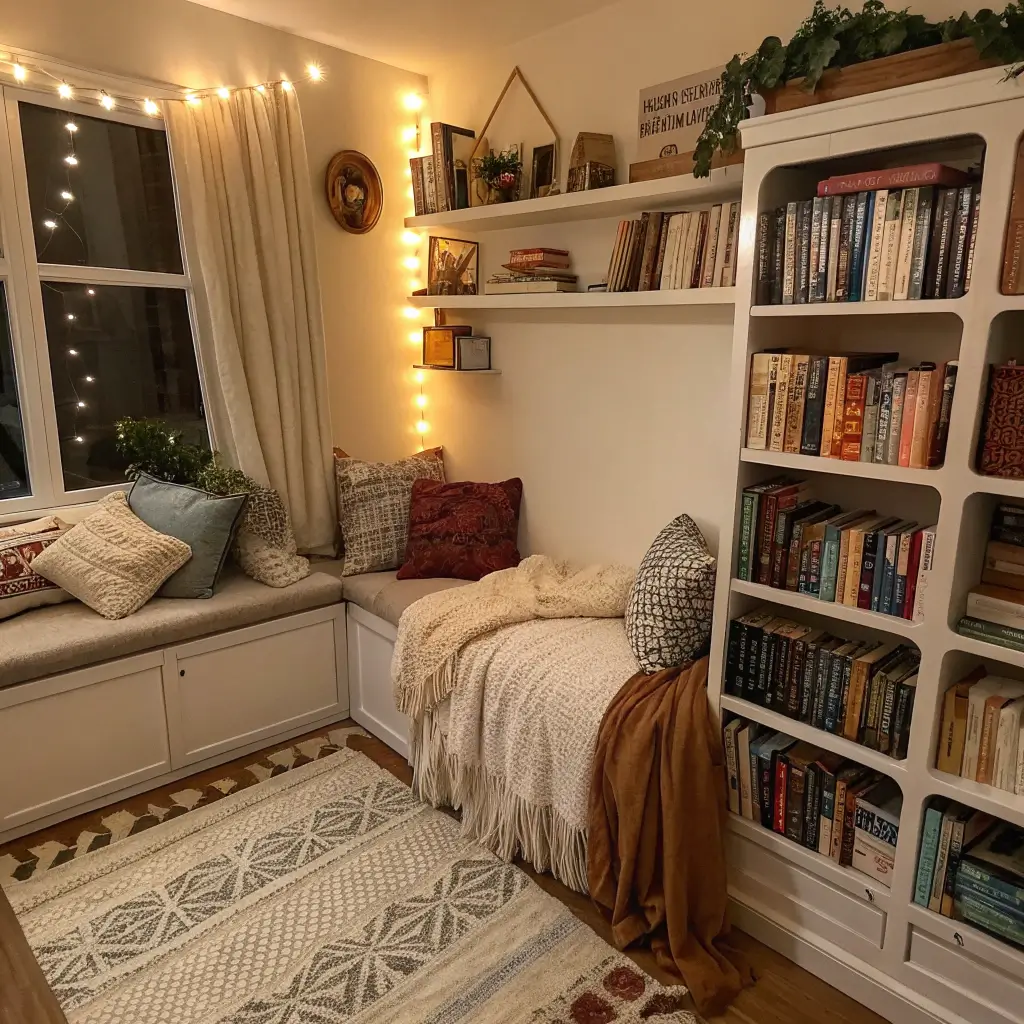
Every bedroom needs a spot that isn’t the bed for lounging. I transformed my awkward corner into a reading nook that’s become my favorite spot in the entire apartment.
Start with seating. Floor cushions work if you’re young and flexible. The rest of us need actual support. I found a small accent chair at a garage sale and reupholstered it myself. YouTube University taught me everything.
Elements of the Perfect Reading Spot
Good lighting makes or breaks a reading nook. Position a floor lamp or wall-mounted reading light at the right angle. Add a small side table or floating shelf for your coffee and current reads.
Layer textures with throws and pillows. Mix patterns that share a color palette for cohesion without matchy-matchy vibes. Include a soft rug to define the space and warm up cold floors. IMO, a reading nook without a cozy throw blanket is just a chair in a corner.
Decorative Mason Jar Night Lights

Mason jars stopped being trendy five years ago, but hear me out – they make perfect customizable night lights that add ambiance without harsh overhead lighting.
I created color-changing night lights using mason jars, tissue paper, and battery-operated LED tea lights. The soft glow creates perfect mood lighting, and you can match colors to your decor.
Making Mason Jars Actually Look Good
Skip the rustic farmhouse look unless that’s your thing. Paint jars with frosted glass spray for a modern feel. Use metallic paint for glamour. Create patterns with painter’s tape before spraying for geometric designs.
Fill jars with fairy lights, not just single bulbs. Layer in decorative elements like fake flowers, colored sand, or even small figurines. Cluster different sized jars for more impact than single scattered pieces.
Fabric Wall Panels for Texture
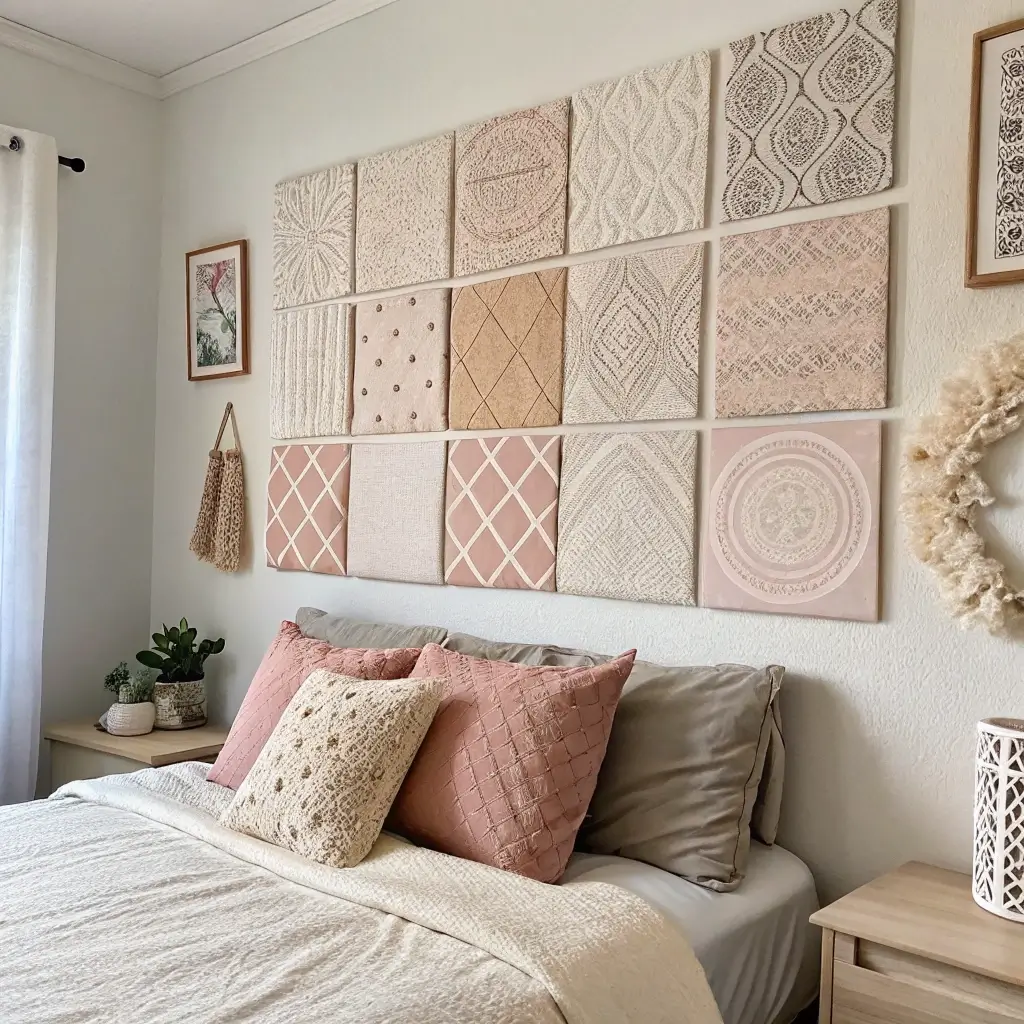
Flat walls bore me. Fabric panels add texture and sound absorption (great for noisy neighbors) while looking intentionally designed rather than randomly decorated.
I covered foam boards with fabric and arranged them in a pattern behind my bed. The texture adds warmth, and the fabric ties together my room’s color scheme. Plus, they’re lightweight enough to hang with Command strips.
Creating Professional-Looking Panels
Choose fabric with enough weight to not show foam texture through it. Iron everything first – wrinkled fabric looks amateur. Wrap fabric tightly around boards and secure with a staple gun on the back.
Create patterns with your arrangement. Symmetrical grids look modern. Asymmetrical groupings feel artistic. Mix fabric patterns within the same color family for depth without chaos. Leave space between panels – breathing room prevents the wall from feeling cluttered.
DIY Mirror and Frame Upgrades
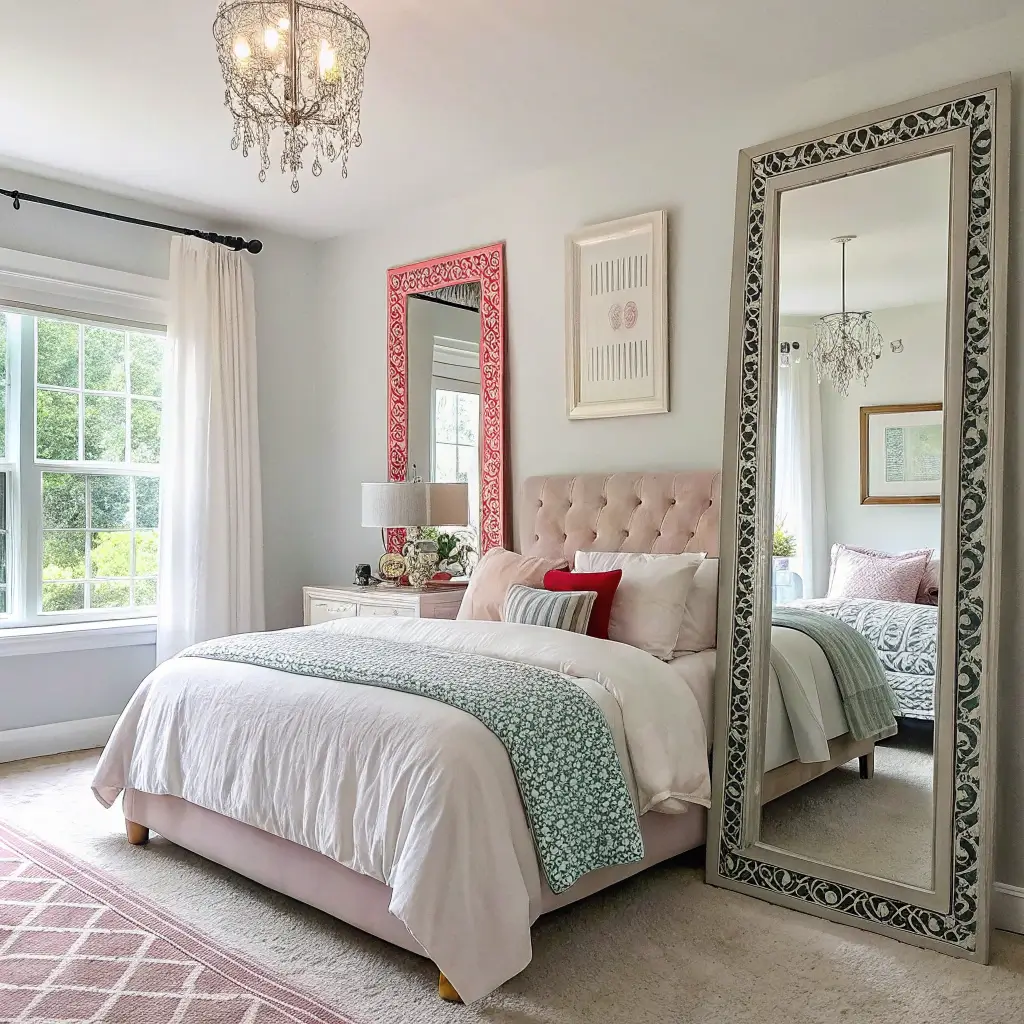
Mirrors make bedrooms feel larger and brighter, but basic mirrors lack personality. I transformed boring mirrors into statement pieces using supplies I already had.
Rope-wrapped frames add texture and nautical vibes. Tile or mosaic borders create artistic flair. Even simple paint transforms builder-grade mirrors into custom pieces. My favorite? I glued wooden dowels in a sunburst pattern around a circular mirror.
Upgrade Techniques Worth Trying
Remove mirrors from cheap frames and mount them directly on painted or papered backing boards. The extended border creates the illusion of a larger, more expensive mirror. Add LED strips behind for backlit ambiance.
Group multiple mirrors instead of hanging one large piece. Thrift stores sell mirrors cheap – collect different shapes and paint frames the same color for cohesion. Arrange them salon-style for maximum impact without maximum spending.
Wrapping Up Your Bedroom Transformation
These 15 DIY projects transformed my bedroom from a place I slept to a space I actually love spending time in. You don’t need to tackle everything at once – I certainly didn’t. Start with whatever project speaks to you most, then build from there.
The beauty of DIY bedroom decor? You create exactly what you want without settling for mass-produced pieces everyone else owns. Your bedroom becomes uniquely yours, filled with projects that tell your story. Plus, you’ll save serious money while developing skills you didn’t know you had.
Pick one project this weekend and just start. The hardest part’s always beginning. Once you see how one small change improves your space, you’ll get addicted to the transformation process. Before you know it, you’ll have a bedroom that looks like it belongs in those Pinterest posts you’ve been saving. Except this time, it’ll actually be yours.


