15 Budget-Friendly Room Decor DIY Ideas You’ll Love
Let me guess – you’re sitting in your room right now, looking at those blank walls, thinking “this place needs some serious personality.” Trust me, I’ve been there.
After moving into my apartment last year, I stared at those empty walls for weeks before finally deciding to take matters into my own hands.
Here’s the thing: you don’t need a designer budget to create a space that screams “you.” I’ve compiled 15 DIY room decor ideas that I’ve either tried myself or watched friends absolutely nail.
Each one costs less than a fancy dinner out, and most take just an afternoon to complete. Sound good? Let’s get your creative juices flowing!
Fairy Light Photo Wall Grid
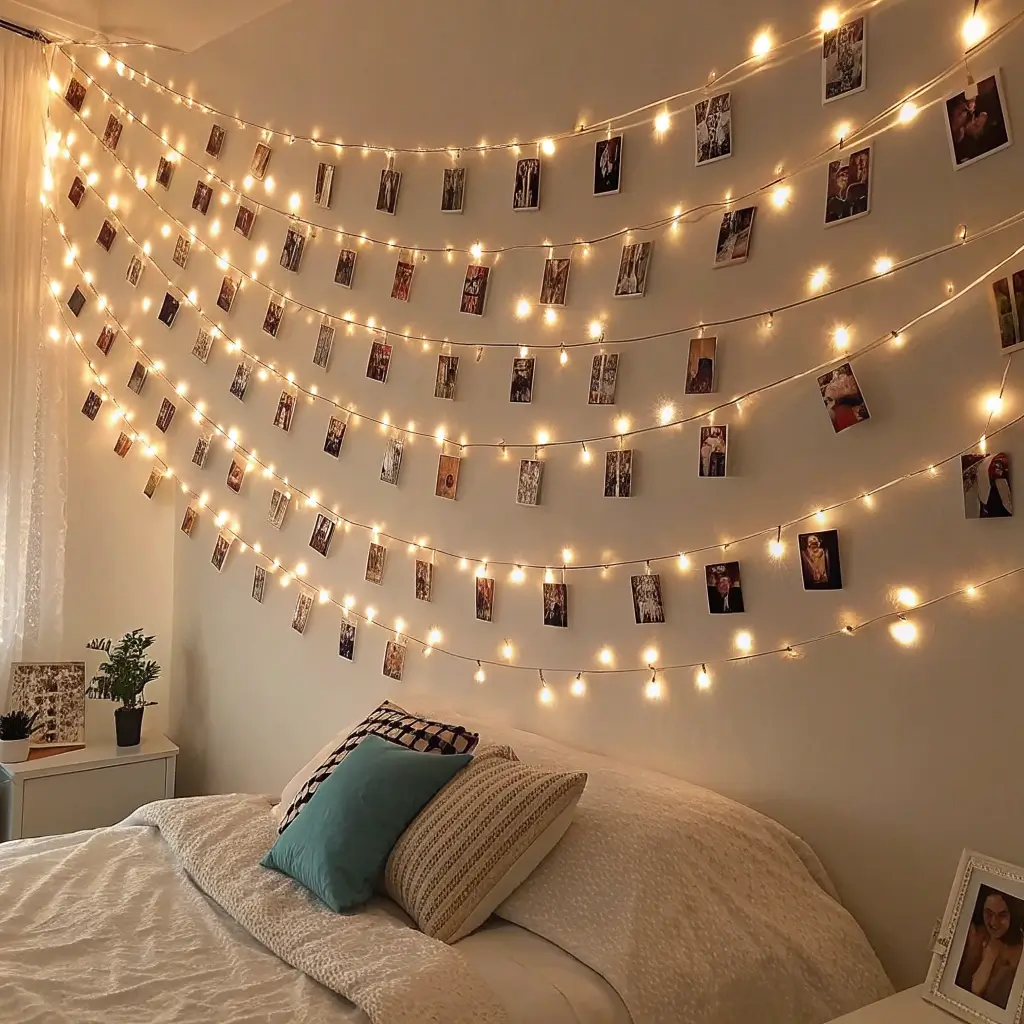
This one hits different, especially at night. Remember those fairy lights you bought three years ago and never quite knew what to do with? Time to put them to work! I created my first photo grid last summer, and now everyone who enters my room asks about it.
Here’s what makes this project genius: you’re combining two decor elements – lighting and photos – into one stunning display. Grab some twine or thin wire, create a grid pattern on your wall using small adhesive hooks, and weave your fairy lights through it. Then clip your favorite photos, postcards, or even concert tickets to the grid using mini clothespins.
The best part? You can switch out the photos whenever you want. Had a great vacation? Swap them in. New memories with friends? Add them to the mix. The warm glow from the lights makes everything look dreamy, and honestly, it’s become my favorite corner for late-night reading sessions.
Pro Tips:
- Use battery-operated LED lights if outlets are scarce
- Space your grid lines about 8-10 inches apart
- Mix black-and-white photos with colored ones for visual interest
Handmade Boho Macramé Wall Hanging
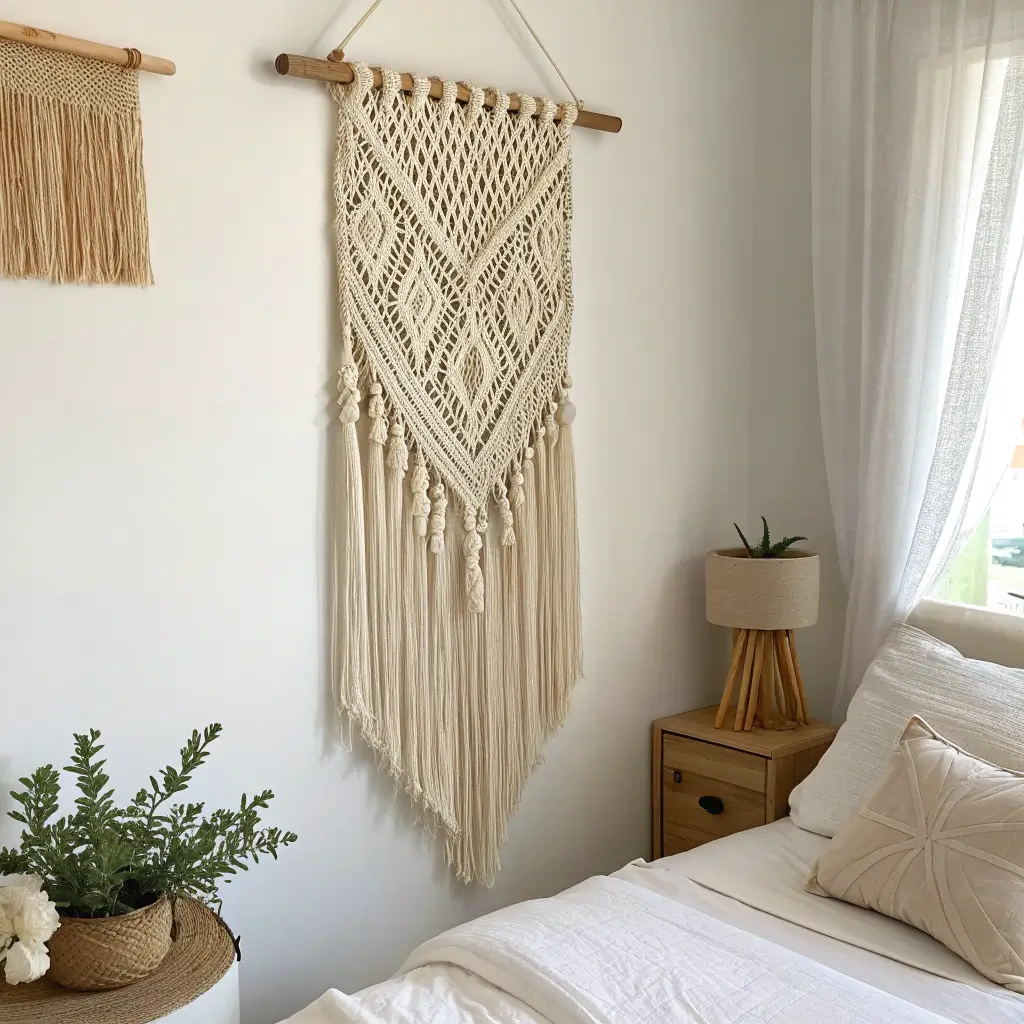
Okay, I’ll admit it – I thought macramé was just for plant-obsessed millennials (guilty as charged). But once I learned the basic knots, I couldn’t stop making these beauties. You literally need rope, a wooden dowel, and maybe two YouTube tutorials to master this.
The technique looks way more complicated than it actually is. Start with simple square knots and work your way up to more complex patterns. My first attempt took about three hours while binge-watching Netflix, and now I make them as gifts for friends. IMO, nothing adds texture to a room quite like a chunky macramé piece.
What I love most is how forgiving this craft is. Mess up a knot? Just untie and redo. Want it shorter? Cut and re-knot the bottom. The organic, handmade look means imperfections actually add character. Plus, you can customize the size to fit any wall space.
Materials You’ll Need:
- Cotton cord (about 100 feet for a medium piece)
- Wooden dowel or branch
- Scissors
- Patience (just a little!)
DIY Peel-and-Stick Accent Wall
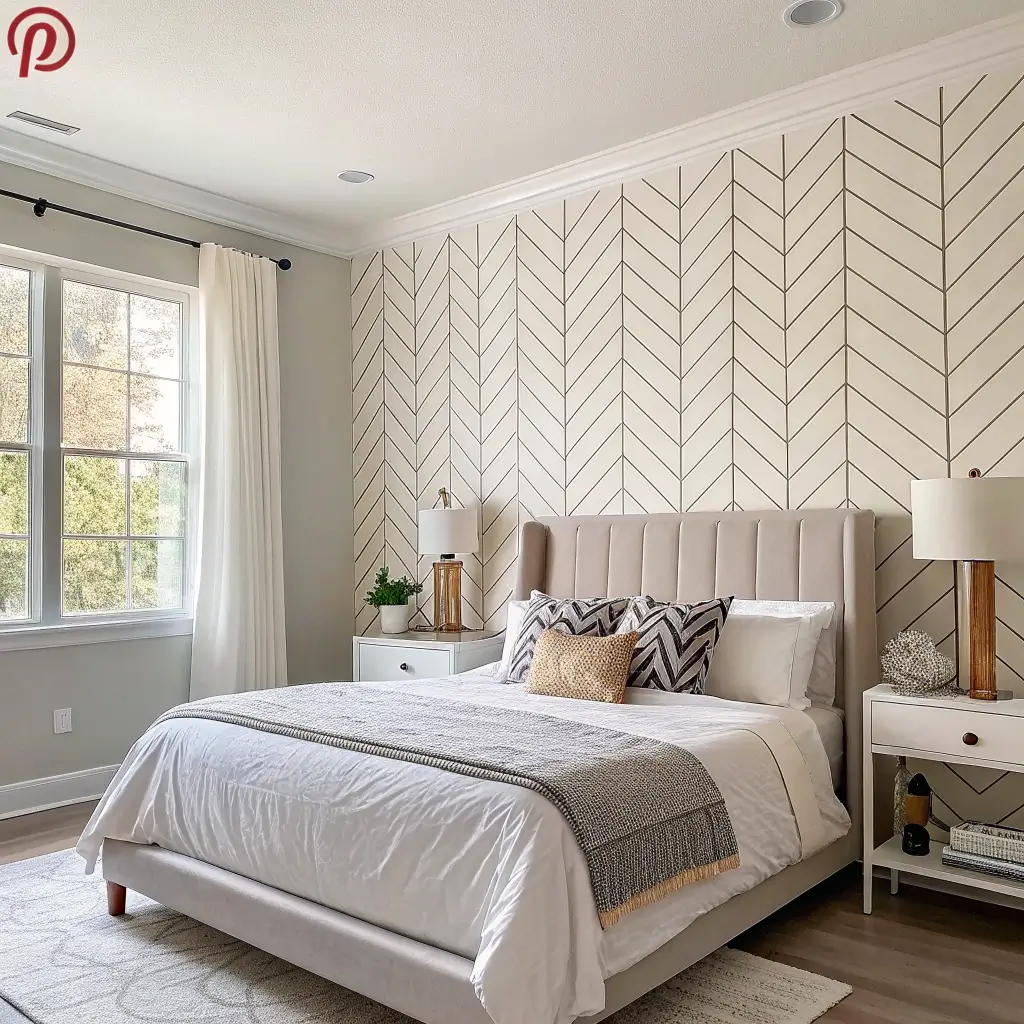
Who says you need to commit to paint or expensive wallpaper? Peel-and-stick options have seriously upped their game lately. I transformed my bedroom wall in one Saturday afternoon, and my landlord will never know 🙂
The trick is choosing the right pattern. Geometric designs work brilliantly for modern spaces, while faux brick or wood grain adds instant warmth. I went with a subtle herringbone pattern that makes my tiny room look twice as expensive. The application process is surprisingly therapeutic – just measure, cut, peel, and stick.
Ever wondered why accent walls work so well? They create a focal point without overwhelming the space. Choose the wall behind your bed or desk for maximum impact. And here’s a secret: if you mess up, most quality peel-and-stick materials can be repositioned within the first few minutes.
Also Read: 15 Fun DIY Room Decor Ideas and Cozy Bedroom Tips
Floating Rope Shelf Decor
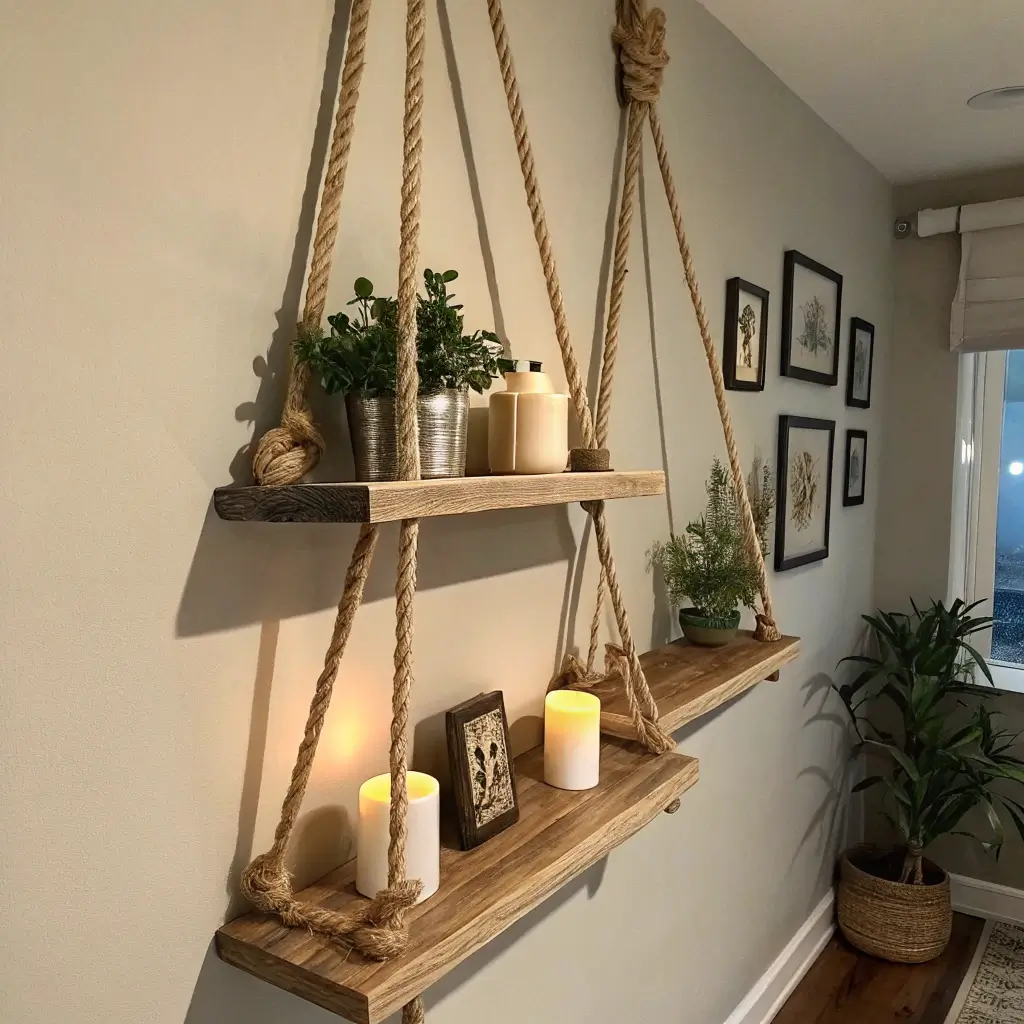
This project screams “Pinterest-worthy” but costs under $20. I made three of these shelves for my bathroom, and they’ve completely changed the vibe. All you need are wooden boards, thick rope, and a drill.
Cut your boards to size (I prefer 24-inch lengths), drill holes in each corner, and thread the rope through. The knots underneath each shelf keep everything in place. Mount the rope to ceiling hooks or wall brackets, and boom – instant storage with character.
What makes these shelves special is their versatility. Stack books on them, display small plants, or showcase your candle collection. The rope adds that nautical or rustic touch depending on your overall aesthetic. Plus, they sway slightly, which oddly enough, makes the room feel more dynamic and lived-in.
Styling Ideas:
- Mix shelf heights for visual interest
- Use different rope thicknesses for varied textures
- Paint the wood to match your color scheme
Aesthetic Paper Butterfly Wall Art
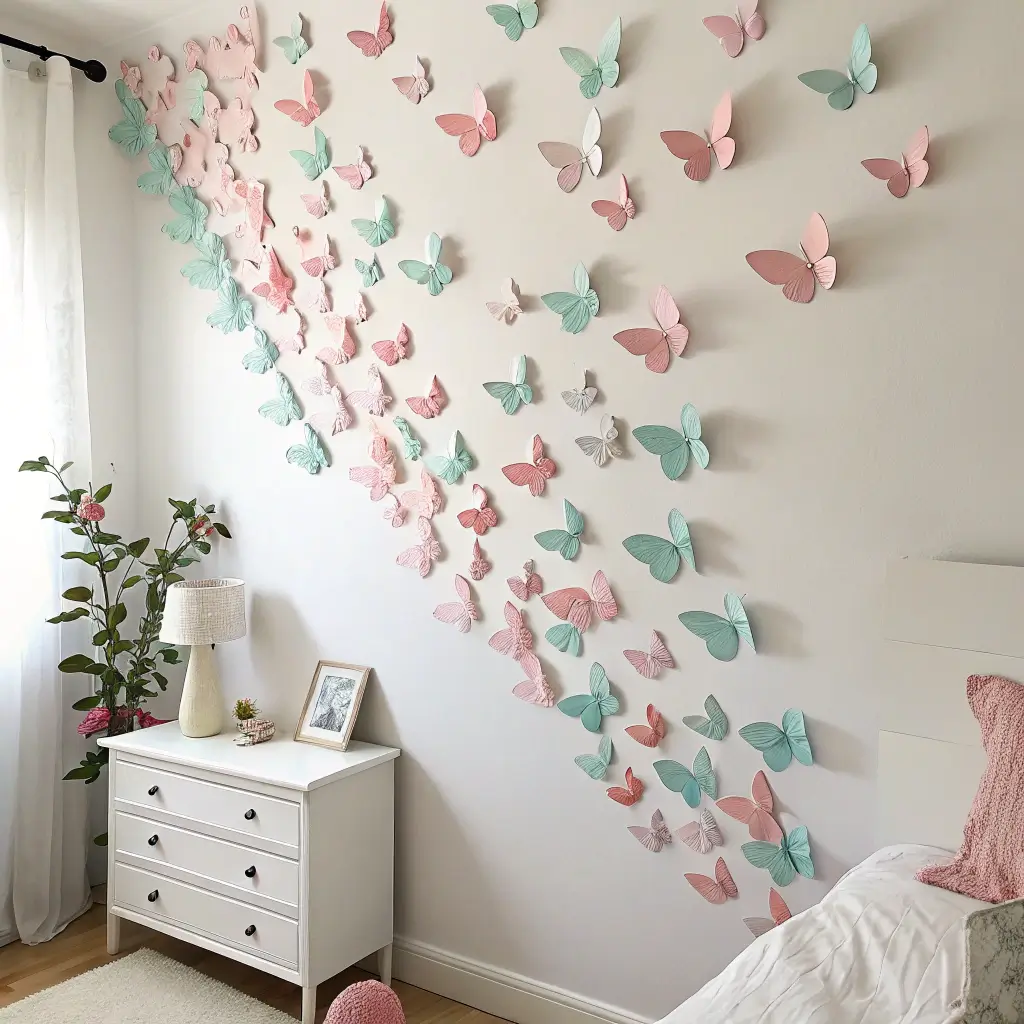
This one’s for my maximalist friends who believe more is more. Creating a butterfly wall changed my daughter’s room from basic to magical, and adults love it just as much. The 3D effect makes people do double-takes every single time.
Start by cutting butterflies from colorful cardstock or old book pages (thrift store books work perfectly). Fold each butterfly slightly down the middle to create that 3D wing effect. Then arrange them on your wall as if they’re mid-flight. I like creating a swarm effect that starts dense in one corner and gradually spreads out.
The symbolism isn’t lost on me either – butterflies represent transformation, and isn’t that what we’re doing to our rooms? Use double-sided tape or small pins to attach them. Pro tip: varying the sizes creates more visual depth.
Mason Jar Lantern Night Lights

Remember when mason jars were everywhere? Well, they’re still useful, especially for this cozy lighting hack. I’ve made about ten of these, and they create the perfect ambiance for movie nights or just winding down after work.
Transform regular mason jars into lanterns using tissue paper, wire, and battery-operated tea lights. Wrap wire around the jar rim to create a handle, then either paint the jar with translucent glass paint or wrap it in colored tissue paper. Drop in your LED candle, and you’ve got instant mood lighting.
What really sells this project is grouping them together. Hang them at different heights from a curtain rod, or line them along a shelf. The soft, diffused light beats harsh overhead lighting any day. FYI, these also make killer gifts for friends who are always complaining about their boring apartments.
Creative Variations:
- Fill jars with fairy lights instead of candles
- Add glitter to the inside for sparkly effect
- Use frosted spray paint for a more elegant look
Also Read: 15 Unique Security Door Design Ideas You’ll Love Today
Fabric-Covered Foam Headboard
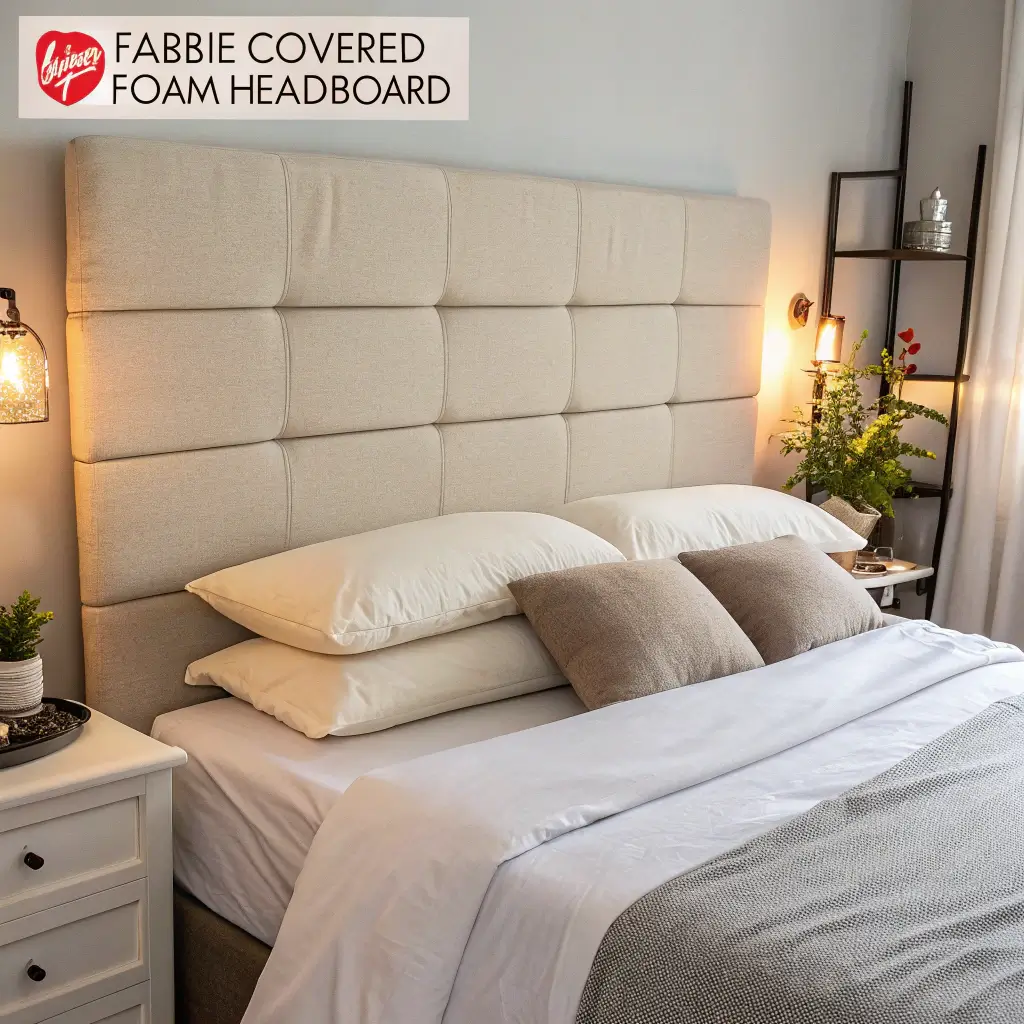
Let’s talk about the elephant in the room – or rather, the missing headboard in your bedroom. Buying one costs a fortune, but making one? That’s a different story. I created mine for under $50, and it looks like something from a boutique hotel.
Get a piece of foam board from your local hardware store, some batting, fabric of your choice, and a staple gun. Wrap the batting around the foam first for that plush look, then stretch your fabric over it and staple to the back. Mount it directly to the wall with picture ledges or lean it behind your bed.
The best part about DIY headboards? You can go as wild or subtle as you want. Velvet fabric adds luxury, while a bold pattern makes a statement. Mine’s covered in a deep emerald green that makes me feel like royalty every morning.
DIY Washi Tape Wall Patterns
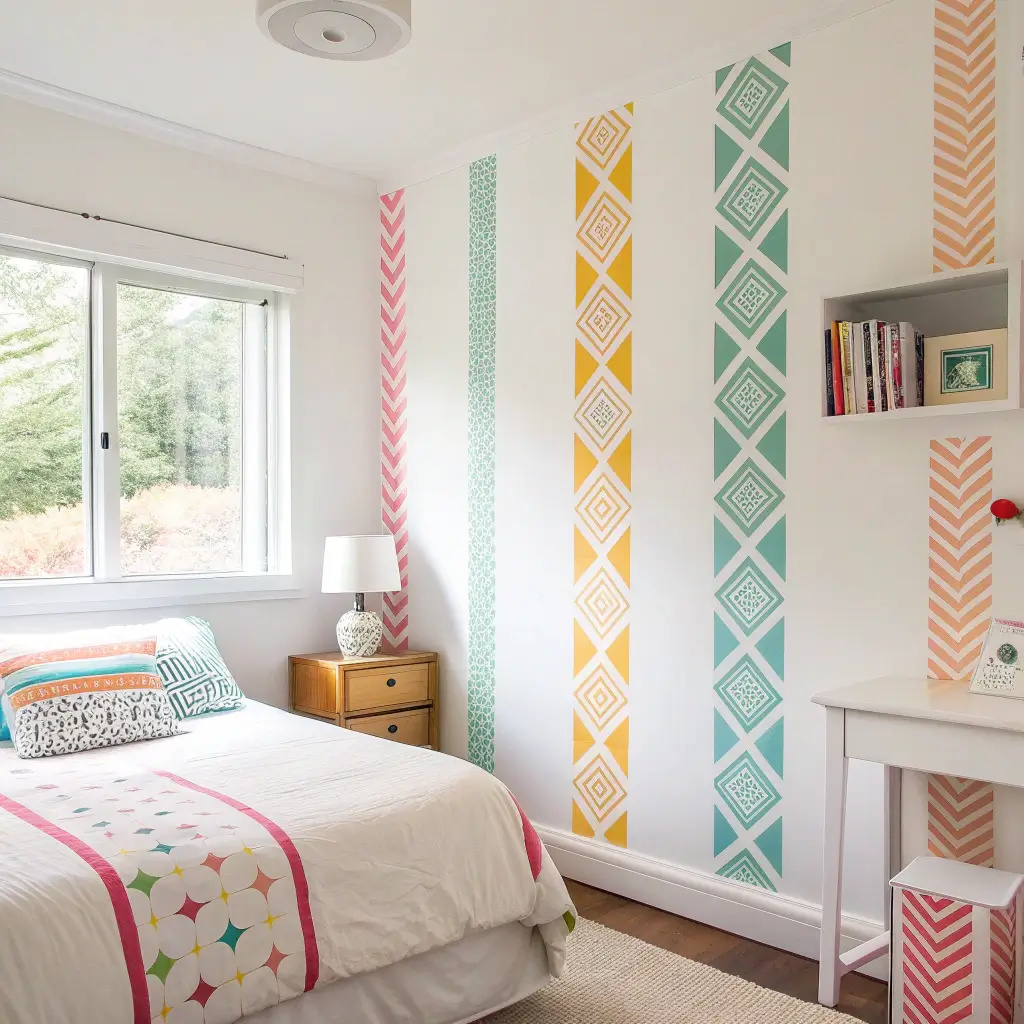
Washi tape might be the most underrated decorating tool ever invented. It’s removable, comes in endless patterns, and costs practically nothing. I’ve used it to create geometric patterns, frame “fake” windows, and even outline architectural details that don’t exist.
Start with a simple design like diagonal stripes or a honeycomb pattern. Use a level and measuring tape for precision, or embrace the slightly imperfect handmade look. The tape removes cleanly, so you can change your design whenever inspiration strikes.
My current obsession? Creating a faux headboard outline with metallic washi tape. It adds structure to the room without any actual construction. Ever notice how a simple line can completely change how you perceive a space?
Design Ideas:
- Create a city skyline silhouette
- Frame your windows or doors
- Make a calendar grid for a functional accent
Minimalist Wooden Quote Frame
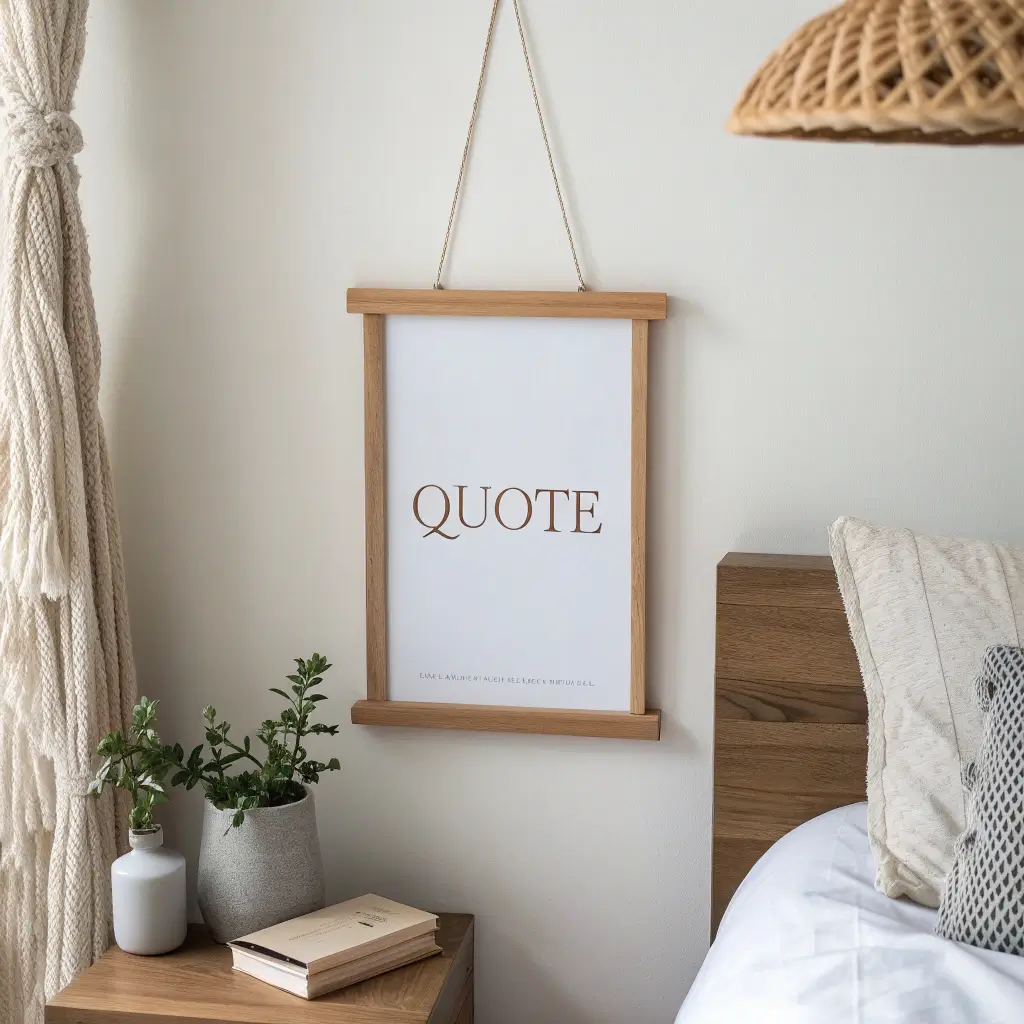
Sometimes less really is more. I made this piece after decluttering my space and realizing I wanted something meaningful but not overwhelming. Choose a quote that actually resonates with you – not just something that looks good on Instagram.
Print your quote in a simple, clean font on quality paper. Build or buy a basic wooden frame (thrift stores are goldmines for these), and consider leaving it unfinished or applying a light stain. The natural wood grain adds warmth without competing with the message.
Position matters here. Place it where you’ll actually see it daily – above your desk, next to your mirror, or across from your bed. Mine says “Create daily” and honestly, it’s become my morning reminder to actually do something productive.
Also Read: 15 Stunning Bathroom Door Design Ideas to Transform Your Space
Hanging Plant Corner Display
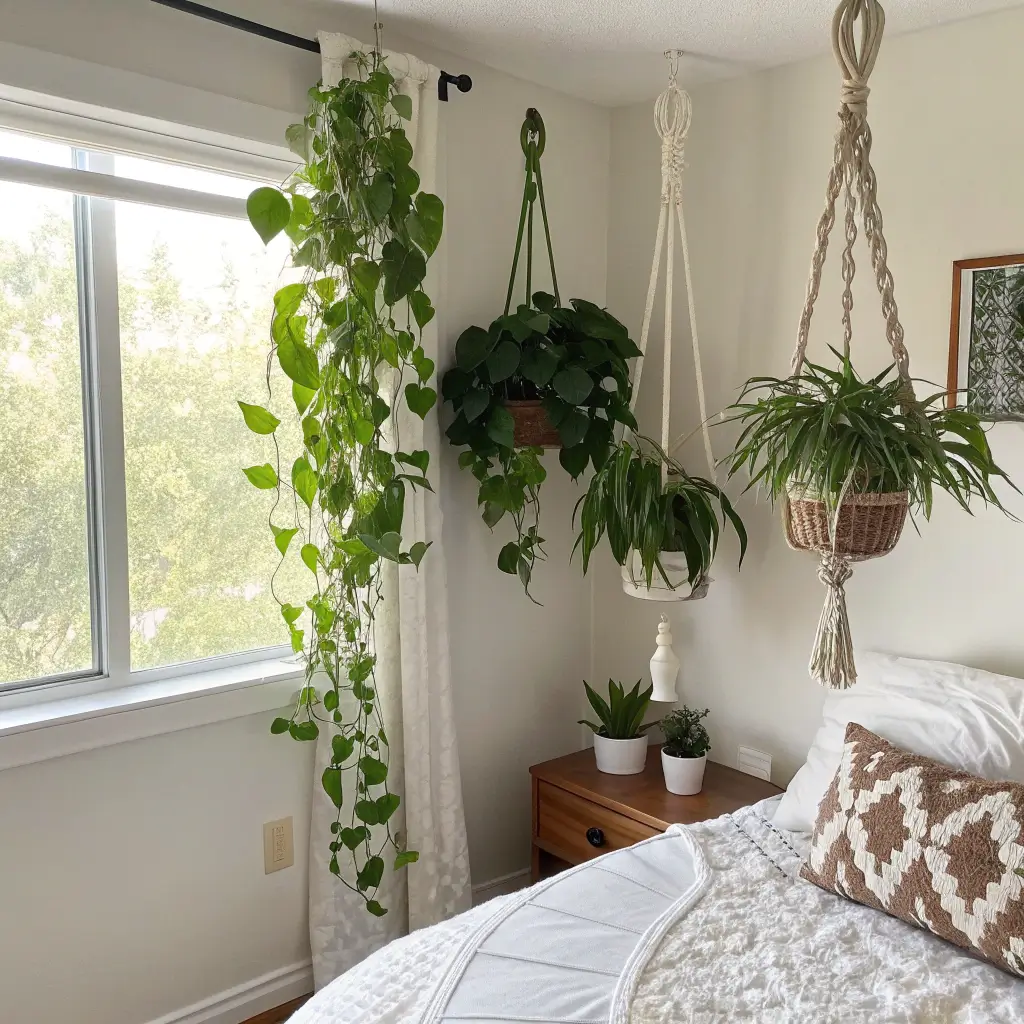
Plants make everything better – that’s just science. But floor space is precious, so why not go vertical? I transformed my empty corner into a green oasis using macramé hangers, ceiling hooks, and various hanging planters.
Layer plants at different heights to create depth. Mix trailing plants like pothos with compact ones like spider plants. The corner location means they won’t get in your way, but they’ll still make a huge visual impact. My setup has become my favorite Instagram background, not gonna lie.
The maintenance is easier than you’d think. Group plants with similar water needs together, and use a step stool for watering day. The improved air quality is just a bonus to the jungle vibes you’re creating.
Best Plants for Beginners:
- Pothos (practically indestructible)
- String of pearls (quirky and low-maintenance)
- Boston ferns (add major volume)
Thrifted Frame Gallery Wall
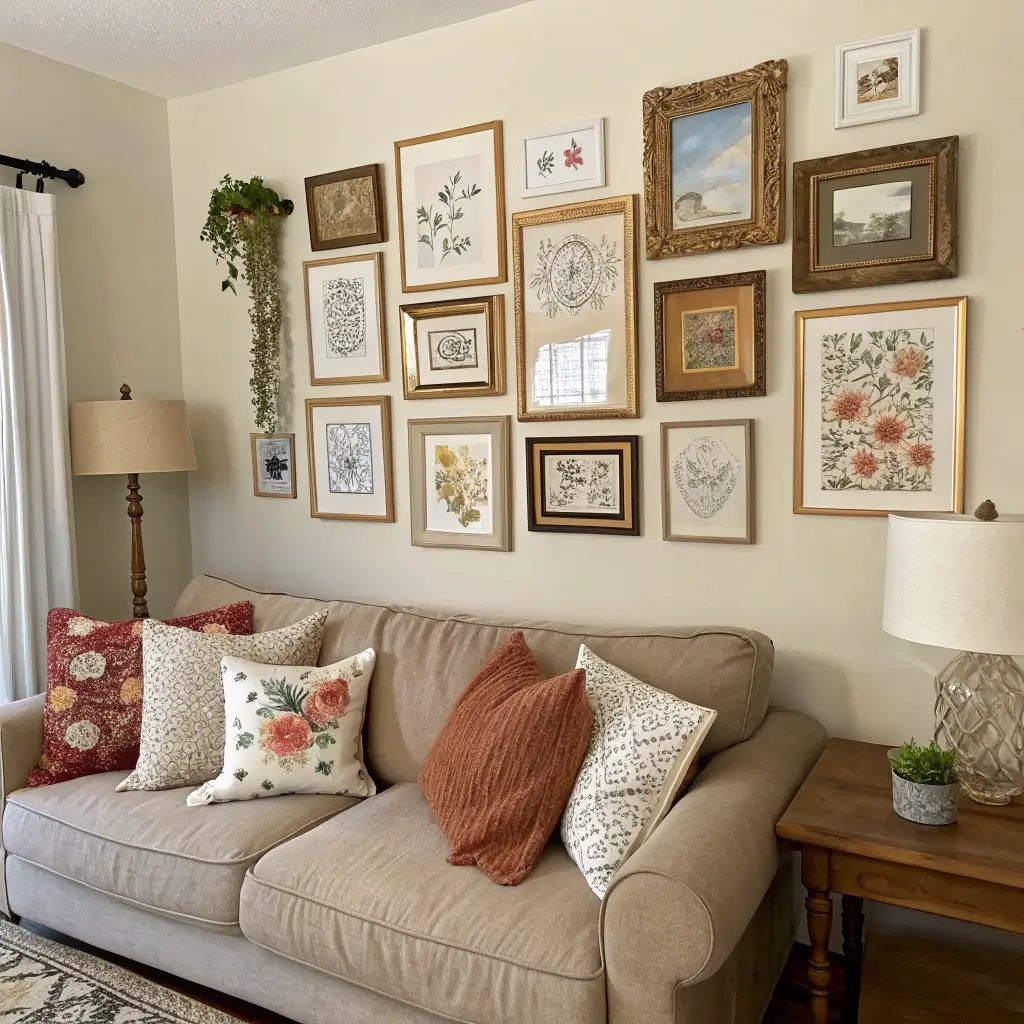
Gallery walls can look pretentious if done wrong, but get it right and you’ve got instant personality. The secret? Mixing frame styles, sizes, and content for an eclectic, collected-over-time look.
Hit up thrift stores, garage sales, and grandma’s attic for frames. Don’t worry about matching – in fact, avoid it. Paint some frames, leave others as-is, and fill them with everything from family photos to concert posters to pages from old books.
Layout is crucial. Arrange everything on the floor first, take a photo for reference, then start hanging. I use the “organic growth” method – start with one central piece and build outward. The result looks effortless even though you definitely put effort into it.
DIY Mirror Tile Wall Accent
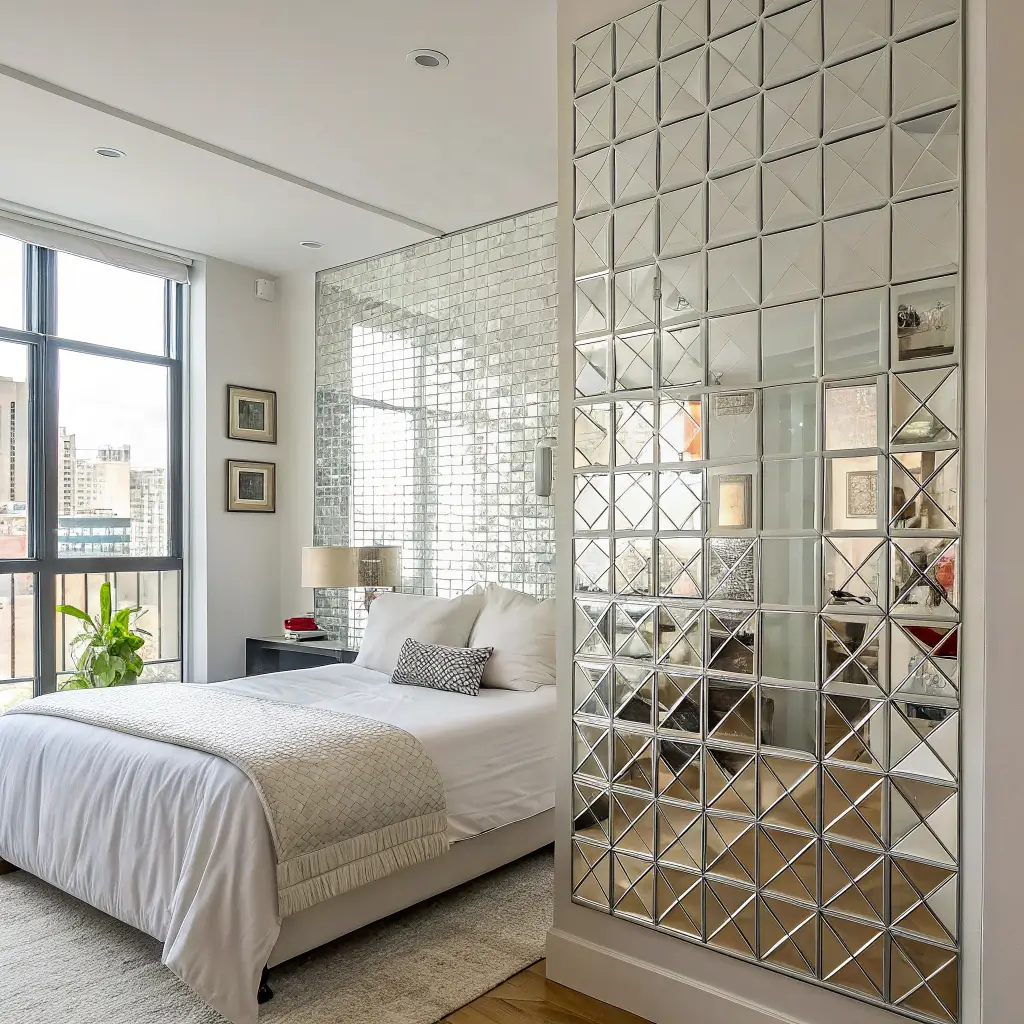
Want to make your room look bigger and brighter without knocking down walls? Mirror tiles are your answer. I installed a grid of 12-inch square mirrors behind my desk, and the light reflection is incredible.
Purchase adhesive mirror tiles online (they’re surprisingly affordable) and plan your pattern. You can go full wall or create a specific shape. I made a diamond pattern that catches morning light beautifully. The installation is straightforward – clean the wall, peel, stick, done.
What nobody tells you about mirror walls? They’re functional art. You get ready faster when you can check your outfit from multiple angles, and the light bouncing around makes even cloudy days feel brighter.
Installation Tips:
- Use a level for straight lines
- Leave small gaps between tiles for a grid effect
- Clean mirrors with newspaper for streak-free shine
Painted Terracotta Pot Makeover
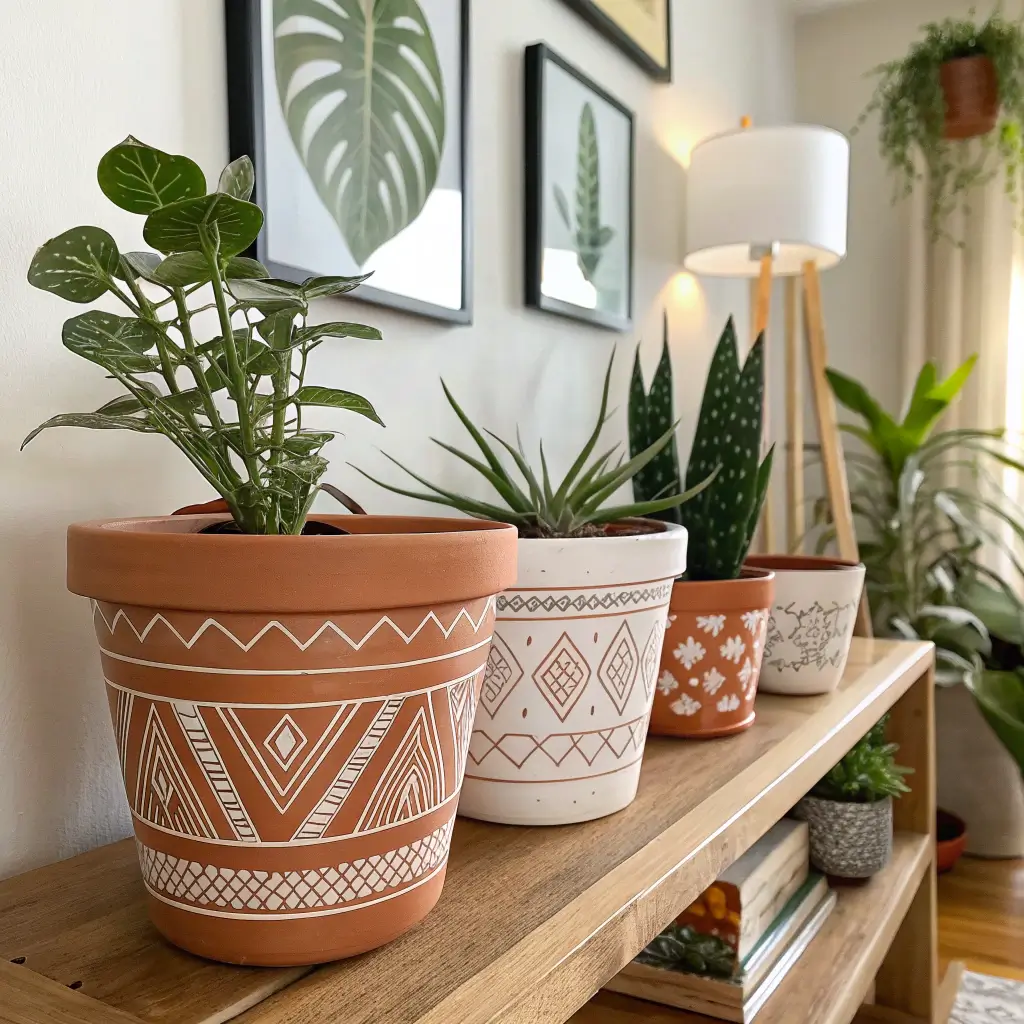
Those basic terracotta pots sitting in every garden center? They’re blank canvases waiting for transformation. I’ve painted dozens of these, and each one adds a pop of personality to my plant collection.
Start with a base coat of acrylic paint, then go wild with patterns. Geometric designs, abstract swirls, or even simple color blocking all work beautifully. Seal with a clear coat if they’ll live outdoors. The rough texture of terracotta actually helps paint adhere better than smooth surfaces.
Group different sized pots together for maximum impact. I’ve got a whole windowsill of them, each painted in a different shade of the same color family. It looks intentional and pulled-together, even though I painted them while procrastinating on actual work :/
Cardboard Arch Wall Decor
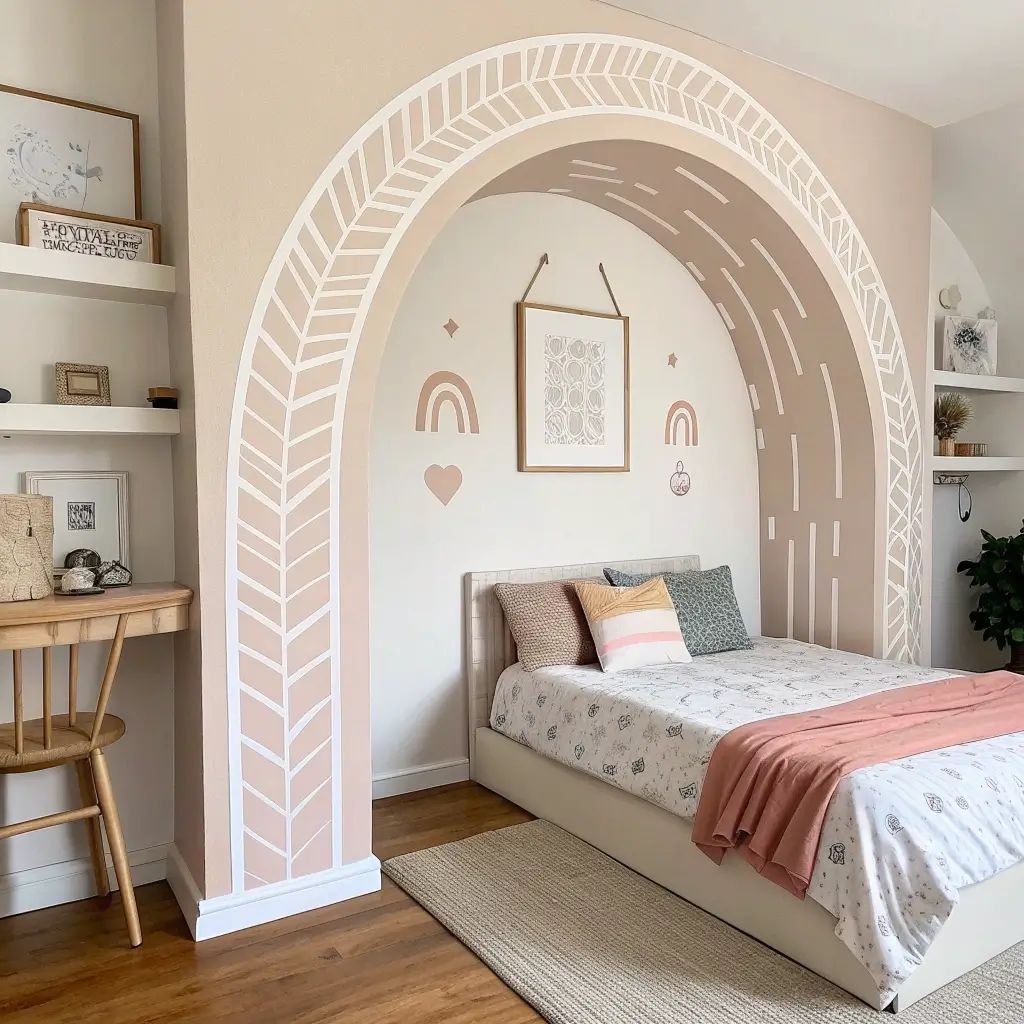
This might sound crazy, but cardboard can create stunning architectural elements. I made an arch “doorway” between my bedroom and closet area, and visitors always assume it’s built-in.
Cut your arch shape from large cardboard pieces (appliance boxes work perfectly). Cover with paint, contact paper, or fabric, then mount to the wall with command strips. The lightweight material means no drilling or permanent damage.
The psychological effect is real – arches make spaces feel more defined and elegant. Mine’s painted the same color as my walls but two shades darker, creating subtle depth. Total cost? Under $10 and one afternoon of cutting and painting.
LED Strip Ceiling Glow Design
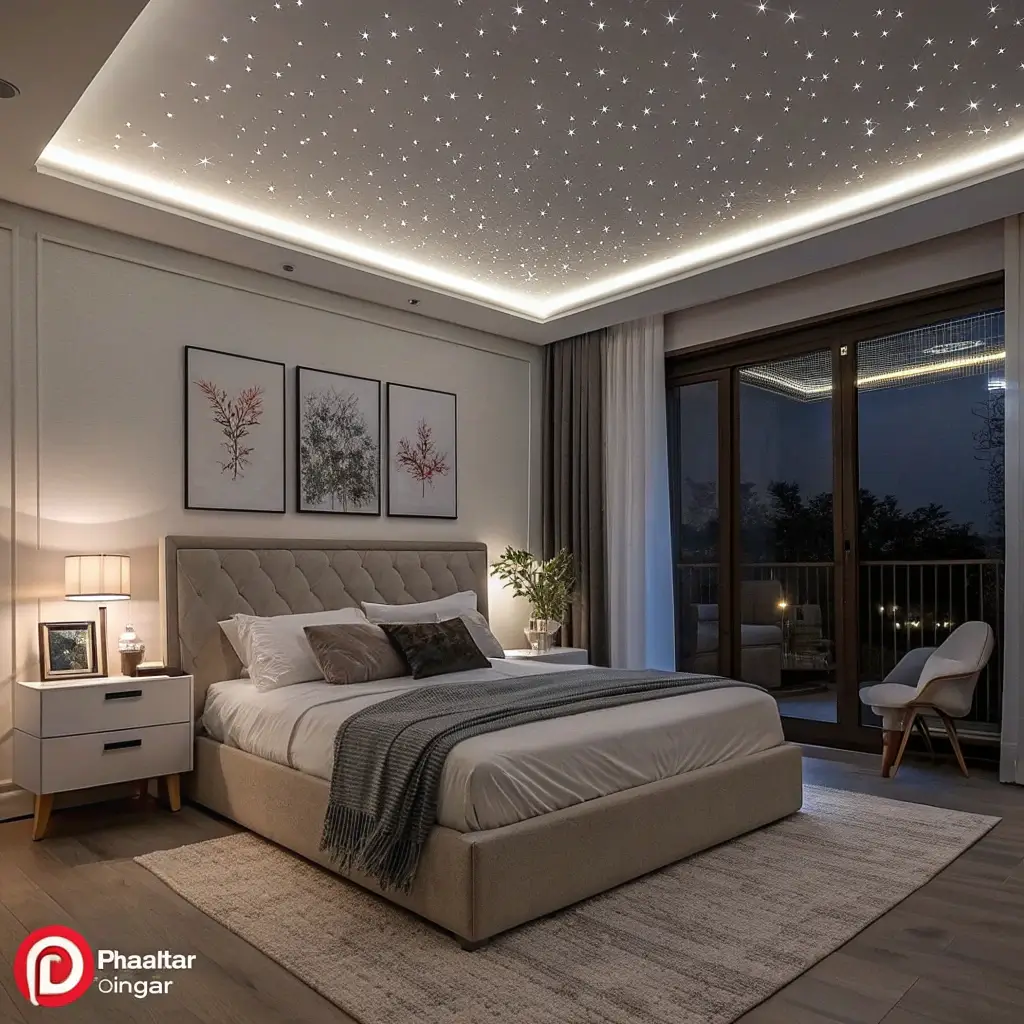
Finally, let’s talk about the ceiling – the fifth wall everyone forgets about. LED strips have revolutionized room lighting, and the ceiling application creates this incredible ambient glow that regular lights can’t match.
Run LED strips along the perimeter of your ceiling, hidden behind crown molding or in the gap where walls meet ceiling. The indirect lighting eliminates harsh shadows and makes your room feel like a high-end hotel. Most strips come with remotes for color changes and dimming.
I installed mine last month, and the vibe shift was immediate. Movie nights feel more cinematic, studying feels less harsh, and don’t even get me started on how good selfies look in this lighting. The installation takes patience but isn’t technically difficult.
Power User Tips:
- Choose warm white for cozy vibes
- Install a dimmer for versatility
- Sync with music for party mode
Wrapping Up Your DIY Journey
Look at you, armed with 15 ideas to completely transform your space! The beauty of these projects isn’t just their affordability – it’s how they let you express yourself. Your room should tell your story, showcase your interests, and make you smile when you walk in.
Start with one project that really speaks to you. Once you finish and see the difference it makes, you’ll be hooked on DIY decorating. Trust me, I started with just fairy lights, and now my place looks like a completely different apartment than when I moved in.
The real secret to great room decor? It’s not about following trends or copying someone else’s style exactly. Take these ideas, twist them, combine them, make them yours. Because at the end of the day, you’re the one living in this space. Make it somewhere you actually want to be.
Now stop reading and start creating! Your blank walls are calling, and you’ve got all the inspiration you need. Which project will you tackle first?


