15 Inspiring Staggered Floating Shelves Ideas for Every Room
You know that moment when you walk into someone’s home and their shelves just work? Not the cookie-cutter, straight-across-the-wall boring stuff, but those staggered floating shelves that make you stop and think, “Why didn’t I think of that?” Well, friend, I’ve been there, staring at my blank walls like they personally offended me.
After transforming three homes with floating shelves (and making plenty of mistakes along the way), I’ve learned that staggered arrangements completely change the game. They add movement, create visual interest, and honestly make you look like you hired an interior designer when really you just watched a few YouTube videos and crossed your fingers.
Why Staggered Floating Shelves Beat Traditional Shelving Every Time
Let’s get real for a second. Traditional shelving units eat up floor space, collect dust like they’re getting paid for it, and usually end up holding that random collection of books you swear you’ll read someday. Staggered floating shelves solve all these problems while making your space look intentionally designed rather than furnished by accident.
The best part? You control everything – the height, the spacing, the arrangement. Want to display your grandmother’s vintage teacup collection next to your succulent obsession? Go for it. Need to work around that weird light switch that the previous owner installed in the most inconvenient spot possible? Staggered shelves laugh in the face of awkward wall obstacles.
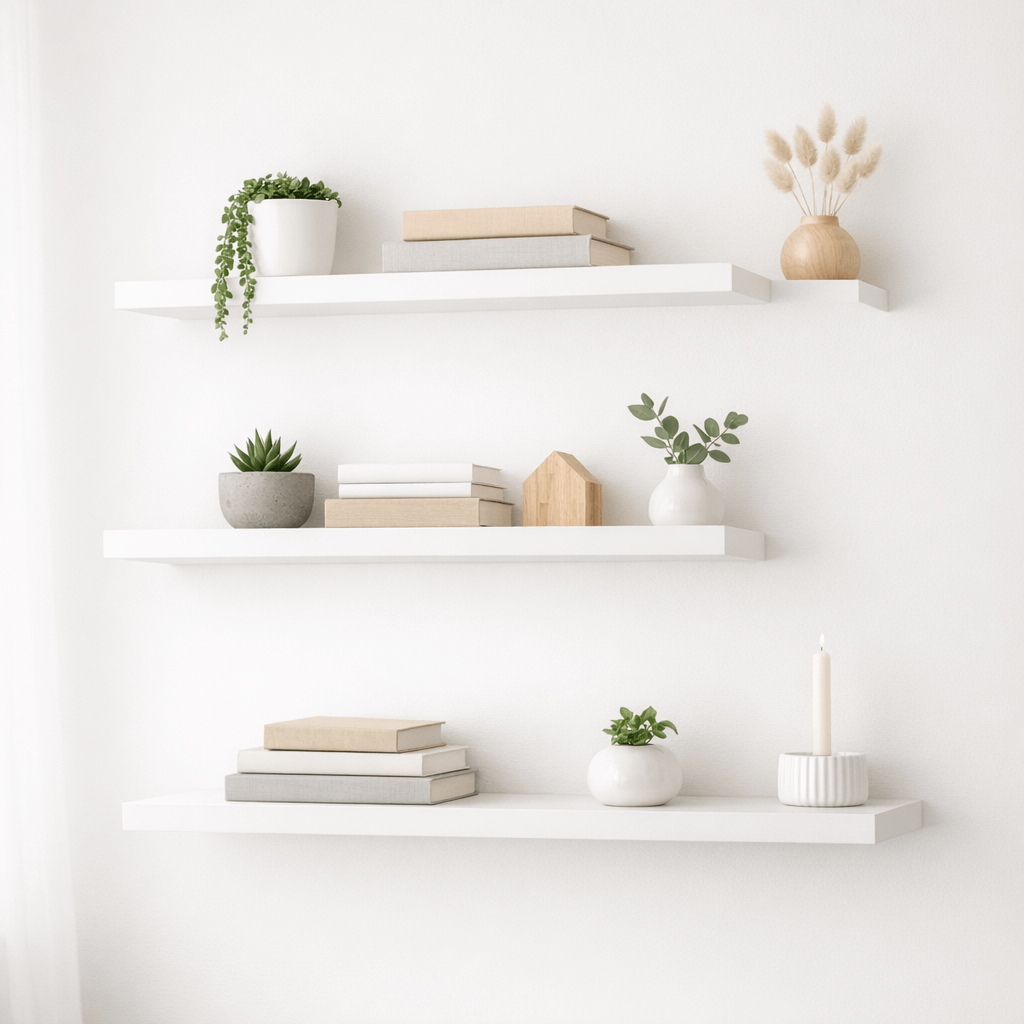
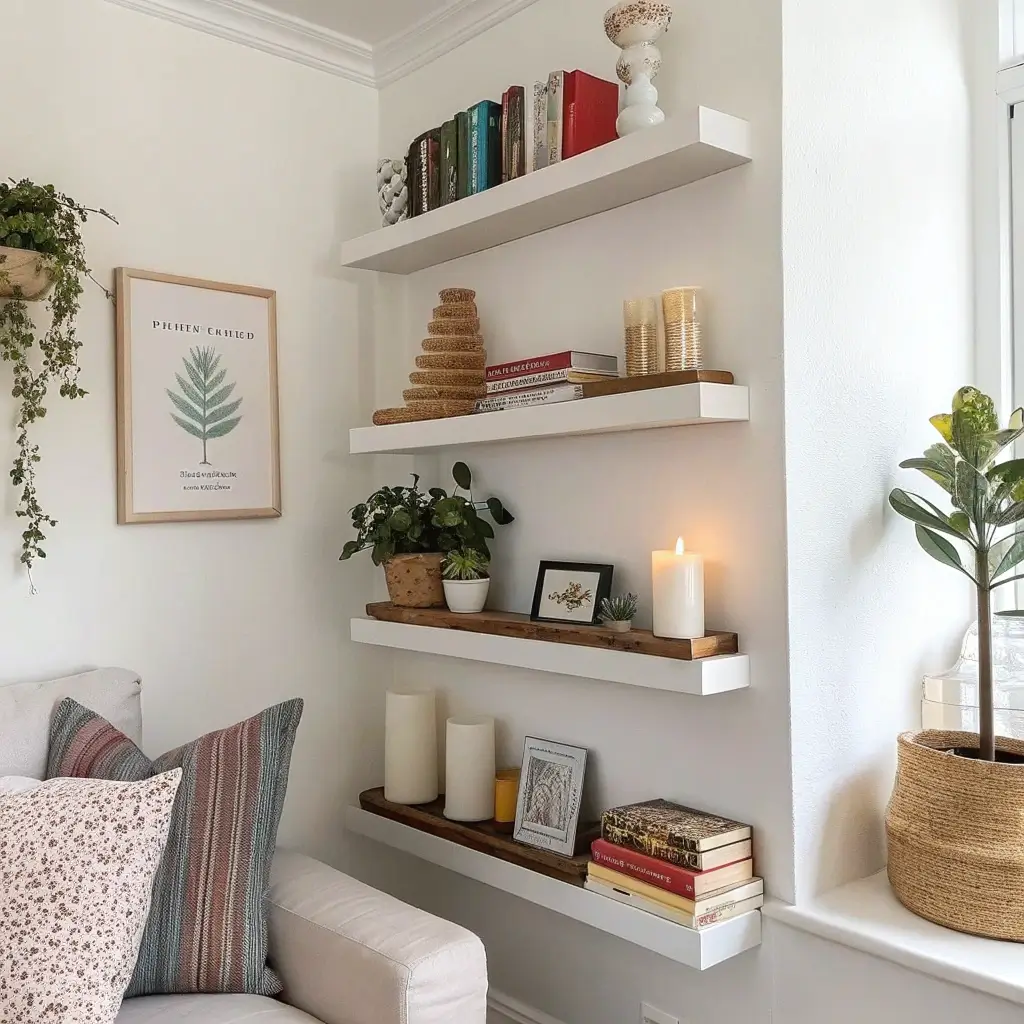
Minimalist White Staggered Shelves
White shelves on white walls might sound boring, but hear me out. I installed these in my bedroom last year, and the clean, minimalist look completely transformed the space. The trick lies in the arrangement – not the color.
Making White Work for You
Start with three to five shelves of varying lengths. I went with 24″, 36″, and 48″ shelves, arranging them in a loose zigzag pattern. The asymmetrical placement creates movement without adding visual clutter. Mount them at different heights – maybe 12 inches apart vertically, but offset horizontally by 6-8 inches.
What really makes white shelves pop? Negative space. Don’t cram every shelf full of stuff. Leave breathing room between objects, and let the wall show through. Display a few carefully chosen items – maybe a small plant, a single framed photo, and that ceramic bowl you bought on vacation.
The shadows these shelves create throughout the day add subtle dimension. Morning light hits differently than afternoon sun, giving your wall an ever-changing personality without you lifting a finger.
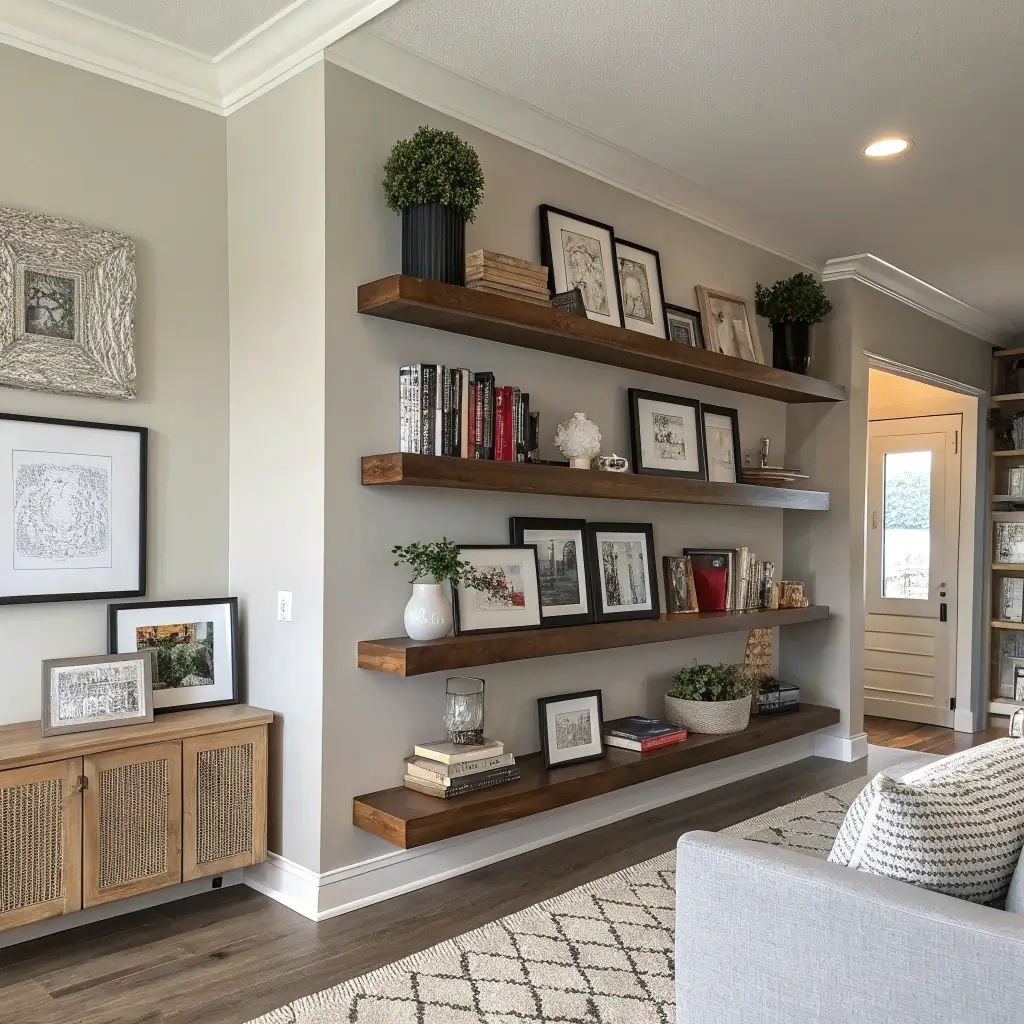
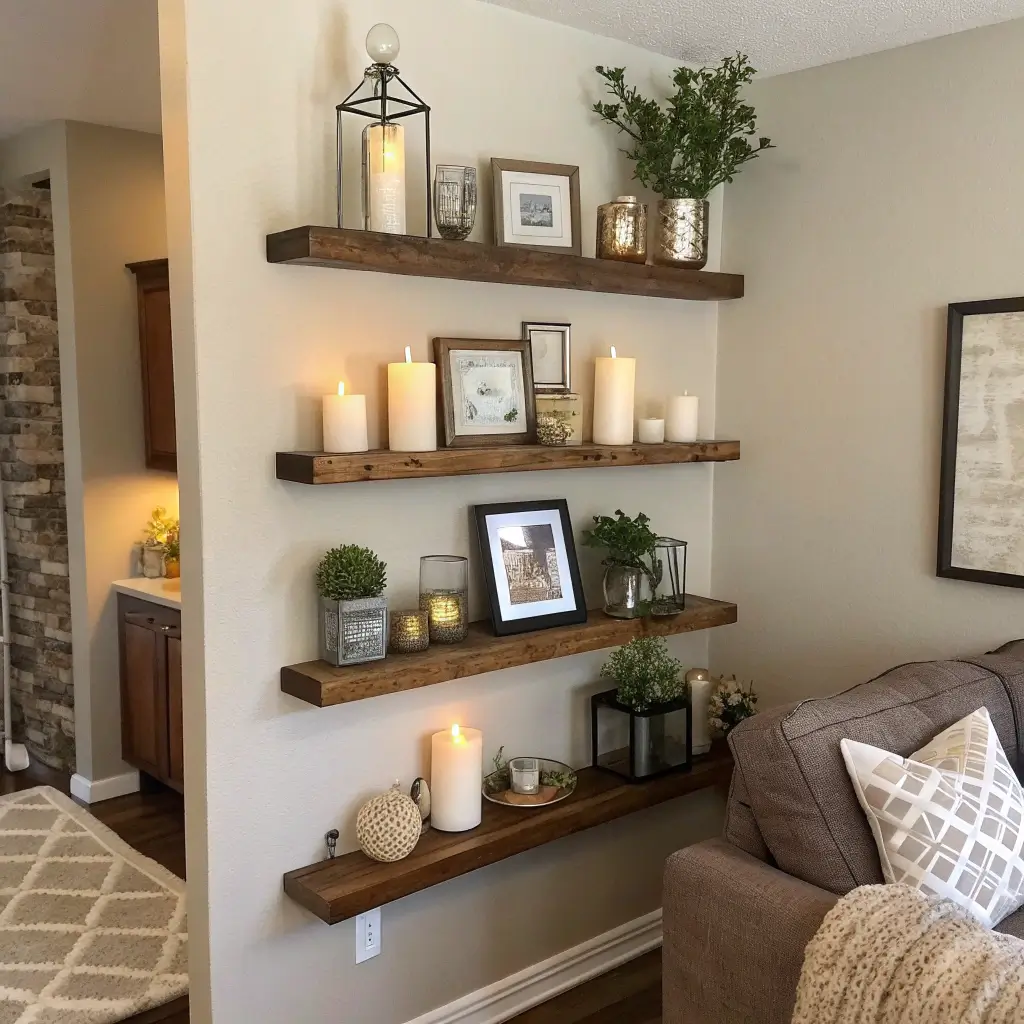
Rustic Wooden Floating Shelf Display
Nothing beats the warmth of natural wood, especially when you’re trying to make a space feel cozy and lived-in. I discovered this firsthand when I moved into a sterile apartment that felt more like a hospital waiting room than a home.
Choosing Your Wood and Arrangement
Reclaimed barn wood or live-edge slabs work beautifully for this style. Mix different wood tones if you’re feeling adventurous – walnut with pine, or oak with cedar. The natural variations in grain and color prevent the arrangement from looking too perfect or manufactured.
Mount your shelves in a scattered pattern across the wall, keeping some closer together and others farther apart. I like to create small “zones” – maybe two shelves close together on the left, then a single shelf floating off to the right. This creates visual balance without symmetry.
For styling, embrace the rustic vibe completely:
- Mason jars with dried flowers
- Vintage books with worn spines
- Small potted herbs in terracotta pots
- Antique finds from flea markets
The beauty of rustic wooden shelves? They only get better with age. Every ding and scratch adds character, telling the story of your home.
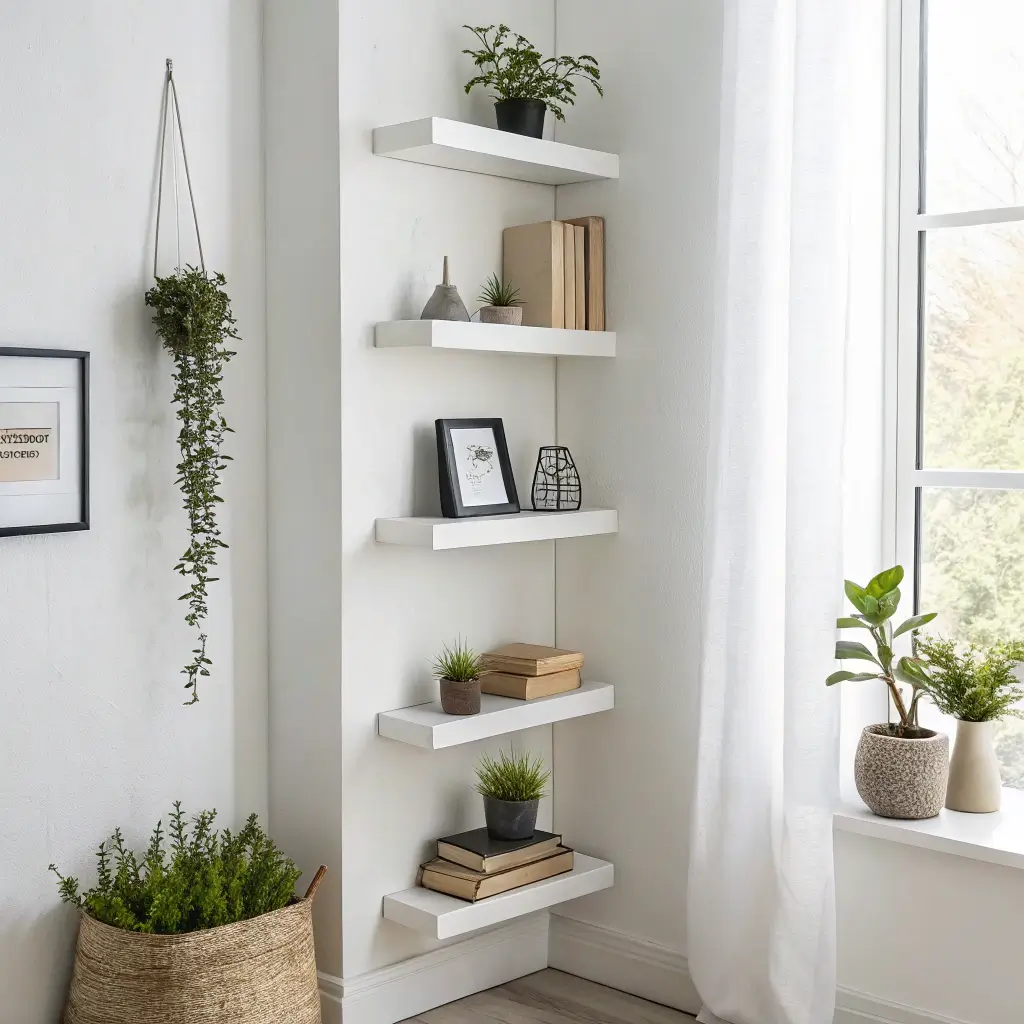
Corner Staggered Shelf Arrangement
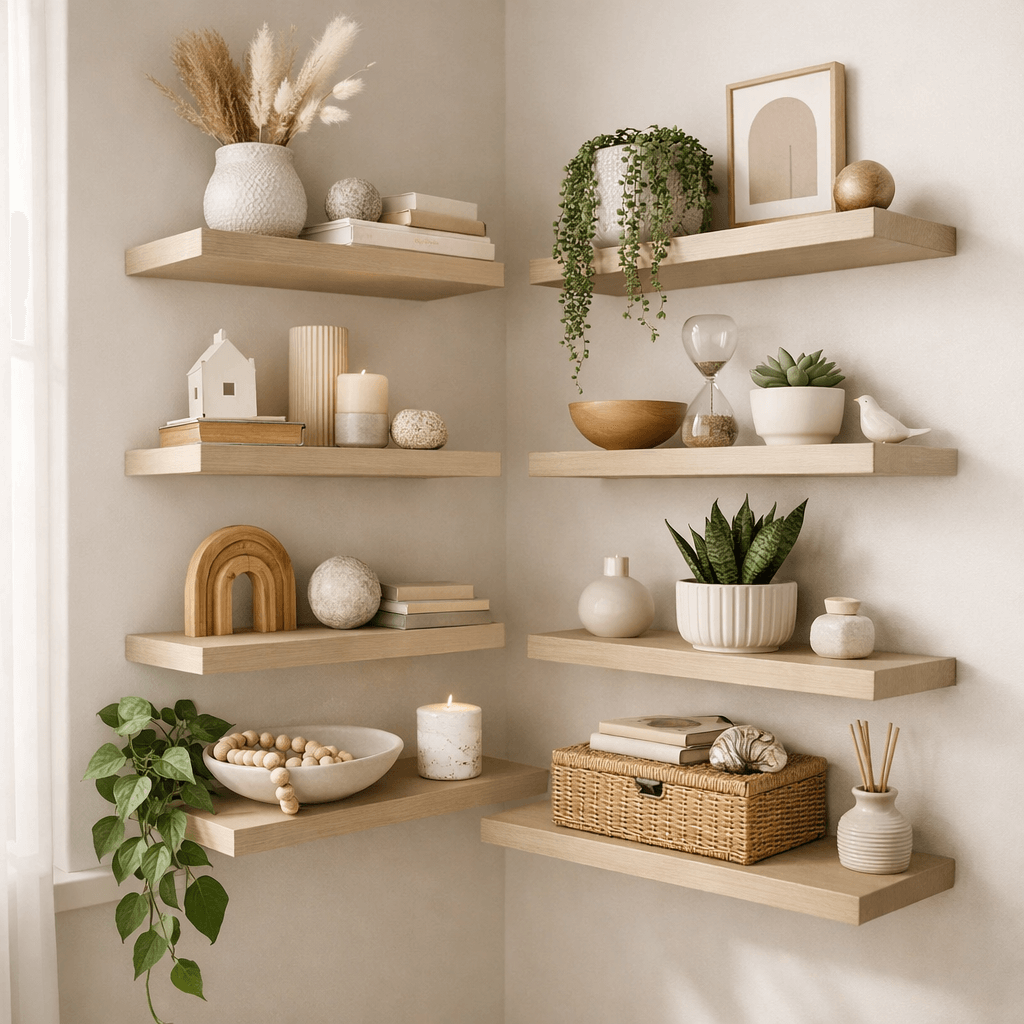
Corners – the forgotten real estate of every room. Most people stick a plant there and call it a day, but corner staggered shelves turn that dead space into a focal point.
Mastering the Corner Game
Installing shelves across a corner requires some planning, but the payoff rocks. Start with your longest shelf spanning the corner at eye level. Then work your way up and down with shorter shelves, creating a stepped effect that draws the eye upward.
I learned the hard way that measuring is everything with corner shelves. Mark your wall studs first (FYI, corner studs can be tricky to find), and use a level religiously. One crooked shelf in a corner arrangement stands out like a sore thumb.
The corner position naturally creates depth and dimension. Use this to your advantage by:
- Placing taller items on the back corners
- Layering objects at different depths
- Adding a small spotlight from below for evening drama
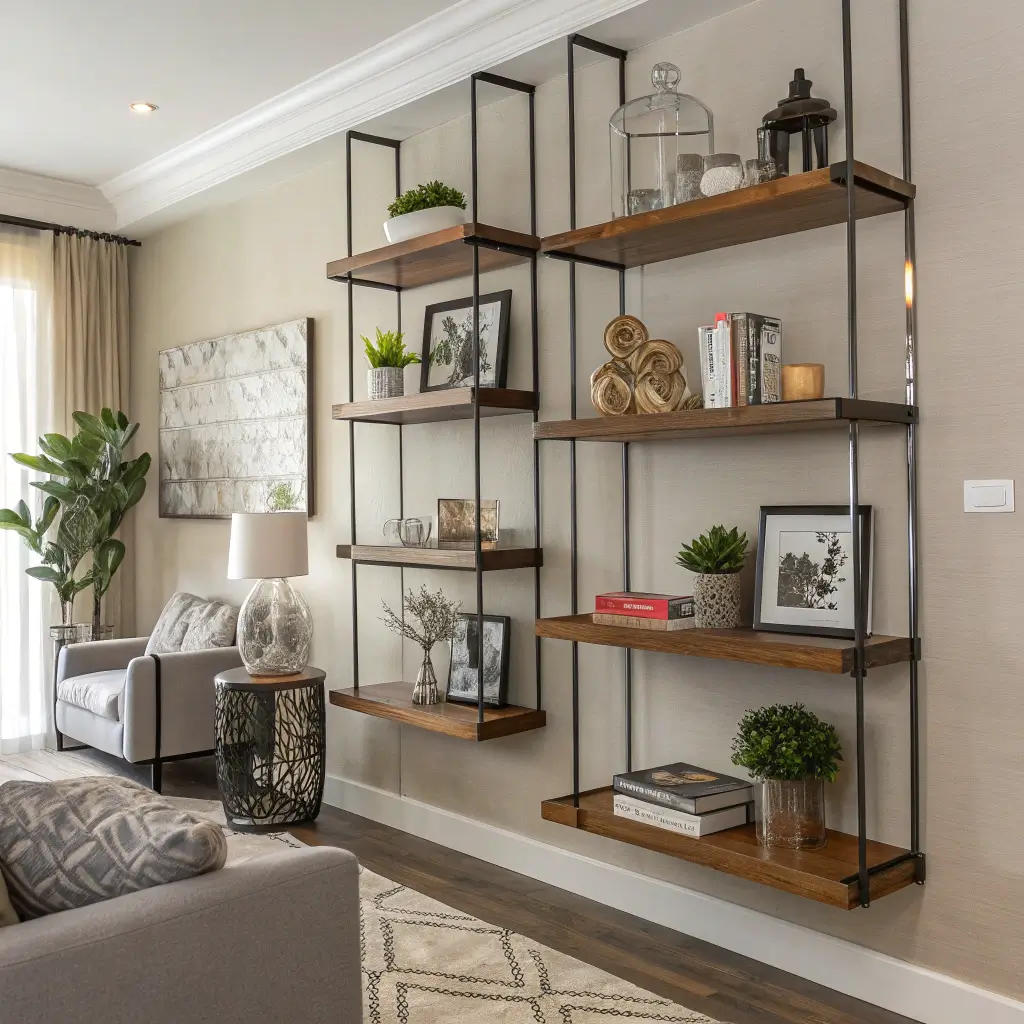
Black and Gold Modern Floating Shelves
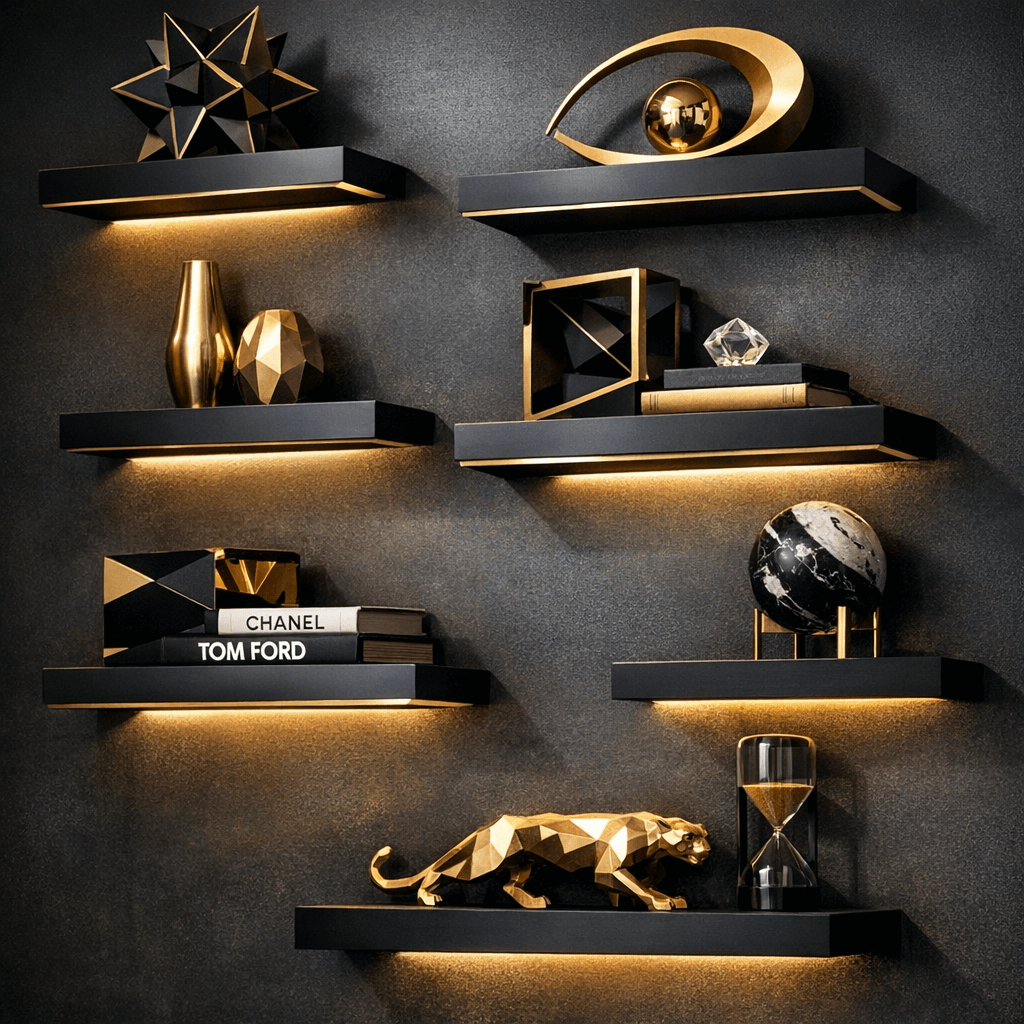
Want to make a statement without screaming for attention? Black shelves with gold brackets deliver that perfect balance of bold and sophisticated. I installed these in my home office, and suddenly my Zoom background became the talk of every meeting.
Creating the Perfect Contrast
The key to nailing this look lies in the finish quality. Matte black shelves paired with brushed gold brackets look expensive and intentional. Avoid glossy finishes – they show every fingerprint and dust particle like they’re under investigation.
Stagger these shelves in a diagonal climb across your wall. Start low on one side and work your way up, spacing them about 14-16 inches apart. This creates movement and prevents the heavy black from overwhelming the space.
Style these shelves with intention:
- White or cream objects for contrast
- Glass pieces that catch light
- A few metallic accents that echo the gold brackets
- Minimal greenery – maybe a single statement plant
Floating Shelves with Indoor Plants
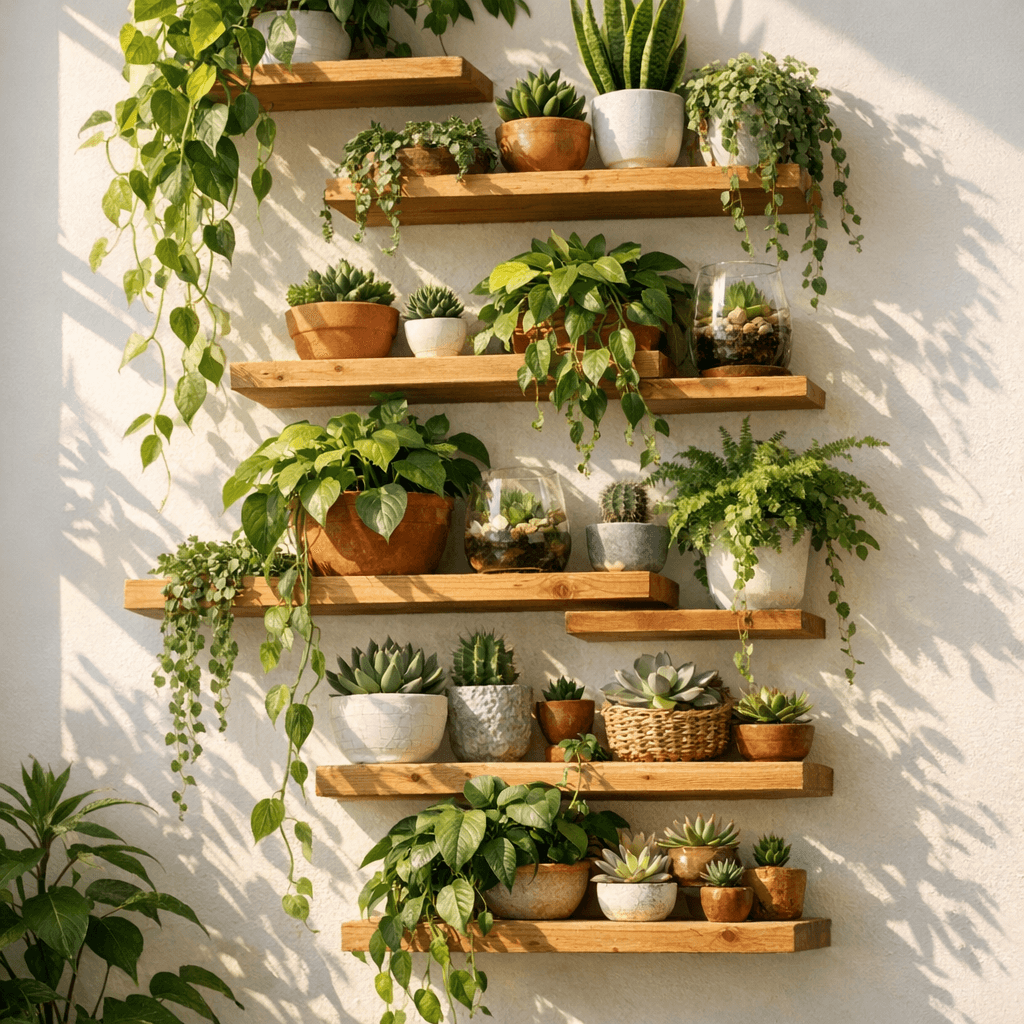
Plant parents, this one’s for you. After killing approximately 47 plants (I stopped counting after the third fiddle leaf fig), I finally cracked the code on creating a living wall with staggered shelves.
Building Your Indoor Jungle
Mix shelf lengths to accommodate different pot sizes. Longer shelves hold multiple small succulents, while shorter ones showcase that dramatic monstera you’re definitely not obsessed with. Install them at varying heights, creating a cascade effect down your wall.
Consider your plants’ light needs when arranging shelves. Place sun-lovers higher up near windows, with shade-tolerant varieties below. This isn’t just aesthetic – it’s practical plant parenting.
Pro tips from my plant journey:
- Install shelves slightly tilted back (just 1-2 degrees) to prevent pots from sliding
- Choose shelves at least 8 inches deep for stability
- Add LED grow lights under some shelves for drama and plant health
- Keep a stepstool nearby – you’ll need it for watering
Staggered Shelves for Small Spaces
Small space living taught me that every square inch counts. Vertical staggered shelves maximize storage without making your room feel like a storage unit.
Making Small Spaces Work Harder
In tight spaces, think narrow and tall. Use shelves no wider than 24 inches, but stack them from floor to ceiling in an irregular pattern. This draws the eye up, making your ceiling feel higher than it actually is.
I discovered that alternating shelf depths creates visual interest without taking up extra wall space. Mix 6-inch deep shelves with 8-inch ones, staggering them both horizontally and in depth. This creates shadows and dimension that make the wall feel less flat.
Small space shelf styling rules:
- Keep color palettes light and cohesive
- Use clear containers to reduce visual weight
- Display items at angles to create movement
- Leave some shelves partially empty for breathing room
Also Read: 15 Charming Coffee Bar with Floating Shelves Ideas Made Simple
Colorful Floating Shelves for Kids’ Rooms
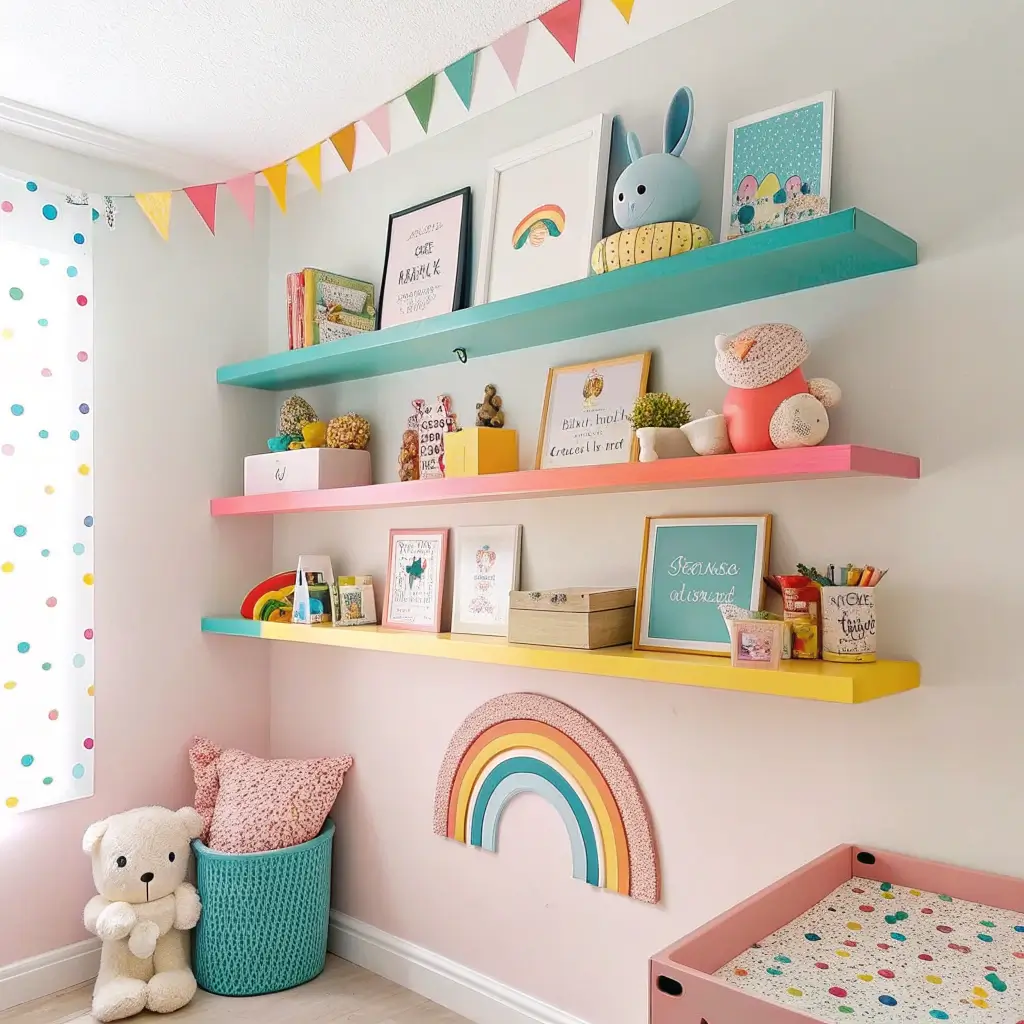
Kids’ rooms need storage that grows with them, and colorful staggered shelves deliver both function and fun. After redoing my nephew’s room three times in five years (kids grow fast, who knew?), I learned what works.
Creating Playful Yet Practical Storage
Paint shelves in a gradient – maybe starting with light blue at the bottom and transitioning to navy at the top. Or go bold with rainbow shelves staggered across the wall like a modern art installation. Kids love the visual stimulation, and you’ll love the Instagram-worthy results.
Mount shelves at kid-accessible heights for the lower ones, with display shelves higher up for those precious items that shouldn’t be touched with sticky fingers. Create zones: low shelves for everyday toys, middle shelves for books, high shelves for display.
The staggered arrangement makes organizing fun:
- Each shelf gets a designated purpose
- Different colors can represent different categories
- The irregular pattern prevents the room from feeling too structured
- Kids actually want to put things away (sometimes) 🙂
Industrial Pipe Staggered Shelves
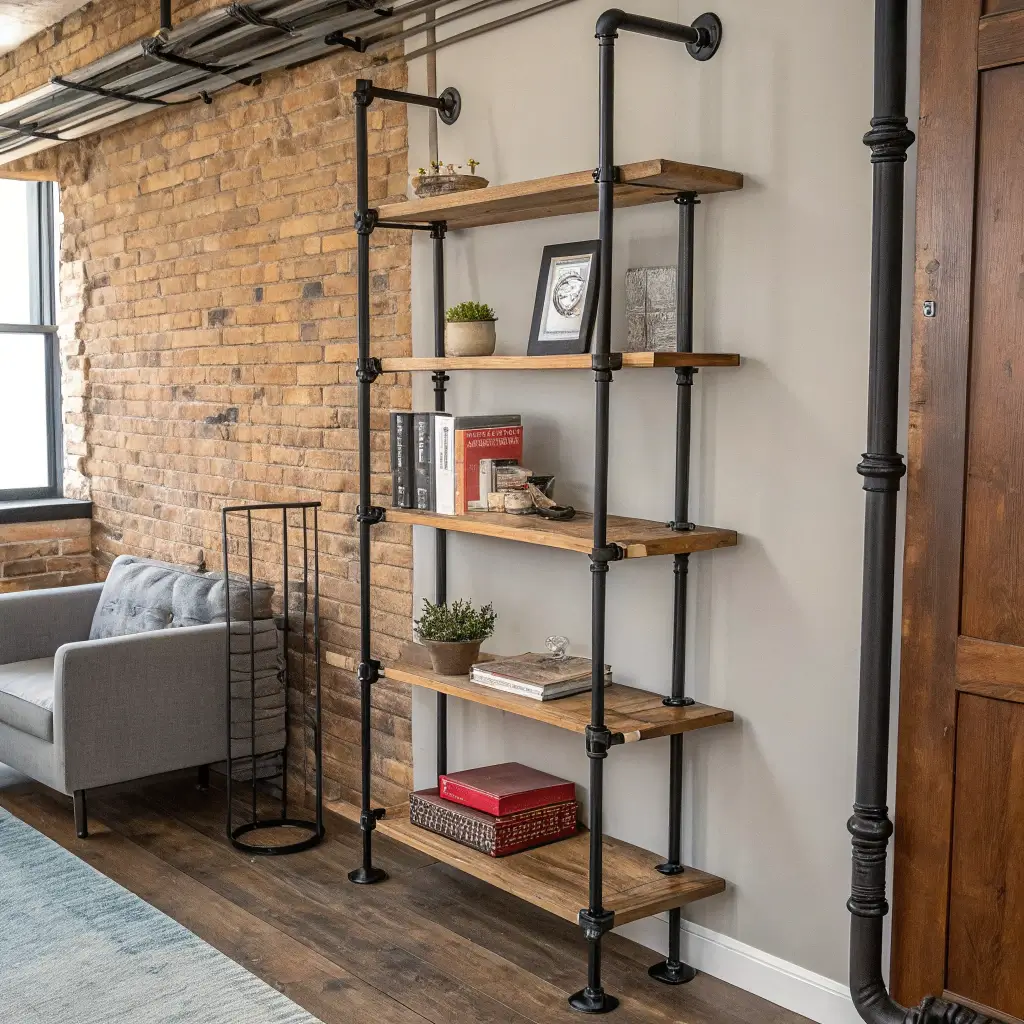
The industrial look never really goes out of style, does it? Pipe shelving brings that raw, urban edge while still being completely functional. I built my first set for my garage and loved them so much they migrated to the living room.
Getting the Industrial Look Right
Black iron pipes with wooden shelves create the classic industrial combo. Stagger them asymmetrically across your wall, using different pipe configurations for each shelf. Some can have supports on both ends, others just one side for a cantilever effect.
The beauty of pipe shelving? Visible hardware becomes part of the design. Those flanges and elbows aren’t hiding – they’re the star of the show. Use this to your advantage by creating interesting support patterns that add to the staggered effect.
Industrial styling tips that work:
- Mix in Edison bulb lighting attached to the pipes
- Display vintage items like old cameras or typewriters
- Add leather-bound books and metal containers
- Include one unexpected soft element, like a plant
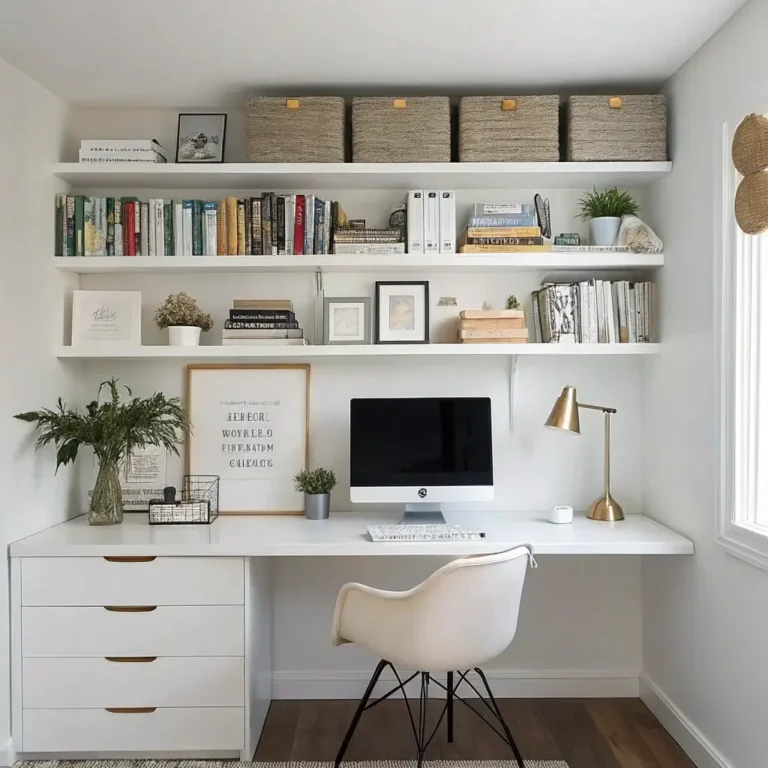
Floating Shelves Above a Desk Setup
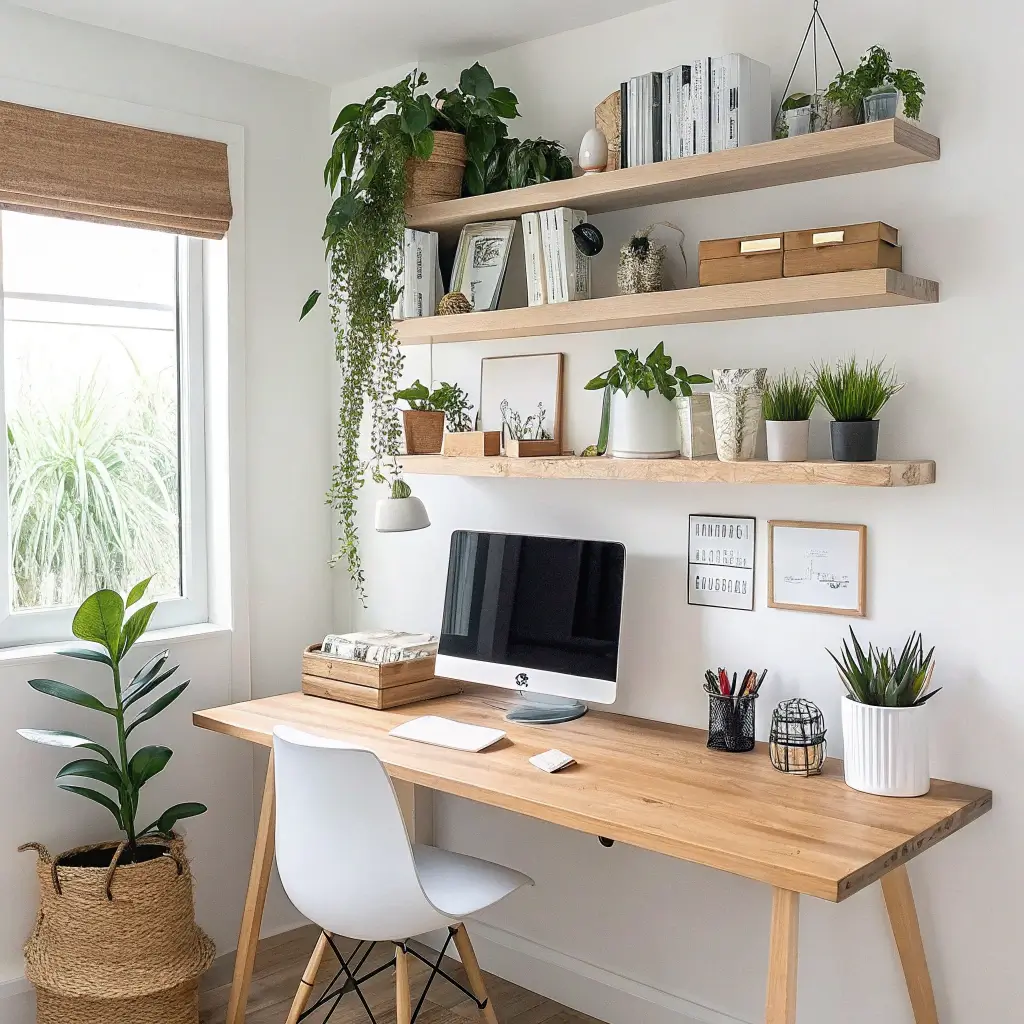
Your workspace needs storage that doesn’t interfere with productivity. Staggered shelves above a desk keep essentials within reach while maintaining that clean, organized look we all pretend to have on video calls.
Optimizing Your Workspace Wall
Start your lowest shelf at least 18 inches above your desk surface – trust me, you need that clearance for your monitor and your Monday morning coffee reach. Stagger shelves upward and outward from there, creating a pyramid-like arrangement that frames your workspace.
I learned that depth matters more here than anywhere else. Keep shelves to 6-8 inches deep max. Anything deeper casts shadows on your workspace and makes you feel boxed in. Nobody needs that energy while working.
Desk shelf organization that actually works:
- Reference materials on the lowest shelf
- Decorative items at eye level when seated
- Storage boxes on higher shelves
- Leave the center area above your monitor clear
Also Read: 15 Inspiring Floating Shelves Decor Ideas for Modern Spaces
Open Wall Gallery with Staggered Shelves
Picture ledges and floating shelves combine to create a dynamic gallery wall that you can change whenever the mood strikes. No more nail holes everywhere from constantly rehung frames!
Creating Your Gallery Display
Mix shallow picture ledges with deeper floating shelves in a staggered pattern across your wall. This creates layers where art can lean, overlap, and interact with three-dimensional objects. The arrangement should feel organic, like it evolved over time.
Start with your largest piece as an anchor point, then build out from there. Vary the spacing – some shelves close together for intimate groupings, others floating solo for breathing room. This prevents the gallery from feeling too rigid or formulaic.
Gallery styling secrets:
- Layer artwork – small pieces in front of larger ones
- Mix media – photos, paintings, prints, and objects
- Include unexpected items like small sculptures or plants
- Change displays seasonally without moving shelves
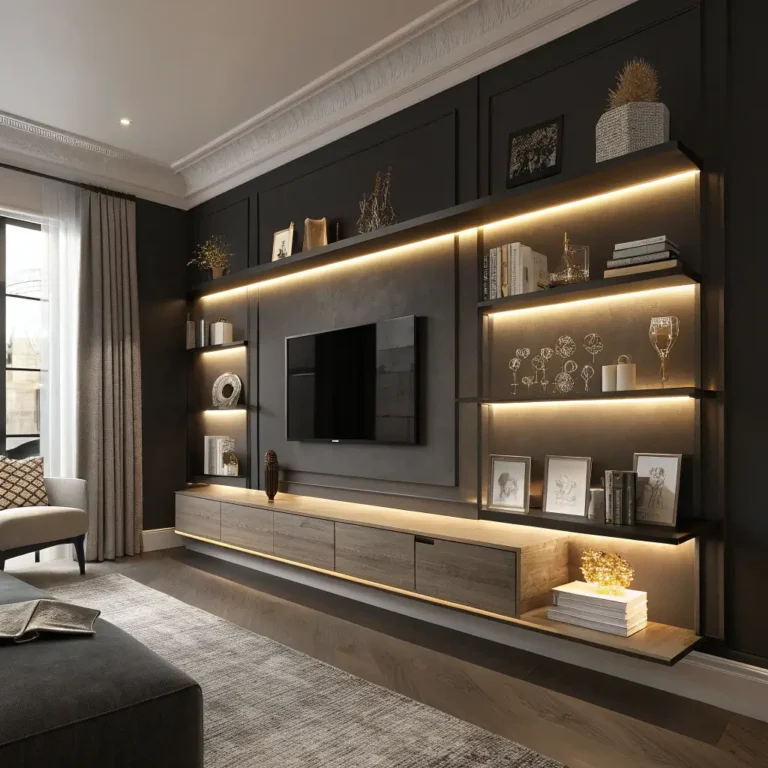
Floating Shelves with Hidden Lighting
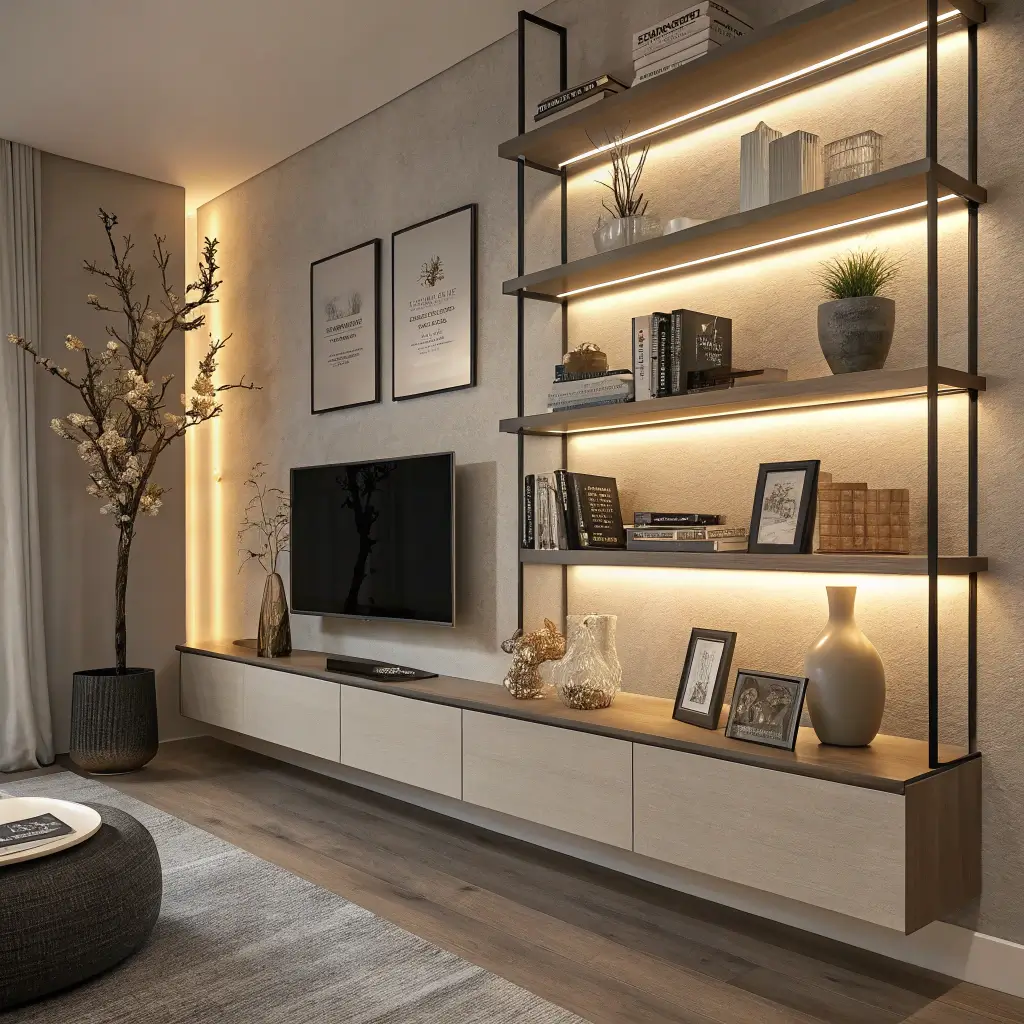
Want to feel fancy? Integrated lighting takes staggered shelves from functional to absolutely stunning. After installing LED strips under my living room shelves, I basically never turn on the overhead lights anymore.
Lighting Your Shelves Like a Pro
Install LED strips on the underside of each shelf, hidden behind a small lip at the front edge. The staggered arrangement creates pools of light at different levels, adding incredible depth to your wall. Use warm white LEDs for a cozy vibe, or go with color-changing strips if you’re feeling adventurous.
The key to great shelf lighting? Diffusion. Nobody wants to see individual LED dots. Use aluminum channels with frosted covers, or position strips far enough back that the light washes the wall evenly.
Lighting placement strategies:
- Bottom lighting for shelves displaying glass or translucent objects
- Back lighting for dramatic silhouettes
- Top lighting for reading areas or task zones
- Dimmer switches for mood control (game changer!)
Bathroom Staggered Shelves for Storage
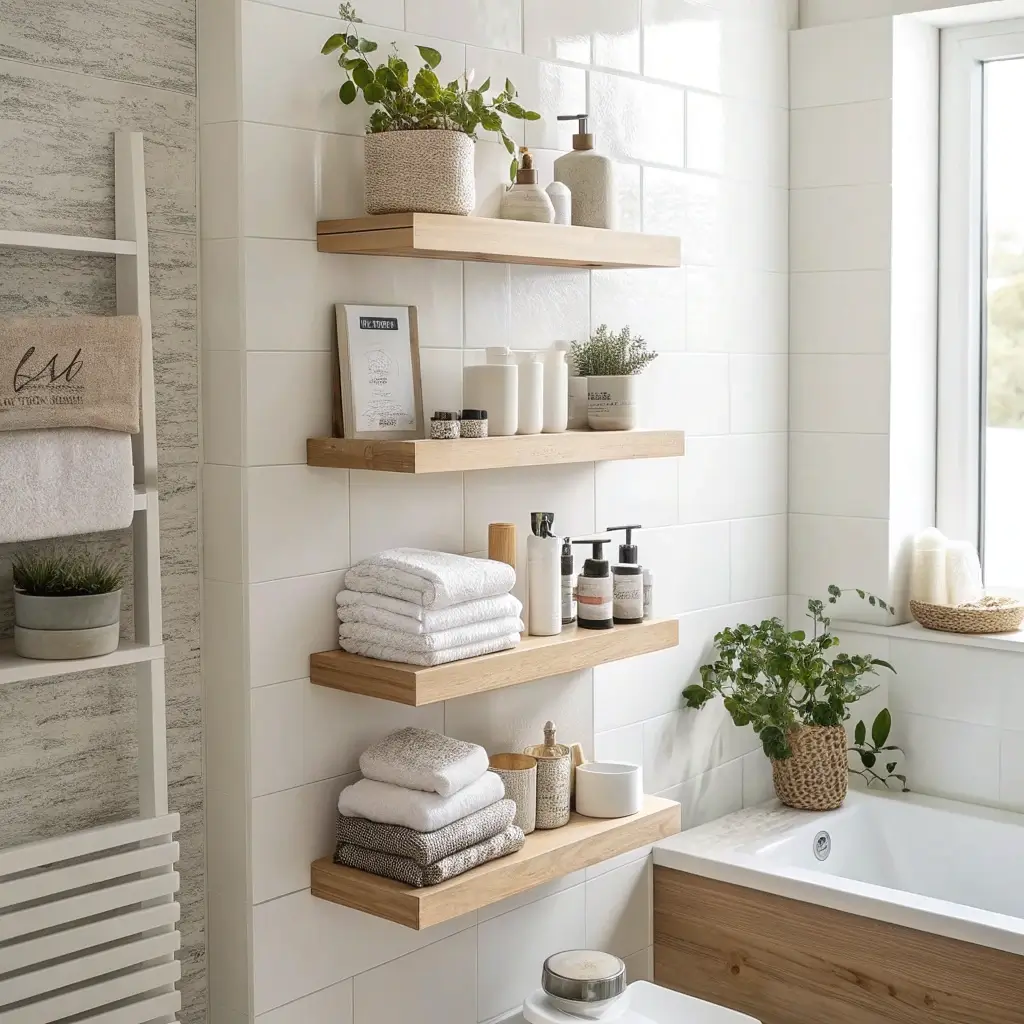
Bathrooms need storage that handles humidity while looking good. Staggered bathroom shelves maximize vertical space without making your bathroom feel like a closet.
Bathroom Shelving That Works
Choose materials wisely – sealed wood, glass, or metal work best in humid environments. Stagger shelves around existing fixtures, working with your mirror, not against it. I like to flank mirrors with asymmetrical shelving for balance without boring symmetry.
Keep shelves narrow in bathrooms – 4-6 inches deep is plenty for most toiletries. This prevents the space from feeling cramped while providing surprising storage capacity. Mount them high enough to avoid head bumps (learned that one the hard way).
Bathroom shelf essentials:
- Matching containers to corral small items
- Rolled towels for spa vibes
- A small plant that loves humidity
- Pretty soap dispensers that deserve display
Also Read: 15 Creative Corner Floating Shelves Ideas for Any Room
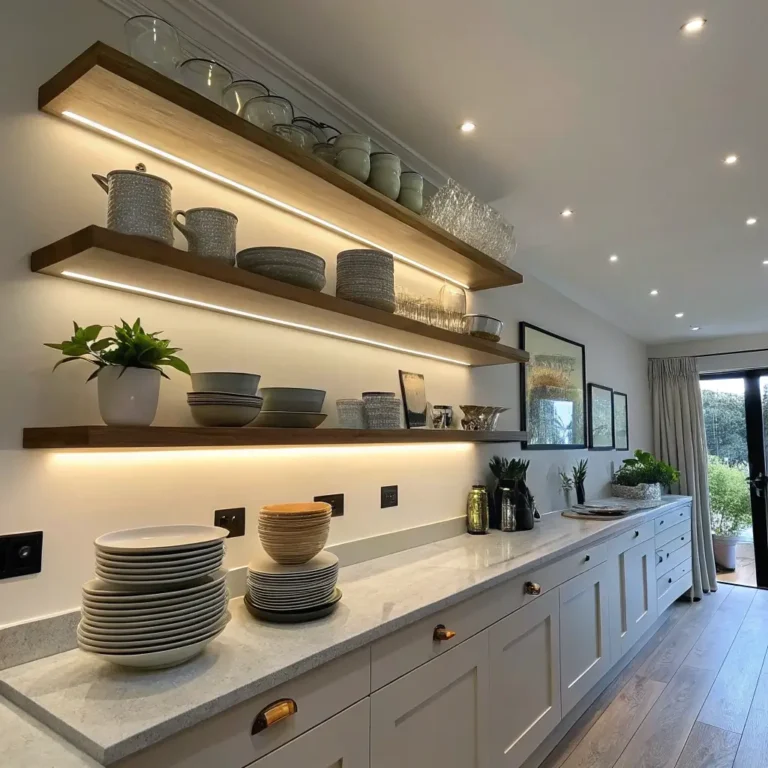
Kitchen Floating Shelves for Dishes
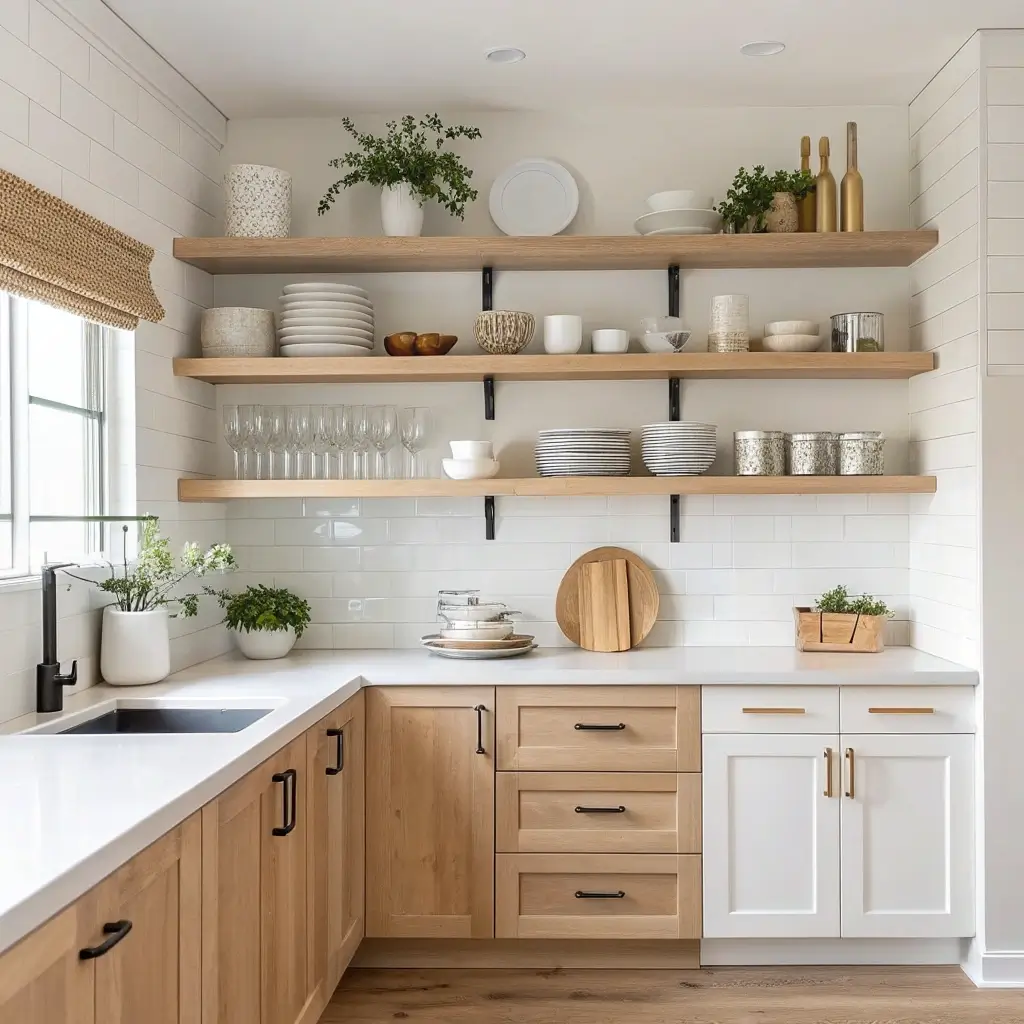
Open kitchen shelving seems scary until you try it. Staggered floating shelves in the kitchen create an airy feel while keeping dishes accessible. Plus, they force you to keep only the dishes you actually use – goodbye, random mugs from 2003!
Making Kitchen Shelves Work
Install shelves at varying heights based on what you’ll store. Lower shelves for everyday dishes, higher ones for special occasions. Stagger them to create visual interest while maintaining practical zones. The asymmetry prevents your kitchen from looking like a restaurant supply room.
I recommend 12-inch deep shelves for dinner plates, with shallower ones for glasses and mugs. The varying depths create shadow lines that add dimension to your kitchen wall.
Kitchen shelf styling rules:
- Stack dishes by color for cohesion
- Display your best pieces – hide the ugly stuff
- Mix in cutting boards or serving pieces vertically
- Add a few non-dish items like cookbooks or plants
Staggered Shelves with Mixed Materials
Why stick to one material when you can mix things up? Combining materials in your staggered shelf arrangement adds layers of visual interest that make people stop and stare.
Mastering the Mix
Combine wood shelves with metal ones, or alternate between glass and concrete. The staggered arrangement lets each material shine without competing. I paired walnut shelves with white marble ones in my dining room, and the contrast still makes me smile every morning.
The trick to mixing materials successfully? Keep the brackets consistent. This creates continuity even as the shelf materials change. Use the same finish on all hardware to tie the look together.
Material combinations that work:
- Wood and metal for industrial warmth
- Glass and wood for modern organic
- Concrete and copper for unexpected elegance
- Acrylic and wood for contemporary lightness
Floating Shelves with Decorative Accents
The final touch that makes staggered shelves sing? Thoughtful styling with decorative accents. This is where your personality shines through, turning functional storage into personal expression.
Styling Your Staggered Shelves
Think in odd numbers – groups of three or five objects create more visual interest than even numbers. Mix heights, textures, and shapes across your staggered shelves. Each shelf should tell part of your story without screaming for attention.
I follow the rule of thirds when styling: one-third books, one-third objects, one-third empty space. This creates balance without looking calculated. The staggered arrangement means you can break this rule on individual shelves as long as the overall display feels balanced.
Decorative accent ideas:
- Vintage finds that spark conversation
- Travel souvenirs with stories attached
- Handmade pottery for organic texture
- Family photos in unexpected frames
- Small mirrors to reflect light and space
Making It All Work Together
After installing staggered floating shelves in every room I’ve lived in (and helping friends with theirs), I can tell you that confidence beats perfection every time. Sure, measure twice and mount once, but don’t obsess over getting everything mathematically perfect. IMO, the slight irregularities make the arrangement feel more organic and personal.
Remember, these shelves should work for your life, not just look good in photos. If you need to store your collection of vintage lunch boxes or display your kid’s art projects, do it. The best staggered shelf arrangements reflect who you are, not what some magazine says you should be.
Start small if you’re nervous – maybe three shelves in a powder room or above a console table. Once you see how staggered floating shelves transform dead wall space into dynamic, functional art, you’ll be planning arrangements for every room. Trust me, it’s addictive in the best way possible.
Your walls are waiting. What story will your staggered shelves tell? :/