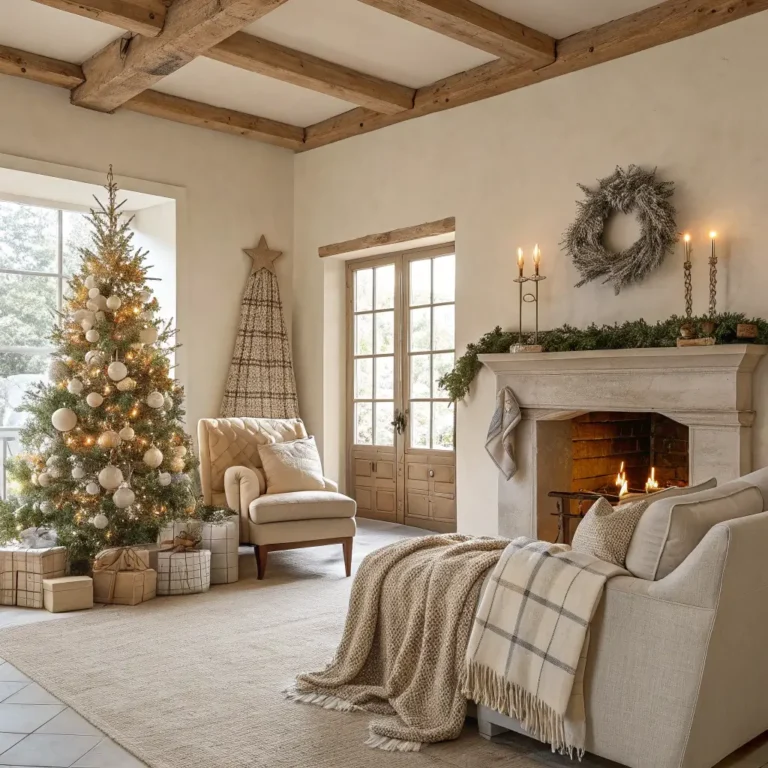
10 Elegant Window Christmas Decor Ideas for Winter Style
You know that feeling when you’re driving through your neighborhood during the holidays and suddenly spot that house—the one with the windows that make you slow down and stare? Yeah, I want your house to be that house this year. And trust me, you don’t need to hire a professional decorator or blow your entire December budget to make it happen.
Windows are basically the eyes of your home, and during Christmas, they’re your chance to show off your festive personality to everyone who passes by. I’ve spent years perfecting my window game (and made plenty of mistakes along the way), so I’m sharing my favorite elegant ideas that actually work without making you want to pull your hair out.
Whether you’re a minimalist who breaks out in hives at the thought of tinsel or someone who believes more is more when it comes to holiday cheer, I’ve got something here for you. Let’s transform those plain glass panes into magical winter wonderlands that’ll have your neighbors asking for your secrets.
Snowy Fairy Light Window Frame
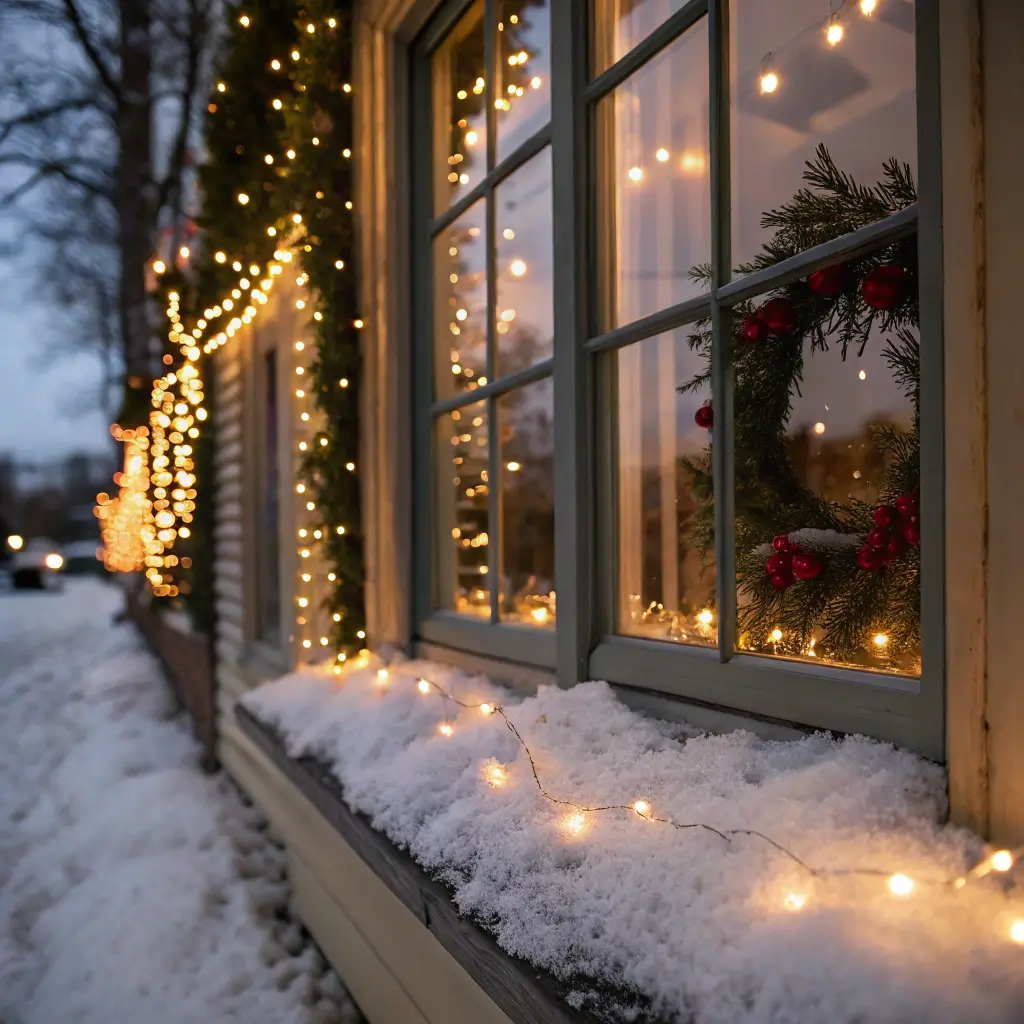
This one’s my absolute favorite, and I’ll tell you why—it looks way more expensive than it actually is. Picture this: delicate white lights outlining your window frame like fresh snowfall, creating this dreamy glow that makes everything look straight out of a Hallmark movie.
Here’s what makes this idea genius: you’re basically creating a luminous picture frame for whatever’s happening inside your home. I discovered this trick three years ago when my outdoor decorations got ruined in a storm, and I had to improvise with what I had indoors. Best accident ever.
Setting Up Your Fairy Light Frame
Start by measuring your window frame carefully—nothing ruins the elegant vibe faster than lights that don’t quite reach the corner. Get yourself some cool white LED fairy lights (warm white works too, but cool white really nails that snowy effect). You want the ones with the tiny bulbs on copper wire, not those chunky old-school Christmas lights your dad keeps in the garage.
Pro tip: Use clear command hooks or tiny nail-in cable clips to secure the lights. These practically disappear against white window frames, and they won’t damage your paint job. Space them about 6-8 inches apart for the best look.
Adding the Snow Effect
Want to level up this look? Add some artificial snow spray to the bottom corners of your windows. Just a light dusting creates this amazing frost creeping up the glass effect. Pair it with some battery-operated timer lights, and you won’t have to remember to turn them on every evening. Your windows will light up automatically as the sun sets—how’s that for magical?
Rustic Garland Curtain Window
Ever walk into one of those fancy ski lodges and wonder how they make everything look so cozy and expensive at the same time? This rustic garland curtain trick is basically their secret sauce, and I’m about to spill it all.
The idea here is to create layers—think of it as window decorating in 3D. You’re not just slapping something flat against the glass; you’re building depth that draws people in. I learned this from a decorator friend who charges ridiculous amounts for “holiday consultations” (sorry, Sarah, but the secret’s out now).
Choosing Your Garland Materials
Skip the plastic stuff from the dollar store—it photographs terribly and looks even worse in person. Instead, grab some real or high-quality faux pine garland. Mix in some eucalyptus branches if you’re feeling fancy. The combination of textures is what sells this look.
Here’s my personal formula that never fails:
- Base layer: Full pine garland (6-9 feet depending on window size)
- Texture additions: Dried orange slices, cinnamon sticks, small pinecones
- Light element: Warm white battery-operated lights woven through
- Statement pieces: 3-5 burgundy velvet ribbons tied at varying heights
Installation Without the Hassle
Forget complicated hanging systems. Get yourself a tension rod that fits inside your window frame—the kind you’d use for a shower curtain. Wrap your garland around it before installing, then pop it in place. Takes literally five minutes, and you can adjust the draping until it looks perfect.
The best part? When you want to open your curtains during the day, the garland becomes a gorgeous valance. Two looks for the price of one—now that’s what I call smart decorating.
Hanging Ornament Window Display

Remember making those paper snowflakes in elementary school and taping them to windows? This is like the grown-up, sophisticated version of that childhood joy. Except now we have better materials and nobody’s judging our scissors skills.
I stumbled onto this idea when my cat knocked over my Christmas tree (twice) and I needed somewhere else to display my favorite ornaments. Turns out, windows make the perfect backdrop for showing off those special pieces you’ve collected over the years.
Creating Your Floating Display
The key to nailing this look is varying your heights and sizes. You want it to look intentional but not rigid—like ornaments are gently floating in your window. Use clear fishing line for an almost invisible hanging effect, or go with thin ribbon if you want that to be part of the design.
Here’s how I organize mine:
- Large statement ornaments (3-4): These anchor your display
- Medium classics (5-7): Fill in the gaps
- Small delicate pieces (8-10): Add detail and interest
- Unexpected elements: Maybe a vintage cookie cutter or two
The Secret to Professional-Looking Arrangements
Want to know the trick that makes this look magazine-worthy? Create invisible grid lines in your mind (or with light pencil marks on your window frame that you’ll erase later). Hang your ornaments so they fall at different points on this grid, but never line them up perfectly. The slightly off-kilter placement is what makes it look organic and elegant instead of like a store display.
Also Read: 10 Brilliant Christmas Entryway Table Decor Ideas Quick Glam
Candy Cane Striped Window Theme
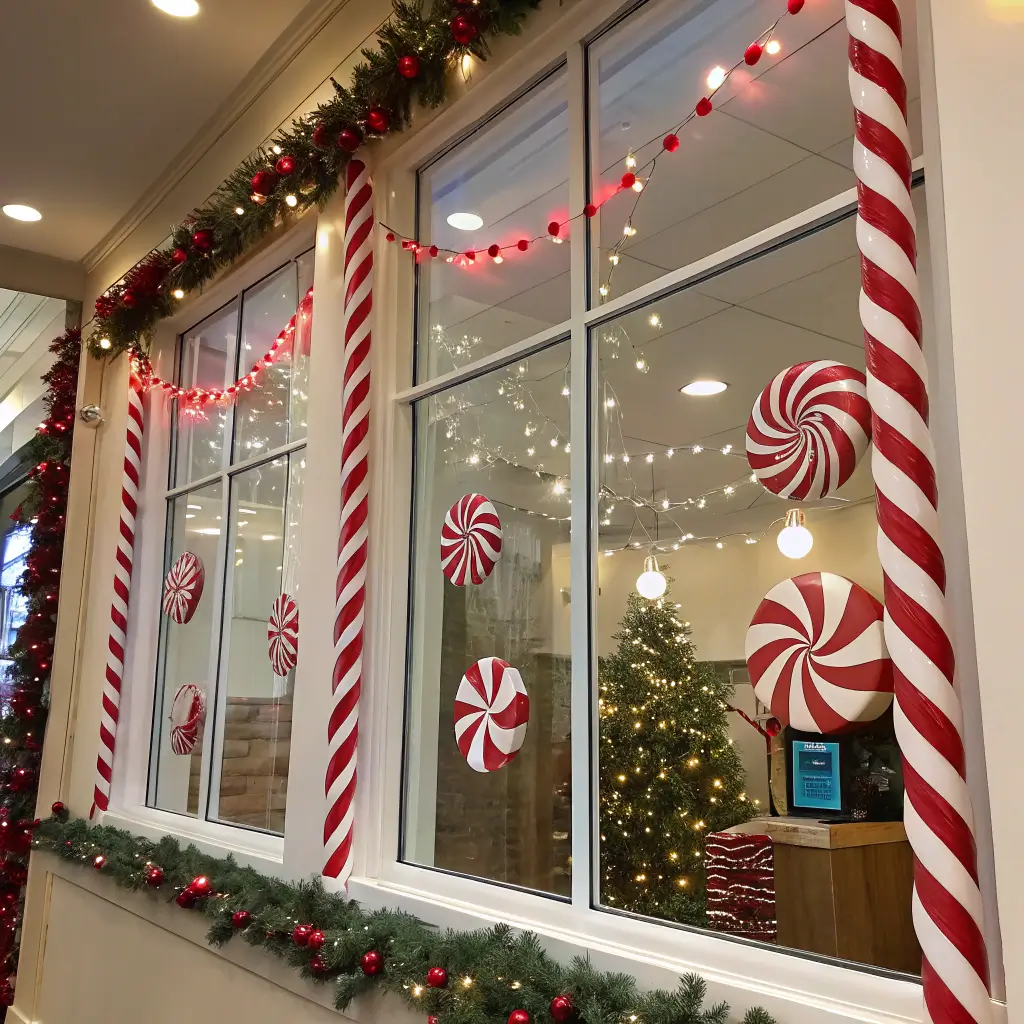
OK, I know what you’re thinking—candy canes can go from classy to kindergarten classroom real quick. But hear me out, because when you do this right, it’s giving more peppermint sophistication than North Pole gift shop.
The trick is restraint and quality. We’re not talking about those plastic candy canes from the grocery store checkout. We’re creating a subtle striped pattern that plays with light and shadow in the most elegant way.
Designing Your Striped Pattern
Start with white and red sheer ribbon (or white and burgundy if you want to be extra fancy). Cut strips that are about 2 inches wide and long enough to go from top to bottom of your window with some extra for securing. The sheer material is crucial—it lets light through while creating this dreamy, diffused striped effect.
Attach the ribbons to the inside top of your window frame, alternating colors. Space them about 4-6 inches apart. During the day, sunlight filters through creating gorgeous shadows, and at night, your interior lights make them glow softly from the street view.
Adding Elegant Candy Cane Accents
Now for the actual candy canes—but we’re being selective here. Get some quality peppermint sticks (the real ones that actually smell like peppermint) or invest in some beautiful glass candy cane ornaments. Hang just 3-5 of them at varying heights in front of your ribbon backdrop. Less is definitely more with this approach.
Minimalist White Christmas Window
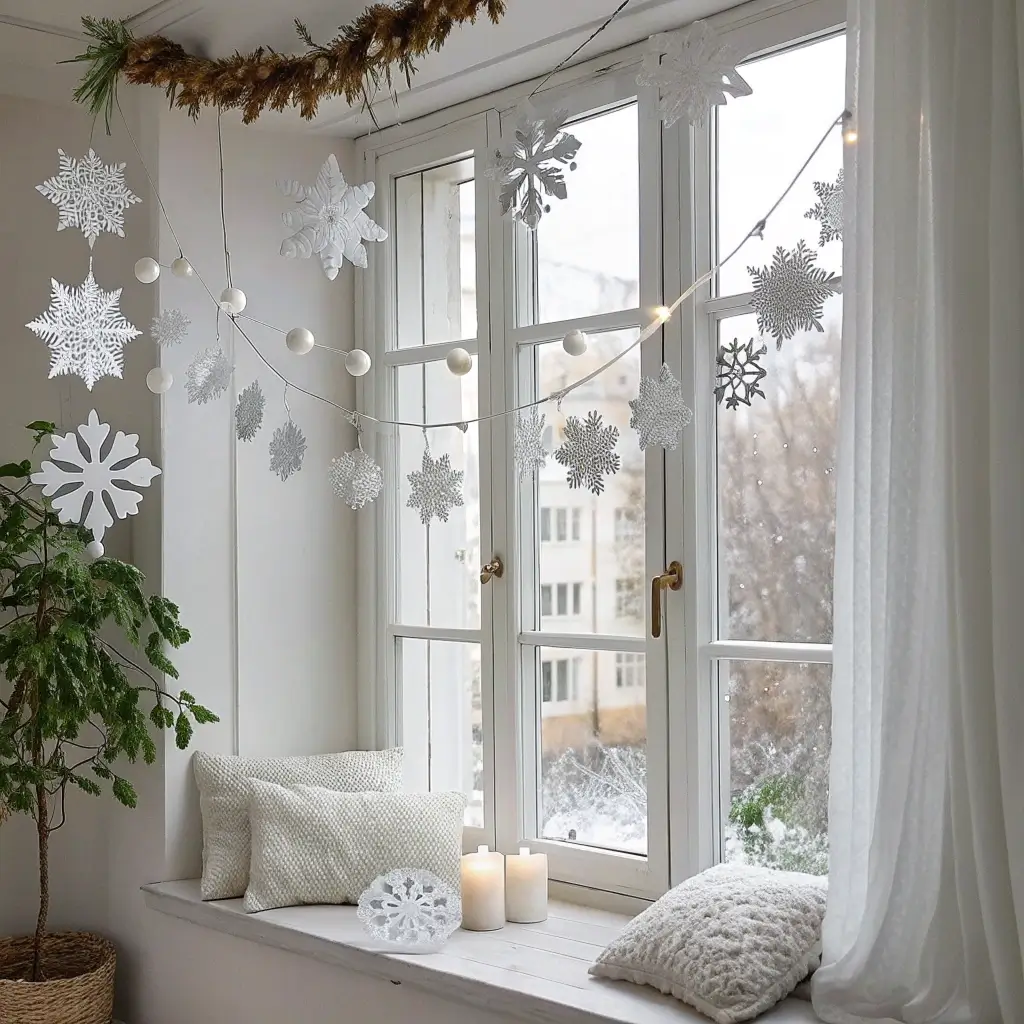
Finally, a decoration idea for those of us who think most Christmas decor looks like a craft store exploded. The minimalist white Christmas window is proof that elegance doesn’t require excess. In fact, it’s often the opposite.
I converted to this style after years of overdoing it (and spending January first weekend taking everything down while nursing a hangover). Now, my windows look like they belong in a Scandinavian design magazine, and setup takes maybe 20 minutes per window. Win-win.
Elements of Minimalist Perfection
The color palette is crucial here: white, cream, and maybe—MAYBE—the tiniest hint of silver. That’s it. No red, no green, no gold. The restriction is actually freeing once you embrace it.
Essential components for this look:
- One statement piece: A large white paper star or geometric ornament
- Simple white lights: One single strand, perfectly placed
- Natural element: A single white birch branch or white-painted twig
- Negative space: This is as important as what you include
Making Minimalism Interesting
The challenge with minimalist design is keeping it from looking boring or unfinished. The secret? Perfect placement and quality materials. That one paper star better be crisp and perfectly folded. Those lights need to be evenly spaced. Everything needs to be intentional.
Position your statement piece slightly off-center (the rule of thirds applies to window decorating too, FYI). Let it be the star of the show while everything else plays a supporting role.
Cozy Candlelit Window Scene
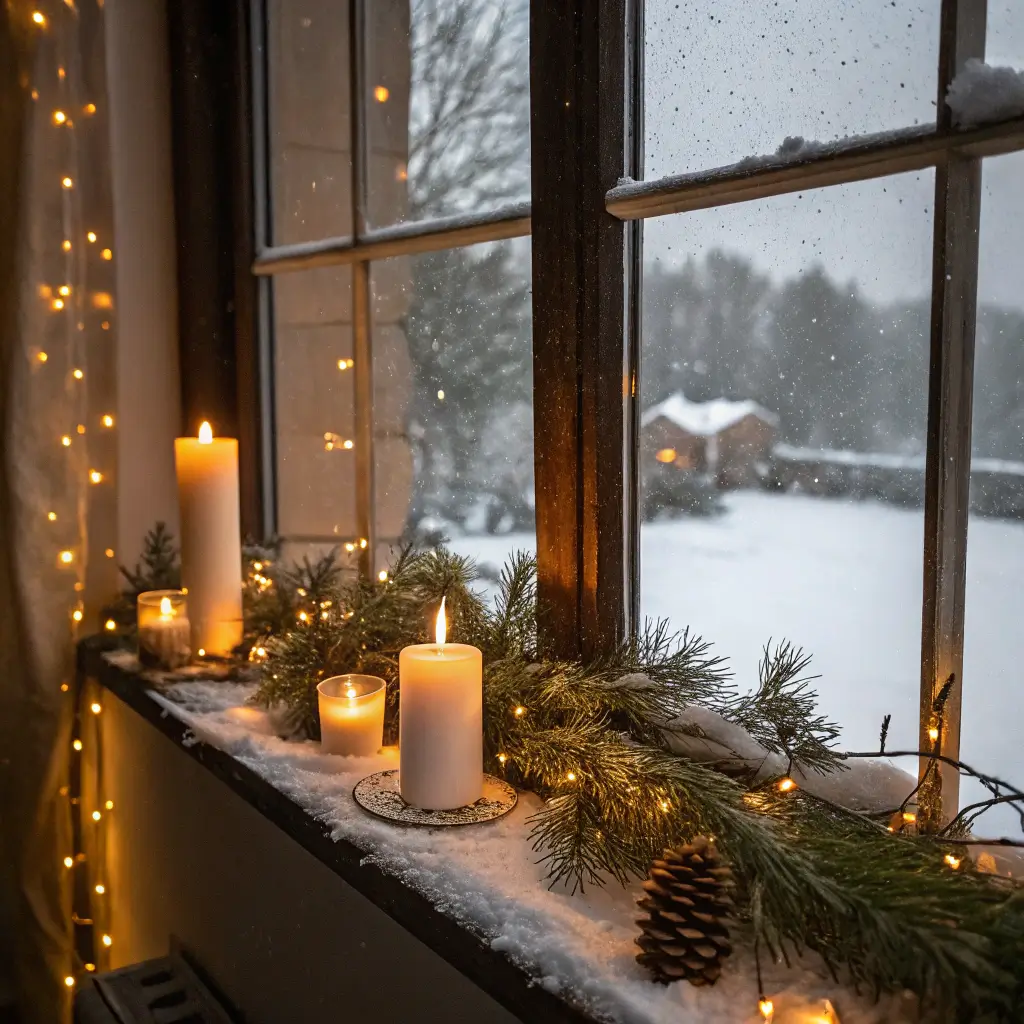
There’s something about candles in windows that instantly says “someone lovely lives here.” It’s been a holiday tradition for centuries, and honestly, our ancestors were onto something. But since real candles and curtains are a disaster waiting to happen, we’re going with the modern safe version that looks just as good.
I learned this lesson the hard way when I tried real candles one year. Let’s just say the smoke alarm going off during Christmas dinner wasn’t the ambiance I was going for. Now I’m all about those battery-operated LED candles that look surprisingly realistic.
Creating Your Candlelit Vignette
Start with different heights—this is crucial for visual interest. Get yourself 3-5 LED candles in varying sizes. The ones with the flickering effect are worth the extra few dollars, trust me. They create movement that catches the eye without being distracting.
Arrange them on your windowsill with:
- A mirror or metallic tray underneath to double the light effect
- Small sprigs of greenery tucked between them
- Maybe some metallic pinecones for texture
- White or cream colored cloth as a base layer for softness
The Timer Trick That Changes Everything
Here’s the game-changer: invest in candles with built-in timers. Set them once, and they’ll turn on at the same time every evening. There’s something magical about driving home and seeing your windows already glowing with warm light. It’s like your house is welcoming you home.
Also Read: 10 Heartwarming Vintage Christmas Images 1950s Ideas for Inspiration
Frosted Snowflake Glass Design
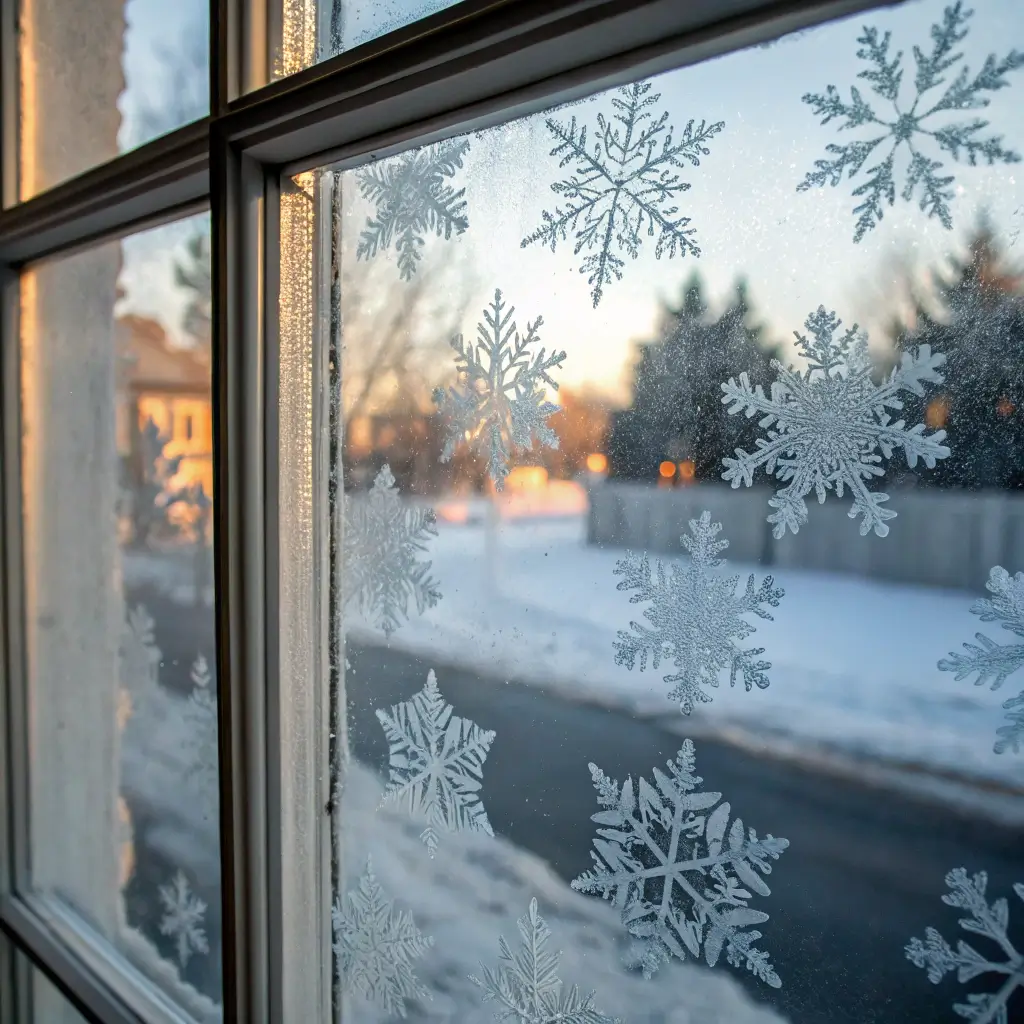
Who needs expensive window clings when you can create something way more elegant yourself? The frosted snowflake design makes your windows look like Jack Frost personally decorated them. And unlike those static clings that never quite stick right, this actually looks professional.
I discovered this technique when I was broke in college but still wanted my apartment to look festive. Turns out, necessity really is the mother of invention—and some of the best decorating ideas come from having a tiny budget.
DIY Frosting Techniques That Actually Work
Forget the spray snow that gets everywhere and looks patchy. Mix equal parts Epsom salt and beer (yes, really) and heat until the salt dissolves. Paint this onto your windows with a sponge brush, and as it dries, it creates the most realistic frost effect you’ve ever seen. Plus, it comes off easily with just water and a squeegee.
For the snowflakes, cut designs from paper doilies or coffee filters. Spray the back lightly with water and press them onto your window before applying the frost mixture around them. Peel them off once dry, and you’ve got perfect snowflake silhouettes.
Patterns and Placement for Maximum Impact
The key to making this look expensive instead of elementary school art project is strategic placement. Cluster your snowflakes in corners and let them cascade down naturally. Vary your sizes dramatically—some should be as big as dinner plates, others as small as coasters.
Vintage Christmas Card Window Wall
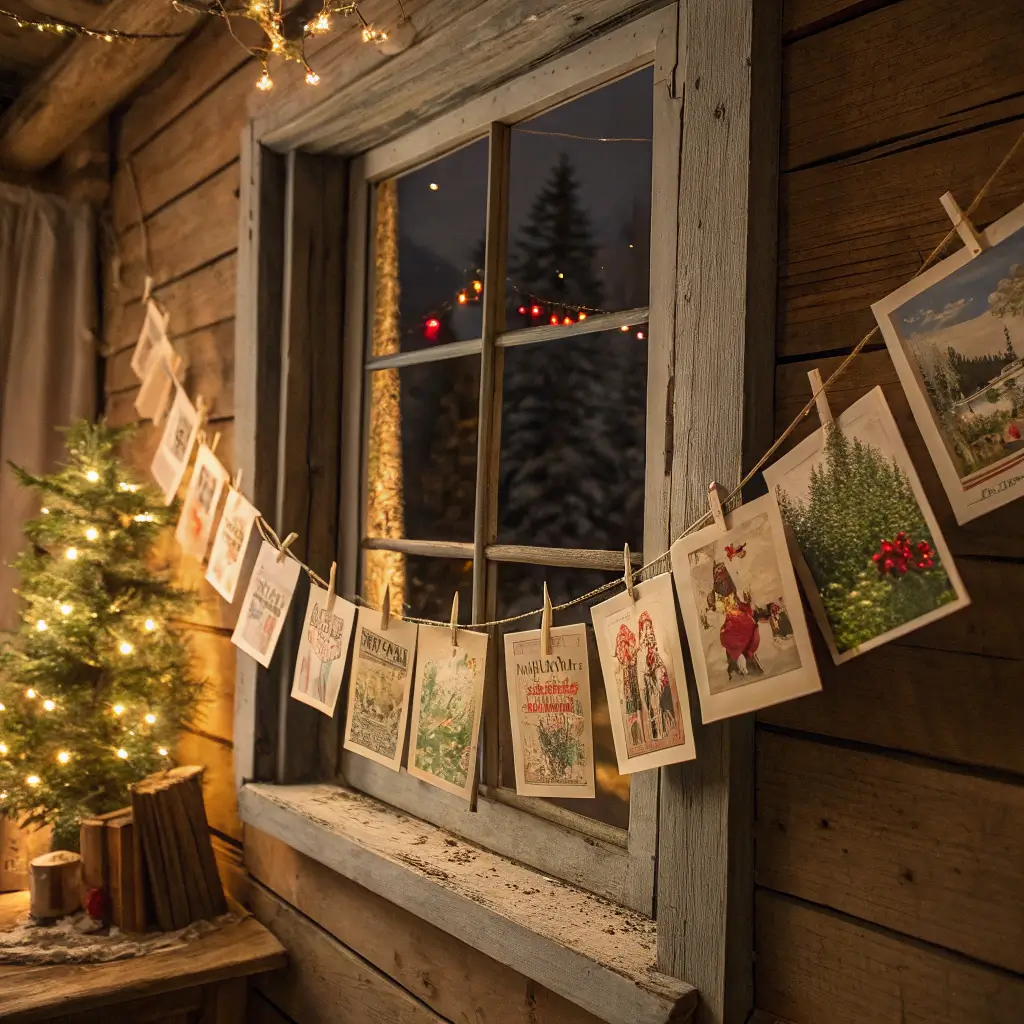
This idea turns your window into a living scrapbook of Christmas past and present. It’s nostalgic without being cheesy, and it’s a great way to actually display all those cards you receive instead of letting them pile up on your counter.
My grandmother did a version of this every year, and walking past her windows was like flipping through decades of Christmas memories. I’ve updated her technique for the modern age, but the heart of it remains the same.
Curating Your Card Collection
Not all Christmas cards are created equal when it comes to display. Choose cards with:
- Beautiful illustrations or vintage designs
- Interesting textures or metallic accents
- Varied sizes for visual interest
- A cohesive color palette (this is what keeps it from looking cluttered)
Mix vintage cards from antique stores with current ones for depth. Those reproduction vintage cards you can buy now work perfectly too—nobody needs to know they’re not actual antiques 😉
Creating Your Display System
String thin wire or fishing line horizontally across your window at different heights. Use tiny clothespins (the miniature ones from craft stores) to attach cards. The trick is to overlap them slightly, creating layers that add depth to your display.
Leave some space between groupings—this breathing room is what keeps it elegant rather than overwhelming. Think art gallery, not bulletin board.
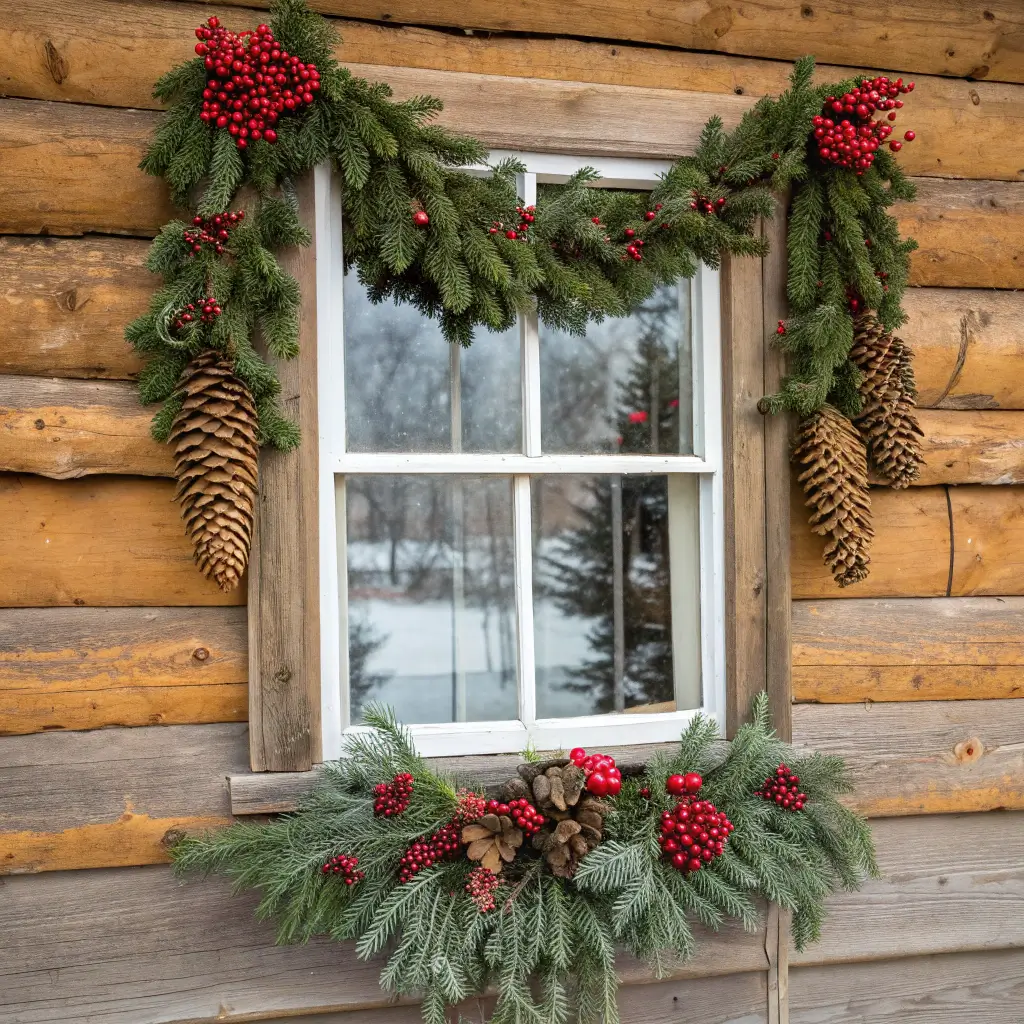
Pinecone & Burlap Window Decor
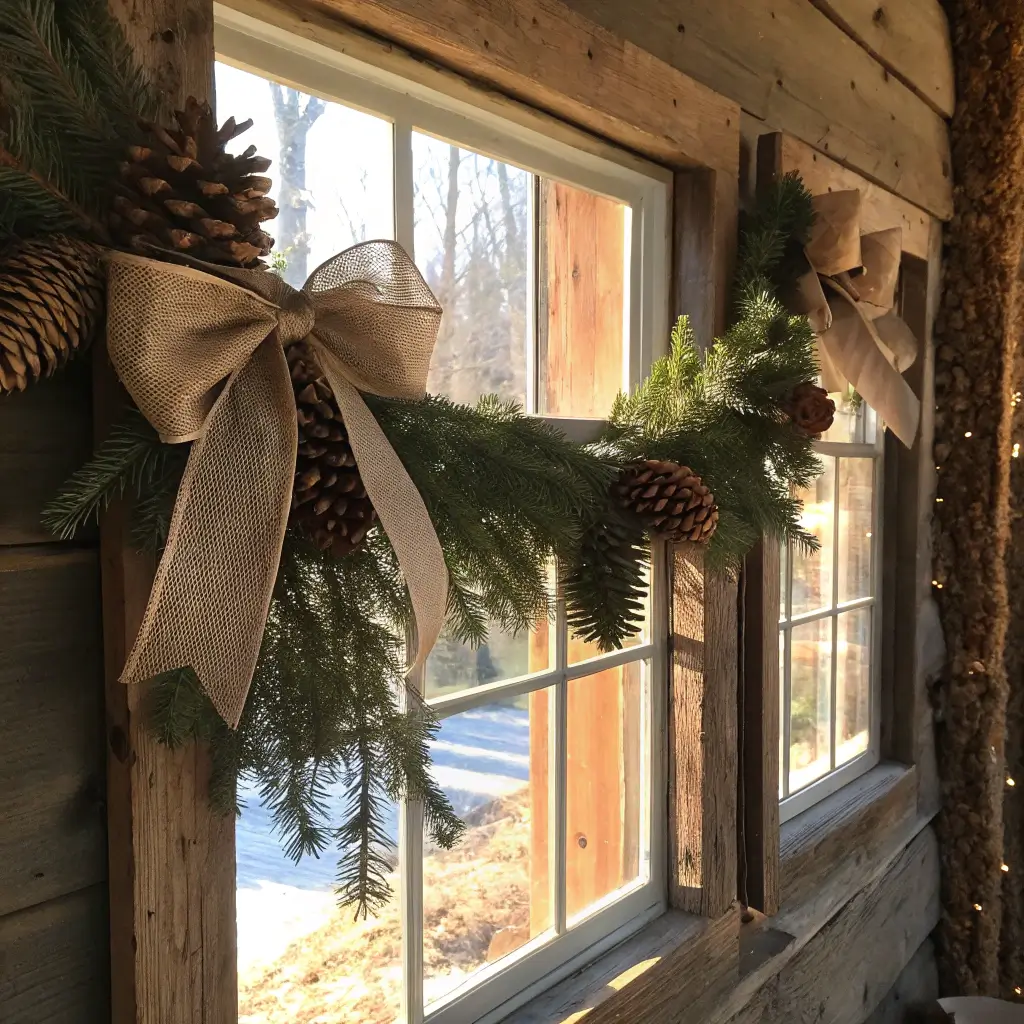
This combination is basically the Pinterest queen of Christmas decorating, but you know what? Sometimes things become popular because they actually work. The natural textures of pinecones and burlap create this effortlessly elegant look that says “I have my life together” even if you definitely don’t.
I was skeptical about the burlap trend at first (seemed a bit too “rustic wedding” for my taste), but when paired with pinecones and the right lighting, it creates this sophisticated country elegance that works in any home.
Gathering and Preparing Materials
First, let’s talk pinecones. If you’re collecting them yourself (which I highly recommend—free decorations!), bake them at 200°F for 30 minutes to kill any bugs and dry them out completely. Trust me on this one—learned it the hard way when tiny spiders emerged from my beautiful window display.
For an elevated look, lightly dust some pinecones with:
- White spray paint for a snowy effect
- Gold or copper paint on just the tips
- Clear glitter spray for subtle sparkle
- Leave some natural for contrast
Assembling Your Rustic Display
Cut burlap into strips about 6 inches wide. Create gentle swags across your window, securing with removable hooks. Don’t pull it too tight—you want that relaxed, organic draping. Tuck pinecones into the folds at irregular intervals.
Add some battery-operated warm white lights woven through the burlap for evening glow. The combination of rough burlap texture and twinkling lights creates this amazing contrast that’s basically decorating gold.
Also Read: 8 Unique Kitchen Island Christmas Decor Ideas for Your Home
Santa Silhouette Night Window

Saved the most dramatic for last! The Santa silhouette window is about creating theater—your window becomes a stage, and every evening performance is free for your neighborhood’s enjoyment.
This idea came to me after watching my neighbor’s kids pressed against my window trying to spot Santa one Christmas Eve. I thought, what if I could create that magic for them every night of December?
Crafting Your Silhouette Scene
You’ll need black cardboard or poster board for your silhouettes. Draw or print templates for Santa, his sleigh, and reindeer. The beauty is that they only need to be recognizable shapes—no detailed features required. In fact, the simplicity makes it more elegant.
Cut your shapes carefully (this is where those good scissors your partner doesn’t know you bought come in handy). The cleaner your edges, the more professional this looks.
Creating the Backlit Magic
Here’s where it gets good. Position your silhouettes on the window using removable adhesive putty. Behind them, string white or colored lights—but here’s the kicker—put them on a dimmer or use adjustable LED strips. The ability to control brightness is what takes this from cute to stunning.
At dusk, the silhouettes are barely visible, just mysterious shapes. As darkness falls and you increase the light intensity, suddenly Santa and his reindeer come alive against your glowing window. IMO, it’s pure Christmas magic.
Adding Movement and Interest
Want to really blow minds? Use a slow-rotating color-changing LED light behind one window section. It creates this subtle movement effect, like the Northern Lights behind Santa’s journey. Kids lose their minds over it, and honestly, adults do too.
Bringing It All Together
Look, decorating your windows for Christmas doesn’t have to be this huge, stressful production that leaves you questioning your life choices. Pick one or two ideas that speak to you, execute them well, and your windows will look better than houses with ten times the decorations.
The real secret to elegant window Christmas decor? It’s not about having the most or the brightest or the most expensive. It’s about choosing what fits your style and doing it with intention. Whether you go full minimalist or create that Santa silhouette spectacular, own your choice.
Your windows are telling a story this Christmas—make sure it’s one you actually want to tell. And remember, the best decorated house on the block is the one where people inside are actually enjoying the season, not stressed about achieving decoration perfection.
Now get out there and make those windows magical. Your neighbors are counting on you for their evening entertainment, and honestly, we could all use a little more beauty and wonder right now. Happy decorating! 🎄