10 Charming Wood Christmas Trees DIY Ideas for Holidays
Remember that year I spent three hours untangling Christmas lights only to discover half the strand didn’t work? Yeah, that’s when I decided traditional Christmas trees weren’t my only option.
If you’re anything like me and love the warmth of wood combined with holiday cheer, you’re gonna absolutely love these wooden Christmas tree projects.
Let’s face it – sometimes we want something different. Something that won’t shed needles all over the carpet or require constant watering. Wooden Christmas trees offer that perfect blend of rustic charm and modern convenience that makes decorating actually enjoyable instead of stressful.
Plus, you get to keep them year after year without worrying about them turning into a fire hazard by New Year’s Eve.
I’ve built most of these myself over the years, and trust me, even if you think you can’t hammer a nail straight (guilty!), you can totally pull these off. Some require basic woodworking skills, others just need creativity and maybe a hot glue gun. The best part? Each one becomes a conversation starter when guests come over.
Rustic Pallet Wood Christmas Tree

This project changed my whole perspective on Christmas decorating. Last year, I found three old pallets behind a warehouse, and instead of letting them rot, I transformed them into the most Instagram-worthy tree you’ve ever seen.
The beauty of pallet wood lies in its imperfections – those weathered edges, nail holes, and varied colors create character you just can’t buy. Start by dismantling your pallets carefully (wear gloves, seriously). You’ll need boards of different lengths to create that classic triangular shape.
Here’s what makes this project so addictive:
- Zero cost if you source free pallets
- Natural weathered look requires no staining
- Each tree turns out completely unique
- Perfect for both indoor and outdoor display
I arrange my boards horizontally, starting with the longest at the bottom and gradually decreasing the length as I work upward. A simple vertical support beam holds everything together. String some warm white lights between the slats, and boom – instant holiday magic. The gaps between boards create perfect spots for tucking in ornaments or greenery.
Materials You’ll Need:
- 2-3 wooden pallets
- Sandpaper (medium grit)
- Wood screws or nails
- Vertical support beam (2×4 works great)
- Star topper (optional but recommended)
Minimalist Floating Shelf Tree
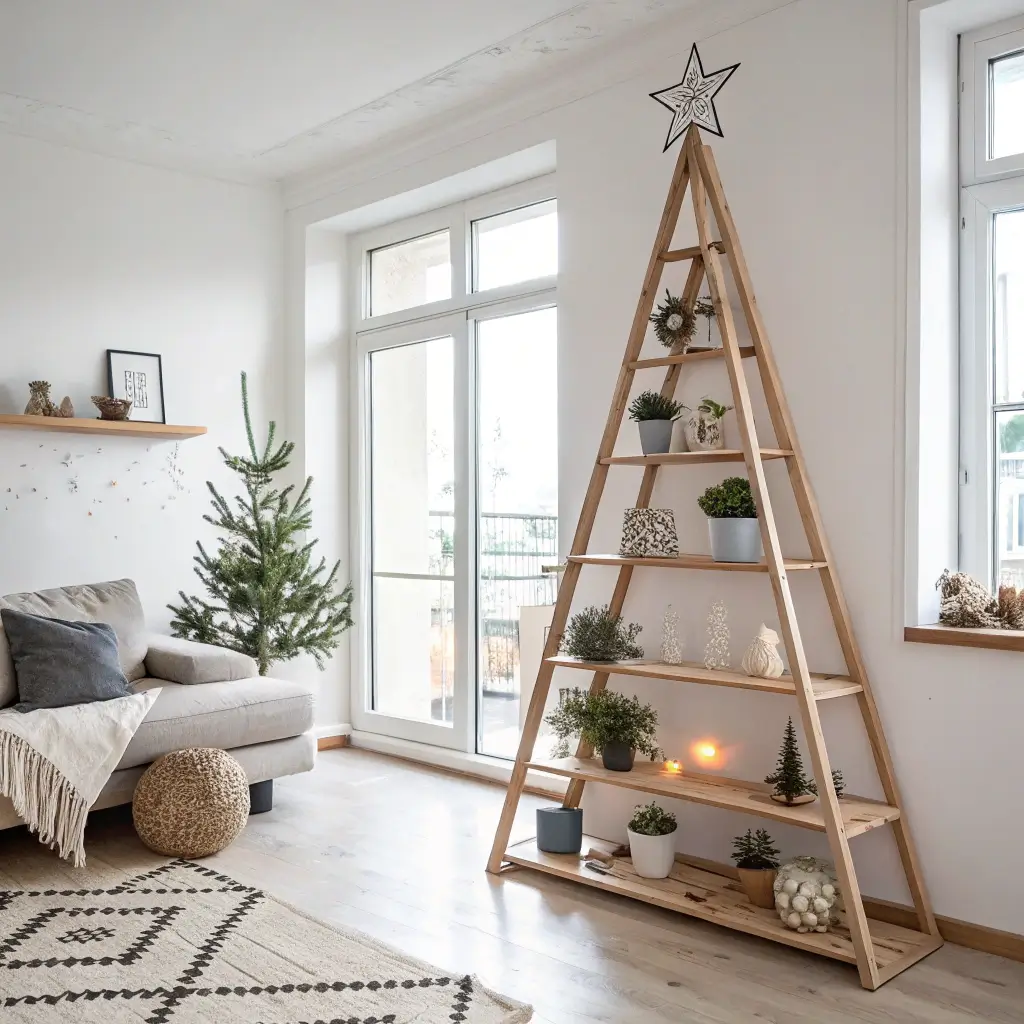
Ever walked into someone’s home and thought “How do they make everything look so effortlessly chic?” This floating shelf tree achieves that vibe perfectly. I built mine in my apartment where floor space comes at a premium, and honestly, it’s become my favorite holiday focal point.
The concept revolves around creating triangular-shaped shelves that mount directly to your wall in a tree formation. Start with five shelves of decreasing sizes – think 36 inches for the bottom, then 30, 24, 18, and 12 inches for the top. The magic happens when you space them properly on the wall.
What I love most? You can style these shelves differently each year. This season I’m going with white candles and silver ornaments. Last year, I used mini potted plants and copper accents. The possibilities make my decorator heart sing!
Mount each shelf using hidden brackets for that true floating effect. Pro tip: use a level religiously – nothing ruins the minimalist aesthetic faster than crooked shelves. Trust me, I learned that the hard way.
Reclaimed Driftwood Christmas Tree

Living near the coast spoiled me with endless driftwood possibilities. But here’s the thing – you don’t need oceanfront property to create this beauty. Rivers, lakes, even craft stores stock driftwood pieces perfect for this project.
Select pieces of varying lengths and thicknesses to create visual interest. I arrange mine from largest to smallest, drilling a hole through the center of each piece. Then I thread them onto a sturdy dowel or metal rod, spacing them with wooden beads or washers.
The natural bleached color of driftwood brings such a serene, beachy vibe to Christmas decorating. Add some subtle white lights, maybe a few shells or starfish ornaments, and you’ve got yourself a coastal Christmas masterpiece that’ll make Martha Stewart jealous.
Assembly Tips:
- Soak driftwood in bleach solution to sanitize
- Pre-drill holes to prevent splitting
- Use clear fishing line for invisible hanging elements
- Consider adding sea glass for extra sparkle
Also Read: 15 Festive Rustic Christmas Decor Ideas for Inspiration
Tiered Wooden Block Tree
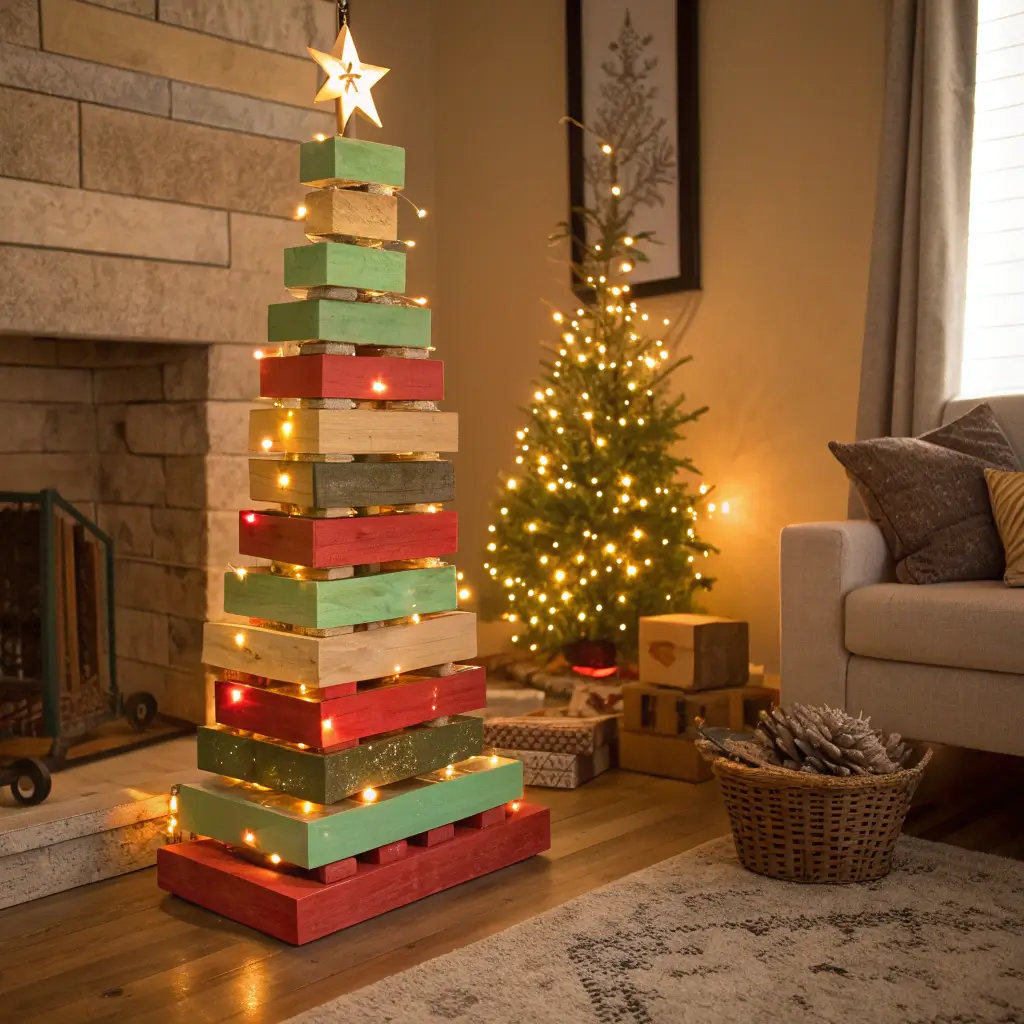
Remember playing with building blocks as a kid? This project brings back all those memories but with a sophisticated twist. I made my first one three years ago, and now I’ve got requests from friends every holiday season.
Start with square wooden blocks in graduated sizes. You can buy these pre-cut or make them yourself if you’re feeling ambitious. Sand them smooth (splinters and Christmas don’t mix), then stack them largest to smallest, rotating each block 45 degrees to create that pine tree silhouette.
What makes this design genius? The hollow spaces between blocks become perfect display spots for LED candles, ornaments, or tiny figurines. I’ve even seen people tuck gift cards in there for a fun surprise element.
Paint them green for traditional vibes, or go wild with metallic colors. This year I’m experimenting with an ombré effect from dark green to light mint. The blocks separate for easy storage, which scores major points in my book.
Wall-Mounted Wooden Christmas Tree

Small apartment? Curious toddlers? Mischievous cats? This wall-mounted option solves all those problems while looking absolutely stunning. I installed mine in my hallway, and now it’s become the perfect backdrop for family photos.
Create the tree outline using wooden boards or branches attached directly to your wall. Think of it as 2D art that captures the essence of a Christmas tree without the bulk. I use reclaimed barn wood for mine, but any lumber works.
The installation process sounds scarier than it actually is:
- Mark your tree shape on the wall with painter’s tape
- Cut boards to create the outline
- Secure with appropriate wall anchors
- Add horizontal shelves for dimension
String lights along the edges, hang lightweight ornaments from small hooks, and you’ve got a tree that won’t eat up any floor space. FYI, this design photographs beautifully for those holiday card shots 🙂
Wooden Spool Tree with Lights

Found some old cable spools at a construction site? Don’t let them go to waste! This project turns industrial waste into holiday gold. The circular shapes of wooden spools naturally stack into a tree form, creating built-in shelves for decorations.
I scored five spools of different sizes from an electrician friend. After sanding them down (those things can be rough), I painted them in alternating shades of green and white. Stack them pyramid-style, largest at the bottom, securing each level with wood glue or brackets.
Here’s where it gets fun – wrap string lights around each spool tier. The circular grooves hold lights perfectly, creating layers of illumination that look absolutely magical at night. Add some garland, maybe a few baubles, and watch your neighbors get spool-envy.
Decoration Ideas:
- Wrap with burlap ribbon for rustic charm
- Paint chalkboard paint on flat surfaces for messages
- Use battery-powered lights for placement flexibility
- Add miniature village pieces on each tier
Also Read: 10 Cozy Primitive Christmas Ideas and Rustic Holiday Charm
Geometric Wooden Triangle Tree
Modern design lovers, this one’s for you. Forget curves and traditional shapes – this geometric wonder brings sharp angles and contemporary style to holiday decorating. I built mine after seeing similar designs selling for $300+ at fancy boutiques. Spoiler alert: it cost me about $40 to make.
Create triangular frames of decreasing sizes using thin wooden strips. Think of it as nesting triangles that stack vertically. I use 1×2 inch strips, cutting angles with a miter saw (though a hand saw works too if you’re patient).
Connect the triangles with vertical supports at the back, spacing them about 6-8 inches apart. The negative space between triangles creates this amazing 3D effect that catches light beautifully. Paint them matte black for drama, metallic gold for glam, or natural wood stain for Scandinavian vibes.
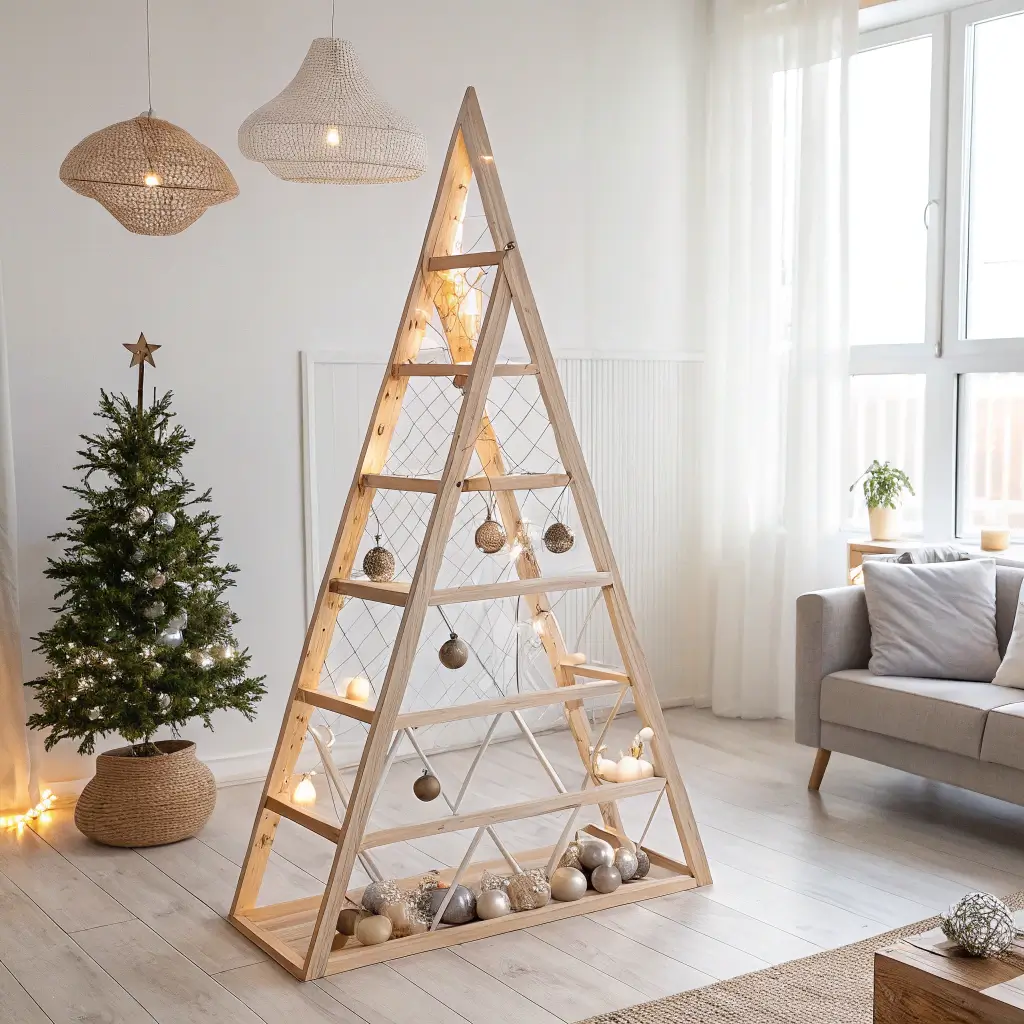
Wooden Ladder Christmas Tree

Got an old ladder gathering dust in your garage? Time to give it new life! This might be the easiest project on this list, and yet it consistently gets the most compliments when people visit.
Simply lean a wooden ladder against your wall and decorate each rung. A-frame ladders work brilliantly as standalone trees, while straight ladders create stunning wall displays. I wrapped mine with warm white lights first, then draped garland loosely for that effortless look.
Each rung becomes a display shelf. Hang ornaments from S-hooks, drape throws or scarves for texture, or place battery-powered candles for ambiance. The graduated width of ladder rungs naturally creates that tree shape we’re after.
Want to get really creative? Paint your ladder green or white before decorating. Add a star to the top rung, maybe some bells that jingle when people walk by. The rustic charm works perfectly with farmhouse décor, but honestly, this adapts to any style.
Driftwood Hanging Mobile Tree
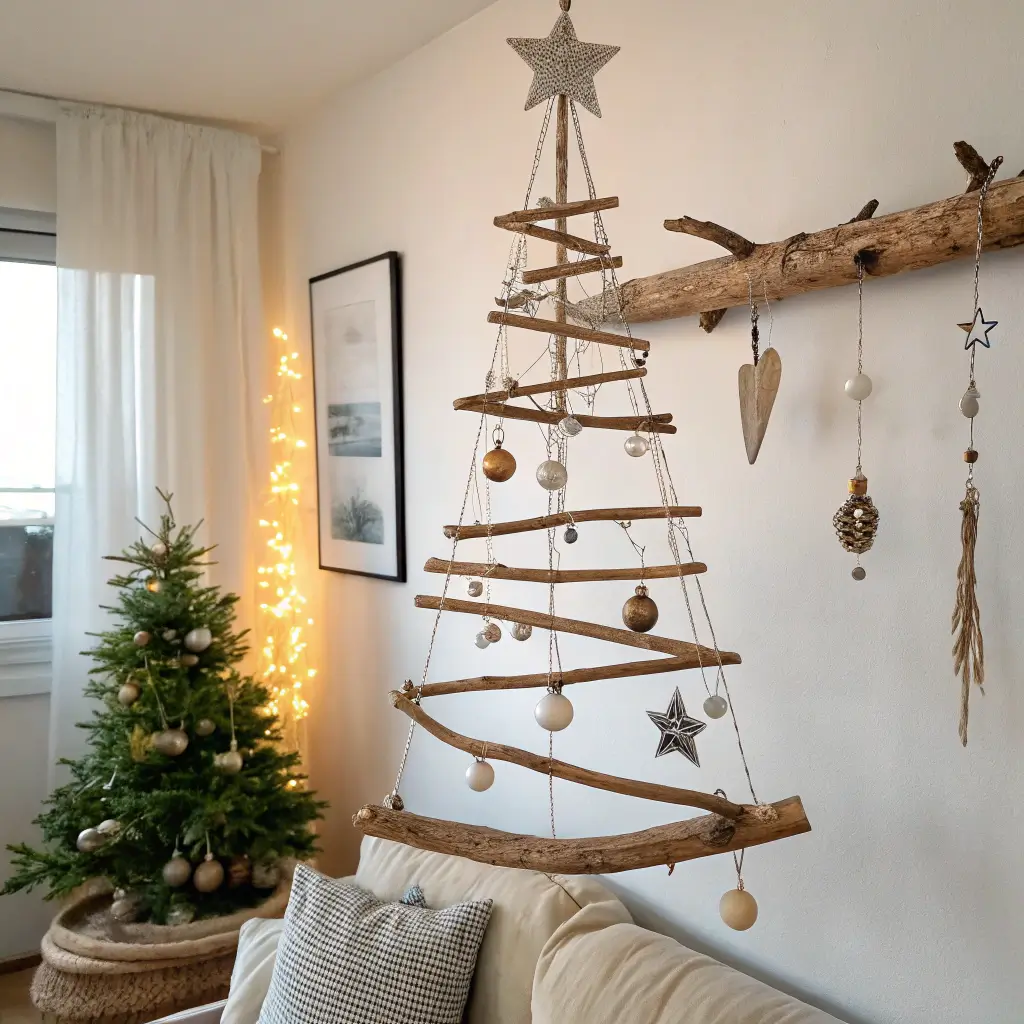
This floating sculpture brings movement and whimsy to your holiday décor. Unlike static trees, this one gently rotates, catching light from different angles throughout the day. It’s basically a chandelier meets Christmas tree, and I’m obsessed.
Start by collecting driftwood pieces in graduated lengths. Arrange them horizontally, longest at bottom, shortest at top, suspending each piece with fishing line from the one above. The trick? Balance each tier carefully so the whole structure hangs level.
I add small ornaments, crystals, or bells between wood pieces. They tinkle softly when air moves through the room – it’s surprisingly peaceful. Hang the entire mobile from a ceiling hook where it can spin freely.
Balance Tips:
- Test balance before final assembly
- Use clear fishing line for invisible support
- Add weight to lighter sides with small ornaments
- Consider motorized rotation for extra magic
Also Read: 15 Elegant Earth Tone Christmas Tree Ideas for Warm Homes
Wooden Branch Tree with Ornaments

Mother Nature provides the best materials sometimes. This design uses actual tree branches arranged in a vase or container, creating an organic, minimalist tree that brings the outdoors in.
Collect branches of varying heights and thicknesses during your next nature walk. Look for interesting shapes, maybe some with lichens or moss still attached. I spray mine with clear sealant to preserve their natural beauty and prevent bugs (learned that lesson the hard way).
Arrange branches in a tall vase filled with sand or stones for stability. The natural branching creates perfect spots for hanging ornaments. Less is more with this design – a few special ornaments look better than overcrowding.
Paint branch tips white for a snow-kissed effect, or leave them natural for that woodland vibe. Add battery-powered fairy lights for evening ambiance. This design works beautifully as a centerpiece or corner accent.
Final Thoughts
Creating your own wooden Christmas tree isn’t just about saving money or being trendy – it’s about making something uniquely yours. Each project I’ve shared comes from personal experience, complete with mistakes, surprises, and those “aha!” moments that make DIY so rewarding.
The beauty of wooden Christmas trees lies in their versatility and longevity. Unlike traditional trees that last one season, these become family heirlooms, improving with age and accumulating memories year after year. My pallet tree from three years ago now holds ornaments made by my nieces, photos tucked between boards, and enough twinkling lights to rival the North Star.
Don’t stress about perfection. That slightly crooked branch, the uneven paint job, the wood grain that doesn’t quite match – these imperfections add character. They tell the story of an afternoon spent creating rather than shopping, of choosing sustainable over disposable, of making Christmas decorating an adventure rather than a chore.
Whether you tackle one project or try them all, remember that the best wooden Christmas tree is the one that makes you smile every time you see it. So grab those tools, channel your inner craftsperson, and create something that’ll make this holiday season truly special. Who knows? You might just start a new family tradition that lasts for generations.